Blog
A little bit of anything and everything that's part of
creating, enjoying, and living a simpler life!
creating, enjoying, and living a simpler life!

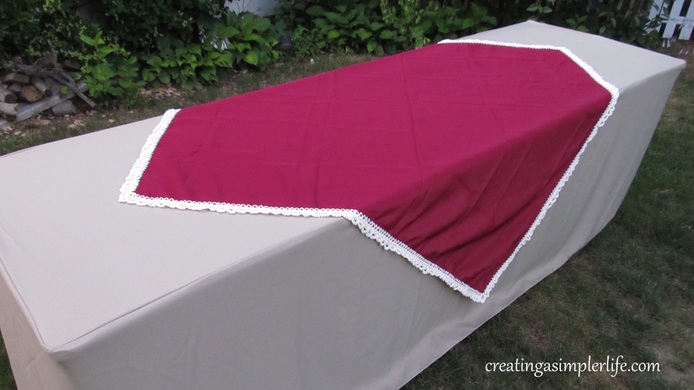
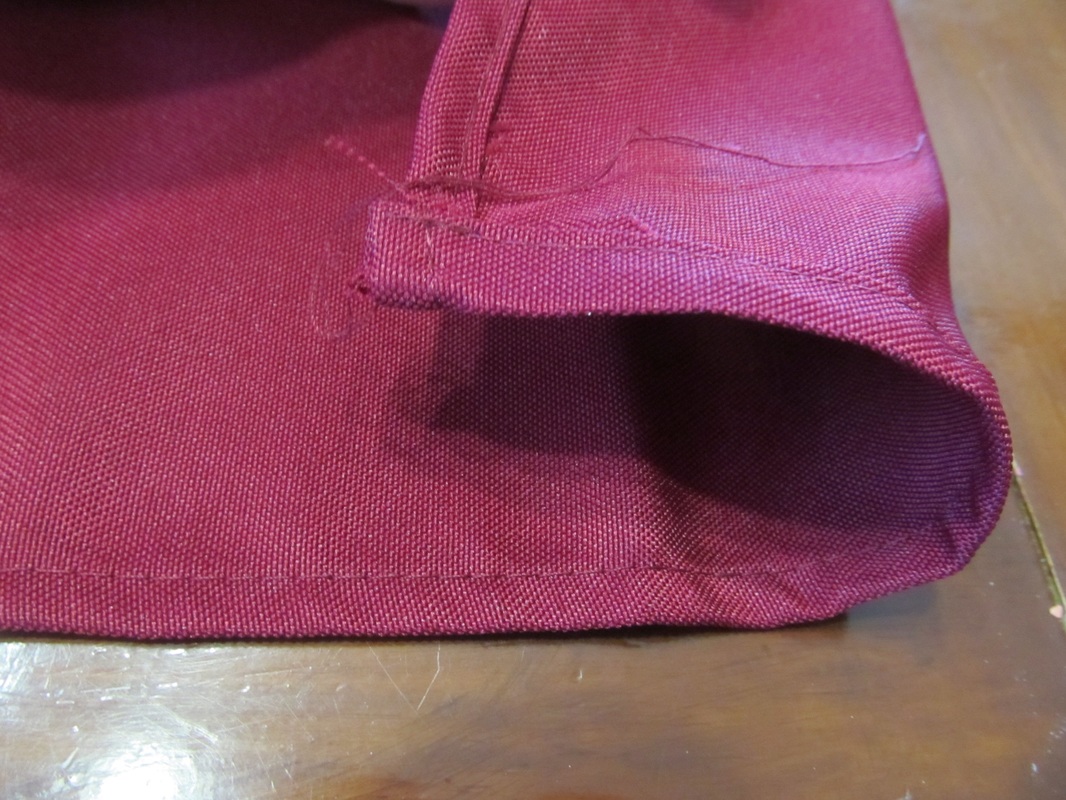
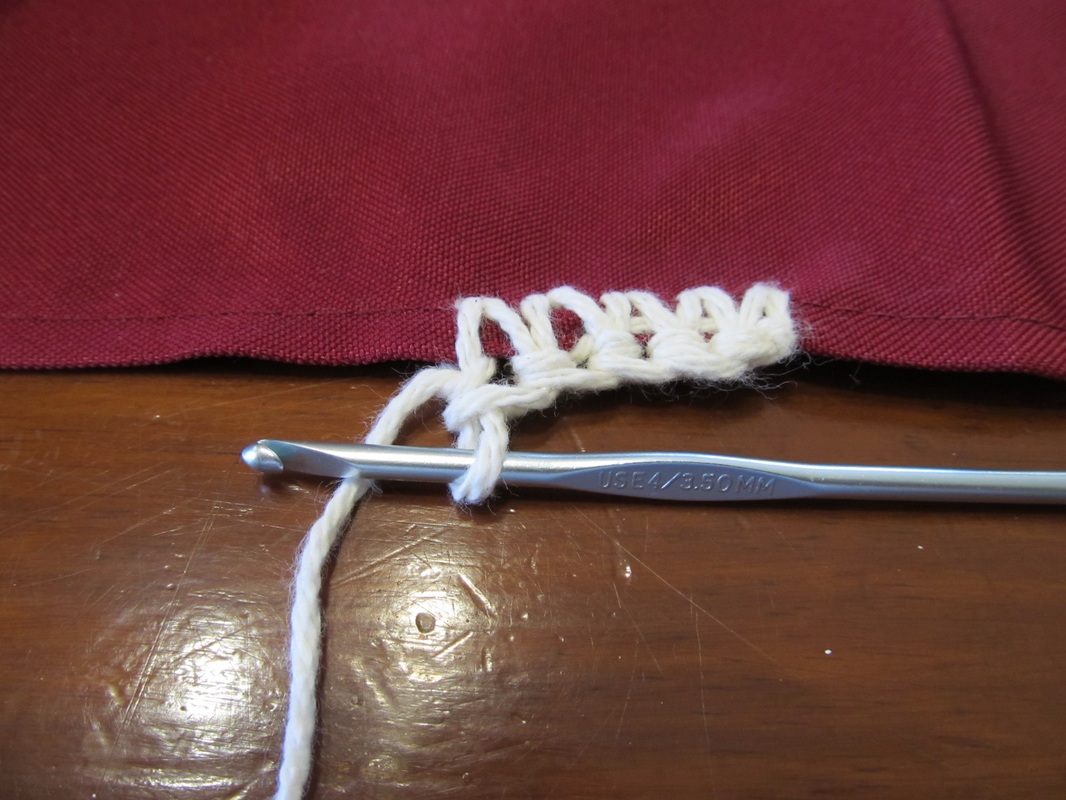
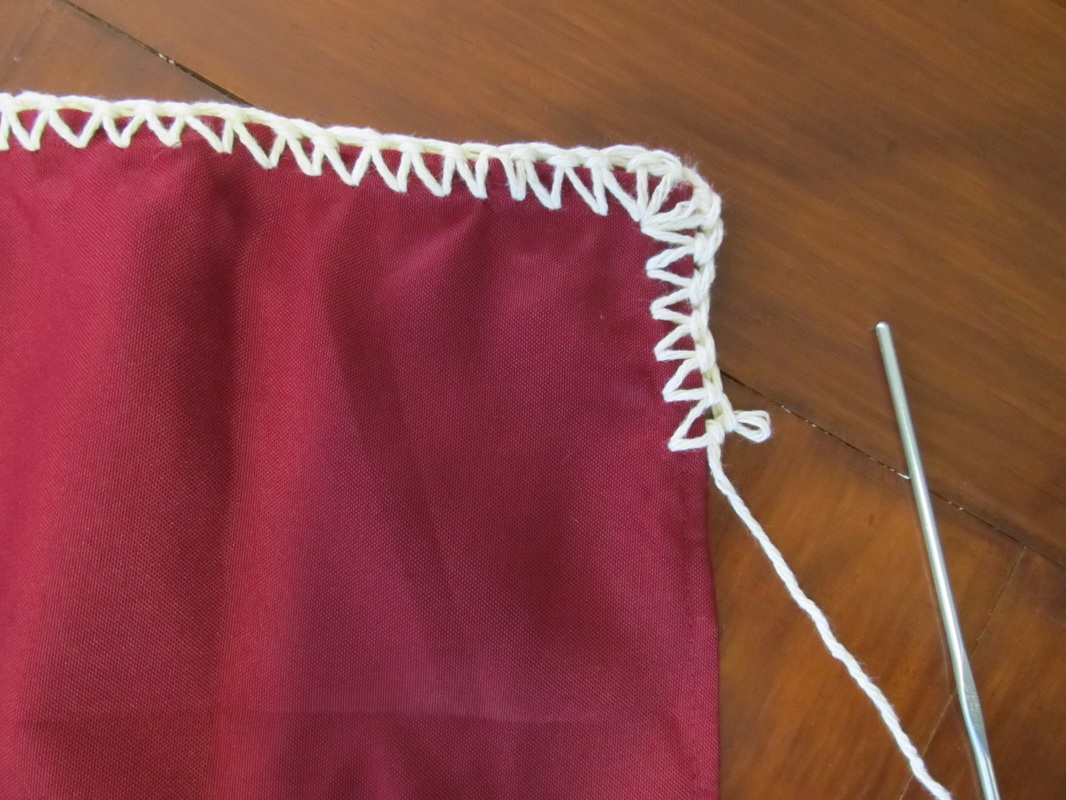
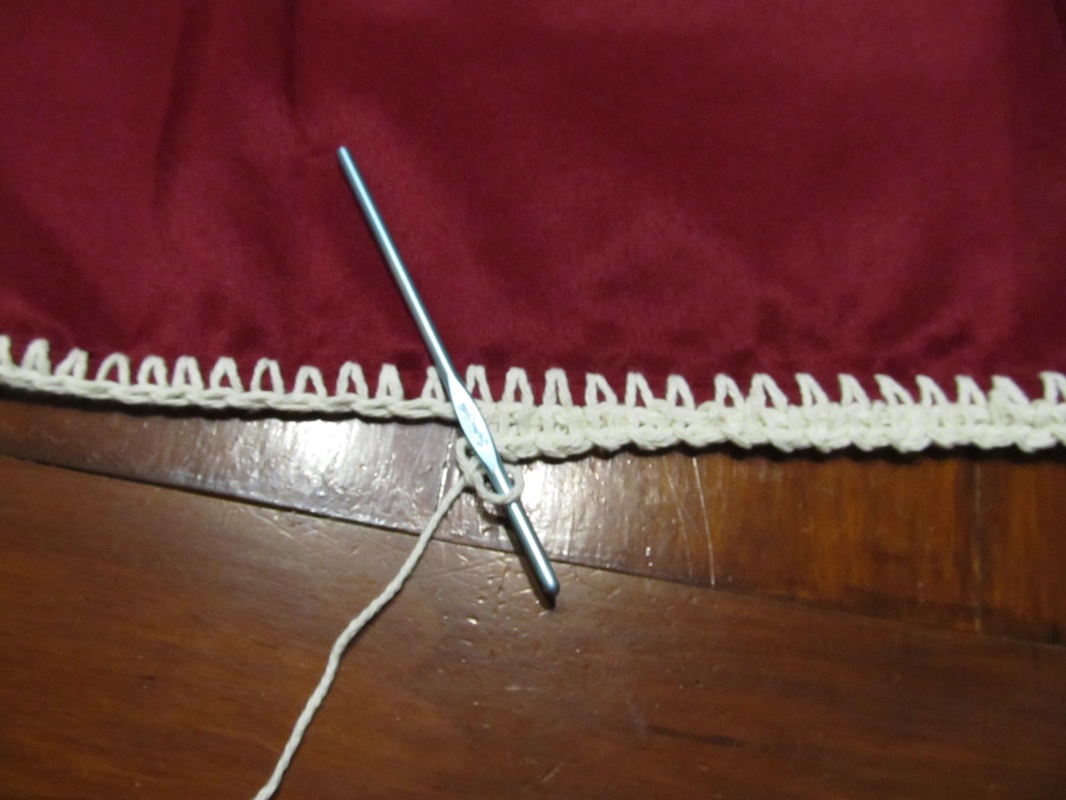
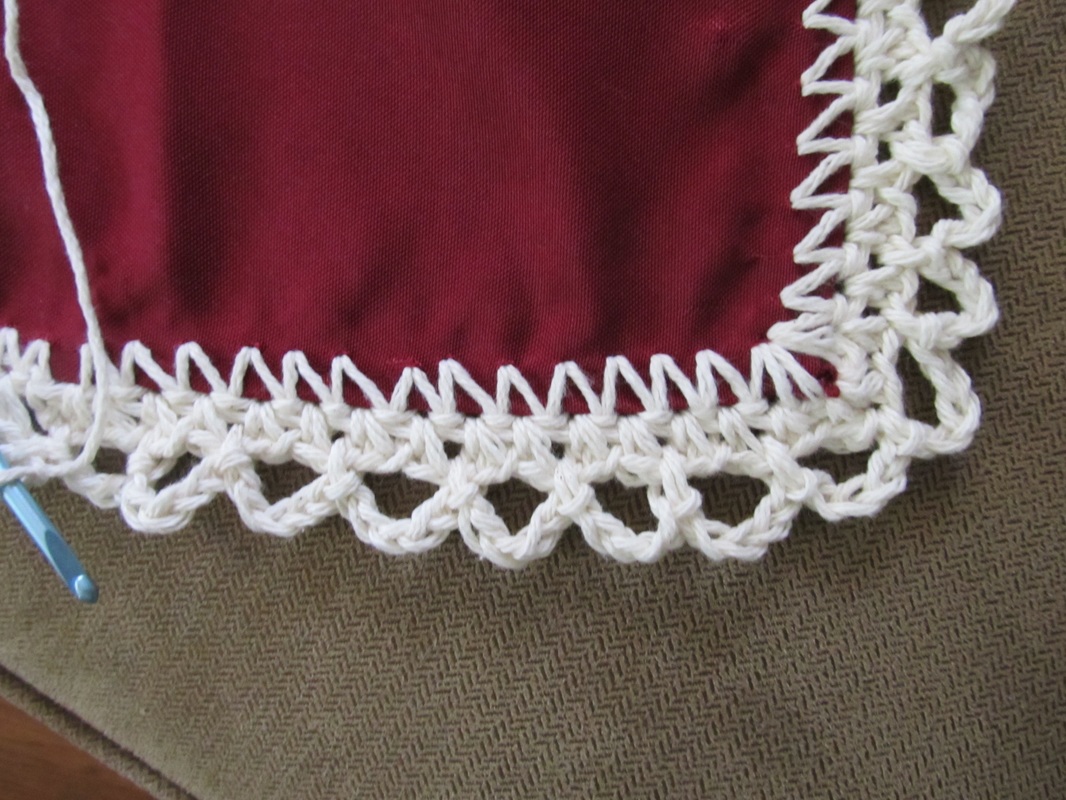
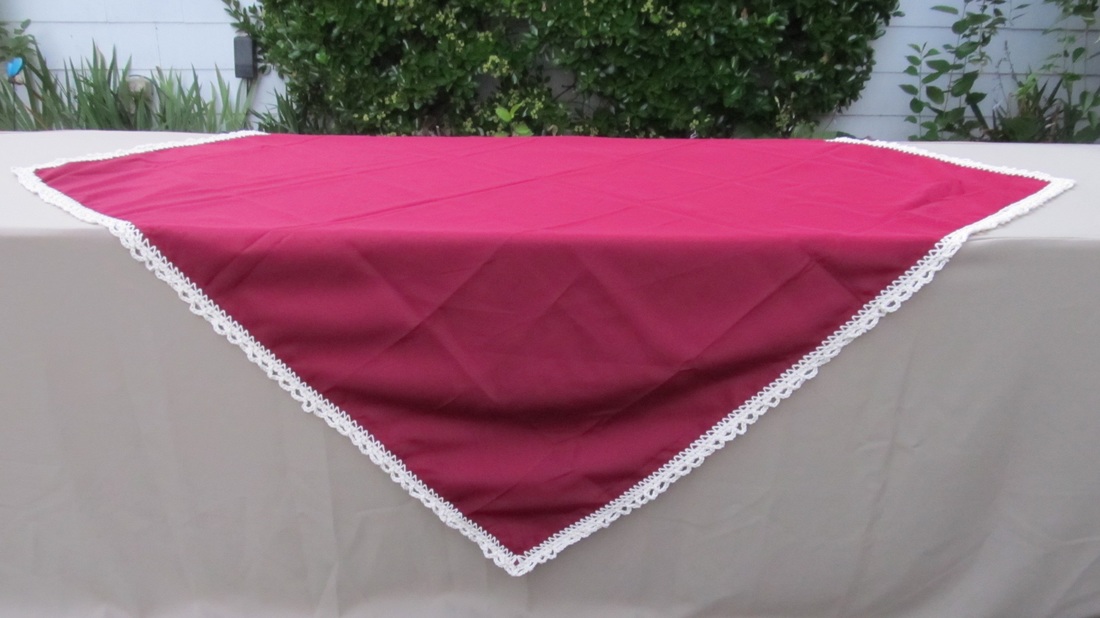
I wanted a tablecloth to decorate my table at craft fairs. Not just any tablecloth because that would be too easy. I wanted something simple, but also different. Something that would stand out and say "this table is special, come and see!" I wanted a tablecloth that attracted some attention and that could potentially start a conversation with potential customers. So of course I had to make it myself. Hence this post and how I created this simple crochet border tablecloth, which of course was exactly what I wanted!
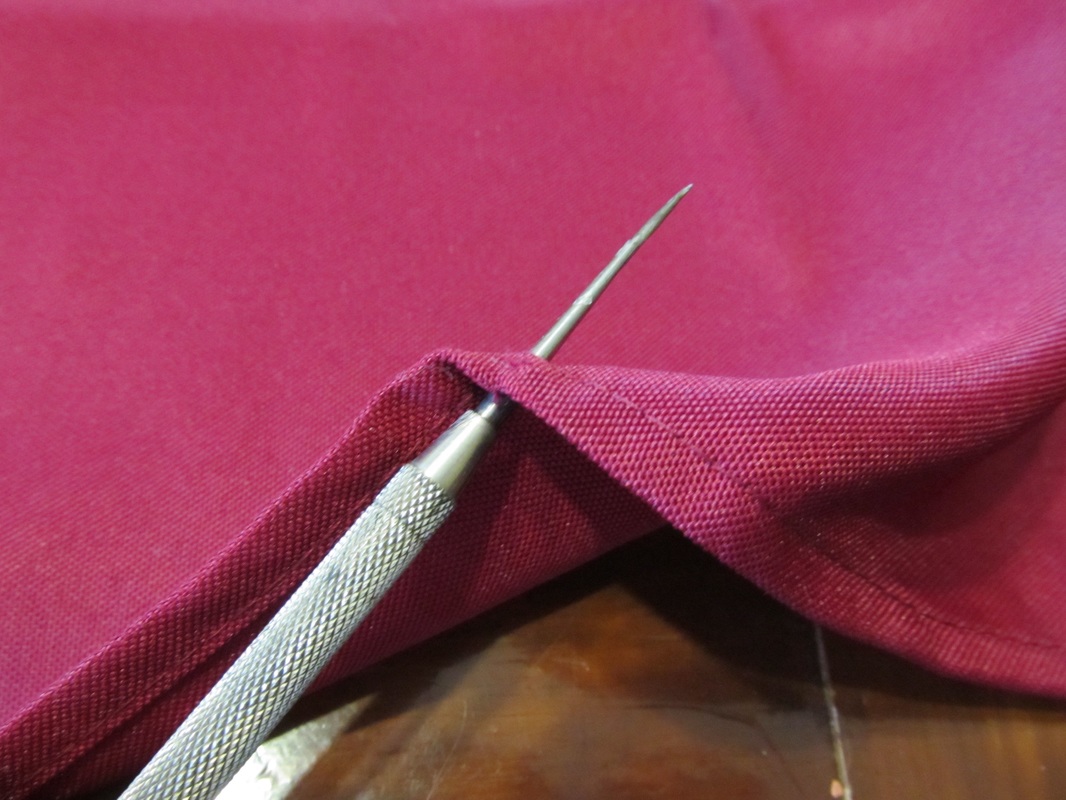
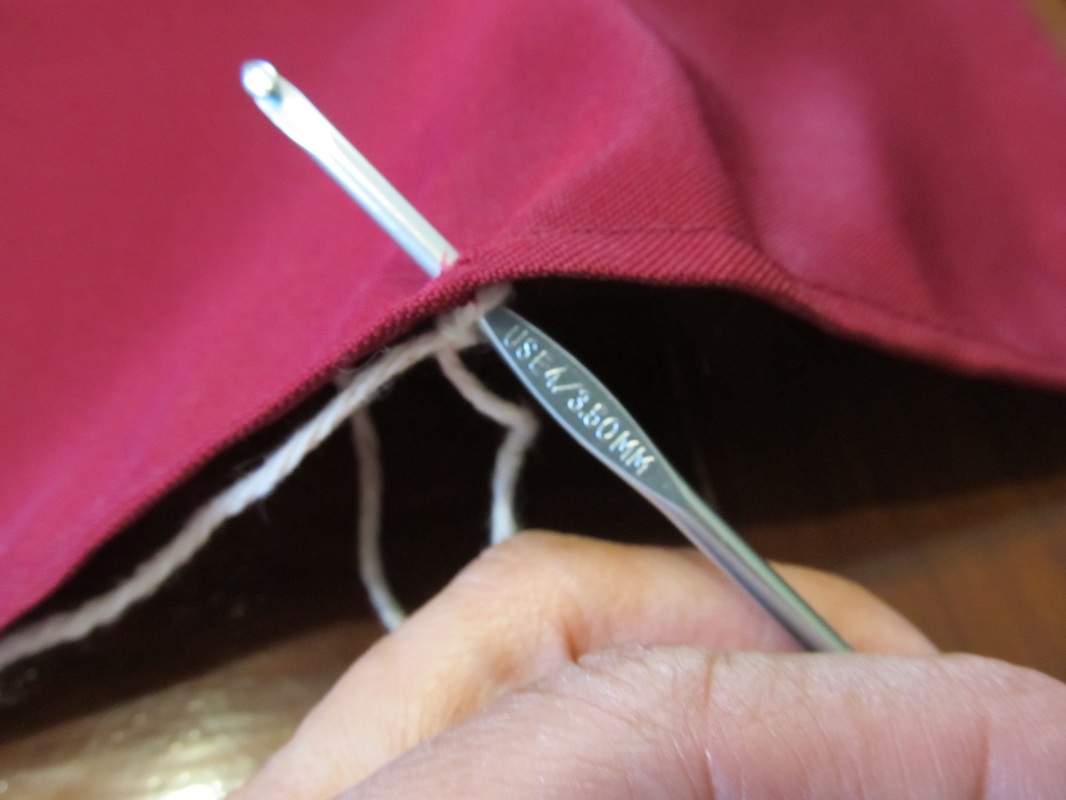
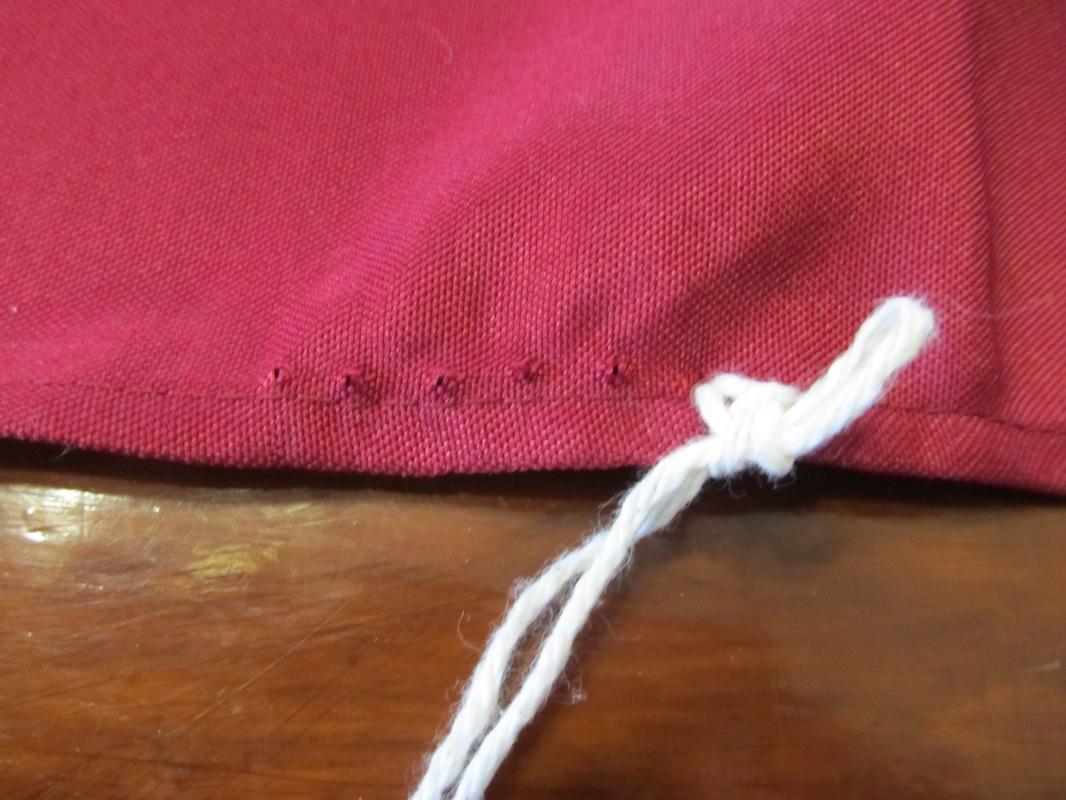
Supplies:
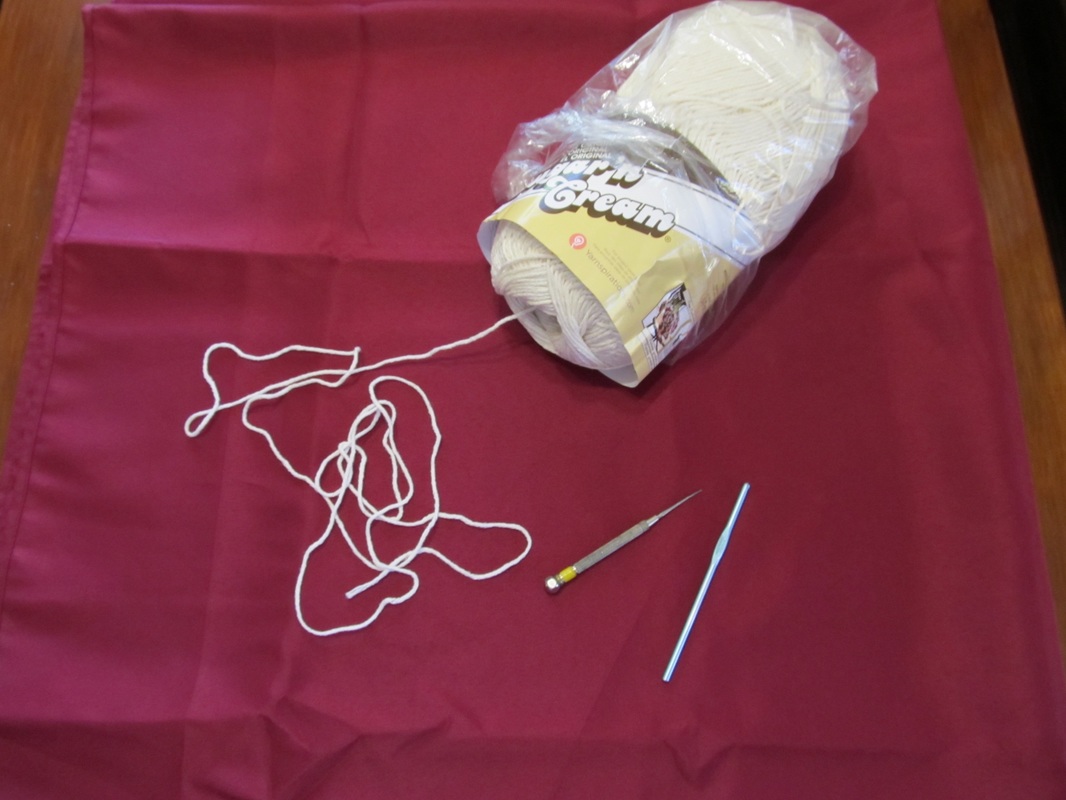
54" square tablecloth (affiliate link) 100% cotton Sugar n' Cream yarn (about 5 ounces) Awl Size 4 crochet hook Size 4.5 crochet hook Scissors Yarn needle
How I did it:
So simple!
Thank you for visiting!
Check out the our other FREE crochet patterns here! Also check out the many crochet project patterns on our Pinterest Boards Crochet ONLY and Crochet for the Kids! Please feel free to comment, e-mail, or contact me through my Facebook or Google+ pages! Sincerely,
0 Comments
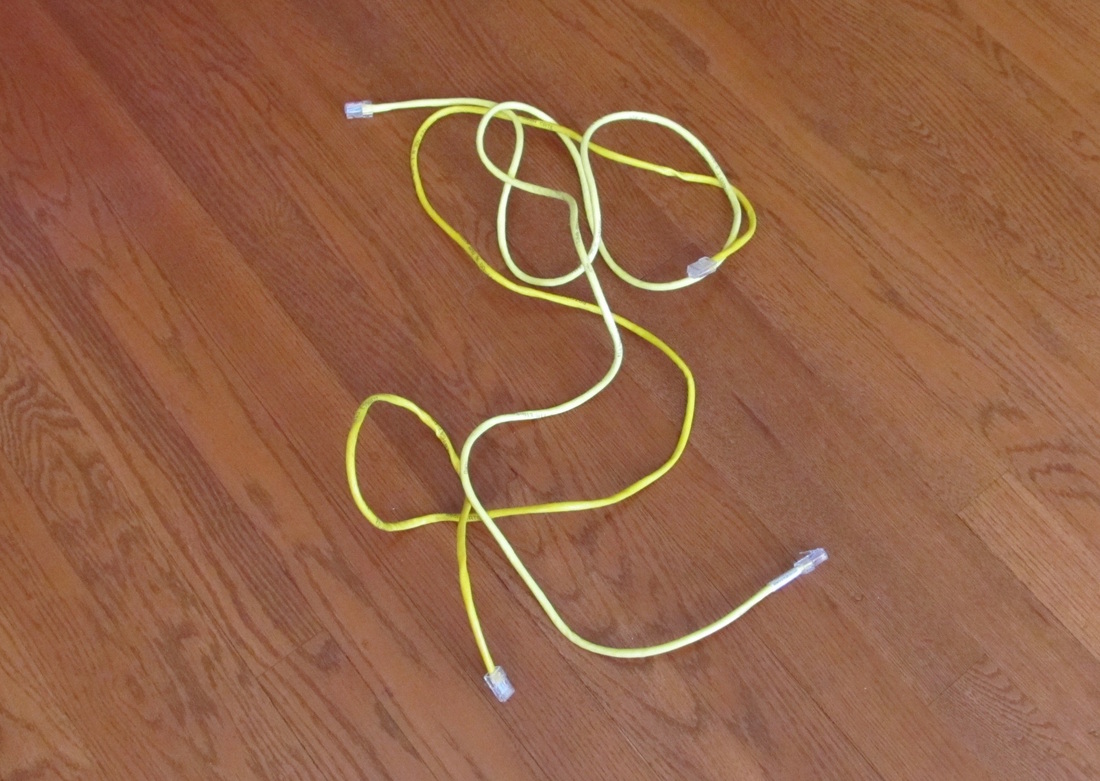
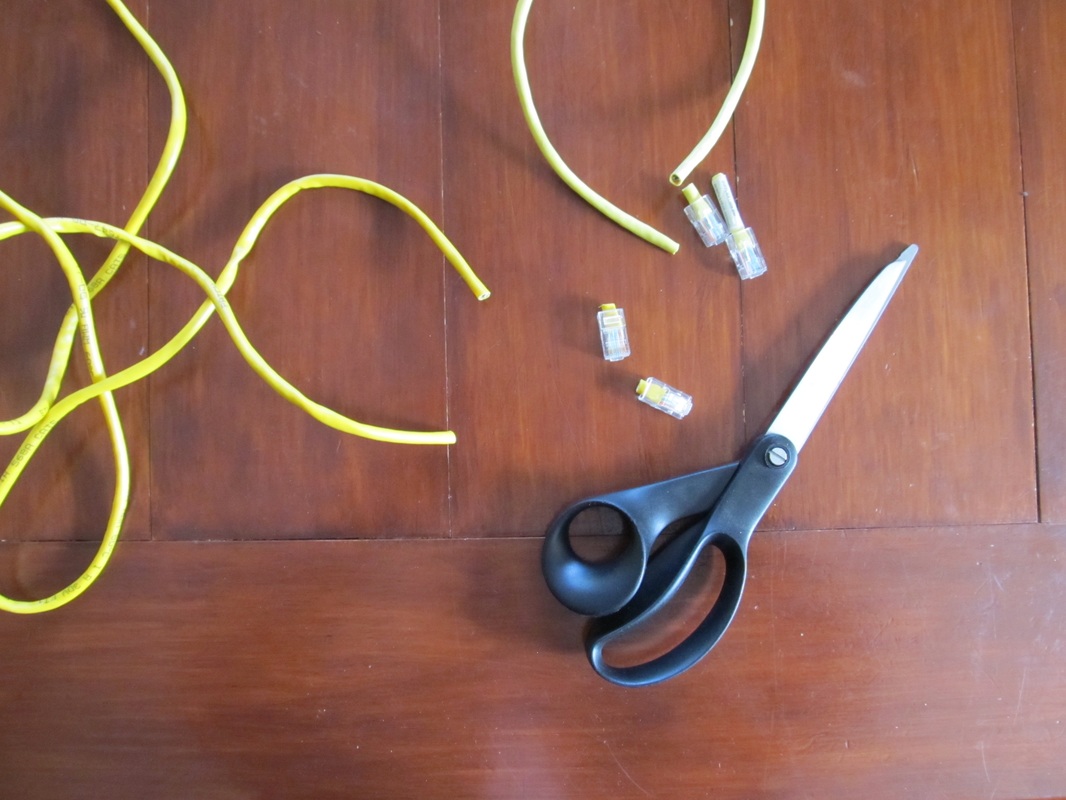
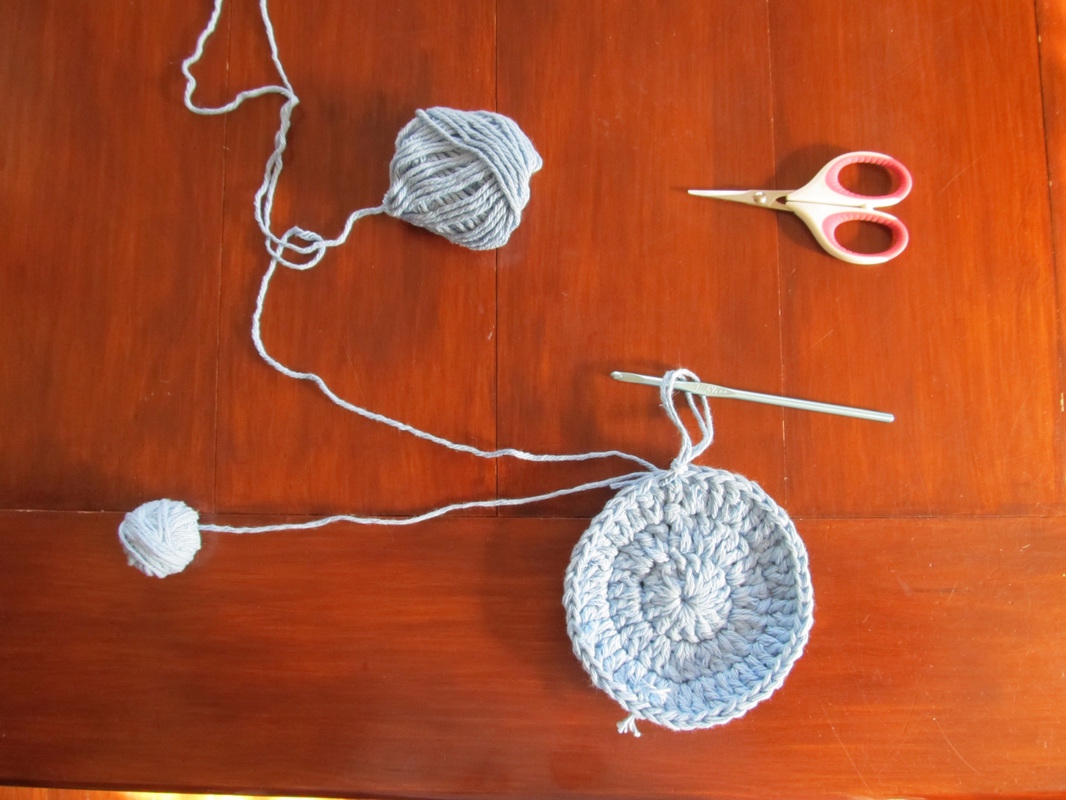
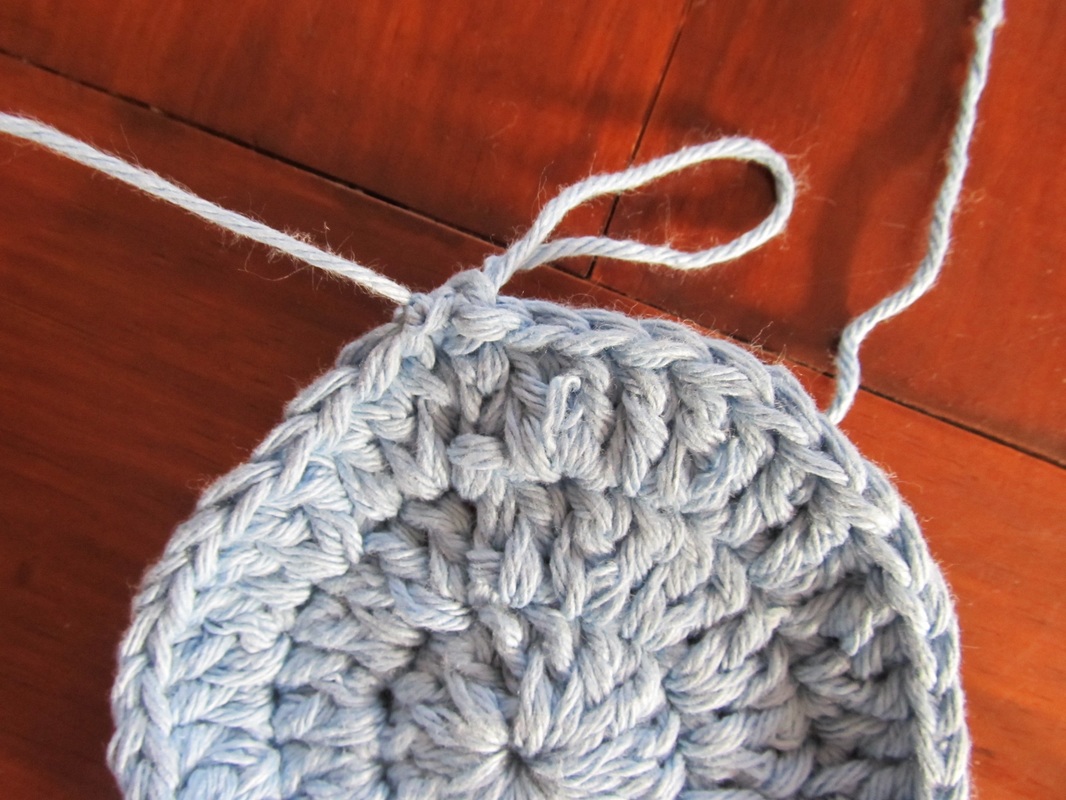
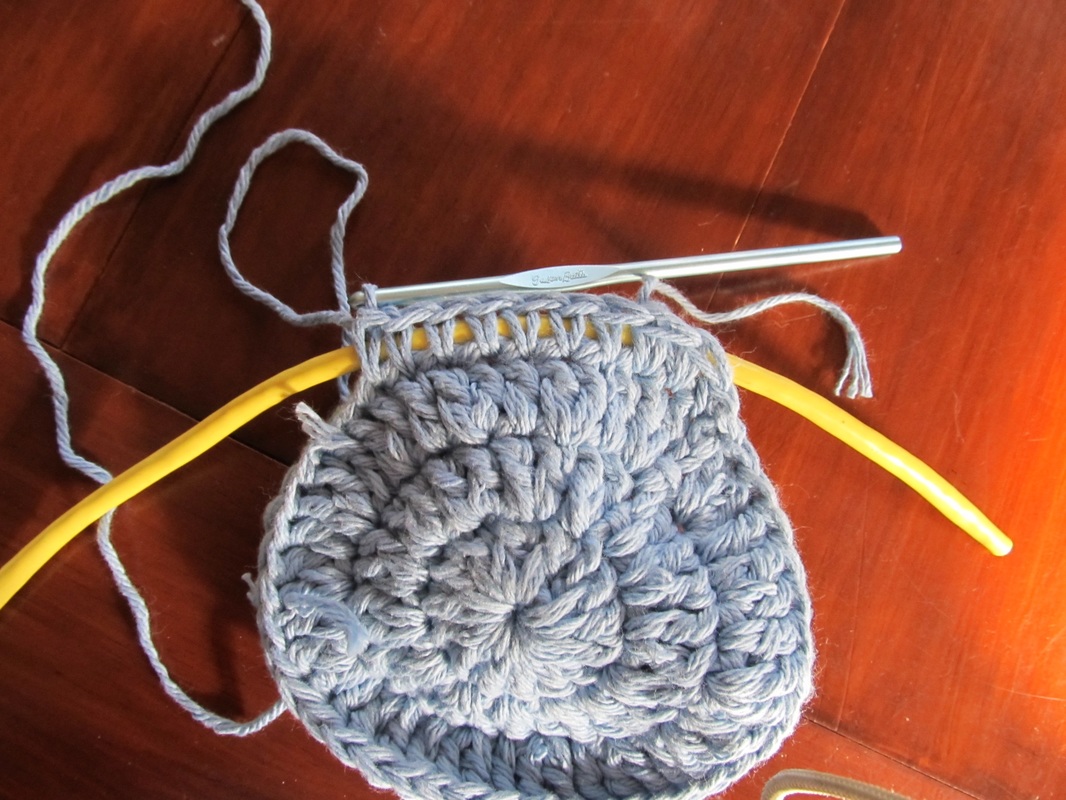
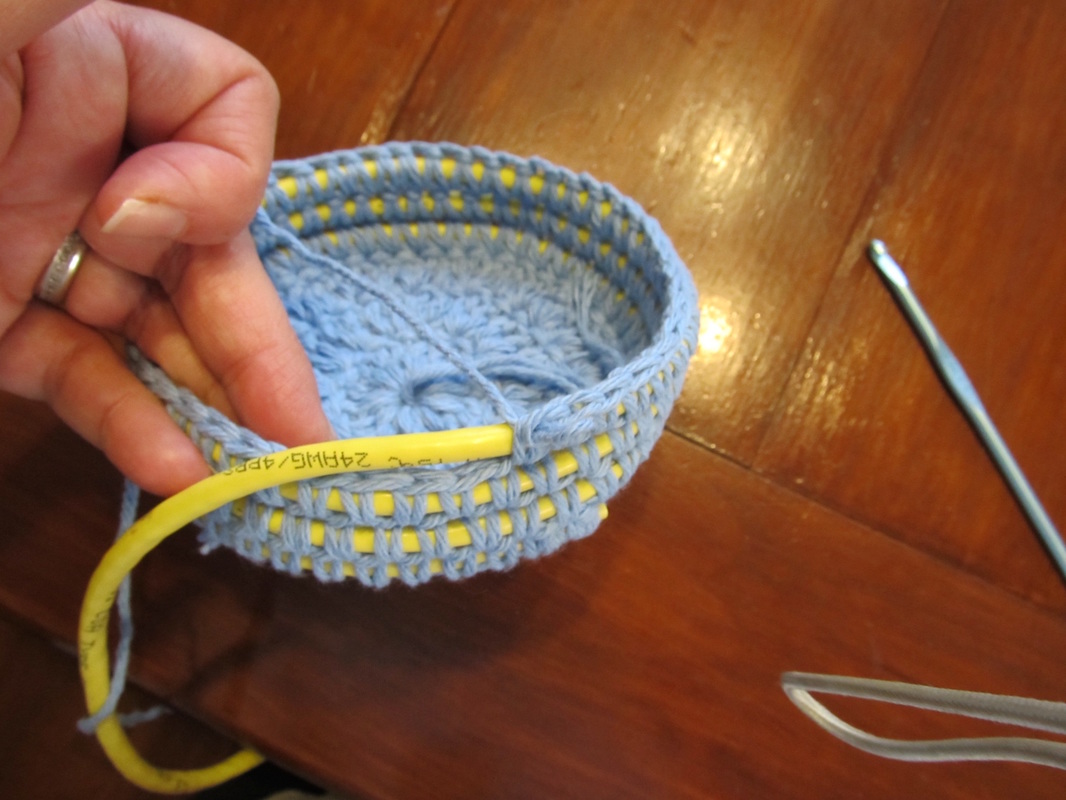
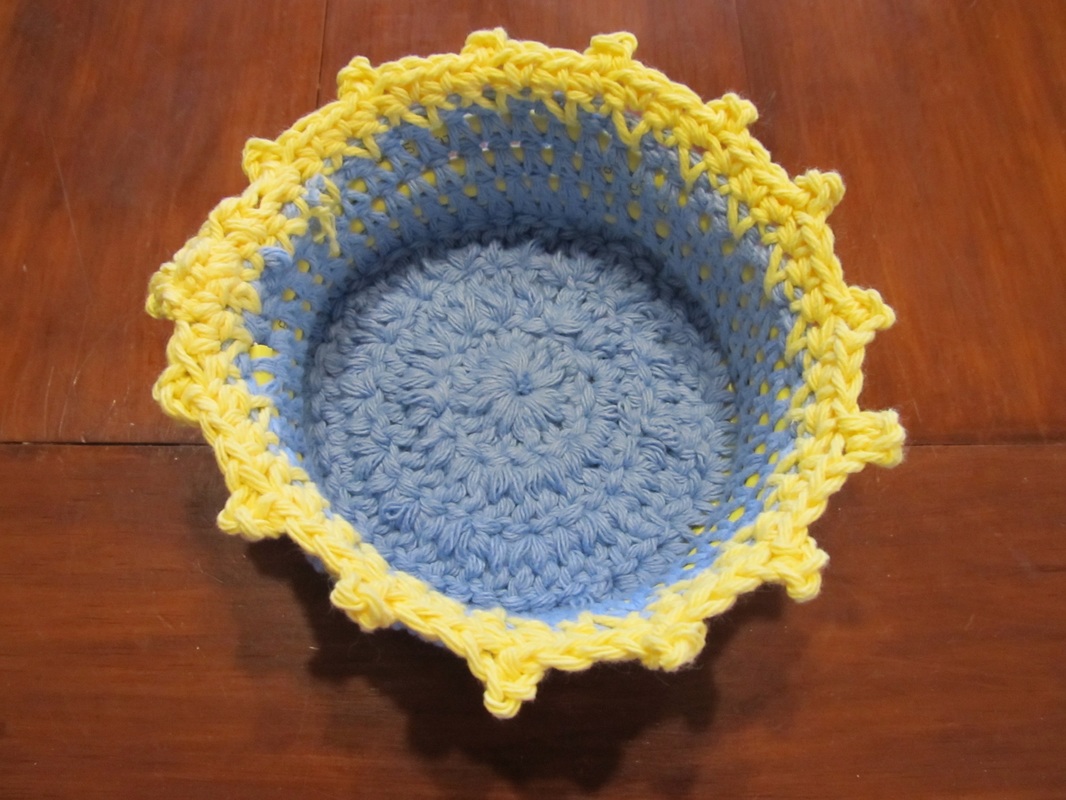
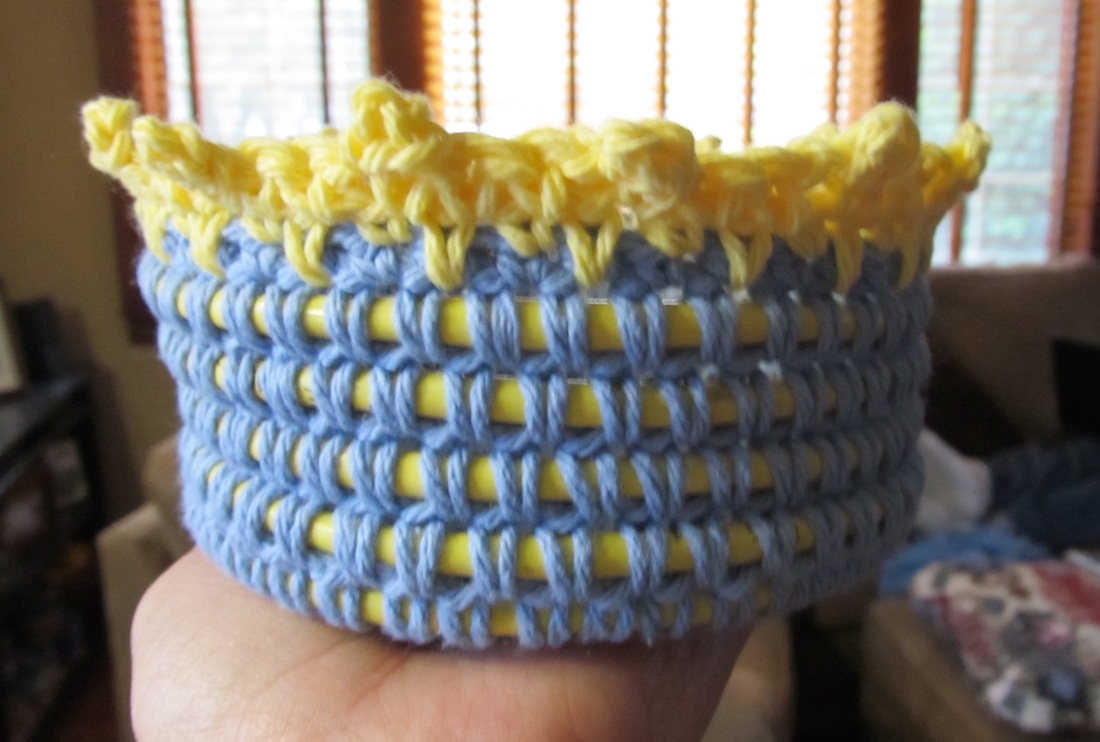
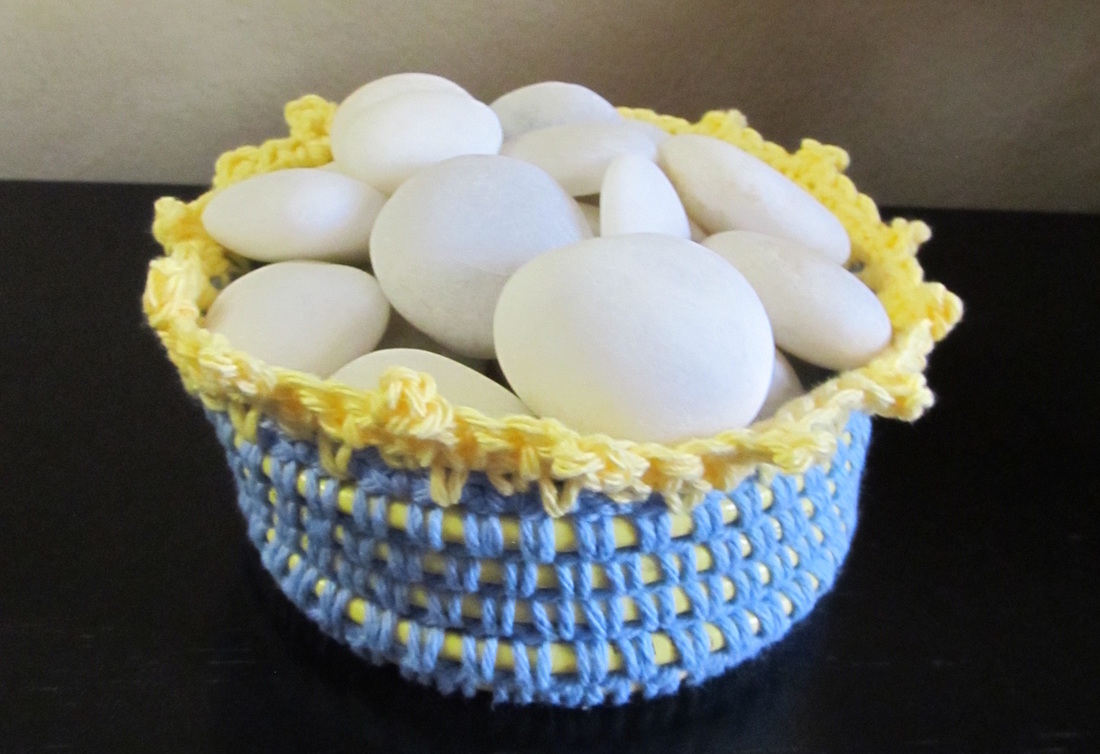
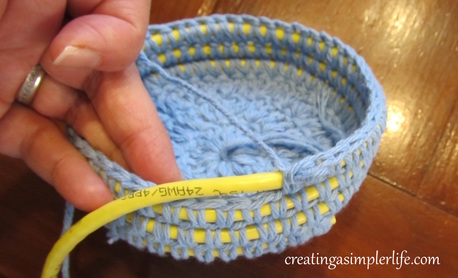 Don't just throw it out...repurpose it! Repurposing is way better than needlessly adding to landfills. Why not find another way to use something? Today's something for me is ethernet cable. You know, that wire that is used to transfer internet into your home and then between the router and various computers, printers, and such? What do you do with it when it's replaced with better stuff? Here's what I did...
Check out more repurposing ideas on our Pinterest Repurposing Board! Also check out our Repurposing Blog Post from 9/30/15! Thanks for visiting! Like what you see? Then please consider following us for more interesting ideas that help in creating and living a simpler life for you and your loved ones! Sincerely,
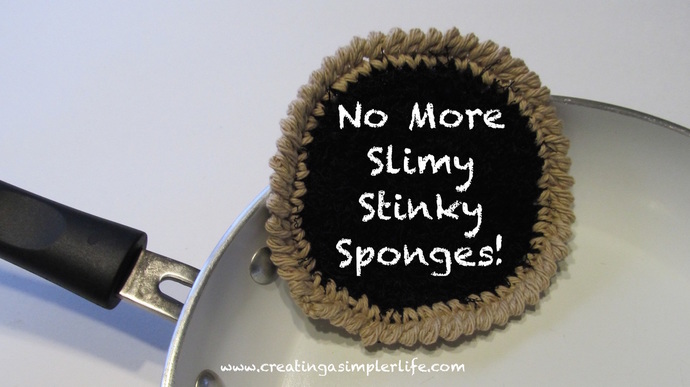 Sick of slimy, stinky, nasty sponges? Tired of having to throw them out and needlessly adding to the landfills of the world? Well be sick and tired NO MORE! This super simple scrubby can be washed, dried and re-used over and over and, well, over. If it gets slimy? Wash it! If it gets stinky? Wash it! It's that simple! And best of all: It is safe for all pots, pans, glassware, and surfaces! Check out this video of my husband using the scrubby on a really nasty pan.... Do you crochet? Then get started making this right away with this FREE PATTERN! Not into crocheting but still want a scrubby? Then BUY IT HERE in our shop :-) Every product we sell MUST meet THREE criteria: 1. Be Made of Simple Materials 2. Benefit Life in a Simple Way 3. Be Earth-friendly The dishcloth and scrubby set we sell is handmade of 100% all natural USA grown cotton and polyester (black scrubby center only). It benefits life simply by being reusable because it can be washed and dried over and over again! And of course, this makes it Earth-friendly because it is one less thing that will need to be thrown out:-) Thank you for visiting! Follow us to keep up with the latest news in Creating A Simpler Life! Sincerely,
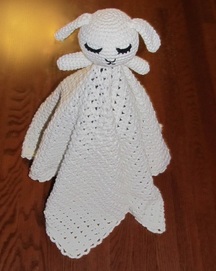
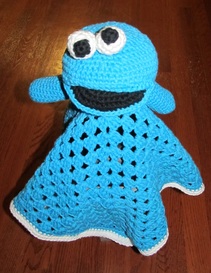
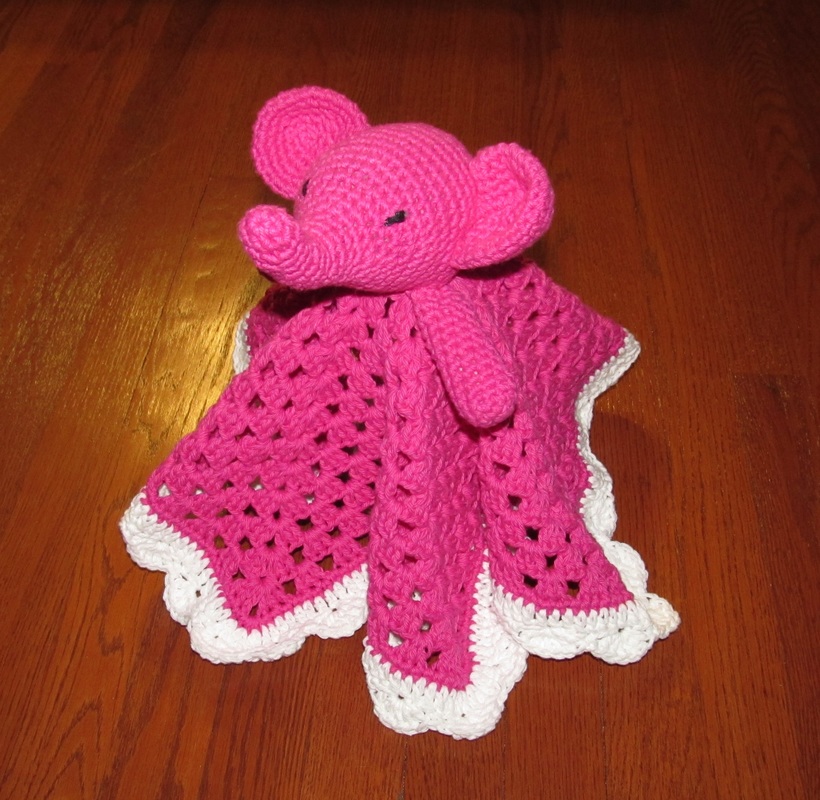
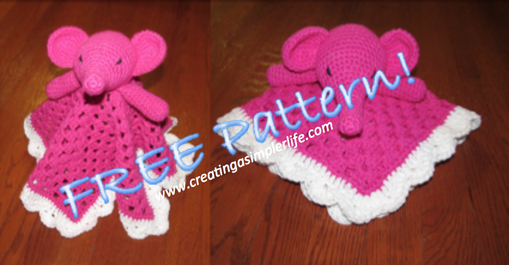 Adorable, right? What little tyke wouldn't want to cuddle with this 100% cotton pink elephant lovey blanket! The pattern can easily be adapted to blue, or any color of your choosing! Please note that you can e-mail me if you have any questions at all about the pattern! The links to video tutorials for various stitches can be very helpful if needed! Supplies Needed:
*Best price I can find for the Sugar'n Cream yarn is $1.99 for a 2.5 oz skein at Michaels Craft Stores. Even better if you print out and use their coupons each week - I print two coupons and bring my husband (They almost always have a 40% or 50% off one regular priced item!).  Make the Head and Nose: (I strongly suggest reading all the directions first and then watching the video tutorial if this is your first time making a ball shape). YOU WILL BE MAKING THE NOSE FIRST:
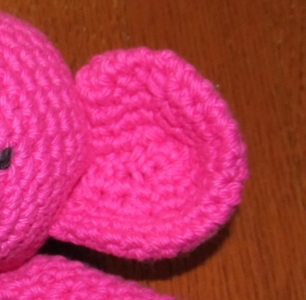 Make the Ears: The ears are worked from the outside of the ear toward the head in sort of a double layer that will be sewn together at the end....look at the picture to get a better idea if you do not understand, but if you still need help check out the Crochet Elephant Ear Tutorial YOU TUBE video I made...it's not the best, as I made it quickly, but I hope it helps!
This is my first tutorial video and I know it's not great, but I tried!
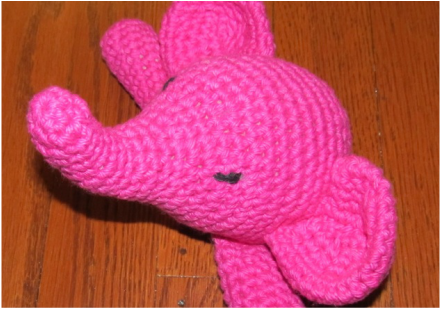 Sew on Eyes:
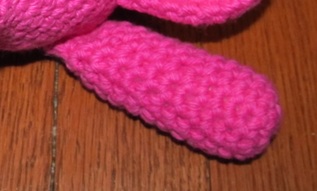 Make the Arms (optional):
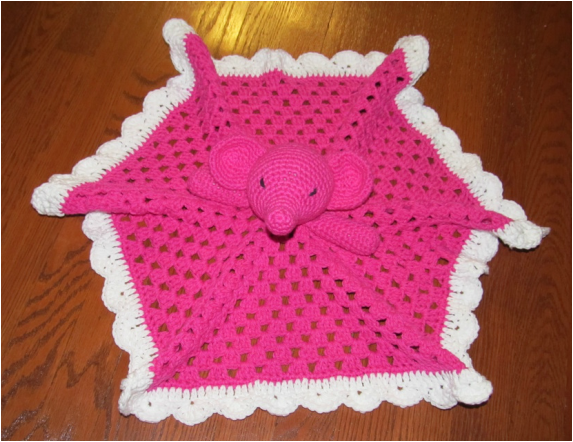 Make the Blanket: The final blanket is approximately 18" x 18". **PATTERN UPDATED AS OF 3/19/18** This is a basic granny square blanket with 6 corners instead of 4 and 13 rows in pink, then the edging. Watch this video tutorial (below) to make the basic 6 sided hexagon. You will do 12 rows in pink. The rest of the pattern continues below. Finishing the Blanket:
 Finishing:
Check out the our other FREE crochet patterns here! Also check out the many crochet project patterns on our Pinterest Boards Crochet ONLY and Crochet for the Kids! Check out these other FREE Lovey Blanket Patterns! Click on the picture to go to the pattern :-)
Thank you for visiting! Sincerely,
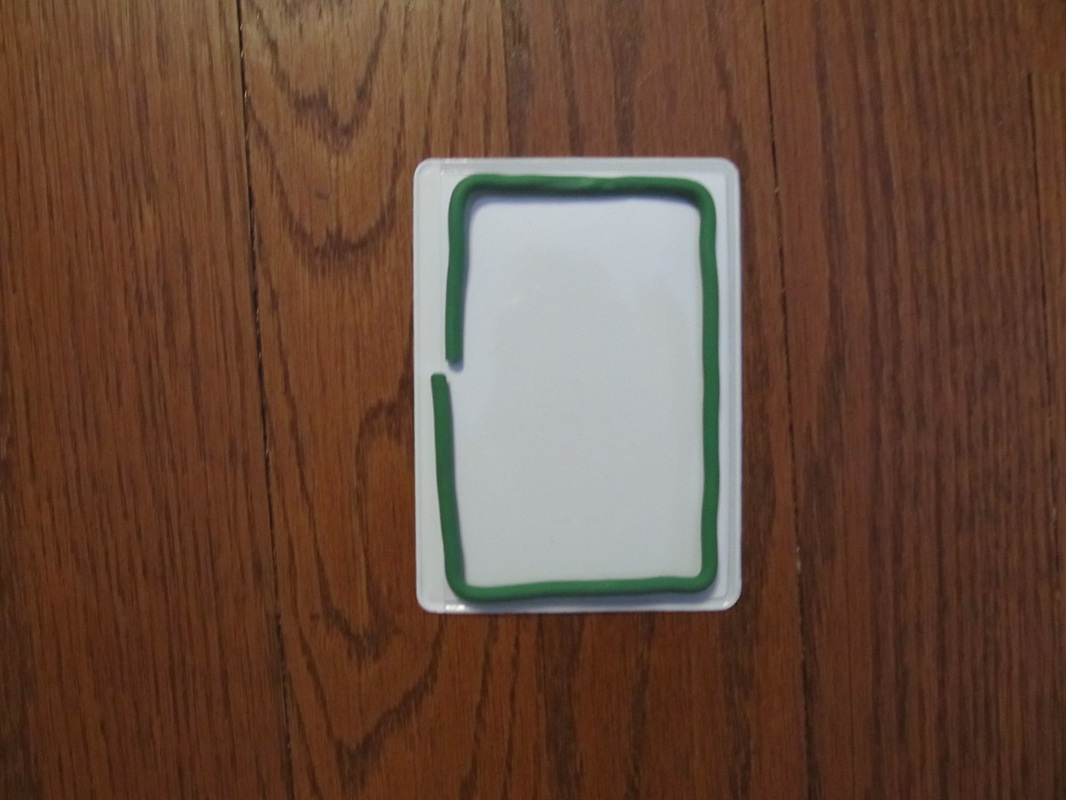
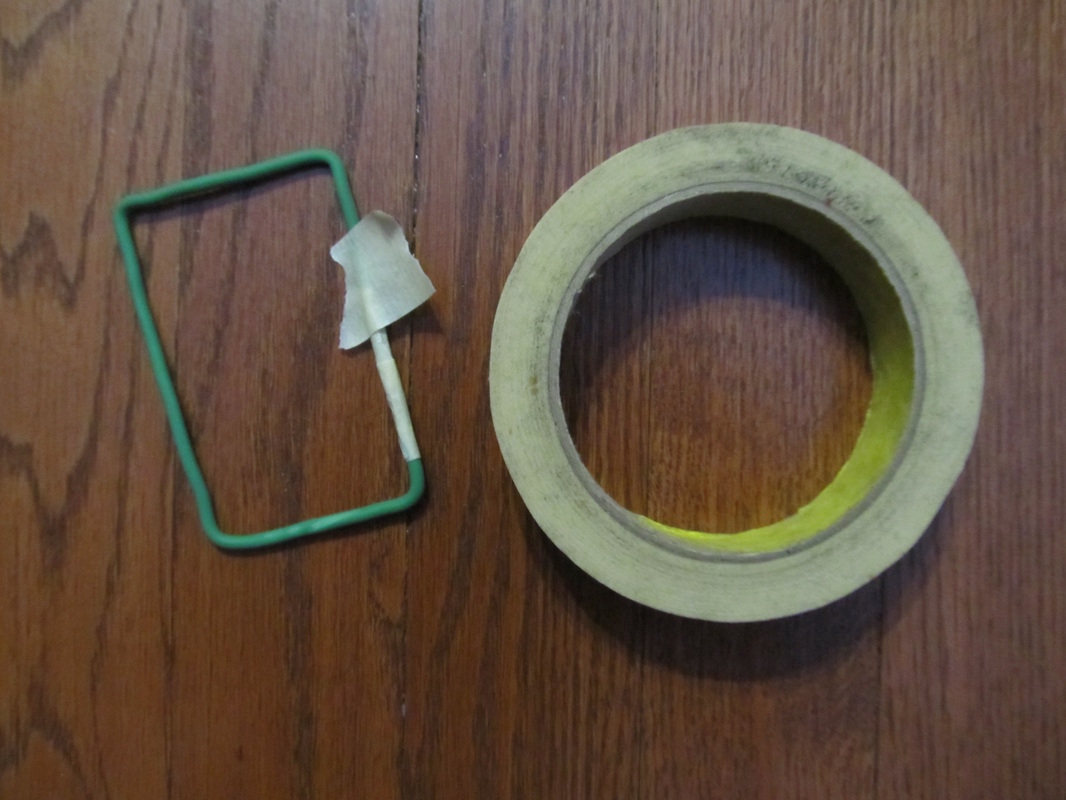
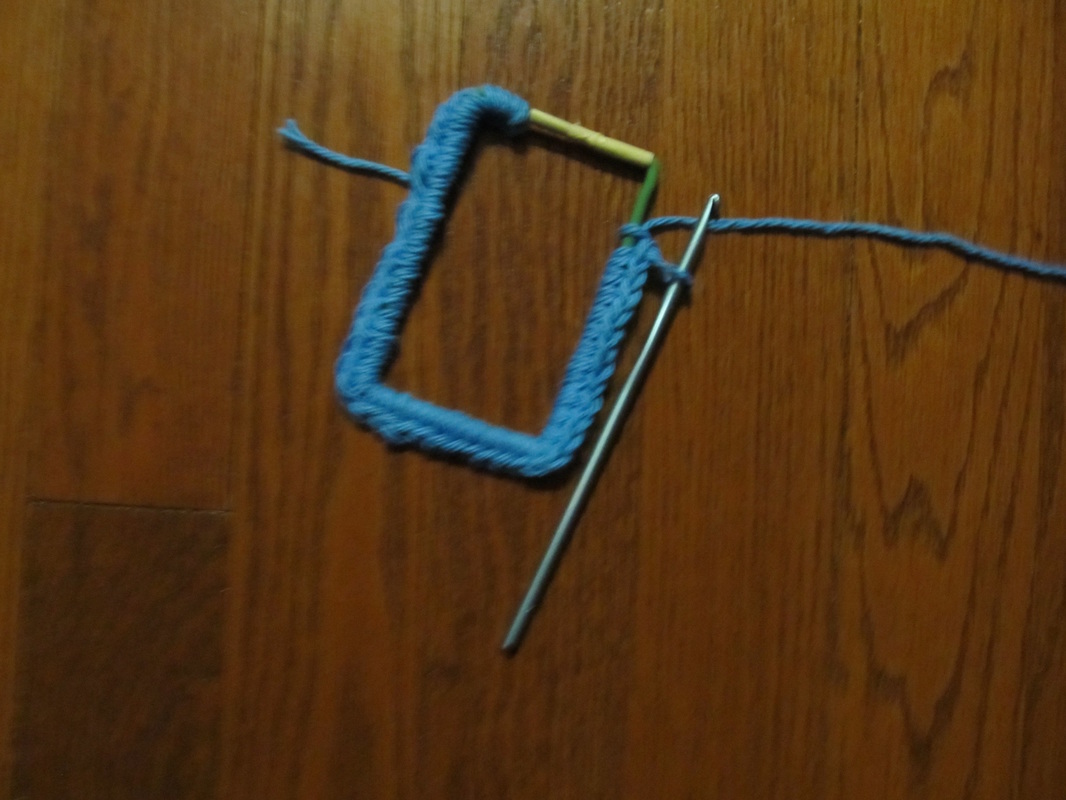
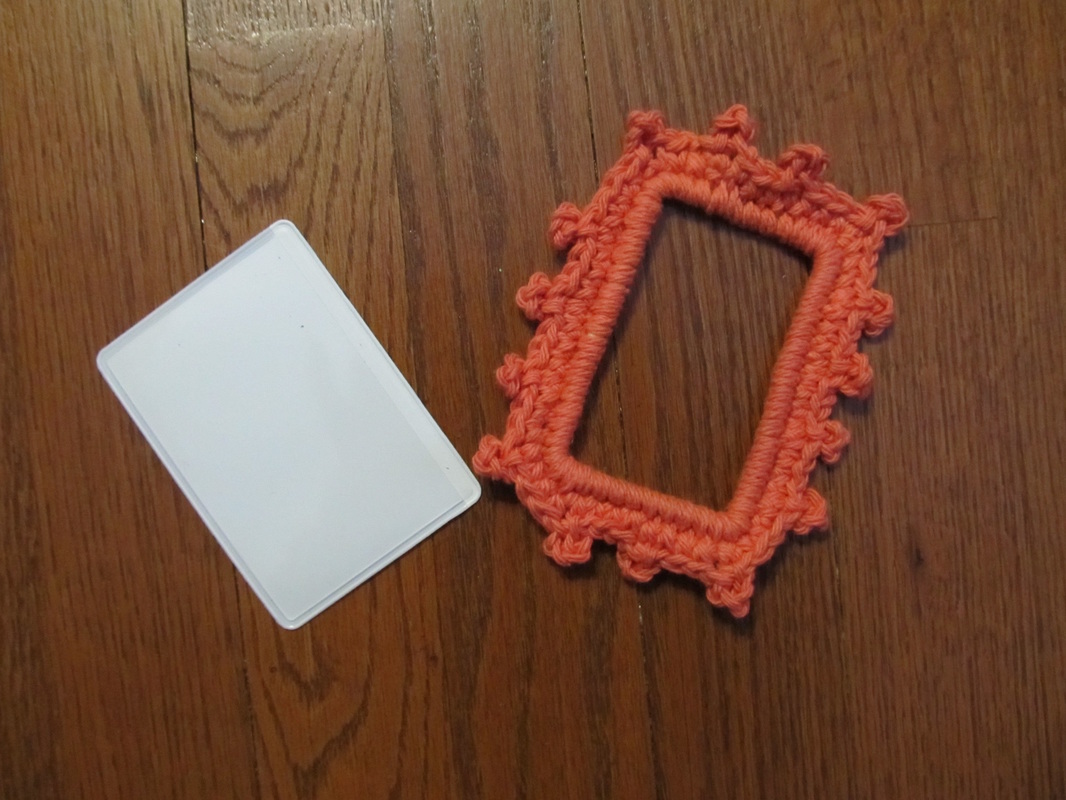
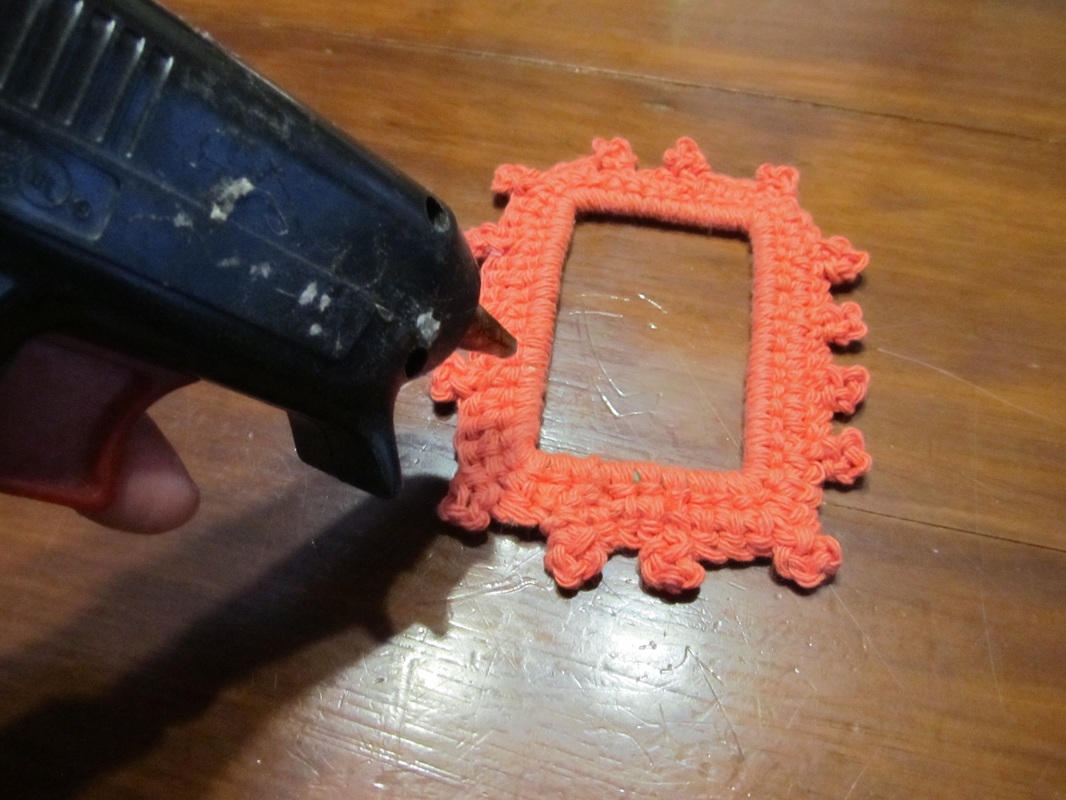
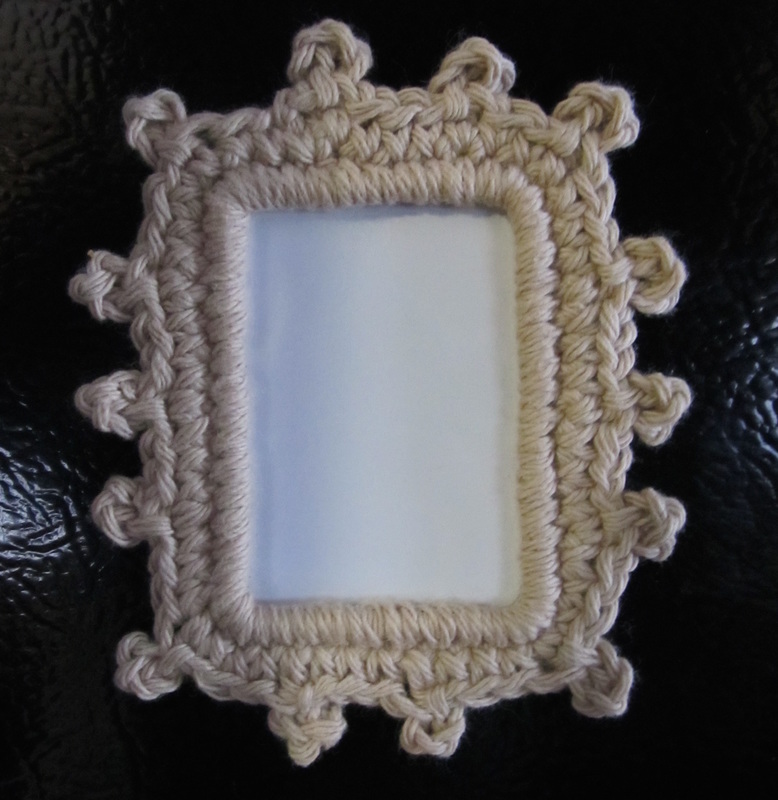
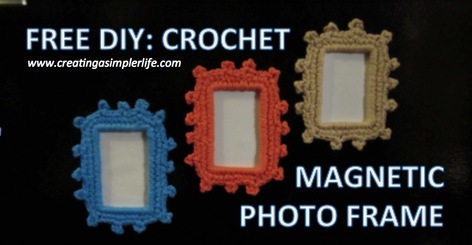 I love it when I find a really great buy that I can turn into something awesome! Thats why I love these refrigerator magnets so much. I found the plain magnets on clearance 3 for $1, and then another 20% off! Of course I couldn't resist buying them! They honestly sat around for a few months until I came up with a great inexpensive way to use them creatively and that's what I am sharing it here with you today! Supplies Needed:
Instructions:
Thank you for visiting! Please check out my other FREE Crochet Patterns or our Crochet Onlyand Crochet for the Kids Pinterest boards! Sincerely,
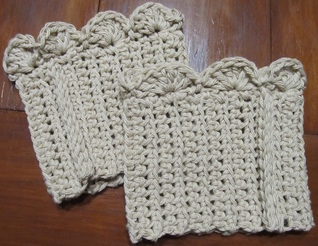
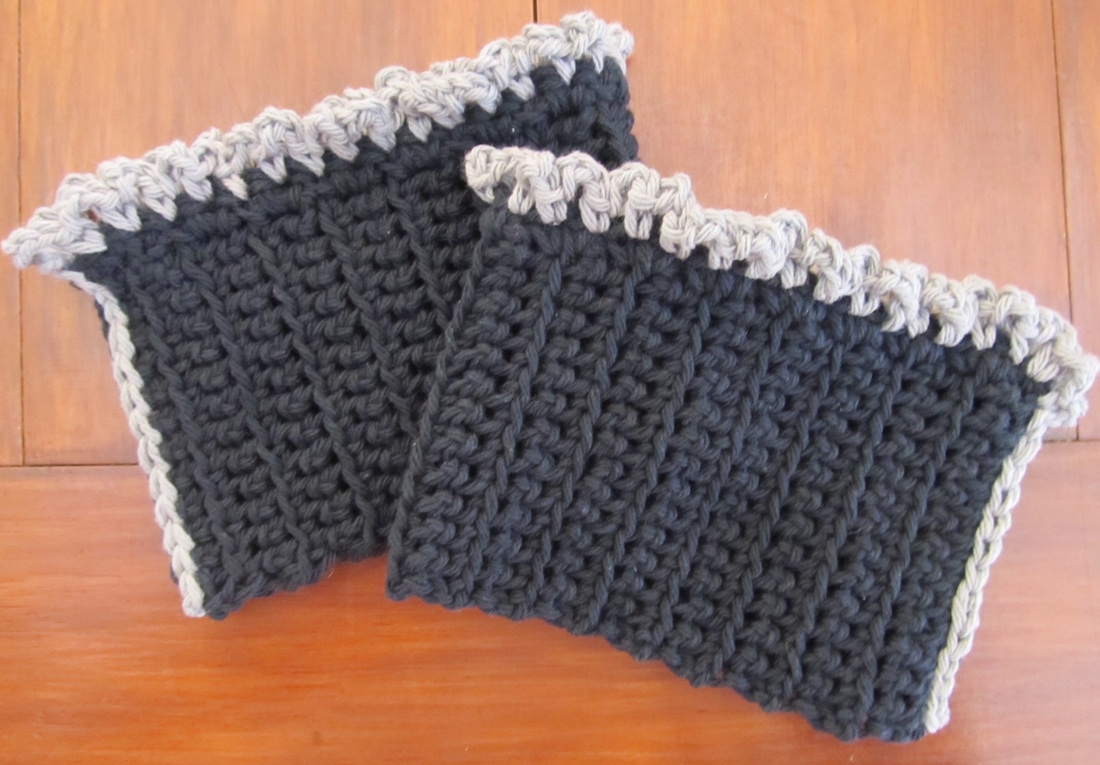
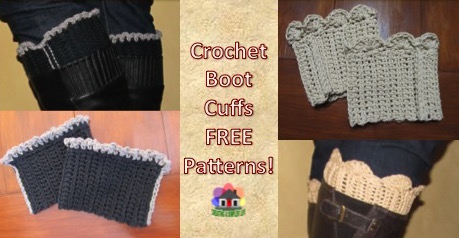 Boot cuffs are apparently the new fad. I would never have known what they were or thought to make them if my sister hadn't specifically requested them. After she explained what they were to me it was simple to come up with a design. The basic design has the same base, but with a choice of two different tops. I decided to do the base sideways because it allows more stretch in the cuff and can therefor fit different sized calfs more easily. The pattern below makes a cuff that is 12 inches in diameter that can stretch to comfortably fit a 14 inch calf. You may need to adjust the rows of the base depending upon the size of the calf. Each of the FREE patterns can be found below! Enjoy :-) Oh, and remember, I am not the best at writing pattern instructions so if you have any questions please feel free to contact me through e-mail or on Facebook! Supplies Needed:
Instructions for the Base and Seam: I used the single crochet front loop ridge stitch to make the base but you can easily just use a regular single crochet stitch. The sides were connected using the slip stitch seam.
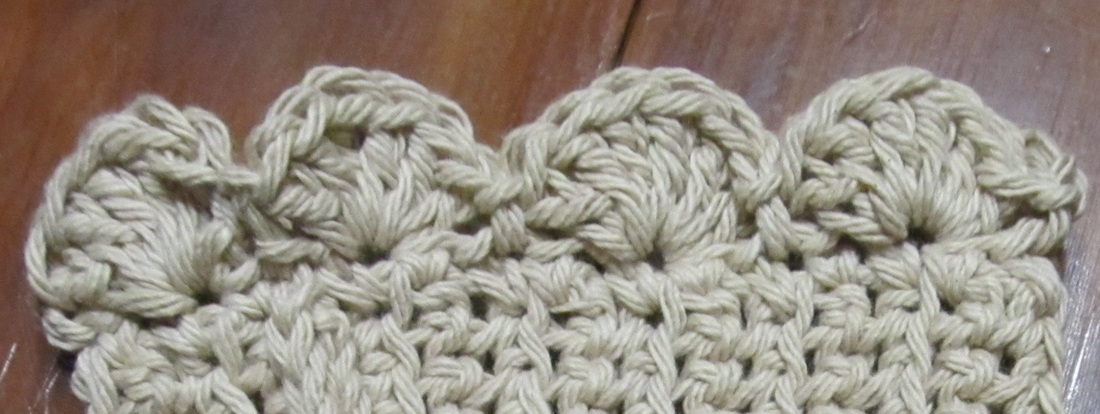
Scalloped Edge: Here is a simple tutorial how to crochet a scalloped edge. I only skip one stitch and I use 6 instead of 5 dc, but the concept is the same!
Ruffled Top: I have no tutorial for this stitch. I do not even know what it might be called, but it is really simple only requiring chains and single crochets.
NOTE: If you choose to use two colors you either need to use the same color as the base to make the seam, or if you want to make the seam a different color like the picture above, you have to make it OPPOSITE so they will match properly! Thank you for visiting! Please check out my other FREE Crochet Patterns or our Crochet Only and Crochet for the Kids Pinterest boards! Sincerely,
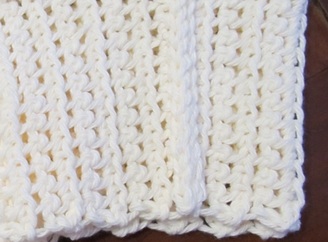
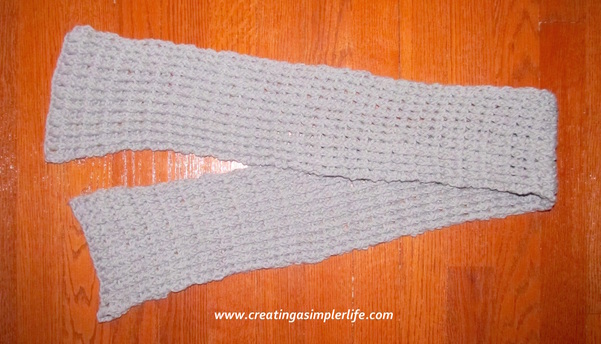 I just love this super simple double crochet stitch because it looks the same on both sides which makes it perfect for a scarf! Connect the ends and turn it into an infinity scarf or add some fringe to dress it up! Supplies:
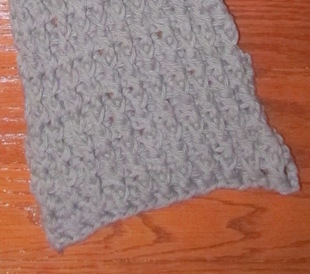 A close-up of the stitch! Directions:
You can leave it as is (simple!) or
Thank you for visiting! Check out the our other FREE crochet patterns here! Also check out the many crochet project patterns on our Pinterest Boards Crochet ONLY and Crochet for the Kids! Please feel free to e-mail me using the form on this page or contact me through my Facebook or Google+ pages if you have any questions! Sincerely,
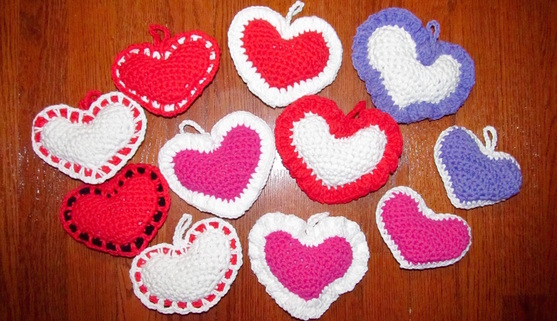 Same simple heart pattern with different borders! Choose the one you want to make, or make them all! Add a few drops of lavender essential oil to turn it into a sachet. A lovely way to show someone you are thinking about them on Valentines Day! Supplies:
Basic Heart:
Connect With A Border: Choose the border you want to use to connect the two sides of the heart. Two Tone Border 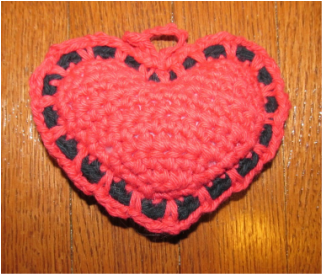 Directions: Using a different color, connect to the center stitch at the tip of the heart and do one single crochet in each stitch around for a total of 47 stitches. Before you finish, be sure to fill the heart with stuffing. Then using the same color as the heart, connect to the original center stitch of the sc you made at the tip and do one single crochet in that spot using the same exact original hole. This will require a longer amount of yarn. Then chain 2, skip one sc, and sc in the same sc stitch as the alternate color. You are basically repeating this pattern all the way around using the same stitch holes as the first row of single crochet. Weave all ends. Refer to picture if you are confused. Plain Sc Border 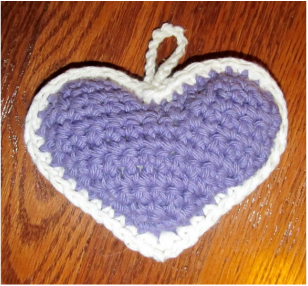 Directions: Connect to the center stitch at the tip of the heart and do 2 sc. Continue around the heart doing one sc in each stitch around. You want to do the sc's loosely especially around the bumps of the heart. Connect to original sc and finish with a slip stitch. Weave all loose ends! Frilly Border 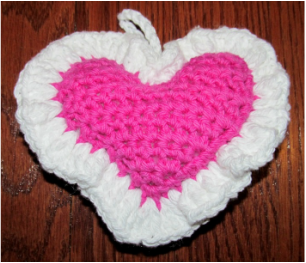 Directions: Connect tot he center stitch at the tip of the heart and do 3 dc in that stitch. Continue around doing 3 dc in each stitch until you approach the "V." Two stitches before the V decrease to 2 half double crochets (learn half double crochet here), then to a sc in the center of the V. Then do 2 half doubles in the next stitch, then do 3 dc in each stitch the rest of the way around. When you get to the point of the heart do one last dc in the same stitch that you originally did 3 in, connect with slip stitch and finish off. Weave all loose ends. Add an Optional Hanging Loop: Connect to the top center of the "V" with a slip stitch. Chain 15 then connect again to the top center of the "V" and finish off. Weave loose ends. Happy Valentines Day and thank you for visiting! Check out the our other FREE crochet patterns here! Also check out the many crochet project patterns on our Pinterest Boards Crochet ONLY and Crochet for the Kids! Please feel free to e-mail me using the form on this page or contact me through my Facebook or Google+ pages if you have any questions! Sincerely, 
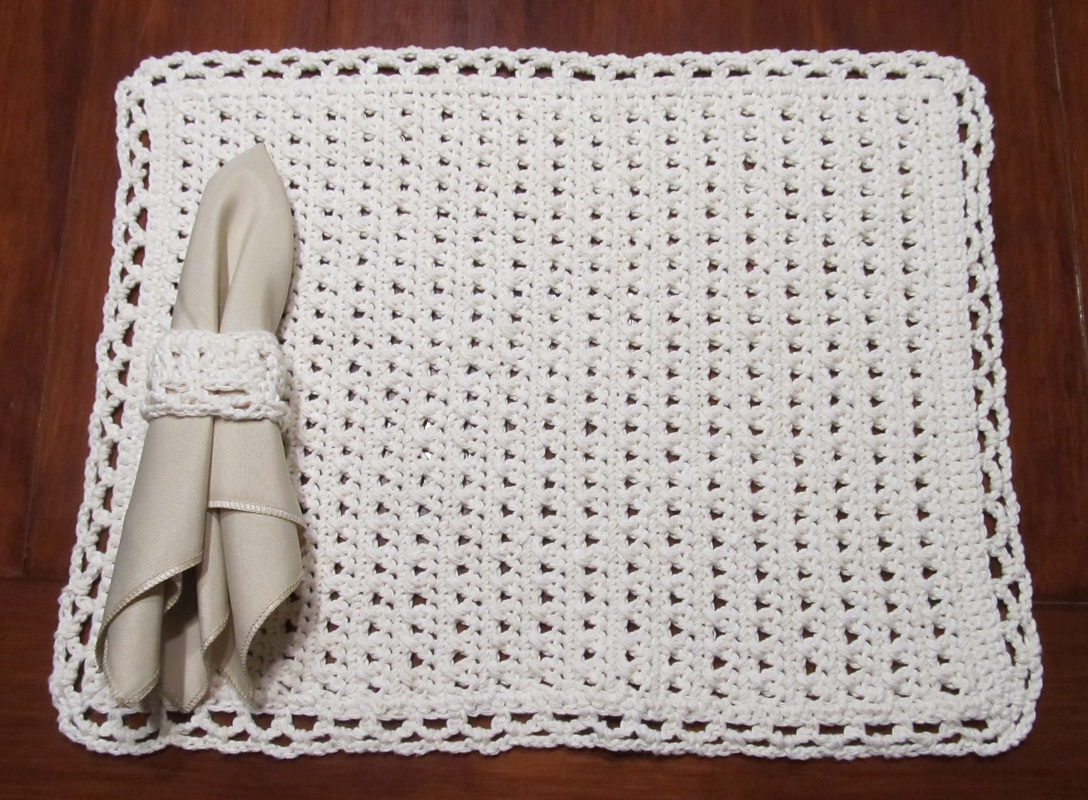
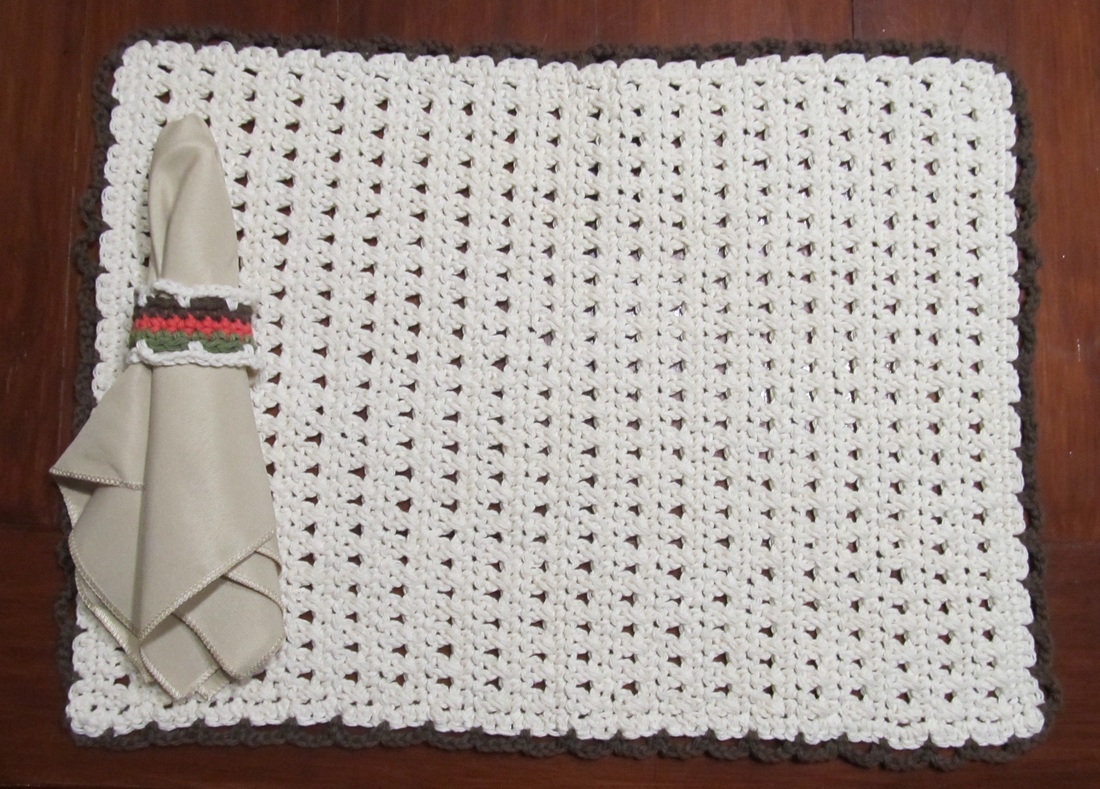
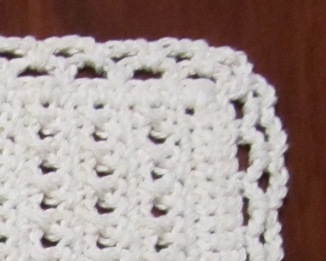
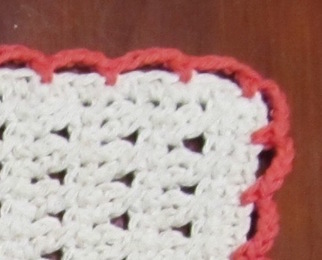
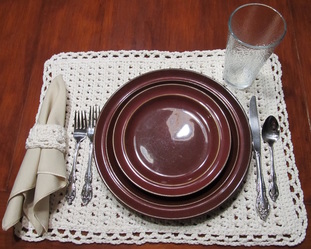
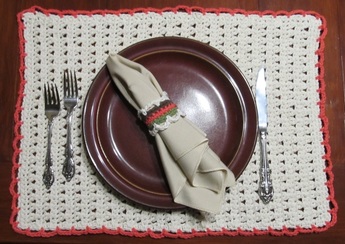
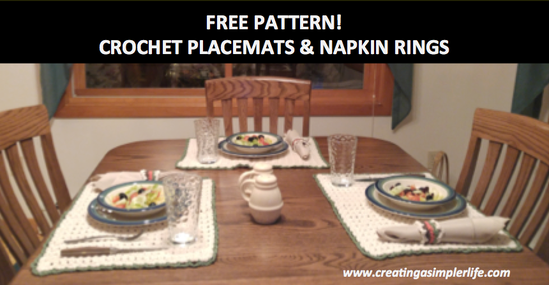 These placemats are simple to make and simple to care for! Made of 100% cotton, they can be washed and dried on the delicate cycle. Why not treat yourself to a matching set or make it as a gift for someone you love? Supplies Needed for Placemats:
Make the Placemats: Chain 46 Row 1: single crochet in 2nd stitch from end and then in each chain accross (45 total). Row 2: chain 3 and turn work. [This is the Crossed Double Crochet shown in the video below] Double crochet in second stitch from end. Double crochet backwards into the stitch you skipped. Repeat the cross crochet to end of row and double crochet in final stitch. Row 3: chain 1 and turn. Single crochet in each stitch accross (45 total). Rows 4 - 41: Repeat the row 2/3 pattern nineteen (19) more times. Do NOT finish yet - continue on with the pattern for Border A or B (note that B is the same as A without the final row), or if you prefer, don't add any border at all! Not sure of the Cross Double Crochet? Then check this video tutorial on You Tube.
Choose A Border: If you want to add a border, note that Border B is the same as border A without the 3rd row!
Border A: Row 1: single crochet accross the side, do 3 single crochet in the corner, single crochet accross bottom, 3 sc in corner, sc across other side, 3 sc in corner, sc accross top, slip stitch connect and chain 1 in corner. Row 2: single crochet in corner, chain 4, skip two stitches and sc into third. Continue pattern all the way around. Be sure to single crochet into the middle stitch at each corner. Slip stitch to connect when done. Row 3: single crochet into corner, chain 3, sc into loop of 4 stitches, chain 3 single crochet into next loop, and continue pattern to corner, sc into middle corner stitch, chain three and repeat pattern all the way around. Slip stitch to finish. Border B: Do Row 1 in the same color as the placemat as per instructions for Border A. Row 2: change color and follow same instructions as for Border A but end after row 2 (so skip row 3). Slip stitch to finish off and weave all loose ends. 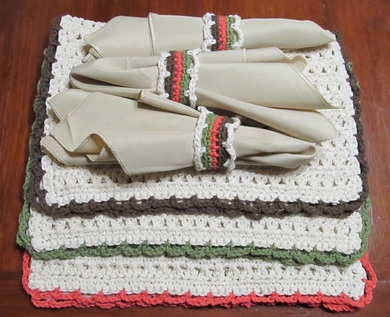 Mix'n Match!
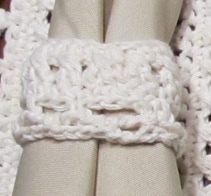
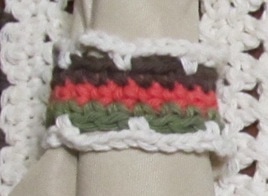
Make the Napkin Rings: Supplies Needed:
Directions For Napkin Ring A: Crochet 19 chains and connect into a circle with a slip stitch. Row 1: one single crochet (sc) in each stitch around for a total of 19. Row 2: Double crochet the cross stitch as follows (same as in the placemat pattern) - chain 3, skip 1 stitch and dc in next (2 from chain), go back and dc in the skipped stitch, then skip one again and dc in next stitch etc. Continue all the way around. Row 3: sc in each stitch around. Row 4: chain 4, skip two stitches and sc into third. Continue pattern all the way around. Slip stitch to connect when done. Row 5: chain 3, sc into loop of 4 stitches, chain 3 single crochet into next loop, and continue around. Slip stitch to finish and weave all loose ends in. Directions For Napkin Ring B: Crochet 19 chains and connect into a circle with a slip stitch. Row 1: chain one and do one single crochet in each stitch around (total 19). Connect with slip stitch. Rows 2-3: repeat row one changing colors after each row as desired. Border: using the same or a different color, single crochet in any stitch to begin, then chain 4, skip 2 and single crochet into third stitch from hook. Repeat the pattern all the way around. Slip stitch to connect to first single crochet and finish off. Repeat the same border on the opposite side of the napkin ring (so the top and bottom with have the border). Weave all loose ends.
Please contact me through e-mail or on my Facebook page if you have any questions! Check out our Crochet Page for other FREE patterns! Thank you for visiting :-) 
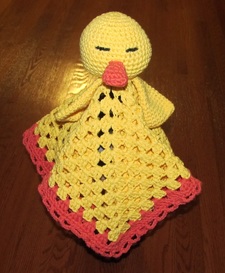
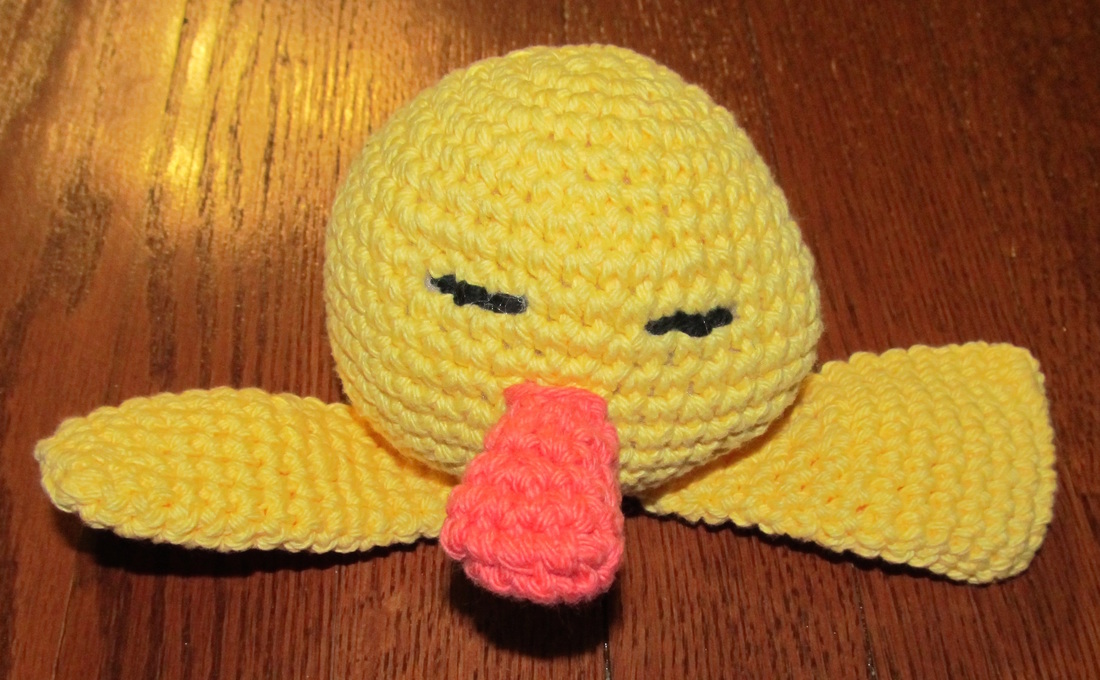
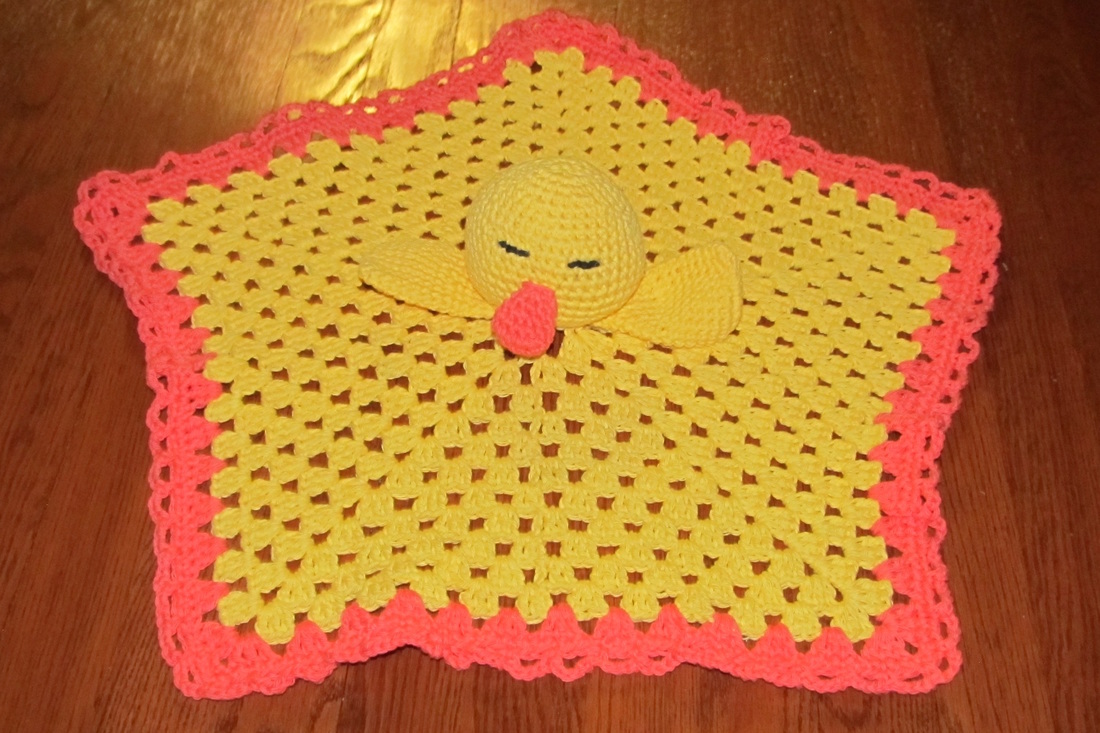
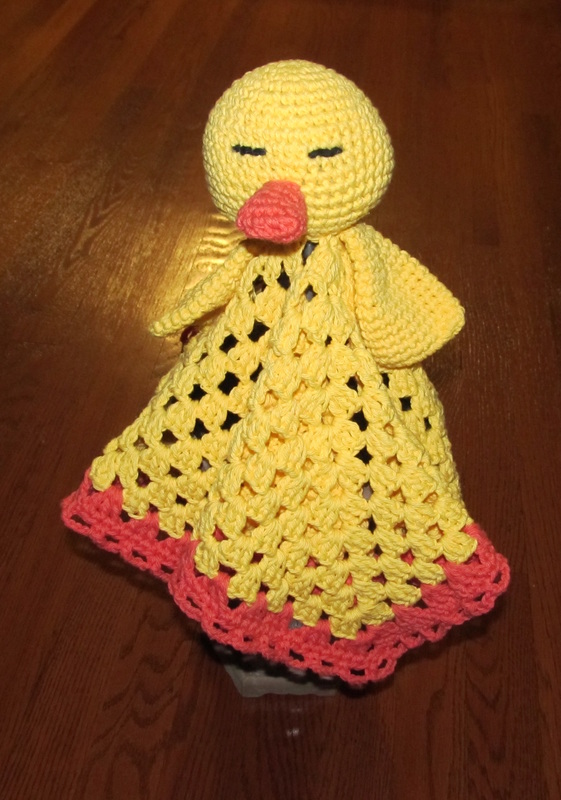
 This lovey blanket was super, super, simple! Many of you already know, but for anyone new, please note that I have poor pattern writing skills....for some reason it just never clicked with me. For this reason I supplement with links to video tutorials that can be watched on tube. However, note that the stitches are all pretty basic and if you have crochet skills you should be fine. I just make these up and write them down as I go, so there really is no right or wrong. as long as it looks good when you're done, who cares? A child will love it no matter what :-) Please remember to feel free to contact me with any questions! Supplies Needed:
*Best price I can find for the Sugar'n Cream yarn is $1.99 for a 2.5 oz skein at Michaels Craft Stores. Even better if you print out and use their coupons each week - I print two coupons and bring my husband (They almost always have a 40% or 50% off one regular priced item!).
Make the Head: (I strongly suggest reading all the directions first and then watching the video tutorial if this is your first time making a ball shape).
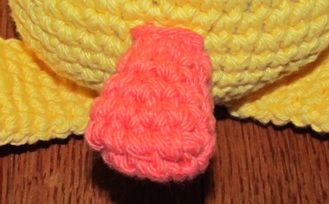
Make the Beak:
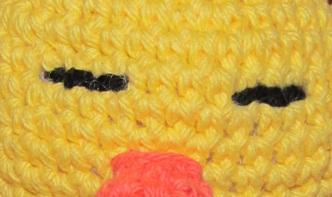
Sew on Eyes:
Make the Wings:
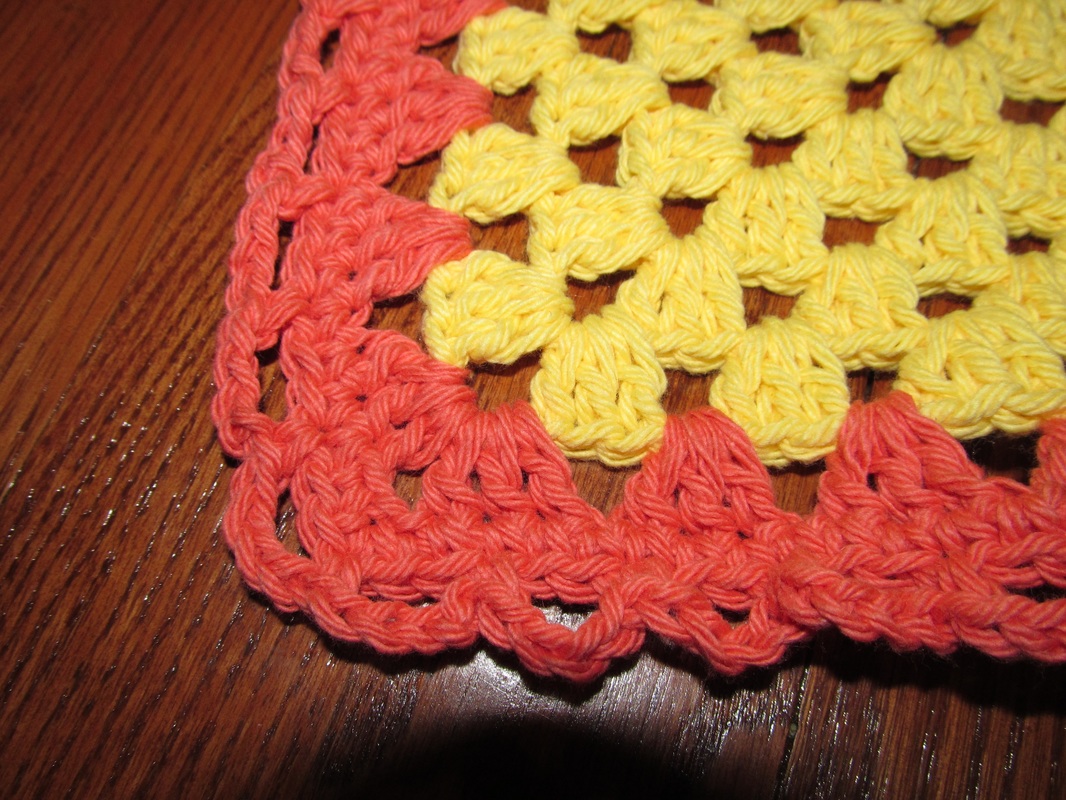
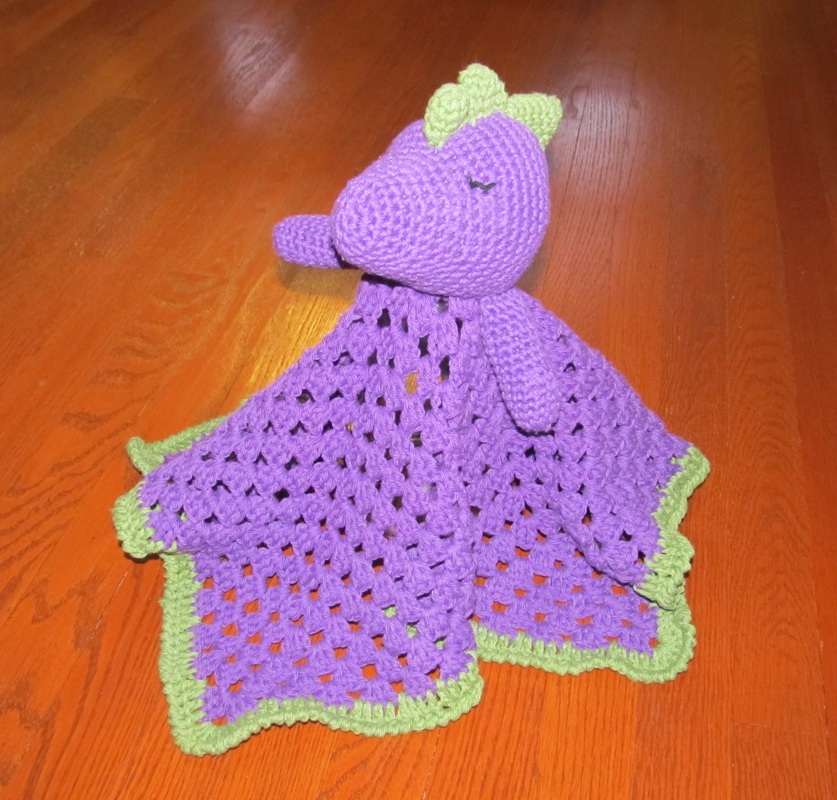
Make the Blanket: This is a basic granny square blanket with 5 corners instead of 4 and 14 rows with the last row in the edging color, one row of single crochet and the chain edge. If my directions are confusing, check out this granny square video tutorial. My pattern just adds an extra corner, but is done pretty much the same! The final blanket is approximately 18" x 18".
Finishing:
Check out the our other FREE crochet patterns here! Also check out the many crochet project patterns on our Pinterest Boards Crochet ONLY and Crochet for the Kids! NEW PATTERNS COMING SOON:
Thank you for visiting. Please like and follow us :-) Sincerely, 
|

Hi there! I'm Kathie, the author behind Creating A Simpler Life blog. I'm excited to share our longterm projects (and planning) toward building our future retirement homestead in the Adirondack Mountains of New York. In the meantime I will be sharing all the other little things we do that are part of creating our simpler life!
Categories
All
Archives
July 2020
|


 RSS Feed