CREATING A SIMPLER LIFE OFF-GRID
  • Home/About
    • What does OFF-GRID mean?
    • MINIMIZING >
      • Home Size
      • Room by Room
      • Get Organized
      • Household Waste
    • MINIMIZE DEBT, MAXIMIZE SAVINGS >
      • Bills & Other Debt
      • Saving Money
      • Shopping Tips
      • Affordable Fun
    • BACKYARD CHICKENS >
      • The Coop
      • The Chickens
      • Feeding the Chickens
      • Fresh Eggs
    • HOME GARDENING >
      • Building the Garden
      • What We Grow
      • Seeds, Weeds, & More
      • Preservation & Storage
    • DO-IT-YOURSELF >
      • Health & Wellness
      • Simple Cleaning & Tips
      • Crafts & More!
      • Printables
    • CROCHET >
      • IDEAS & MORE
      • VIDEO TUTORIALS
  • HOMESTEAD
    • The 5 Year Plan PLUS! >
      • 2017
      • 2018
      • 2019
      • 2020
      • 2021
      • 2022
    • WHY AN EARTH SHELTERED HOUSE?
    • OFF GRID TINY TRAILER
    • BUILDING our HOMESTEAD from Scratch >
      • BUYING LAND & GETTING STARTED
      • BUILDING THE CONCRETE DOME
      • FROM DOME to HOME
      • SURVIVING OUR FIRST WINTER
    • HOMESTEAD MACHINERY >
      • GENERATORS
      • KUBOTA TRACTOR
      • ATV'S & UTV'S
      • WOOD CHIPPER
      • CHAINSAWS
      • LOG SPLITTER
      • POWER TOOLS
      • SNOWMOBILES
      • AUTOMOBILES
    • BUDGETING THE BUILD
    • SUSTAINABILITY >
      • WATER
      • FOOD
      • SHELTER
      • ENERGY >
        • SOLAR POWER
    • The Adirondacks >
      • Wildlife & Nature
      • Insects & Bugs
      • Things to Do
      • Water Fun
    • ADIRONDACK CRAFTS
  • VLOG
    • 2023
    • 2022
    • 2021

Blog

A little bit of anything and everything that's part of
​creating, enjoying, and living a simpler life!
Picture

HOST A BACKYARD CAMPFIRE!

7/27/2015

0 Comments

 
Picture
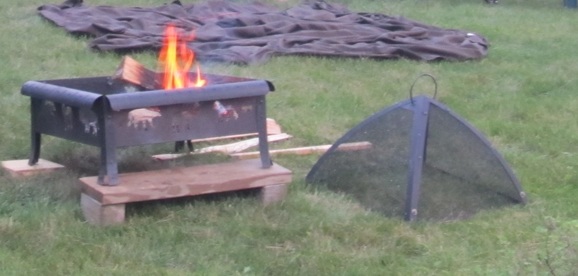
Looking for something inexpensive, simple, and fun to do this summer? Then consider having a backyard campfire complete with marshmallows, a sing-along and ghost stories. No matter what age your guests are, it's sure to be a big hit that everyone will want to do over and over again!
When I was growing up we used to go camping all the time. Whether it was upstate NY or on the beaches of Fire Island, there was always a campfire involved. Some of my fondest childhood memories are of singing around the campfire with family and friends. In fact, the picture above was taken just this summer while visiting my parents in the Adirondacks - in their backyard! No matter how old you are, campfires are fun and you don't have to travel farther than your backyard to create new memories!
WHAT DO YOU NEED?
BACKYARD 
No backyard?  No worries! Would someone you know be willing to share theirs? Is there a park or other similar place near you that permits campfires? You can call the local parks you know of and see if they allow fires or find parks in your state using America's State Parks.   Many parks already have fire pits ready and waiting to be used!
FIRE PIT
If you don't already have one then you can either buy one, or even better, make one yourself!
  • Buy: Fire pits can cost anywhere from $50.00 and up.  I personally have the Fire Sense Bonfire portable. I've had it about 10 years now and it is still going strong! 
  • DIY: Making your own fire pit is pretty easy as well. It can cost anywhere from nothing (except a little energy and time) to about $100 depending upon the kind you build.  Check out 12 DIY Fire Pits for Your Yard.
WOOD
Yes folks, you can't have a fire without something (usually wood) to burn.  
  • Buy: Lowe's is currently selling Lost Coast Forest Firewood for $6.88 (.75 cubic feet).
  • Find: Collect dead wood from around your yard and neighborhood.
  • Recycle: Burn wood scraps from projects.  I would avoid burning CCA-pressure treated lumber which contains chromium, copper, and arsenic.  
SEATING
There are a lot of options here!
  • Furniture you already have: folding chairs, beach chairs, etc.
  • Guests can bring their own folding chairs (Check out Modell's Canvas Camp Chair for $9.99 with a carry bag!).
  • Use blankets, towels, or even sit-upons!
Picture
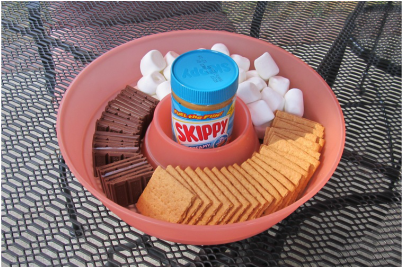
CAMPFIRE SNACKS
In my opinion a backyard campfire is nothing without being able to roast marshmallows and make s'mores! Making them is pretty easy, but you do need a few things and being prepared ahead of time makes it very simple (And we all love simple, right?).  
  • Purchase marshmallows, graham crackers, and Hershey chocolate bars. Keep an eye out for combination coupons - they have been in my Sunday paper several times this summer  so I am sure you can find them too!
  • Preparing the s'mores ingredients ahead of time makes it ready-to-go and  makes a nice presentation as well!  
MARSHMALLOW STICKS
You can either make your own, improvise, have guests bring their own, or buy them!  
  • Buy:  I actually have telescoping marshmallow sticks.  I bought a set of 8 and kept two for myself when I was making "Summer Fun" gift baskets (actually coolers filled with goodies) last year!  For a less expensive alternative you could purchase wooden sticks instead. They cost less for more, however they do not last long. 
  • Improvise: use skewers or long oven meat forks. However, be extra careful about getting too close to the fire and since they are probably made of metal they will transfer heat to your hands so be careful about getting burned.  This is definitely not an option for children!
  • Find and make your own!  If you live in an area with some trees or woods, you can probably find some good sticks to use. Make sure they are at least 24" long or more, especially for children.  
SING-ALONG SONGS
What's a campfire without an old fashioned sing-along? If you or your guests play an instrument, then even better!  We have a lot of guitar players in my family so besides the classic campfire songs we always sang a few oldies too! You can choose to sing whatever songs you want or even just listen to music, but I am not joking when I say sing-a-longs are fun!
  • FREE PRINTABLE:   CAMPFIRE SING-ALONG SONGS & GHOST STORIES BOOKLET
GHOST STORIES
Depending upon the age of the guests, these can range from funny to scary.  Either way,  ghost stories have been told around campfires for a very long time....
  • A very thorough collection of short ghost stories!
  • FREE PRINTABLE:   CAMPFIRE SING-ALONG SONGS & GHOST STORIES BOOKLET
CAMPFIRE SAFETY
A few important things about fire safety (learn more at Smokey The Bear): 
  • Have a bucket of sand and/or water nearby. 
  • Never leave the fire unattended.
  • Be sure to put out the fire properly when done.
CLICK ON THE PICTURE BELOW TO GO TO THE FREE PRINTABLE CAMPFIRE BOOKLET!
Picture

Did you like this post?  Then please take a second to hit like below!  Thank you for your support :-)🌻
Don't forget to follow us on Facebook too!

0 Comments

WHAT'S A DAILY DOSE OF SIMPLE?

7/25/2015

0 Comments

 
Picture
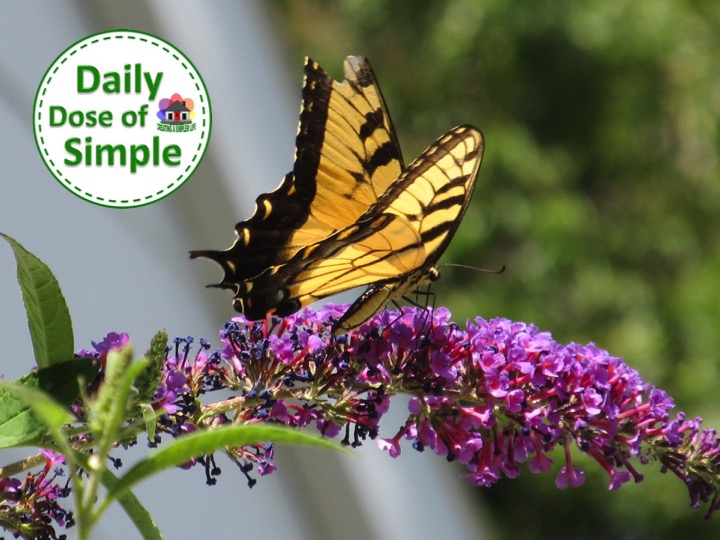
A Daily Dose of Simple is a photo posted on Facebook, Instagram, and Google+ once every day to remind us to take a break and appreciate the simple things in life.  Yes my friends, it really is that simple.  It can be something that simply makes you feel good, something that makes you smile, or something that reminds you to stop for a minute and appreciate all of the wonderful things that we are too busy to notice a lot of the time!

ARE YOU INTERESTED IN SHARING YOUR PICTURES?

I am really hoping that you might be interested in sharing your pictures of the simple things that make you feel good!  Yes of course there are some rules and requirements for sharing that have to be followed, but they are pretty straight forward and if you have e-mail, then sharing your pictures will only take a couple of minutes.  So please, if you are willing, take a few minutes to share because I can't do it all alone!

WHY CAN'T I DO IT ALL ALONE?

Well, actually I can do it all alone, but I really don't want too! I can easily take plenty of pictures to share one a day, however I would really like to be able to share a variety of different pictures and there are plenty of pictures that I am simply unable to take. For example, I live near the beach so I could (if I had time) take pictures at the beach during sunset, or a picture of a wave, a sandcastle, or even just the sand in an interesting formation.  I don't live near mountains or lakes and unless I specifically go on vacation to where they are I will not have the opportunity to enjoy the simplicity of beautiful mountain scenery, serene lakes or calm reflections.  And there are plenty of other places I may never get to see because they are just too far away (the sandstone formations in Arizona come to mind). Thats why I sincerely hope that you will share...so we can all enjoy pictures of simple things we would not, and do not, ordinarily see in our daily lives. 

So the next time God places something simple in your path that makes you feel good, snap a photo and take a minute to share it for the Daily Dose of Simple.  Or maybe you already have the perfect picture you're willing to share, thats fine too.  Remember, its all about a daily reminder that it's the the simple things in life that really matter😊

Even if you don't want to share, be sure to hit like for Facebook or follow us on Instagram so that you can share in enjoying the Daily Dose of Simple post every day!
Click here to go to 
DAILY DOSE OF SIMPLE PHOTO 
Sharing REQUIREMENTS
0 Comments

DIY GIANT BACKYARD BUBBLES

7/20/2015

0 Comments

 
Picture
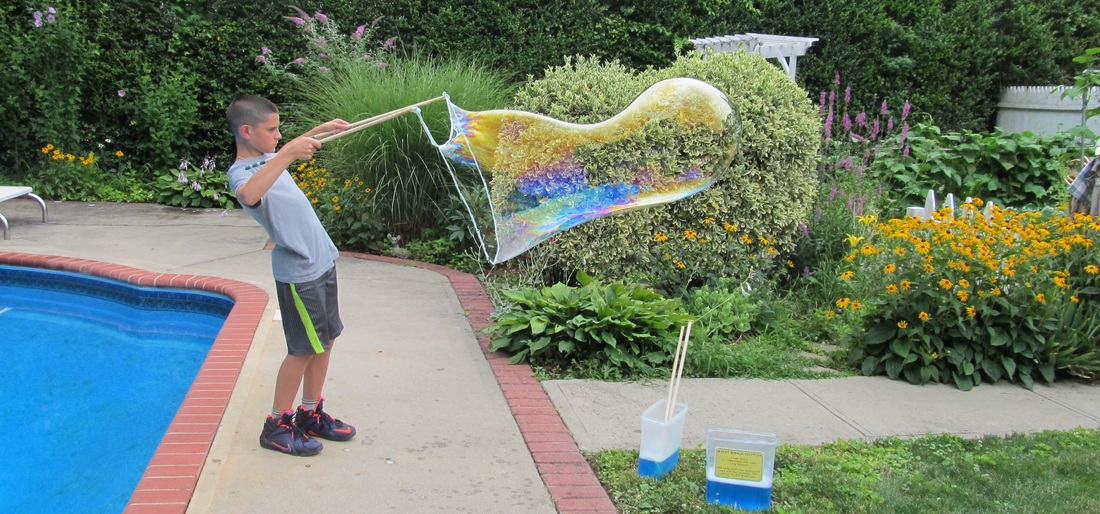
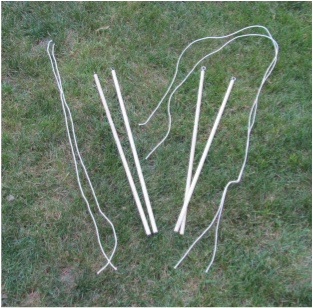
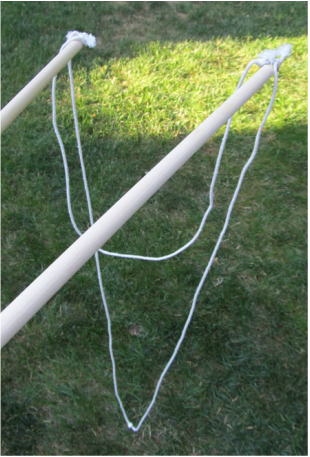
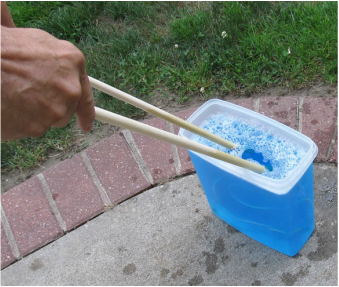
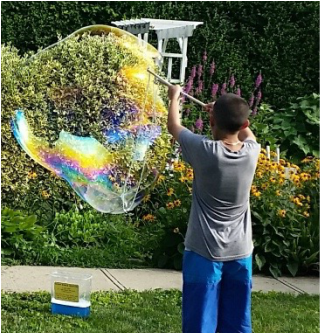
Well, maybe not giant, but they were big!   I love bubbles.  I admit it.  I saw a video of people blowing giant bubbles and I couldn’t wait to try it for myself!  But could I make a giant bubble maker just for me?  Wasn’t that a little … odd?  But then I remembered my nephew was turning 11 and I suddenly had a great excuse to make and play with gigantic bubbles!  There was not one single child or adult that did not try the bubble sticks that day!

Easy to make, inexpensive (or free if you already have everything you need!), and tons of fun!
TO MAKE THE BUBBLE SOLUTION:
  • 12 cups of water
  • 5 cups of liquid dish soap
  • 1/2 cup glycerine
  • Upright 21 cup capacity container
Add the water, then slowly add the soap and then the glycerine.  Stir gently and try not to make any suds.  The solution works best if it is allowed to sit in a cool location overnight.  
TO MAKE TWO SETS OF STICKS:
(Trust me, you want at least two sets....or more!)
  • 2 - 48" x 1/2" dowel rods 
  • 4 - #10 screw eyes
  • 17.5' of 1/8" cotton cord
  • 2 nuts (for weight on the longer cord)
  • Scissors
  • Drill
  • Saw
Cut the two rods in half so that you have four 24" rods. Drill a small hole in one end of each of the four rods and screw in an eye hook. Cut two 70" and two 35" lengths of cotton cord.  Tie the ends of one 35" cord to the eye hooks on two of the sticks.   Next, tie one end of a 70" cord to one of those same eye hooks and then slide the  nut onto the cord. Finish by attaching the other end of the 70" cord to the opposite eye hook.  Your first set of bubble sticks should look like the picture to the right. Make the second set of sticks they are ready!  You can even paint and decorate them if you want....
Picture
Picture
Picture
Picture
TO MAKE GIANT BUBBLES:
  • Holding the sticks together, submerge them into the bubble solution.   Be sure that the ends of the sticks and all of the cord is covered.
  • Remove and keep sicks 'closed' until you are ready to make a bubble.
  • Separate sticks and slowly step backwards to allow the soap to be stretched into a bubble.  
  • To 'close' the bubble gently bring the tips of the sticks together.  You may even want to cross the tips.
Picture
Enjoy!  If you give it a try, please let me know how it works out :-)

Printable Label that can be taped onto the container:
Right click and save to your desktop or computer, then print, cut, and tape onto container!
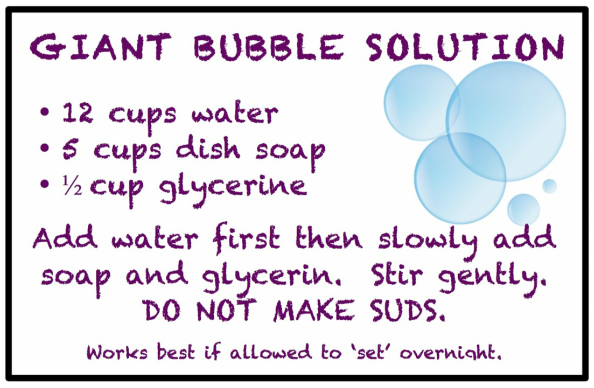
Picture
Potential Problems:
  • Too much wind sometimes causes the bubbles to pop, so calmer days are best!
  • If the solution is not holding a bubble good, allow it to sit for a while (you could also try adding a little more glycerine or soap).
  • Sometimes if there are too many suds a good bubble does not form.  If this happens just give the suds time to settle.  

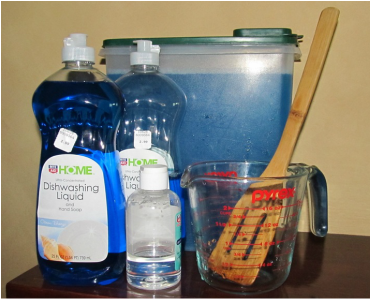
The best prices I could find for the glycerine and the container were on Amazon.  
The other materials are more cost effective to purchase at Home Depot, however I have supplied links to all of them below for the simplicity of being able to see what is needed.
Sources:
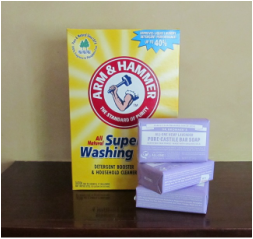
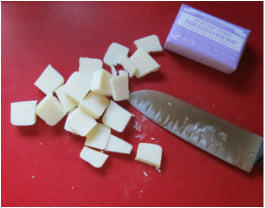
http://www.amomknows.com/2012/03/how-to-make-a-bubble-wand-and-homemade-bubbles/
http://www.designdazzle.com/2011/07/summer-camp-giant-bubbles-kit-tutorial-with-free-printables/
http://rhondas3boys.blogspot.com/2010/07/bubbles-bubbles-everywhere.html
http://tatertotsandjello.com/2010/08/summer-project-make-giant-bubbles.html

0 Comments

DIY LAUNDRY SOAP

7/14/2015

0 Comments

 
Picture
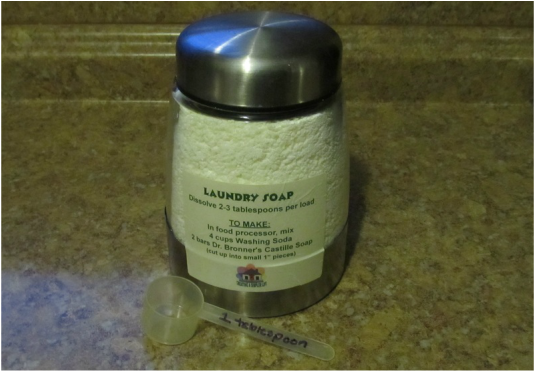
Laundry does not end.  Whether its towels, sheets, or just clothes, there always seems to be more to do.  I hated having to buy laundry detergent, fabric softener, bleach, and even dryer sheets.  Everything was so expensive!  And we used it up so quickly that it always seemed like we were on the verge of running out.  In fact, it was so ridiculous that I finally decided that doing laundry needed to be simpler too!  
With just a few common household ingredients and directions from mommypotamus, I made my own laundry soap!  I also no longer buy bleach, fabric softener or dryer sheets!  
Homemade Laundry Soap:
  • The recipe is 2:1 (2 cups Washing Soda to 1 five oz bar Dr. Bronners Castile Soap)
  • I simply used 4 cups of washing soda and 2 bars of Dr. Bronners Lavender Castile Bar Soap. You could actually use any of Dr. Bronners scented bar soaps - it comes in eucalyptus, peppermint, etc.
  • Cut the soap into chunks and blend in a food processor. Be careful to keep the top of the food processor covered while pulse mixing so the powder does not escape (and you don't  breathe it in).  
  • Store soap in air-tight container.
  • Depending upon the size of the load of laundry I use 2-3 tablespoons of soap.  I keep a cup next to the washer machine to dissolve the soap in before adding to the laundry tub.  Note that I have an old fashioned top load washer, so I do not know how this would work with a front loader.  
Picture
Picture
Picture
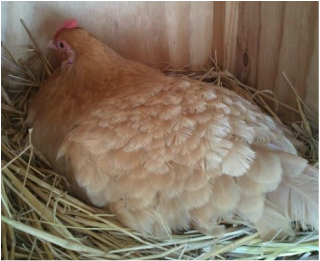
Other Laundry Alternatives (more information at mommypotamus):
Fabric Softener: a little white distilled vinegar
Bleach Alternative: peroxide
Stain Remover/de-greaser: Lemon Essential Oil
And, if I am using the dryer (instead of line drying) I use Woolzies Dryer Balls instead of dryer sheets!  I will never buy dryer sheets again!

0 Comments

WHICH EGGS DO YOU BUY?

7/8/2015

0 Comments

 
A healthy mommy means a healthy baby.  Just google that to see how many sites you come up with.  Shouldn't the same be true for hens? Shouldn't a healthy hen mean a healthy egg?
Picture
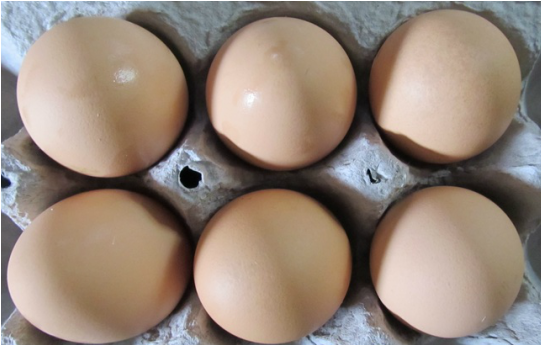
If you've purchased eggs lately you may have noticed how many different options there are.  White, brown, organic, cage-free, the labeling on the cartons can be daunting, especially if you don't know what the labels actually mean.  A lot of the labeling is actually bogus and means nothing.  For example, "All Natural" and "Farm Fresh" really  have no officially defined meaning.  And "no added hormones" is only true because it's been the law for  more than 50 years! Other terms have been defined and many people think they know the meaning, but do they really?  Think about it: do you really know the difference between cage-free, free-range, and pasture-raised?  Are all cage-free requirements the same?  Why do some eggs cost significantly more than others? Which eggs are better?  Which eggs are healthier for my family?  So many questions lead to confusion and it is just easier to buy the cheapest eggs and move on. Trust me, I've been there.  My goal today is to very simply describe the basic  differences between the third party certifiers so that you can at least make a somewhat more informed decision when purchasing eggs for you and your family.
Two things to understand when purchasing eggs:
  1. Not all eggs are third party certified.
  2. Third party certified eggs are better because they had to meet stricter standards.

In general, the eggs that come from companies that are third party certified are the most humane to the chickens and in turn this means they will also be the healthiest eggs for you and your family! This is because they are the companies that will have the strictest rules in place regarding what the hens are fed, how much space each hen has, whether they can go outside or not, when and if antibiotics or other medicines may be used, and if they allow  beak cutting.
Picture
LAYING AN EGG
Picture
DUST BATHING
How those general conditions can affect the eggs you eat:
  1. The quality of the egg is directly affected by what the chicken eats (like a mother to an unborn child). Every egg certification discussed below has rules with respect to nutrition. However, you should decide if you care whether or not the food contains GMOs or animal by-products.  You are what you eat!  Right?
  2. The amount of space each bird has also directly affects the quality of the egg.  The amount of space varies from less than 1 square foot per bird (caged) to 10 times that for pasture-raised.  The less space a hen has, the more condensed the hens will be, so the potential will be greater for bacterial contact and transfer (think feces).  
  3. The chickens having outdoor access can also affect the quality of the egg, but the rules for each certification vary.  Some do no require any outdoor access and others do not state a minimum amount of outdoor time or space. Being outdoors is important for a chicken so it can forage (eat bugs and natural vegetation), dust bathe, spread its wings, and have access to natural sunlight. They belong outdoors!  Some certifications even require vegetation and rotational grazing (This is important so that the vegetation has time to replenish.). 
  4. Growth promoters, antibiotics, vaccines and other medicines can all effect the quality of the egg. Do you care if those might be in the eggs you and your family are eating?  Note: growth promoters are not the same as growth hormones (growth hormones are not permitted to be used for any poultry as per the FDA).
  5. De-beaking, also called beak cutting, (not the same as beak trimming) is generally permitted, especially where the chickens have very little space, to prevent them from cannibalism and pecking each other (the less space they have the more common this is).  Other physical alterations that are generally only necessary when chickens have very limited space: blunting or tipping the beak, declawing, de-spurring, de-toeing, toe punching, pinioning, dubbing, notching, and trimming the wattle or comb. The only alteration that is actually known to not physically harm the chicken is feather trimming. Read  more: poultry mutilations.
Picture
The beak is the mouth of the chicken. They use it to fight and to protect themselves. It also acts like 'teeth' so the bird can break up vegetation and bugs into 'bite-sized' pieces.
Picture
FORAGING HENS
OK.  So where does that leave us when it comes to buying eggs?
There are five third-party egg certifiers, some with more than one area of certification (so eleven certifications total).  I started out by making a spread sheet to compare them all but there were so many differences and so many levels it just became too much.  What I have done here is list them in order from what, in my opinion, is the worst at the top to the best at the bottom.  I have included a brief description of why I chose to place them where they are in the 'pecking order' (yes, pun intended). If you want to read the actual requirements for each certification I have included the links under 'sources' at the bottom of this post.
WORST TO BEST CERTIFICATIONS FOR EGGS:
11.  United Egg Producers Certified Caged (see example of certification stamp below)
  • Battery Cages (67-86 square inches per bird - about a half a square foot per bird!), beak cutting is  permitted (they do NOT leave the cages)
10.  American Humane Certified Caged
  • Enriched Colony Cages (.8 square feet per per bird - more space than battery caged), beak cutting is permitted (they do NOT leave the cages)
  9.  United Egg Producers Certified Cage-Free
  • 1 square foot per bird, outdoor access not required, beak cutting is permitted
  8.  American Humane Certified Cage-Free
  • 1.25 square feet per bird,  no outdoor access required, beak cutting is permitted
  7.  Certified Humane Cage-Free
  • 1 - 1.5 square feet per bird, no growth promoters, antibiotics only for specific medical reasons, no animal by-products in food, no outdoor access required, beak cutting is permitted
  6.  Food Alliance Certified Cage-Free
  • 1.2 - 1.5 square feet per bird, antibiotics only for specific medical reasons, no animal by-products in feed (except milk), beak trimming is permitted, toe-clipping and dubbing are NOT permitted, minimum of 8 hours of natural daylight required per day, outdoor access is not required
  5.  Certified Humane Free-Range
  • 1 - 1.5 square feet per bird (indoors), no growth promoters, antibiotics only for specific medical reasons, no animal by-products in food, must have outdoor access minimum 6 hours per day weather permitting, 2 square feet outdoor space per bird, beak cutting is permitted.
  4.  American Humane Certified Free-Range
  • 1.25 square feet per bird (indoors), must have outdoor access minimum 8 hours per day weather permitting, 1 acre of outdoor area for every 2,000 birds (1/4 must be accessible at any one time to allow for rotational grazing), beak cutting is permitted.
  3.  American Humane Certified Pasture-Raised
  • 1.25 square feet per bird (indoors), must have outdoor access minimum 8 hours per day, 2.5 acres of outdoor area for every 1,000 birds (1/4 must be accessible at any one time to allow for rotational grazing), beak cutting is permitted.
  2.  Certified Humane Pasture-Raised
  • 1 - 1.5 square feet (indoors), no growth promoters, antibiotics only for specific medical reasons, no animal by-products in food, must have outdoor access minimum 6 hours per day weather permitting, 2.5 acres of outdoor area for every 1,000 birds (1/4 must be accessible at any one time to allow for rotational grazing), beak cutting is NOT permitted (that is why this trumps #3 even thought the outside time is two hours less).
  1.  Animal Welfare Approved Pasture-Raised
  • 1.8 square feet per bird (indoors), no GMOs or animal byproducts or fishmeal in food, herbal, homeopathic, non-antibiotic methods preferred, must have outdoor access minimum of 50% of daylight hours, beak cutting is prohibited as are all other forms of physical alterations, flocks must be less than 500 total hens.

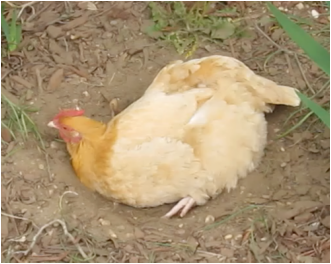
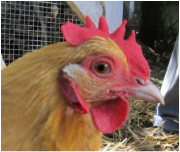
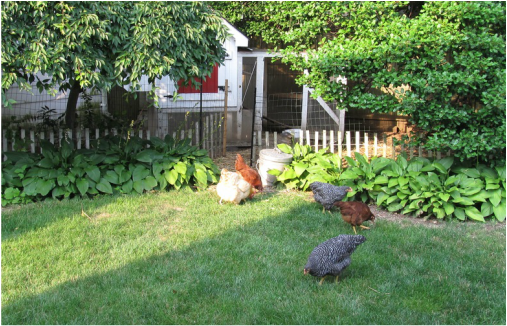
So  take a look at the eggs in your refrigerator...ARE THEY CERTIFIED, and if so, by who?

And the absolute best eggs?  Raise your own backyard chickens!  You will know exactly what they eat, how they are taken care of, and if they are happy or not :-)
The Farm Animal Welfare Council (FAWC) “Five Freedoms of Animal Welfare”:
  • Freedom from hunger and thirst 
  • Freedom from discomfort 
  • Freedom from pain, injury, or disease 
  • Freedom from fear and distress 
  • Freedom to express normal behaviors
Picture
EGG CERTIFICATION EXAMPLE
A happy chicken is a healthy chicken!
Sources:
How to Read Egg Carton Labels (The Humane Society of The United States)
Certified Humane Levels 1-3 Requirements (pdf file)
American Welfare Approved Requirements (pdf file)
American Humane Certified Enriched Colony Cages Requirements (pdf file)
American Humane Certified Cage-Free Requirements (pdf file)
American Humane Certified Free-Range & Pasture Requirements (pdf file)
Food Alliance Certified Requirements
United Egg Producers Certified Levels 1 & 2 Requirements (pdf file)

0 Comments

5 REASONS TO SWITCH TO LED BULBS NOW!

7/1/2015

0 Comments

 
Picture
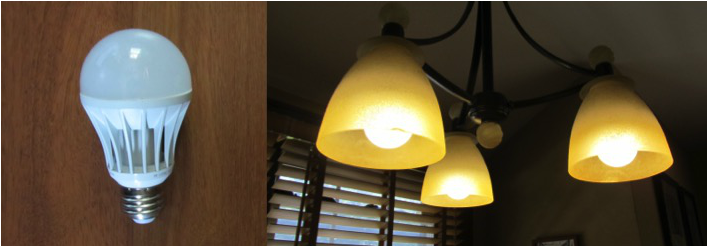
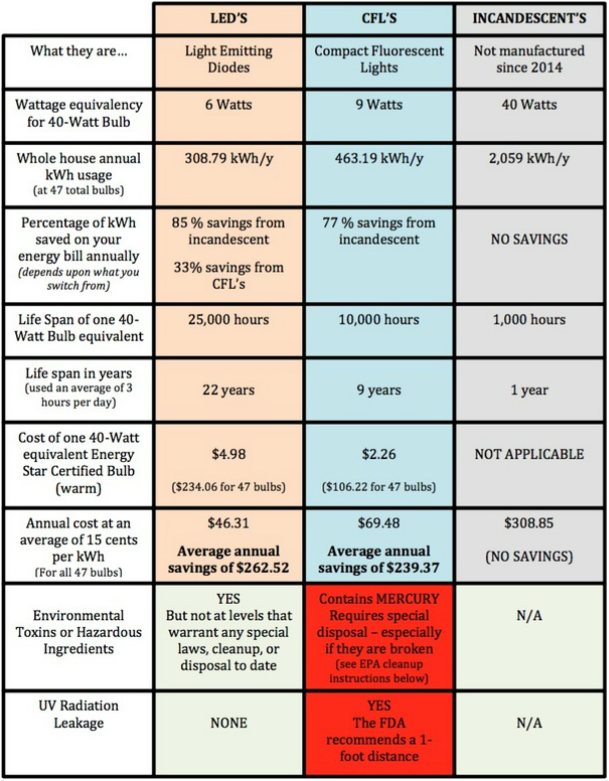
LED bulbs are the latest and greatest, but are they really worth it?  The answer is a resounding YES!  They are more than worth it for a variety of reasons, five to be exact!  

A little background information:
We have a total of 47 regular bulbs in and around our house (this includes the front and back porch lights). This does not include the three high hat bulbs in the kitchen (they are special dimmable bulbs).

In the dining room and the basement my husband replaced the dimmer switches with regular switches so we could use regular bulbs.  This saved us money  because  purchasing dimmable bulbs is generally more expensive and we really didn't need the dimmers in those locations anyway.

We use 40-Watt (equivalent) bulbs (warm in color)  in all locations in and around the house (There never seemed to be any reason to use more than that and it was cost efficient to use less Watts.).  

What this means in terms of kWh's:
A 40-Watt incandescent bulb uses 40 Watts for every hour it is turned on. According to the EPA lights are turned on for an average of 3 hours per day (When shopping for bulbs you should notice that most of them are rated for a daily use of 2 or 3 hours).

                               40 Watts x 3 hours/day x 47 bulbs = 5,640 Watts used on average every day!  

Convert that to kWh (that is what is on your bill) by dividing by 1,000 and that works out to approximately 5.64 kWh per day or about 2,059 kWh per year!   

Obviously this is only an average because nobody leaves all of their lights on for 3 hours a day.  Some are actually on for more (such as in the kitchen or living room) and some are only used as needed (such as in the bathroom).  However, when all the lights in a home are taken into account, it is actually a fair estimate because don't forget that depending upon where you live the lights are used a lot more in the winter than in the summer!  

Light Bulb Comparison Chart

Picture
At this point it should be obvious that if you are still using incandescent bulbs you should change them NOW because you are literally throwing money away. 

Even if you are currently using CFL's it's still 33% more cost effective to convert to LED's!  
It is also HEALTHIER for you and your family to use LED's instead of CFL's.  
  • If you accidentally  break a CFL it IS TOXIC and the EPA has specific cleanup and disposal procedures you should follow!  
  • Don't get too close to a CFL either as it emits ultraviolet radiation (UV) at potentialy harmful levels when on.   The FDA recommends a distance of 1 foot minimum.

Convinced yet?  OK, heres more: 

Change just a few bulbs for now.  Even if you just switch out the bulbs in the most commonly used room(s) in the house (for us it's the living room and kitchen), you can save money!  

Example:  We have 6 bulbs between the living room and the kitchen and they definitely stay on for at least 5 hours every day.
  • Incandescent: 5 hours x 6 bulbs x 40 Watts = 1200 Watts/day = 1.2 kWh/d x 365 days = 438 kWh/y
  • CFL:  5 hours x 6 bulbs x 9 Watts = 270 Watts/day = .27 kWh/d x 365 days = 98.55 kWh/y    
  • LED:  5 hours x 6 bulbs x 6 Watts = 180 Watts/day = .18 kWh/d x 365 days = 65.7 kWh/y

At this point, if you are not 100% convinced that switching to LED's will save you money and be healthier for you and your family, then I have one last reason:  THE ENVIRONMENT!
  • According to the EPA, just switching one incandescent bulb to a CFL will save .0382 metric tons of carbon dioxide! Yes, that is a small number, but that is only one bulb.  Imagine the savings if every household changed just one bulb?  Or if they changed every bulb?  Even better, imagine changing to LED's instead?  

OK, enough said.  I think you get the picture.  

SUMMARY OF FIVE REASONS TO SWITCH TO LED'S NOW:
  1. Uses less Watts (and in turn less kWh's) than both CFL's and Incandescent
  2. Less kWh's means less money spent - so you save $$$
  3. They have a life span of up to 22 years!
  4. Less kWh's means less carbon dioxide emissions - so better for the environment!
  5. They are NOT toxic or harmful for you, your family, or the environment and therefor require no special disposal methods.  

LED's are a WIN WIN:-)
SOME POINTERS WHEN PURCHASING:
  • Know if you want soft/warm light or bright white light. There is a HUGE difference.  We prefer the soft/warm light but note that the bright white is generally less expensive.
  • When purchasing LED's be aware of the Watts they use. The same A19 (40-Watt) equivalent bulb can vary in wattage from 4 to 10 Watts!  So pay attention and know what you are getting!  
  • LED's are directional meaning that you have to purchase special bulbs if you want the light to be in more than one direction.  Because of this it is helpful to know ahead of time where the light bulb will be used.  Example:  If you are using it in a table lamp you will want a multidirectional bulb.  If you're using it in a ceiling fan, one direction is fine.
  • Note that you will see some bulbs say that they are ENERGY STAR QUALIFIED instead of ENERGY STAR CERTIFIED. From what I could find out, this just means that they meet the independent energy star testing criteria, but they didn't get the official certification from energy star yet.  

Read more about choosing and purchasing the right lighting and light bulbs at ENERGY STAR.

Sources:
http://www.energy.gov/energysaver/articles/how-energy-efficient-light-bulbs-compare-traditional-incandescents
0 Comments
    Picture
    Hi there! I'm Kathie, the author behind Creating A Simpler Life blog. I'm excited to share our longterm projects (and planning) toward building our future retirement homestead in the Adirondack Mountains of New York. In the meantime I will be sharing all the other little things we do that are part of creating our simpler life!
    Creating a Simpler Life

    RSS Feed

    Visit Creating A Simpler Life's profile on Pinterest.

    Categories

    All
    Adirondack Crafts
    Chickens
    Conservation
    Crochet
    Do It Yourself
    Energy Savings
    Essential-oils
    Essential-oils
    Food-storage-preservation
    Food-storage-preservation
    Gardening
    Health
    Health-wellness
    Health-wellness
    Homemade-remedies
    Homemade-remedies
    Homesteading
    Homesteading Dreams
    Inexpensive Fun
    Minimizing
    Organization
    Products We Sell
    Recipes
    Recycling
    Saving-money
    Saving-money
    Shopping
    Wedding & Shower DIY

    Archives

    July 2020
    June 2020
    April 2020
    March 2020
    March 2019
    January 2019
    December 2018
    October 2018
    August 2018
    July 2018
    June 2018
    April 2018
    March 2018
    February 2018
    January 2018
    November 2017
    October 2017
    September 2017
    August 2017
    July 2017
    June 2017
    May 2017
    April 2017
    March 2017
    February 2017
    January 2017
    December 2016
    November 2016
    October 2016
    September 2016
    August 2016
    July 2016
    June 2016
    May 2016
    April 2016
    March 2016
    February 2016
    January 2016
    December 2015
    November 2015
    October 2015
    September 2015
    August 2015
    July 2015
    June 2015

mrandmrscorbi@gmail.com
Contact Us - Privacy Policy - Disclaimer
Copyright 2022©Creating A Simpler Life, Inc. All rights reserved. Reproduction in whole or in part without permission is prohibited.
  • Home/About
    • What does OFF-GRID mean?
    • MINIMIZING >
      • Home Size
      • Room by Room
      • Get Organized
      • Household Waste
    • MINIMIZE DEBT, MAXIMIZE SAVINGS >
      • Bills & Other Debt
      • Saving Money
      • Shopping Tips
      • Affordable Fun
    • BACKYARD CHICKENS >
      • The Coop
      • The Chickens
      • Feeding the Chickens
      • Fresh Eggs
    • HOME GARDENING >
      • Building the Garden
      • What We Grow
      • Seeds, Weeds, & More
      • Preservation & Storage
    • DO-IT-YOURSELF >
      • Health & Wellness
      • Simple Cleaning & Tips
      • Crafts & More!
      • Printables
    • CROCHET >
      • IDEAS & MORE
      • VIDEO TUTORIALS
  • HOMESTEAD
    • The 5 Year Plan PLUS! >
      • 2017
      • 2018
      • 2019
      • 2020
      • 2021
      • 2022
    • WHY AN EARTH SHELTERED HOUSE?
    • OFF GRID TINY TRAILER
    • BUILDING our HOMESTEAD from Scratch >
      • BUYING LAND & GETTING STARTED
      • BUILDING THE CONCRETE DOME
      • FROM DOME to HOME
      • SURVIVING OUR FIRST WINTER
    • HOMESTEAD MACHINERY >
      • GENERATORS
      • KUBOTA TRACTOR
      • ATV'S & UTV'S
      • WOOD CHIPPER
      • CHAINSAWS
      • LOG SPLITTER
      • POWER TOOLS
      • SNOWMOBILES
      • AUTOMOBILES
    • BUDGETING THE BUILD
    • SUSTAINABILITY >
      • WATER
      • FOOD
      • SHELTER
      • ENERGY >
        • SOLAR POWER
    • The Adirondacks >
      • Wildlife & Nature
      • Insects & Bugs
      • Things to Do
      • Water Fun
    • ADIRONDACK CRAFTS
  • VLOG
    • 2023
    • 2022
    • 2021