CREATING A SIMPLER LIFE OFF-GRID
  • Home/About
    • What does OFF-GRID mean?
    • MINIMIZING >
      • Home Size
      • Room by Room
      • Get Organized
      • Household Waste
    • MINIMIZE DEBT, MAXIMIZE SAVINGS >
      • Bills & Other Debt
      • Saving Money
      • Shopping Tips
      • Affordable Fun
    • BACKYARD CHICKENS >
      • The Coop
      • The Chickens
      • Feeding the Chickens
      • Fresh Eggs
    • HOME GARDENING >
      • Building the Garden
      • What We Grow
      • Seeds, Weeds, & More
      • Preservation & Storage
    • DO-IT-YOURSELF >
      • BABY SHOWER
      • Health & Wellness
      • Simple Cleaning & Tips
      • Crafts & More!
      • Printables
    • CROCHET >
      • IDEAS & MORE
      • VIDEO TUTORIALS
  • HOMESTEAD
    • The 5 Year Plan PLUS! >
      • 2017
      • 2018
      • 2019
      • 2020
      • 2021
      • 2022
    • WHY AN EARTH SHELTERED HOUSE?
    • OFF GRID TINY TRAILER
    • BUILDING our HOMESTEAD from Scratch >
      • BUYING LAND & GETTING STARTED
      • BUILDING THE CONCRETE DOME
      • FROM DOME to HOME
      • SURVIVING OUR FIRST WINTER
      • BURYING THE DOME
      • EXTERIOR FINISHING
      • INTERIOR FINISHING
    • HOMESTEAD MACHINERY >
      • GENERATORS
      • KUBOTA TRACTOR
      • ATV'S & UTV'S
      • WOOD CHIPPER
      • CHAINSAWS
      • LOG SPLITTER
      • POWER TOOLS
      • SNOWMOBILES
      • AUTOMOBILES
    • BUDGETING THE BUILD >
      • BUDGET BUILD TIPS
      • COSTS
    • SUSTAINABILITY >
      • WATER
      • FOOD
      • SHELTER
      • ENERGY
      • AIR
    • The Adirondacks >
      • Wildlife & Nature
      • Insects & Bugs
      • Things to Do
      • Water Fun
    • ADIRONDACK CRAFTS
  • VLOG
    • 2025
    • 2024
    • 2023
    • 2022
    • 2021

Blog

A little bit of anything and everything that's part of
​creating, enjoying, and living a simpler life!
Picture

Fresh Peppermint Tea - So Simple!

6/27/2016

0 Comments

 
Picture
You won't believe how simple it really is! Watch the video and find out :-)
  • Collect a handful of fresh peppermint leaves. Choose leaves with a nice dark rich color.  
  • Chop them up while you boil a pot of water.  
  • Add about a tablespoon of chopped peppermint to your favorite tea cup.
  • Cover with boiling water and wait 5 - 10 minutes.
  • You can choose to strain out the leaves or drink them right up with the tea!
  • Simply Delicious :-)

Check out our other videos on our You Tube Channel!

If you like what you see consider following us on social media :-)

Thanks for visiting!

​​
Sincerely,
Picture
0 Comments

DIY DISHWASHER SOAP

8/4/2015

0 Comments

 
Picture
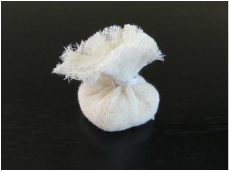
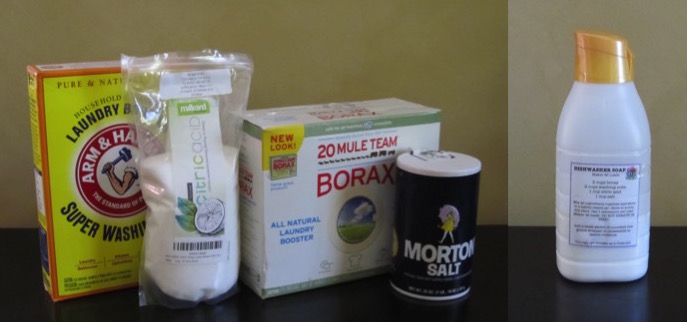
Since phosphorous was banned in NY as an ingredient in dishwasher detergents (and many other states as well) I have wanted to start making my own automatic dishwasher soap.  Banning phosphorous was good for the environment, but not good when it came to getting clean dishes.  So why bother buying the soaps when I can make it myself and get the same, if not better, results for less money? Well, I finally did it!  It is a simple recipe, and though I am not thrilled about using Borax, I already had it in the closet so I chose to use a recipe that included it.  I still don't use it in my DIY Laundry Soap, but considering the fact that the dishes have a final extra high temperature rinse, I tried the recipe with Borax and it was a success! This works really well so until I find a better DIY alternative and or run out of Borax, it's the recipe I will be using!
Recipe:
  • 2 cups Borax
  • 2 cups Washing Soda
  • 1 cup Citric Acid
  • 1 cup Salt
Picture
Rice in cheesecloth.
Picture
Close it with a twist tie.
Directions:
Warning: Do not inhale any of the powdered dust that is created.  I recommend wearing a dust mask as you make it.  FYI - this is true for ALL powdered dishwasher soaps!  Check out the MSDS for Powdered Cascade.
  • Mix all ingredients in a large bowl.
  • Make a small bag of rice using cheesecloth to use as a desiccant in the container (see pictures above).  Put it the bottom of the container (I used an old vanilla creamer container) and then pour in the powder mixture.  
  • Use one tablespoon per load (I just fill the compartment in the dishwasher about half-way.).
  • The recipe makes 48 oz, enough to do about 96 loads if you measure exactly.
Cost Effectiveness:
  • Cascade Powdered Dishwasher Detergent costs $8.85 for a 75 oz. box at Stop and Shop.  If used according to the directions, I would get about 40 loads per box at a cost of .22 cents per load.
  • DIY detergent above cost .09 cents per load.  If I do one load per day I will save about $47.00 per year.  Not a big difference but good enough for me, especially when I combine that savings with all the other ways that I save money every day😊.

For Additional Information:
I found this after I made the soap above.  It has some very useful information about the different ingredients that go into making DIY Dishwasher Soap and how to correct a few problems you might have with respect to your dishes getting clean or not.  10 Things You Should Know Before Making Homemade Dishwasher Detergent.
0 Comments

DIY LAUNDRY SOAP

7/14/2015

0 Comments

 
Picture
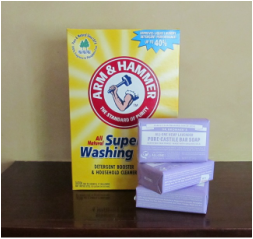
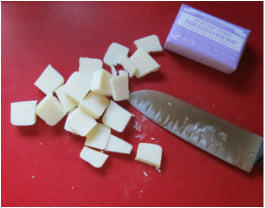
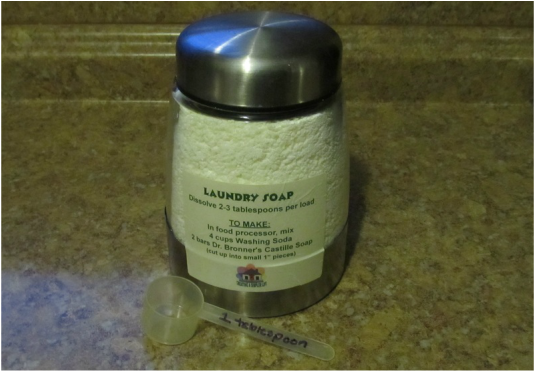
Laundry does not end.  Whether its towels, sheets, or just clothes, there always seems to be more to do.  I hated having to buy laundry detergent, fabric softener, bleach, and even dryer sheets.  Everything was so expensive!  And we used it up so quickly that it always seemed like we were on the verge of running out.  In fact, it was so ridiculous that I finally decided that doing laundry needed to be simpler too!  
With just a few common household ingredients and directions from mommypotamus, I made my own laundry soap!  I also no longer buy bleach, fabric softener or dryer sheets!  
Homemade Laundry Soap:
  • The recipe is 2:1 (2 cups Washing Soda to 1 five oz bar Dr. Bronners Castile Soap)
  • I simply used 4 cups of washing soda and 2 bars of Dr. Bronners Lavender Castile Bar Soap. You could actually use any of Dr. Bronners scented bar soaps - it comes in eucalyptus, peppermint, etc.
  • Cut the soap into chunks and blend in a food processor. Be careful to keep the top of the food processor covered while pulse mixing so the powder does not escape (and you don't  breathe it in).  
  • Store soap in air-tight container.
  • Depending upon the size of the load of laundry I use 2-3 tablespoons of soap.  I keep a cup next to the washer machine to dissolve the soap in before adding to the laundry tub.  Note that I have an old fashioned top load washer, so I do not know how this would work with a front loader.  
Picture
Picture
Picture
Other Laundry Alternatives (more information at mommypotamus):
Fabric Softener: a little white distilled vinegar
Bleach Alternative: peroxide
Stain Remover/de-greaser: Lemon Essential Oil
And, if I am using the dryer (instead of line drying) I use Woolzies Dryer Balls instead of dryer sheets!  I will never buy dryer sheets again!

0 Comments

Bugs-Be-Gone! HOMEMADE INSECT REPELLENT

6/25/2015

2 Comments

 
Picture
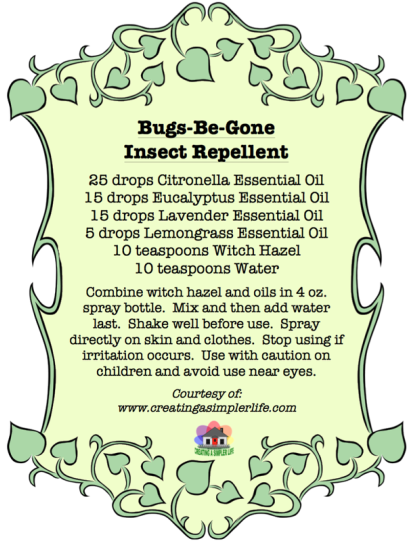
Tired of all those nasty chemicals? Interested in something more natural?  Well here is a recipe we use to battle the bugs that uses all natural essential oils.  If you're not sure what essential oils are, they are basically natural oils usually made by distillation of specific parts of a plant (bark, leaves, stems, etc.).  The resulting oil will have the fragrance and the useful properties of the plant it was extracted from.
Essential oils should not be taken internally.  When applied to the skin they should generally be diluted. The recipe shown will make approximately 4 ounces at a 3% dilution.
Aside from the essential oils and witch hazel, you will also need a mini funnel and a 4 ounce spray bottle (preferably amber colored to preserve the essential oils) to make this simple recipe.  
  • Always be sure to shake the repellent well before using.  
  • Test first on a small patch of skin to see if there is a reaction with any of the ingredients.   
  • If any irritation occurs wash with soap and water immediately.
  • Avoid use near eyes and as with all insect repellents, avoid use when pregnant. 
  • Repellent can be sprayed on skin and clothing (But remember there are oils in it!). Reapply as needed, or about every 3 hours, and enjoy keeping the bugs away!

Cost effectiveness:
It will cost approximately $45 initially (including the funnel & spray bottle), however, you will have enough supplies to make the 4 ounce repellent mixture 24 times - thats 96 ounces total!  Thats only .45 cents per ounce and if you do not get the funnel and spray bottles, it will cost even less :-)
Compare:
  • Homemade recipe:  Cost of approximately .45 cents/ounce
  • Cutter Insect Repellent 6 ounces at $5.99: Cost of approximately $1/ounce  (contains 7% DEET - a manmade chemical called diethyltoluamide)
  • All Terrain Herbal Armor DEET-Free 4 ounces at $9: Cost of $2.25/ounce

Note that the All Terrain brand  includes many of the same ingredients as our homemade recipe (with a few extra), however our recipe, though it costs more initially, is actually less money in the long run.  How many of us really only use one bottle of bug spray over the summer?
Saving money by making the repellent yourself is awesome.

Being healthier by NOT putting potentially harmful manmade chemicals on yourself and your family is PRICELESS.

If you are interested in more information on using essential oils check out "Do-It-Ourselves:  Essential Oils."  
2 Comments

HOMEMADE WEED KILLER - IT WORKS AND SAVES $$$

6/24/2015

1 Comment

 
Recently I had been considering buying a commercial weed killer just to use around my patios and driveways.  You know where I mean – those little cracks where a weed starts peeking through and before you know it you have a full-grown plant in the middle of your patio.  If you let this go on for too long, before you know it you will be weed-whacking your patio once a week!  Being against using any harsh chemicals that might be harmful to animals, humans, or the environment, I usually pick all these weeds by hand (Yes, I really do.).  However, last week a post went around on Facebook for Weed-Be-Gone Homemade Weed Killer.  I was intrigued by the recipe and became determined to try it out. 

Right off the bat I was not thrilled that the recipe called for Dawn dish soap since it contains a few ingredients I prefer not to use for potentially harmful environmental reasons: 
(methylisothiazolinone, sodium lauryl sulfate, and sodium laureth sulfate).  
Picture
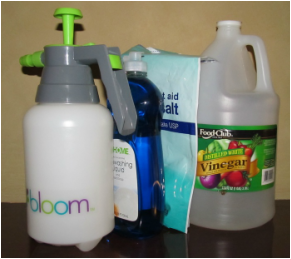
I don't even use regular dish soap in my home anymore (I use Dr. Bronners liquid castile soap instead.). However, after much research, and despite the fact that there are some concerns regarding the environment, I still think using the dish soap is the lesser of two evils when compared to the commercial brand weed killers.  I would choose to have a tablespoon of Dawn dish soap infiltrate into my groundwater rather than RoundUp’s potentially carcinogenic ingredients.

I have modified the recipe to work with a smaller 1-liter pump sprayer as making a gallon or more of the product seemed wasteful (I do not see myself using it that much plus the large sprayers are expensive and need to be stored somewhere.).  Instead I purchased a 1-liter pump garden sprayer (50% off) at RiteAid for $3.99 plus tax.  Also, after much research regarding the ingredients and their purposes, I have determined that this homemade weed killer should only be used on weeds in the patio or driveway or anywhere far away from plants and soil I do not want to harm. In my gardens I will continue to maintain the weeds by pulling them by hand or raking.  

Picture
I learned a tremendous amount about the different recipes:  http://www.garden-counselor-lawn-care.com/vinegar-weed-killer.html

Here is a more detailed explanation of each of the ingredients and the roles they play: http://www.garden-counselor-lawn-care.com/home-made-weed-killer.html
The three  ingredients are vinegar, salt, and dish soap.  The good news is that it does NOT matter what kind (brand, etc.) you use.  
Here’s why:
  • Vinegar – whether it is white, apple cider, distilled or not, it is an acid.  The acid will kill most weeds, but not all since it cannot be absorbed into leaves if they have a waxy type of coating on them.
  • Salt – a natural desiccant (draws out moisture). This will kill what vinegar will not however it is very bad for soil.  It is definitely recommended only for use on driveways and patios. You can use household salt, road salt, melting salt, sea salt, coarse salt, Epsom salt, etc.  
  • Dish soap – the dish soap, being designed to fight grease, will break down the waxy surface of the leaves that would otherwise prevent the vinegar from being absorbed.  The oils in the soap also help to kill the plant as well as making it easy to see what weeds you have already sprayed (shiny leaves after spraying).
Modified recipe:
4 cups vinegar 
½ cup salt 
1 tablespoon dish liquid 

(I used white vinegar,  Epsom salt and blue Rite Aid brand dish soap because it was $2.39 for 25 oz compared to $3.99 for 25 oz of Dawn)
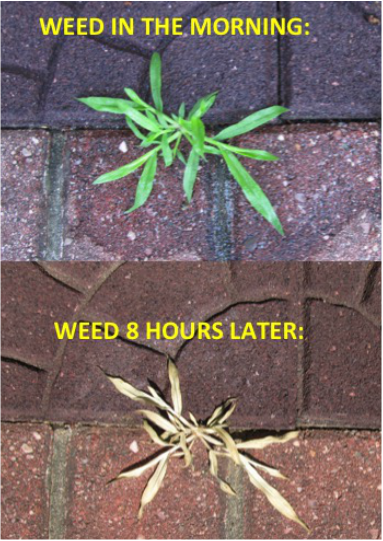
I added the ingredients to a 1-liter pump sprayer and let it sit until the next morning.  Before work I sprayed the weeds on a small patio made of rubber tiles (made from recycled tires!). I returned home 8 hours later and the weeds were DEAD!  Using just a strong bristle brush/broom I was able to sweep the weed away!  The weed killer was a success and definitely saved me MONEY and I still have plenty of the soap left for future batches of weed killer ☺
A couple of last minute pointers:
  • You really want to soak the area a lot where the weed is in order to kill the root.  If you do not do this you might be spraying a lot more often.  This is also another reason why you only want to use this spray on patios and driveways and NOT in or around your gardens.  
  • Spraying in the morning does work best as the addition of sunlight during the day speeds up the killing process. 
1 Comment
    Picture
    Hi there! I'm Kathie, the author behind Creating A Simpler Life blog. I'm excited to share our longterm projects (and planning) toward building our future retirement homestead in the Adirondack Mountains of New York. In the meantime I will be sharing all the other little things we do that are part of creating our simpler life!
    Creating a Simpler Life

    RSS Feed

    Visit Creating A Simpler Life's profile on Pinterest.

    Categories

    All
    Adirondack Crafts
    Chickens
    Conservation
    Crochet
    Do It Yourself
    Energy Savings
    Essential-oils
    Essential-oils
    Food-storage-preservation
    Food-storage-preservation
    Gardening
    Health
    Health-wellness
    Health-wellness
    Homemade-remedies
    Homemade-remedies
    Homesteading
    Homesteading Dreams
    Inexpensive Fun
    Minimizing
    Organization
    Products We Sell
    Recipes
    Recycling
    Saving-money
    Saving-money
    Shopping
    Wedding & Shower DIY

    Archives

    July 2020
    June 2020
    April 2020
    March 2020
    March 2019
    January 2019
    December 2018
    October 2018
    August 2018
    July 2018
    June 2018
    April 2018
    March 2018
    February 2018
    January 2018
    November 2017
    October 2017
    September 2017
    August 2017
    July 2017
    June 2017
    May 2017
    April 2017
    March 2017
    February 2017
    January 2017
    December 2016
    November 2016
    October 2016
    September 2016
    August 2016
    July 2016
    June 2016
    May 2016
    April 2016
    March 2016
    February 2016
    January 2016
    December 2015
    November 2015
    October 2015
    September 2015
    August 2015
    July 2015
    June 2015

[email protected]
Contact Us - Privacy Policy - Disclaimer
Copyright 2022©Creating A Simpler Life, Inc. All rights reserved. Reproduction in whole or in part without permission is prohibited.
  • Home/About
    • What does OFF-GRID mean?
    • MINIMIZING >
      • Home Size
      • Room by Room
      • Get Organized
      • Household Waste
    • MINIMIZE DEBT, MAXIMIZE SAVINGS >
      • Bills & Other Debt
      • Saving Money
      • Shopping Tips
      • Affordable Fun
    • BACKYARD CHICKENS >
      • The Coop
      • The Chickens
      • Feeding the Chickens
      • Fresh Eggs
    • HOME GARDENING >
      • Building the Garden
      • What We Grow
      • Seeds, Weeds, & More
      • Preservation & Storage
    • DO-IT-YOURSELF >
      • BABY SHOWER
      • Health & Wellness
      • Simple Cleaning & Tips
      • Crafts & More!
      • Printables
    • CROCHET >
      • IDEAS & MORE
      • VIDEO TUTORIALS
  • HOMESTEAD
    • The 5 Year Plan PLUS! >
      • 2017
      • 2018
      • 2019
      • 2020
      • 2021
      • 2022
    • WHY AN EARTH SHELTERED HOUSE?
    • OFF GRID TINY TRAILER
    • BUILDING our HOMESTEAD from Scratch >
      • BUYING LAND & GETTING STARTED
      • BUILDING THE CONCRETE DOME
      • FROM DOME to HOME
      • SURVIVING OUR FIRST WINTER
      • BURYING THE DOME
      • EXTERIOR FINISHING
      • INTERIOR FINISHING
    • HOMESTEAD MACHINERY >
      • GENERATORS
      • KUBOTA TRACTOR
      • ATV'S & UTV'S
      • WOOD CHIPPER
      • CHAINSAWS
      • LOG SPLITTER
      • POWER TOOLS
      • SNOWMOBILES
      • AUTOMOBILES
    • BUDGETING THE BUILD >
      • BUDGET BUILD TIPS
      • COSTS
    • SUSTAINABILITY >
      • WATER
      • FOOD
      • SHELTER
      • ENERGY
      • AIR
    • The Adirondacks >
      • Wildlife & Nature
      • Insects & Bugs
      • Things to Do
      • Water Fun
    • ADIRONDACK CRAFTS
  • VLOG
    • 2025
    • 2024
    • 2023
    • 2022
    • 2021