CREATING A SIMPLER LIFE OFF-GRID
  • Home/About
    • What does OFF-GRID mean?
    • MINIMIZING >
      • Home Size
      • Room by Room
      • Get Organized
      • Household Waste
    • MINIMIZE DEBT, MAXIMIZE SAVINGS >
      • Bills & Other Debt
      • Saving Money
      • Shopping Tips
      • Affordable Fun
    • BACKYARD CHICKENS >
      • The Coop
      • The Chickens
      • Feeding the Chickens
      • Fresh Eggs
    • HOME GARDENING >
      • Building the Garden
      • What We Grow
      • Seeds, Weeds, & More
      • Preservation & Storage
    • DO-IT-YOURSELF >
      • Health & Wellness
      • Simple Cleaning & Tips
      • Crafts & More!
      • Printables
    • CROCHET >
      • IDEAS & MORE
      • VIDEO TUTORIALS
  • HOMESTEAD
    • The 5 Year Plan PLUS! >
      • 2017
      • 2018
      • 2019
      • 2020
      • 2021
      • 2022
    • WHY AN EARTH SHELTERED HOUSE?
    • OFF GRID TINY TRAILER
    • BUILDING our HOMESTEAD from Scratch >
      • BUYING LAND & GETTING STARTED
      • BUILDING THE CONCRETE DOME
      • FROM DOME to HOME
      • SURVIVING OUR FIRST WINTER
    • HOMESTEAD MACHINERY >
      • GENERATORS
      • KUBOTA TRACTOR
      • ATV'S & UTV'S
      • WOOD CHIPPER
      • CHAINSAWS
      • LOG SPLITTER
      • POWER TOOLS
      • SNOWMOBILES
      • AUTOMOBILES
    • BUDGETING THE BUILD
    • SUSTAINABILITY >
      • WATER
      • FOOD
      • SHELTER
      • ENERGY >
        • SOLAR POWER
    • The Adirondacks >
      • Wildlife & Nature
      • Insects & Bugs
      • Things to Do
      • Water Fun
    • ADIRONDACK CRAFTS
  • VLOG
    • 2023
    • 2022
    • 2021

Blog

A little bit of anything and everything that's part of
​creating, enjoying, and living a simpler life!
Picture

Sharpies to Decorate Easter Eggs!

3/26/2016

 
Picture
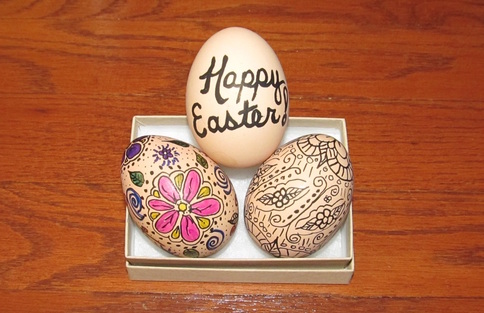
I used sharpies to decorate my Easter Eggs this year.  I wanted to try something different, and I have to say I was happy with the outcome! 

Seriously, all you need are some hard boiled eggs, sharpie markers and minimal drawing abilities.   If you can draw a simple flower,a leaf, a line with curls at the end, and make a few dots, you are good to go!

Just start at the ends and work your way down to the other end, or do both ends and then fill in the  middle.  Either way, who cares?  Just keep it simple and fun, because in the end it's just an egg you are going to crack open and eat!

And if you feel extra ambitious, you can color it in!  They look awesome both ways.

The whole idea is to just have fun!  I know I did :-)
Picture

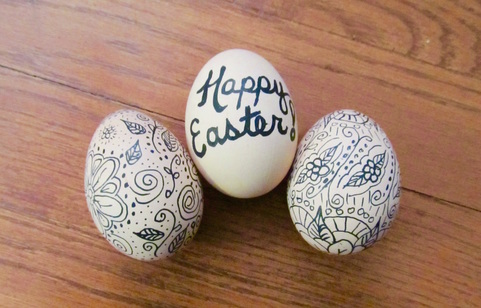
And watch this video where I use RevMark Markers to decorate eggs in 2-19!

Also check out the many other fun DIY Easter Ideas on our Pinterest Board!

Thanks for visiting!

Sincerely,
Picture

Five Steps to a Clean Bedroom in ONE Day!

3/24/2016

 
Picture
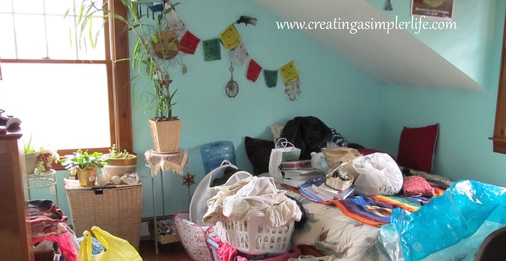
Do you have a messy bedroom or guest room in your home?  Most people do for one reason or another.  I happen to have several since my kids are slowly leaving the 'nest' their bedrooms have become a medley of their belongings and things that have been 'temporarily' stored in there over time.  It is easy for this to get more carried away than anyone ever expected. One day when  you're adding to the pile you actually stop and really look at it and you're like "Oh My Gosh! How on Earth did this happen?"  If you're like me or my daughter whom this post is actually dedicated to, the thought of cleaning is overwhelming so you kind of just keep the door shut.  Out of sight, out of mind, right?  Well that only lasts for so long.  Eventually, for whatever reason, you need something in there, or, like me, you actually have a need to use the room for something other than a bedroom so it's time to clean it!  

We have our new online store starting up (coming soon) so with all the stuff piling up we really needed a room to keep everything together and organized.  My daughter hasn't officially lived (or slept) in her bedroom for a few years so I mentioned to her that I really could use the space.  She completely understood but is overwhelmed by the amount of stuff she has accumulated over the years. She asked me for help and I told her I could have it done in a day if she really wanted me too.  I think she was afraid for me to do it without her, so she's been working on her room a little at a time (the picture above is a work in progress).  But, naturally the fact that I said I could do it in one day is based on experience as I have accomplished this very task several times in the past and this, of course, is what inspired me to write this post!  If you are disciplined and on task, you too can clean a messy room  in one day and if you follow the step-by-step process it should be as simple and painless as possible!
​
So here we go....
STEP 1
  • Gather several large garbage bags or several large moving boxes.
  • Empty the room.  Yes, completely and totally empty if possible.  If you can't remove the large furniture like beds and dressers, then at least empty them completely and move them.
  • This also includes emptying the closet if there is one AND it includes taking all pictures, etc. off of the walls.  NOTHING SHOULD BE LEFT (unless you can't move the furniture).
  • Do your best to put all clothing in a bag, all accessories in another, etc. If you come across stuff that belongs in another room, make a separate bag or box for it or put it in that room immediately (such as dishes and glasses). This is very basic simple sorting and should not take a long time.  You will do a more thorough sorting later.
  • If you know something is garbage, then throw it out!  If you think something is garbage, but aren't sure, then it is probably garbage so THROW IT OUT (or save it in a special bag to be donated or sold).
  • When I empty a room to clean top to bottom, I put the stuff in the hallway and in another room - remember this is only temporary!  However, if you think there is a chance that you will not finish in one day then be sure not to block any exits or rooms that you will need to get into!
STEP 2:
  • ​Clean the room!
  • Dust around the ceilings, walls, hanging lamp fixtures, windows, etc.
  • Wash the windows.
  • Clean the floor (vacuum, mop, etc.)
  • Great chance to re-paint if necessary but note that this will add additional days to the cleaning process!
STEP 3:
  • Put the furniture you want to keep back in the room (if you took it out in the first place) and clean it!
  • Dust and polish the surfaces, vacuum drawers, mattresses, cushions, etc.
STEP 4: 
  • Eat lunch or have a snack!  You are halfway there ;-)
  • This is where you start to put the rest of the 'stuff' back into the room.  This can also be the hardest part....we don't like to let things go but remember the saying "Less is More"?  It is so true!  Most of the stuff we keep just takes up space and causes us stress (hence the reason the room got so messy in the first place).  
  • Doesn't the room look great with nothing but furniture?  This makes it a little easier to get rid of some stuff - you won't want to put it back in and clutter up the room again!
  • Do clothing first - go through it one piece at a time.  If you haven't worn it in 6 months or more, it needs to go.  Anything that you will continue to wear  regularly, hang in the closet or fold into a drawer.  If not, add it to the donation bag!
  • Do the same for accessories like jewelry, knick-knacks, pictures, wall hangings, books, etc.  Most of the stuff has to go (we don't want clutter anymore) so try making it a rule to only keep 15 pieces or less of special jewelry or other special knick-knacks or books (you pick the number).  
  • Remember, everything must have a specific place that it goes in the room!  If it doesn't have a place, then it doesn't belong so 'by-bye' it goes.
STEP 5:
  • Your room should be done and you should be left with a bunch of boxes or bags to get rid of! You need to get rid of it as soon as possible.  You could simply throw it out. That would be the simplest solution, however it is not environmentally friendly and it doesn't help others.  So please, consider either donating the items or, if you think they have a decent amount of value, sell them for some extra money! Check out Recycling Part III: Selling & Donating for more information.
The bottom line: get rid of as much stuff as you can.  Less really is more!  Less stuff to clean, manage, and take care of means less stress and more happiness :-)
Enjoy your clean room!
​

Thanks for visiting!  

Check our our Minimizing and Organizing pages and our Organization board on Pinterest for other ways to help simplify your life!

​Sincerely,
Picture

DIY: SLEEP SPRITZER ESSENTIAL OIL BLEND

3/7/2016

 
Picture
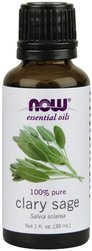
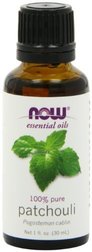
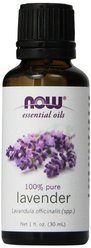
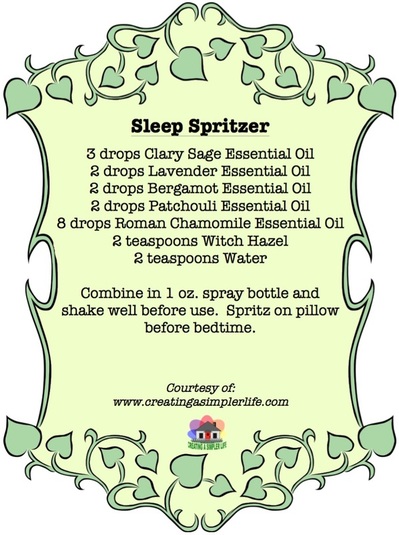
Difficulty falling asleep lately?  Then check out this simple sleep spritzer essential oil blend!  It can help to relax you so that you can fall asleep.  This is spritzed on your pillow just before bedtime so that you are inhaling the essential oil scents.  Each essential oil was carefully chosen:
  • Clary Sage - helpful for insomnia, stress, and anxiety.
  • Lavender - helpful for insomnia, stress, and anxiety.
  • Bergamot - helpful with fatigue and anxiety.
  • Pachouli - helpful with anxiety.
  • Roman Chamomile - helpful for insomnia.
NOTE: Always research the safety of using any essential oil before use!  Check with a doctor before using, especially if you are pregnant or nursing. This is not intended for use by children.
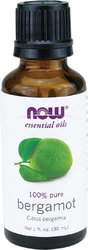
The following pictures are links to the supplies needed to make this sleep spritzer - (Note that they are all affiliate links through Amazon.com):
Picture
Picture
Picture
Picture
Picture
Picture
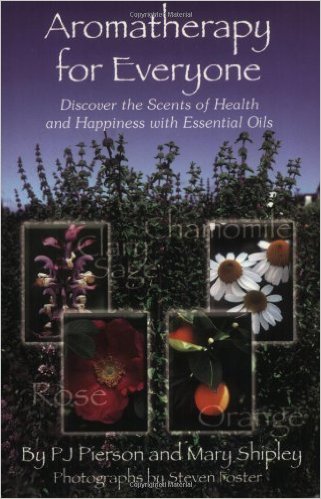
Here is one of my favorite "go to" books about aromatherapy (affiliate link):
Picture
Please note that essential oils for home health DO NOT replace a doctor or modern day medicine.   However, some can definitely be used to supplement, or, in the case of minor medical issues, be used instead of pharmaceuticals.  

Always use common sense and seek the advice of a medical professional before making any major medical decisions.
Thanks for visiting!  

Check our our other Essential Oil Remedies & Recipes and our Essential Oils Etc. Pinterest Board for other great uses!

​Sincerely,
Picture

Crochet Elephant Lovey Blanket

3/1/2016

15 Comments

 
Picture
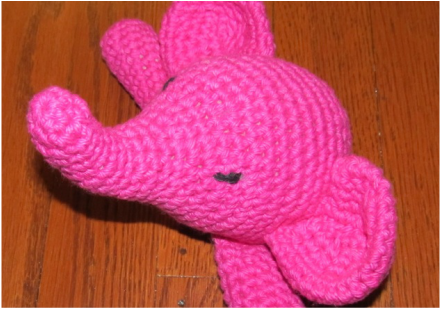
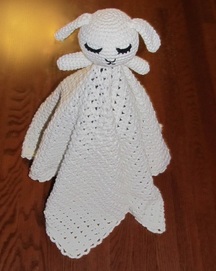
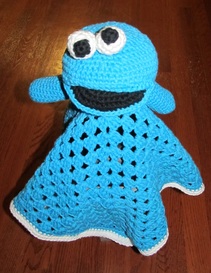
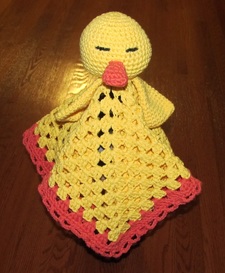
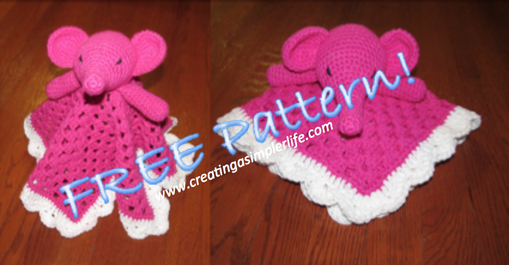
Adorable, right?  What little tyke wouldn't want to cuddle with this 100% cotton pink elephant lovey blanket!  The pattern can easily be adapted to blue, or any color of your choosing!

Please note that you can e-mail me if you have any questions at all about the pattern!  The links to video tutorials for various stitches can be very helpful if needed!

Supplies Needed:
  • *Qty. 3  Hot Pink 2.5 oz. skeins of Lily Sugar'n Cream 100% cotton 4 ply yarn
  • *Black 100% cotton Lily Sugar'n Cream 100% cotton 4 ply yarn (about 1 yard)
  • *Qty. 1 White 2.5 oz. skein Lily Sugar'n Cream 100% cotton 4 ply yarn
  • Crochet Hook size 7 (4.5 mm)
  • Cotton or Poly Stuffing for head, eyes, and arms
  • Yarn Needle

*Best price I can find for the Sugar'n Cream yarn is $1.99 for a 2.5 oz skein at Michaels Craft Stores.  Even better if you print out and use their coupons each week - I print two coupons and bring my husband  (They almost always have a 40% or 50% off one regular priced item!).
Picture
Make the Head and Nose:
(I strongly suggest reading all the directions first and then watching the video tutorial if this is your first time making a ball shape).
YOU WILL BE MAKING THE NOSE FIRST:
  • Round 1: Start with a magic circle with 6 single crochets. 
  • Round 2: 2 sc stitches in each stitch around.
  • Round 3: do 1 sc in each stitch around.
  • Rounds 4-9: continue 1 sc in each stitch around - you should start to see the nose forming.  You can choose to make the nose longer or shorter by adding more or less rows here. PLACE MARKER HERE.
  • Round 10: At this point you will start to make the head.  Do one single crochet in the next two stitches, then two single crochets in the third, then one sc in each of the next two, then 2 sc in the next one. Repeat pattern around until you come to the marker.
  • Round 11: 3 sc, then two sc in one, 3 sc, then two sc in one (repeat around to marker)
  • Rounds 12-16: Basically with each round, you will increase the the number of single crochets in each stitch by one, then do two in one stitch, then repeat the same number of sc again.  You can continue the pattern by adding rounds and increasing the sc by one each time until the bottom of the head is the size that you want. By the 16th round you should be doing 8 sc in a row, then 2 sc in one stitch and repeating that pattern all the way around  to the marker.
  • Rounds 17-20: single crochet in each stitch around without increasing.
  • ​Round 21 to end: Start decreasing by one for each round as follows: sc 8 stitches, then do a double decrease stitch (see video) and continue around to marker, next round do 7 sc., then a double decrease stitch and continue pattern around to marker.  You will then do a round of 6 sc 1 dd, then a round of 5 sc 1 dd, and 4 etc. Before you finish be sure to fill it with stuffing.  Lastly, using the yarn needle, thread the yarn around the remaining hole and pull tightly closed.
Picture
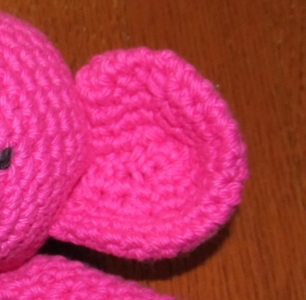
Make the Ears:
The ears are worked from the outside of the ear toward the head in sort of a double layer that will be sewn together at the end....look at the picture to get a better idea if you do not understand, but if you still need help check out the Crochet Elephant Ear Tutorial YOU TUBE video I made...it's not the best, as I made it quickly, but I hope it helps!
  • Chain 21 (this has been updated 8/2017 due to finding this mistake - it said 20 before!)
  • Round 1: sc into 19th stitch and all the way around on both the top and bottom of the chains.  Add one extra stitch at each end for a total of 42 single crochets.
  • Rounds 2 -5: sc in each stitch decreasing twice on each side.  It doesn't matter where on each side you do the decrease, but it is best if they are separated by a few stitches.
  • ​Bend into ear shape and use yarn to sew closed and sew onto head using a yarn needle.​
This is my first tutorial video and I know it's not great, but I tried!
Picture
Sew on Eyes:
  • ​Using black yarn and the yarn needle, double the yarn and embroider eyes on using two stitches each.  
Picture
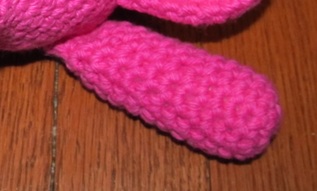
Make the Arms (optional):
  • Round 1: make a magic circle and sc 6 stitches into it.
  • Round 2:  do two single crochets in each stitch around (you could place a marker here if necessary)
  • Rounds 3 - 10: do one single crochet in each stitch around.
  • Finish with a slip knot and cut the hanging string so there is approximately 12 inches attached to the arm.
  • At this point stuff the arm with stuffing.
  • ​Make a second arm.
  • Thread  the 12 hanging inches of yarn through the yarn needle and use it to sew each arm onto the head.  Check out this video tutorial on how to sew the arms closed and sew them on.  
Picture
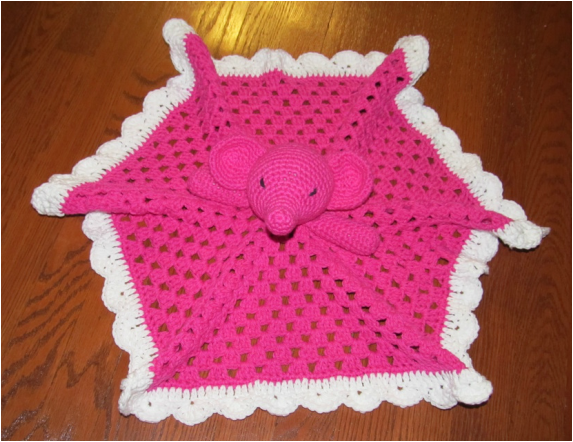
Make the Blanket:
The final blanket is approximately 18" x 18".
**PATTERN UPDATED AS OF 3/19/18**

This is a basic granny square blanket with 6 corners instead of 4 and 13 rows in pink, then the edging. Watch this video tutorial (below) to make the basic 6 sided hexagon. ​You will do 12 rows in pink. The rest of the pattern continues below.
Finishing the Blanket:
  • Row 13: In pink, chain 1 and do 1 sc in each stitch to the corner. Do three sc in the corner and then 1 sc in each stitch to the next corner. Repeat on all 6 sides. Connect with slip stitch.
  • Row 14:  Switch to white.  Chain 3 and double crochet in every stitch around.  In the corners do 2 double crochets in each of the three single crochets from row 13.
  • Row 15: Make the scallop stitch - chain 3, and double crochet 6 times into the same stitch, skip 2 and single crochet into the third stitch, then skip 2 and dc six times into the third stitch away, etc.  Repeat all the way around.  If you are not sure of the scallop stitch check out this video tutorial - just note that I do six dc instead of 5 like in the video!
Picture
Finishing:
  • Sew head onto the center of the blanket.
  • Finish by using yarn needle to weave in all loose ends.
  • Lovey blanket can be washed and dried on delicate cycle.
Check out the our other FREE crochet patterns here!

Also check out the many crochet project patterns on our Pinterest Boards Crochet ONLY and Crochet for the Kids!

Check out these other FREE Lovey Blanket Patterns!
Click on the picture to go to the pattern :-)

Picture
LITTLE LAMB LOVEY
Picture
MONSTER LOVEY
Picture
DUCK LOVEY
Thank you for visiting!

​Sincerely,
Picture
15 Comments
    Picture
    Hi there! I'm Kathie, the author behind Creating A Simpler Life blog. I'm excited to share our longterm projects (and planning) toward building our future retirement homestead in the Adirondack Mountains of New York. In the meantime I will be sharing all the other little things we do that are part of creating our simpler life!
    Creating a Simpler Life

    RSS Feed

    Visit Creating A Simpler Life's profile on Pinterest.

    Categories

    All
    Adirondack Crafts
    Chickens
    Conservation
    Crochet
    Do It Yourself
    Energy Savings
    Essential-oils
    Essential-oils
    Food-storage-preservation
    Food-storage-preservation
    Gardening
    Health
    Health-wellness
    Health-wellness
    Homemade-remedies
    Homemade-remedies
    Homesteading
    Homesteading Dreams
    Inexpensive Fun
    Minimizing
    Organization
    Products We Sell
    Recipes
    Recycling
    Saving-money
    Saving-money
    Shopping
    Wedding & Shower DIY

    Archives

    July 2020
    June 2020
    April 2020
    March 2020
    March 2019
    January 2019
    December 2018
    October 2018
    August 2018
    July 2018
    June 2018
    April 2018
    March 2018
    February 2018
    January 2018
    November 2017
    October 2017
    September 2017
    August 2017
    July 2017
    June 2017
    May 2017
    April 2017
    March 2017
    February 2017
    January 2017
    December 2016
    November 2016
    October 2016
    September 2016
    August 2016
    July 2016
    June 2016
    May 2016
    April 2016
    March 2016
    February 2016
    January 2016
    December 2015
    November 2015
    October 2015
    September 2015
    August 2015
    July 2015
    June 2015

mrandmrscorbi@gmail.com
Contact Us - Privacy Policy - Disclaimer
Copyright 2022©Creating A Simpler Life, Inc. All rights reserved. Reproduction in whole or in part without permission is prohibited.
  • Home/About
    • What does OFF-GRID mean?
    • MINIMIZING >
      • Home Size
      • Room by Room
      • Get Organized
      • Household Waste
    • MINIMIZE DEBT, MAXIMIZE SAVINGS >
      • Bills & Other Debt
      • Saving Money
      • Shopping Tips
      • Affordable Fun
    • BACKYARD CHICKENS >
      • The Coop
      • The Chickens
      • Feeding the Chickens
      • Fresh Eggs
    • HOME GARDENING >
      • Building the Garden
      • What We Grow
      • Seeds, Weeds, & More
      • Preservation & Storage
    • DO-IT-YOURSELF >
      • Health & Wellness
      • Simple Cleaning & Tips
      • Crafts & More!
      • Printables
    • CROCHET >
      • IDEAS & MORE
      • VIDEO TUTORIALS
  • HOMESTEAD
    • The 5 Year Plan PLUS! >
      • 2017
      • 2018
      • 2019
      • 2020
      • 2021
      • 2022
    • WHY AN EARTH SHELTERED HOUSE?
    • OFF GRID TINY TRAILER
    • BUILDING our HOMESTEAD from Scratch >
      • BUYING LAND & GETTING STARTED
      • BUILDING THE CONCRETE DOME
      • FROM DOME to HOME
      • SURVIVING OUR FIRST WINTER
    • HOMESTEAD MACHINERY >
      • GENERATORS
      • KUBOTA TRACTOR
      • ATV'S & UTV'S
      • WOOD CHIPPER
      • CHAINSAWS
      • LOG SPLITTER
      • POWER TOOLS
      • SNOWMOBILES
      • AUTOMOBILES
    • BUDGETING THE BUILD
    • SUSTAINABILITY >
      • WATER
      • FOOD
      • SHELTER
      • ENERGY >
        • SOLAR POWER
    • The Adirondacks >
      • Wildlife & Nature
      • Insects & Bugs
      • Things to Do
      • Water Fun
    • ADIRONDACK CRAFTS
  • VLOG
    • 2023
    • 2022
    • 2021