CREATING A SIMPLER LIFE OFF-GRID
  • Home/About
    • What does OFF-GRID mean?
    • MINIMIZING >
      • Home Size
      • Room by Room
      • Get Organized
      • Household Waste
    • MINIMIZE DEBT, MAXIMIZE SAVINGS >
      • Bills & Other Debt
      • Saving Money
      • Shopping Tips
      • Affordable Fun
    • BACKYARD CHICKENS >
      • The Coop
      • The Chickens
      • Feeding the Chickens
      • Fresh Eggs
    • HOME GARDENING >
      • Building the Garden
      • What We Grow
      • Seeds, Weeds, & More
      • Preservation & Storage
    • DO-IT-YOURSELF >
      • Health & Wellness
      • Simple Cleaning & Tips
      • Crafts & More!
      • Printables
    • CROCHET >
      • IDEAS & MORE
      • VIDEO TUTORIALS
  • HOMESTEAD
    • The 5 Year Plan PLUS! >
      • 2017
      • 2018
      • 2019
      • 2020
      • 2021
      • 2022
    • WHY AN EARTH SHELTERED HOUSE?
    • OFF GRID TINY TRAILER
    • BUILDING our HOMESTEAD from Scratch >
      • BUYING LAND & GETTING STARTED
      • BUILDING THE CONCRETE DOME
      • FROM DOME to HOME
      • SURVIVING OUR FIRST WINTER
    • HOMESTEAD MACHINERY >
      • GENERATORS
      • KUBOTA TRACTOR
      • ATV'S & UTV'S
      • WOOD CHIPPER
      • CHAINSAWS
      • LOG SPLITTER
      • POWER TOOLS
      • SNOWMOBILES
      • AUTOMOBILES
    • BUDGETING THE BUILD
    • SUSTAINABILITY >
      • WATER
      • FOOD
      • SHELTER
      • ENERGY >
        • SOLAR POWER
    • The Adirondacks >
      • Wildlife & Nature
      • Insects & Bugs
      • Things to Do
      • Water Fun
    • ADIRONDACK CRAFTS
  • VLOG
    • 2023
    • 2022
    • 2021

Blog

A little bit of anything and everything that's part of
​creating, enjoying, and living a simpler life!
Picture

BLACK FLY FEVER - It's Awful!

7/16/2020

0 Comments


Black Fly Fever - Something we never want to go through again!

Despite the fact that we have been traveling to and spent a tremendous amount of time in the Adirondacks (my parents live there and we own land and are building a homestead there), I had NEVER heard of nor had I experienced Black Fly Fever.

Yes, I had heard of black flies, but not about their bites or how awful they are!

Being a teacher, I had never had the opportunity to be there for any extended amount of time from late spring to early summer because, well, I was teaching!

But this year, thanks to COVID 19, I was teaching online and I was able to do that from the Adirondacks. That also meant we were there for black fly season. And not only were we there, we were outside blazing new ATV trails through the woods. And that is when it happened, though we didn't know it until the next day.

That's what happens with the black fly bites. Not only are they so small you don't see them, you also don't feel the bites. Until the next day that is. And by then, well, it is too late to do much but take care of them.

And that is how we ended up with black fly fever. We had so many bites, which swell up and get a sort of pimple in the middle, that our bodies couldn't fight them. Our glands swelled, we had headaches, and we basically felt like total crap. That lasted about a week. 

Yes, that's right, a WEEK! And we are never going to let that happen to us again because it was AWFUL!

I'm sharing information so YOU and YOURS can avoid having to deal with this but still have fun in the Adirondacks!
What is black fly fever?
  • Black flies bite the neck and behind the ears the most - but they also bite any exposed skin as well.
  • Black fly bites may not show up until the next day.
  • They will be large lumps and very itchy and if you have any sort of allergies they will most likely be even worse.
  • Those lumps will have a small scab, pimple, or oozing hole in the center that will itch like crazy. It is VERY important that you do not itch them because they are easily infected and will definitely leave a scar.
  • If you get enough bites and your body needs to fight back neck glands are known to swell and you can feel like you are coming down with a cold: run down, swollen glands, headache, maybe nausea, and an overall not well feeling.
​Season is from May to early July
  • Black flies are not the kind of fly you might think they are! Check out this link at the Illinois Dept of Health to learn about the different types of biting flies: https://www.dph.illinois.gov/topics-services/environmental-health-protection/structural-pest-control/biting-flies
  • They are super small and you will generally not see them. In fact, there is a good chance that you won't even know you are bitten until the next day when you are swollen, terribly itchy, and possibly have a small scab or oozing spot where they bit you.
  • The bites are brutal and last up to a week because they literally slice you open to get at your blood. 
  • Unfortunately you may even end up with a scar from their nasty little bite!
  • And worst case scenario, you get Black Fly Fever (not the African one). See below for more information.
Active Times & Locations:
  • They are more active in the mornings and late afternoons so it is best if you plan your activities during mid-day. Unfortunately for us that is when it is the hottest and basically unbearable for getting any work done!
  • They are also more active nears rivers and streams because it is where they lay their eggs and during hot times of day they can be found in the understory of forests where it will remain cooler and more humid.
​Smells:
  • Do NOT wear any sort of perfumes or deodorants. They will love you if you do!
  • ​They do not like the smell of pine, lavender or vanilla so if you are going to wear a scent or wash with a soap, try one that smells like any of those three.
  • We use either pine essential oil or a 50/50 combination of Pine essential oil and Cedarwood essential oil. Rub on back of neck and behind ears with a cotton ball. 
Colors:
  • ​​Avoid dark colors because they seem to like them. Especially black and dark blue. 
  • The best color to wear is white so that is what we wear during the worst of the black fly season.
WHAT WE DO to AVOID BLACK FLY BITES AND BLACK FLY FEVER:
  • We wear a light color. Usually white.​
  • We use either pine essential oil or a 50/50 combination of Pine essential oil and Cedarwood essential oil. Rub on back of neck and behind ears with a cotton ball. 
  • We wear either a bug jacket (see video below) or a netted bug hat.
  • We will also use a bug spray with picaridin in it on the occasions when they are swarming very badly. My favorite is the AVON brand bug spray in the silver can.
​*How WE Treat Black Fly Bites:
  • We prefer to clean them with rubbing alcohol and apply plain ole calamine lotion.  That is the method that works the best for us. We have also used some sort of anti itch cream like Benadryl when it is really bad. Just remember that we clean them often and keep them covered to avoid scratching them.
  • We sometimes find it helpful to take a Benadryl pill if we are experiencing a bad reaction, including black fly fever.
​*Note that this is what we do to treat black fly bites. This may or may not work for you. We are not doctors and recommend seeking the advice of a medical professional before utilizing any treatment plan for black fly bites.
Watch this video where we share how we avoid black fly bites while still enjoying our time outdoors clearing another ATV trail!
So now that you know what black flies are and how you can get black fly fever, you can make the most of your outdoor experience in the Adirondacks! Check out other bugs in the Adirondacks and how we deter them here: ​https://www.creatingasimplerlife.com/adirondack-insects.html
Sincerely,
Picture
0 Comments

How we Open our Inground Pool

6/22/2020

0 Comments


A great way to save money on pool expenses!

Test question: How old is our pool?
​Watch the video to find out...we think you will be very surprised!
We decided a long time ago that instead of going on a big vacation every year, we would rather enjoy our summers right in our own backyard. It was worth every penny and we have never had any regrets!

Rich and I are the original owners of this pool and he has personally and meticulously taken care of it each and every year. He opens it, maintains it, and closes it with no problem (I do help of course). This is the ONLY way to make sure it IS DONE PROPERLY and lasts because nobody is going to take as much care with your belongings as you are!
​
Thanks for watching and please feel free to reach out to use with any questions you might have! We are happy to help :-)
TIME STAMPS:
2:45 Replacing spider gasket on Multiport Diverter Valve
6:08 Connecting the Multiport Diverter Valve
9:29 pool chemicals
10:28 priming the pump
11:21 Starting the pump
12:58 understanding the DE filter pressure
13:05 adding chlorine to the chlorinator
13:53 adding DE to the skimmers
14:24 Adding chemicals
14:27 Adding Alkalinity +
14:38 Putting the Polaris in
15:27 Adding ph+
15:34 Adding super shock
16:23 Backwashing and Rinsing
21:27 Emptying the Pump filter basket
22:20 Washing DE filters and putting back in tank
25:18 Cleaning Polaris hose filtration screen (not the Polaris bag)

EQUIPMENT:
Jandy Pump Model PHPU1.5
Jandy Filter Model DEL48
Jandy Multiport Valve
Zodiac Polaris 360
​
▬ *AFFILIATE LINKS ▬
Sincerely,
Picture
*A Note About Affiliates: This video and description may contain affiliate links to various products. If you click through and make a purchase, we will receive a small commission. It does not affect the price you pay in any way and we thank you in advance for your support :-)
0 Comments

BURN BABY BURN! Divorce papers go up in smoke...

6/19/2020

0 Comments

 
"Sometimes you need to burn bridges in order to stop yourself from crossing them again."
Author Unknown
Well, this is certainly one way to minimize household waste!

Both Rich and I had very contentious divorces that had us in and out of family court repeatedly over the course of 10 or more years. Because of that we accumulated quite a lot of papers, court documents, proof of child support etc. that basically was stored in a series of boxes, bags, and bins in the basement. 

Both of our children are way past the age that any of the divorce agreements etc. are necessary any more. They have finished college and basically moved on in their lives and, well, we don't want to leave them a legacy of bad memories to go through God forbid anything were to happen to us! We would rather leave them with the good memories :-)

Now is the perfect time to burn them because we are currently in the process of cleaning out our house to sell so that we can build our dream earth sheltered house (learn more about that here) and we are fortunate to have a very safe place to do the 'ritual burning' on our future homestead in the Adirondack Park of New York State!

Everyone should perform a 'ritual burning of their divorce papers'.

Do something good for yourself and your children and let it all go!

Enjoy the video of our "burn" :-)
Sincerely,
Picture
0 Comments

EASY CROCHET VARIEGATED BASKET - UNDER 30 MINUTES!

4/2/2020

0 Comments

 
Picture
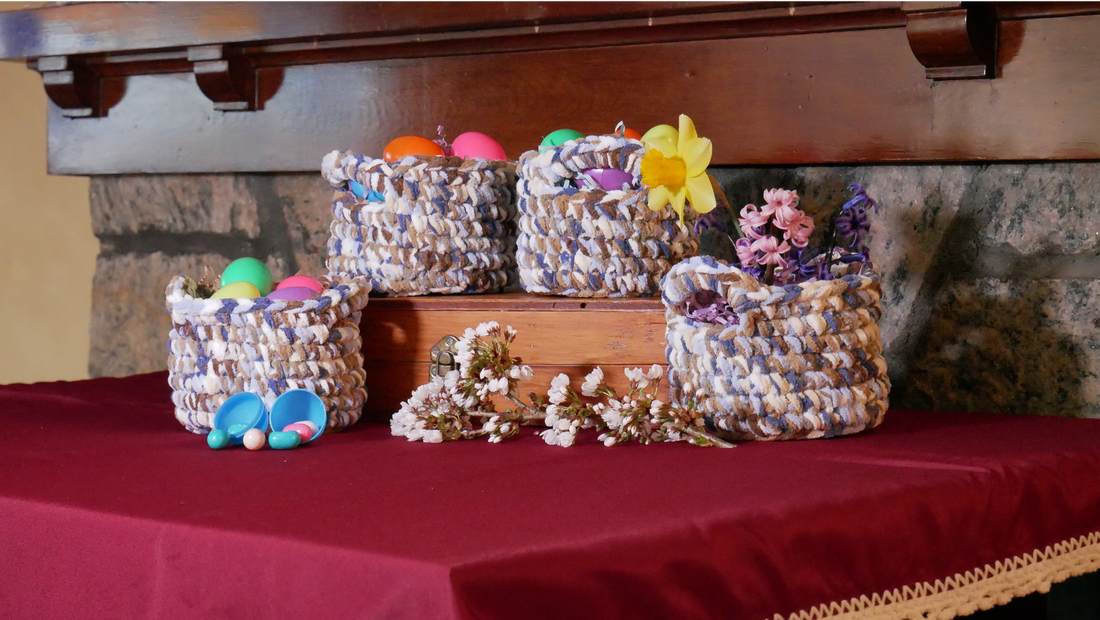
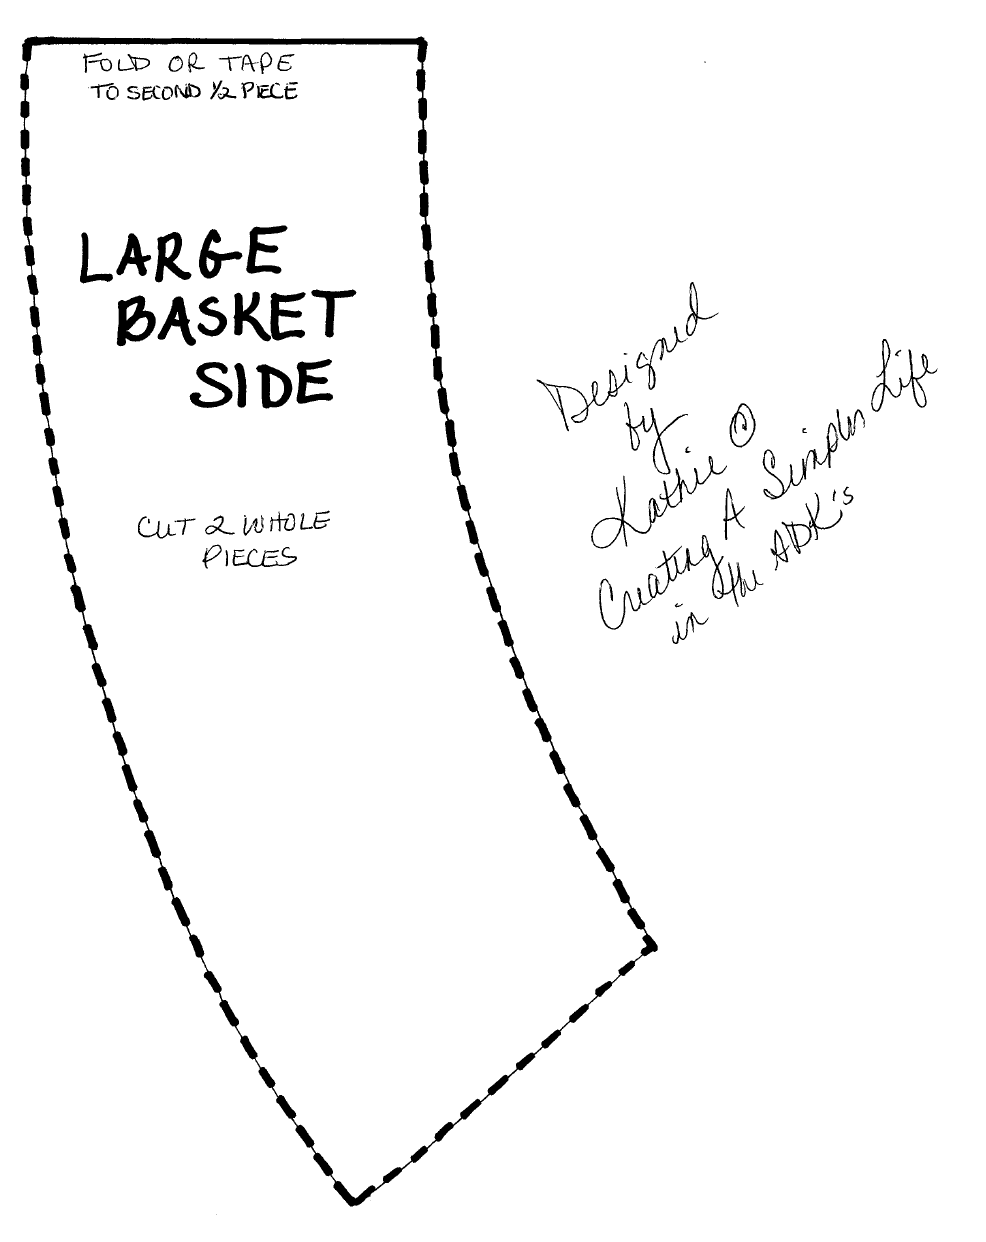
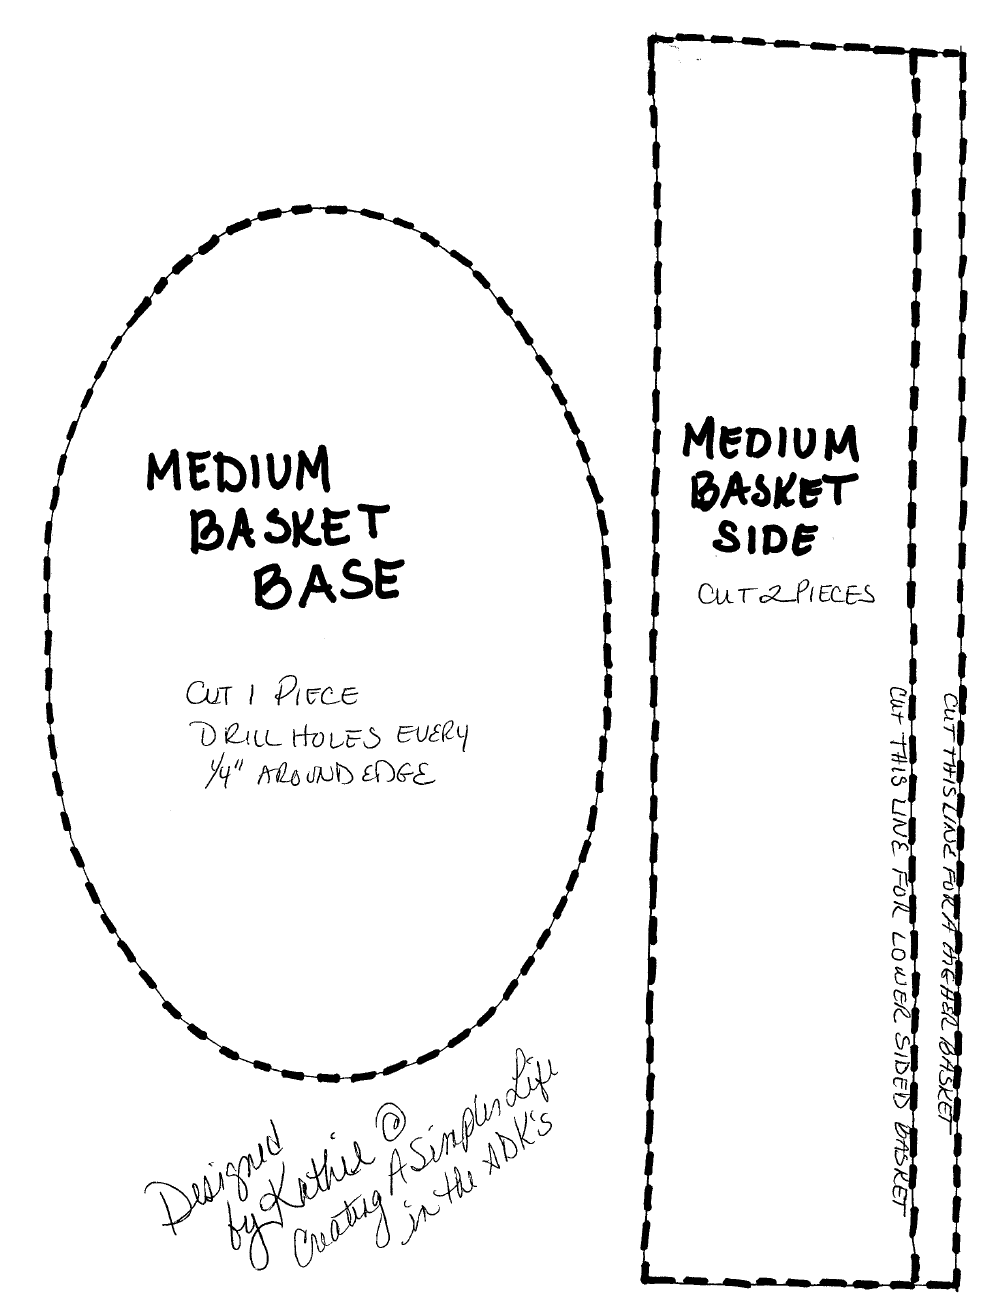
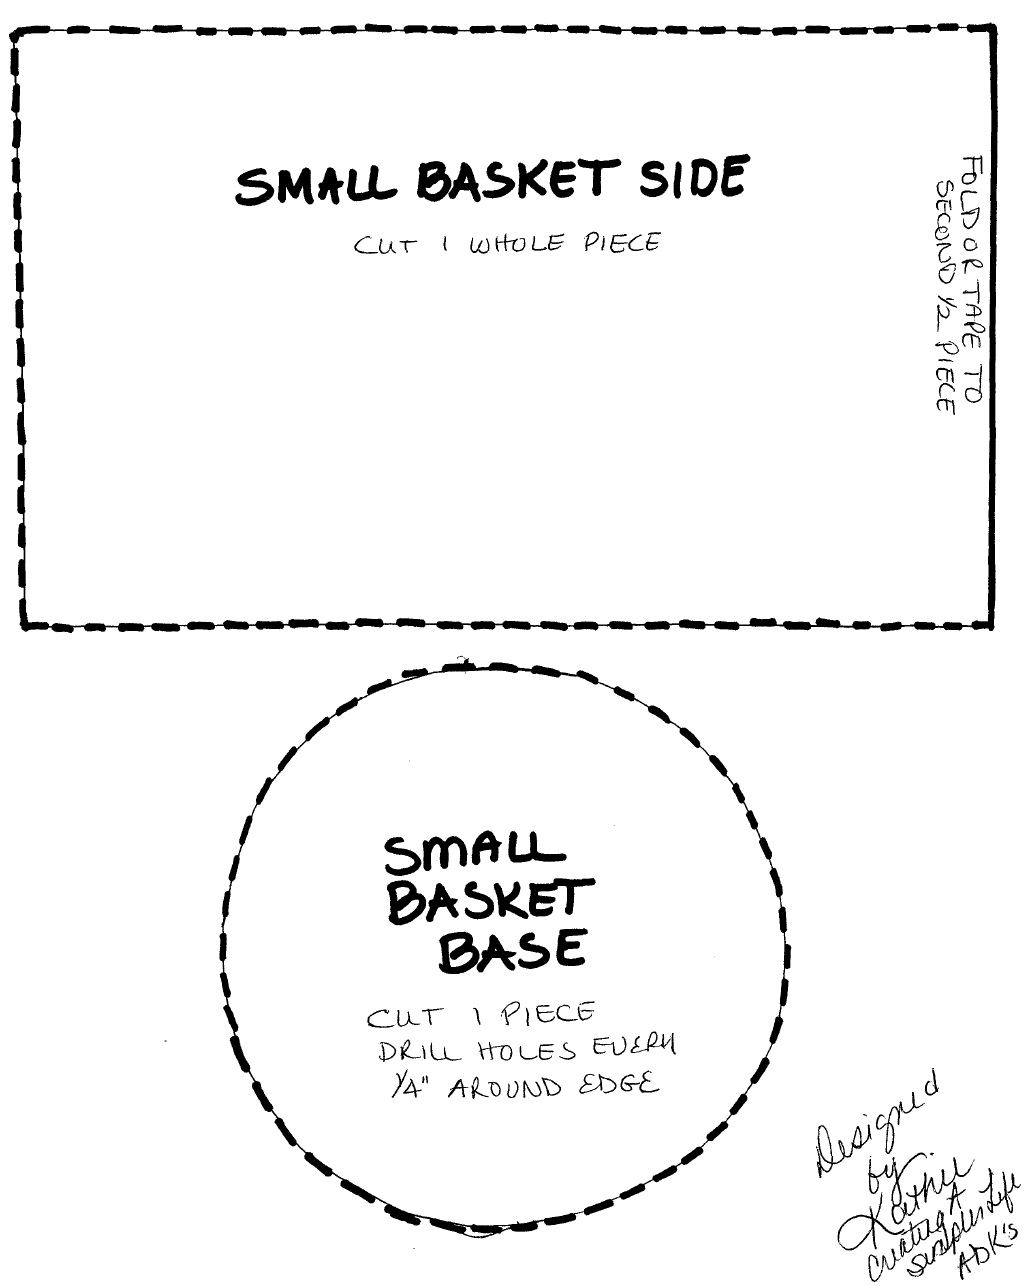
I love this little variegated basket. It is a combination and modification of two other basket videos that I watched by Jayden in Stitches and CJ Designs and it literally takes me less than 30 minutes to make!

Written pattern can be found below Video :-) 
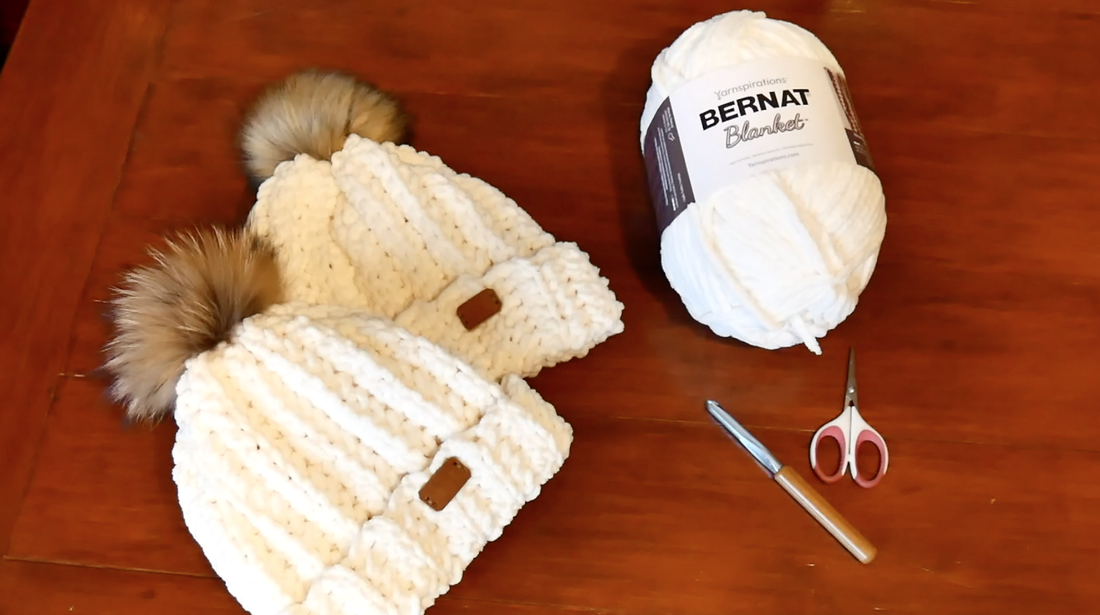
Supplies Used:
9 mm crochet hook
Bernat Blanket Yarn in color "Sonoma"
Bernat Baby Blanket Yarn in color "Blue Dreams"
Yarn Needle
​Scissors

Written Pattern:

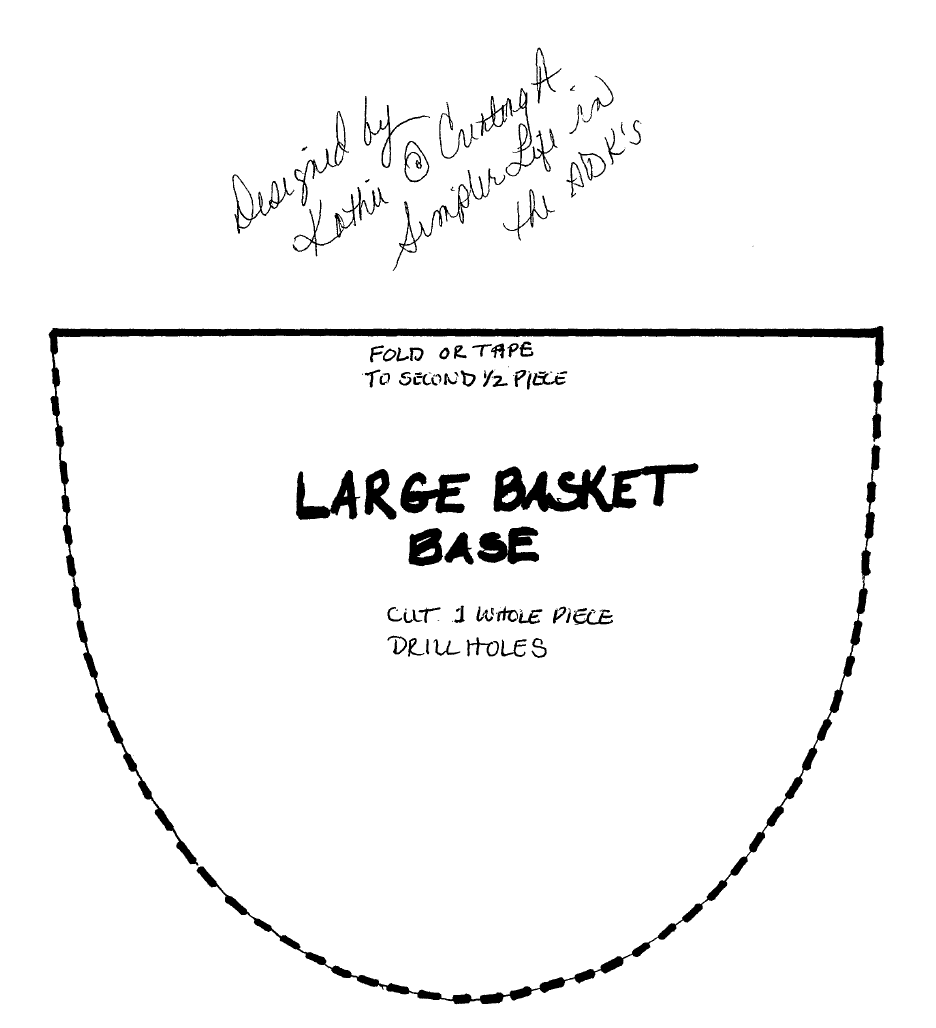
BASKET BASE
**NOTE** See the pictorial pattern below for the base of the basket

Loop onto your hook and chain 4
Slip stitch connectd to the first chain to create a loop/circle
Round 1: Chain 1, and single crochet (sc) 8 times into the center of the loop. Slip stitch to connect to the first sc.
Round 2: Chain 1 and do two (2) single crochet in every stitch going around for a total of 16 stitches. Slip stitch to connect.
Round 3: Chain 1, and do 1 sc in the first stitch, 2 sc into the second stitch, then 1, sc, then 2 sc, etc all the way around for a total of 24 sc. Slip stitch to connect.
Round 4: Chain 1 and do 1 sc each in the next two stitches, then 2 sc in the third, then repeat all the way around for a total of 32 sc (see picture below). Slip stitch to connect.
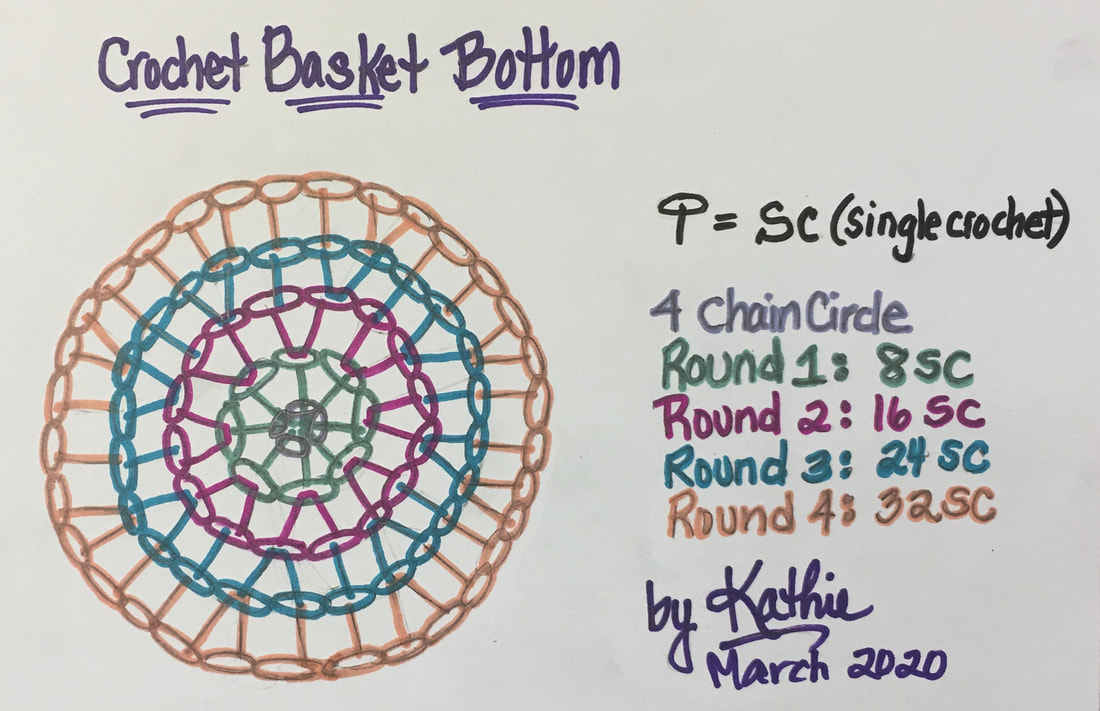
Picture
Pattern Continued:
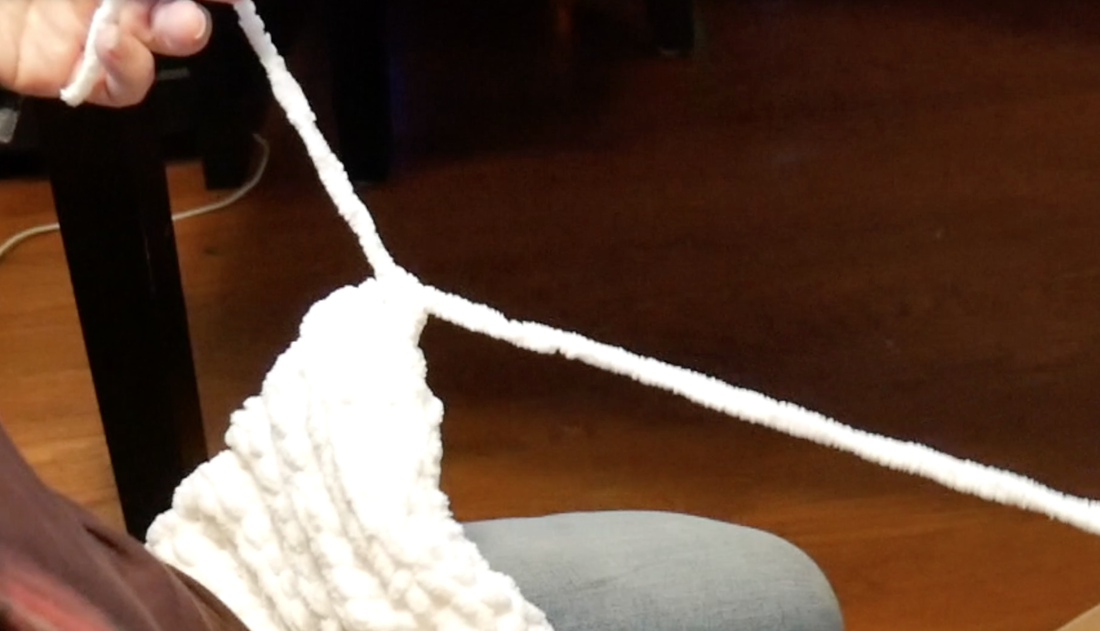
BASKET SIDES AND HANDLES:
Round 5: Chain 1 and sc in the BACK LOOP ONLY of each stitch around for a total of 32 sc. Slip stitch connect.
Rounds 6-9: Chain 1 and sc in each stitch around until you have 4 more rows. You can place a marker here if it helps you. 
Round 10: Chain 7, then sc into the 7th stitch from the start of the chain. This is the first handle. Then sc into each of the next 10 stitches (total of 11 sc). Then chain 7 again, and sc into the 7th stitch from the start of the chain (this is the second handle), then sc 10 more times for a total of 11. You should be at the beginning of the first handle again.

We are still working in the round (this is the 11th round but the sides are 7 of them). Now you will do *10 sc into the center of the handle loop, then 11 sc (one in each of the next 11 stitches), then *10 sc into the center of the second handle, and then 1 sc in each of the next 11 stitches. Slip stitch into the 12th and knot off. 

*Note, as. you sc into each handle you will want to keep pulling them to the right as you get closer to the left. Refer to the video if you are not sure what I mean.

Finish up by weaving all loose ends with the yarn needle and enjoy :-)
Thanks so much for visiting! Hope you liked this simple pattern :-)
Sincerely,
Picture
0 Comments

CROCHET SPRING MARKET PRODUCE BAG FREE PATTERN

3/21/2020

0 Comments


Super simple FREE crochet pattern/tutorial!
The written pattern is below the video.

Super simple crochet spring mesh market/produce bag free pattern!

New York made a new law as of March 1, 2020 - no more plastic bags from the stores. These bags are one of my answers to this problem and I like them better than the basic reusable bags because these can be washed and dried!

The patterns I saw all started at the top of the bag and seemed complex so I designed a pattern that starts from the bottom and in my opinion is pretty simple! It uses three basic stitches: chain/slip, single, and triple crochet. You have control over the size and how wide to make the double straps! I made them in so many colors and can't wait to be able to share them with my friends and family.

▬ *AFFILIATE LINKS ▬
✅ Bulk Buy: Lily Sugarn Cream (2-pack) (Hot Pink)
✅ Bulk Buy: Lily Sugar'n Cream (2-pack) (Ecru)  
✅Susan Bates size 4.5mm, 5-1/2-Inch Bamboo Handle, Silvalume Head Crochet Hook, Rose  
✅ Lion Brand Yarn 400-5-5002 Large-Eye Blunt Needles, Set of 6  

Supplies needed:
Two skeins of Lily Sugar'n Cream 4 ply cotton yarn 
4.5 mm crochet hook (US size 7)
Scissors
Yarn needle


FREE WRITTEN PATTERN
NOTE: In the video I call the double crochet a triple crochet because that is how I learned it. I apologize for not remembering to make the change when I did the video. Here is why I get confused:
https://www.thesweetestgeek.com/learn-to-double-crochet/

Chain 5, connect with slip stitch to create a circle.

Row 1: Chain 5 (counts as 1 /double crochet), double crochet into center of circle , chain 2. dc, chain 2 and repeat for a total of 6 double crochets. After the last two chains slip stitch to connect.

Row 2: Chain 5 (counts as 1 triple crochet), dc crochet into the space formed by the chains in row 1, chain 2. NOTE: since the first chain of 5 counts as a dc crochet, you now have two double crochets in that space. You will now double crochet into the next space, ch 2, dc, and chain 2. In other words you will be doing 2 double crochets in every space around and every double crochet will have two chains between them. When this row is done you should have a total of 12 double crochets around. Slip stitch to connect.

Row 3: Chain 7 (this counts as one double), double crochet into the first space created by the chains below. You will be doing the same as in row 2, except you will now do 4 chains in between each double. It will be very loopy looking and you should have 24 total double crochets when you are done. Slip stitch to connect.

Working in the round: STITCH CHANGES TO SC AND YOU WILL ONLY BE DOING ONE IN EACH SPACE FROM NOW ON. Chain 7 and single crochet into the next space/loop, ch 7, sc into next space/loop, repeat around and around and around until your yarn is almost gone. See video if you are not sure. When you are done with this it should basically cover your lap. Do not cut yarn!

Border/Straps Row 1: Do a second sc into the same space so there are 2 sc in that loop), chain 2, do 2 sc into next loop, chain 2, then 2 sc into next loop....repeat until you are all the way around the bag. You should end with two chains and a slip stitch connect to the two single crochet's you started with. At this point you can continue with the same color or knot off and start a new color.

Border/Straps Row 2: Connect, chain 1 (or continue in the round), and sc in each stitch all the way around. Slip stitch connect.
​
Border/Straps Row 3: Chain 50, then count 24 sc from where you started and sc into the 25th stitch, sc 25, chain 50 and count 24 from where you started and sc into the 25th sc, finally, sc 25 (this might be one or two more or less but IT DOESN'T MATTER. Don't fret it is really no big deal). Do NOT slip stitch connect.

Border/Straps IN THE ROUND: Continue sc up the strap, around the side and up the other strap, and on the other side back to where you started, and then continue one more time around until you have two rows on both straps. When you get back to where you started make your last stitch a slip stitch instead of sc and then knot off.

Weave all loose ends and fill your bag! It stretches to fit more and more. 

It can be washed and dried, and I hope you LOVE It as much as I do!

Once again, I apologize for making the mistake by calling the double crochet's triple crochets! Obviously I am far from perfect but I still believe it is a simple pattern and even if you did triples it would just come out a little wider but still be great! Heck, maybe it would be better!
Thanks so much for joining me today!
Check out my other
FREE patterns here!
​
Sincerely,
Picture
0 Comments

Recipes: Spaghetti Pie & Hashbrowns

3/12/2020

0 Comments

 
I love cooking for my family from scratch....well, whenever I have the time to do so! That's one reason I love both of these recipes, they are from scratch, but they are super simple, super delicious, and super economical!

Both of these recipes are printable below (a pdf file below). Enjoy!
Use the button under the recipe cards to download the pdf file. It will print one sheet of  8 1/2 x 11 paper, preferably cardstock paper.  Cut out each of the 4 x 6 inch recipe cards and put them in your recipe book!  They always come two recipes per sheet in an effort to not waste paper! 

Visit my Recipes Page to print out previous recipes (pdf files) or to download a FREE 4 x 6 Recipe Card Template (.dox file) for your own recipes! 

Don't want to print them?  No worries, just copy them down and enjoy!
Picture
Download 8 1/2" x 11" printable pdf file here
Thanks for visiting!
Check out our other printable recipe cards!
Sincerely,
Picture
0 Comments

COZY CROCHET AFGHAN - FREE Pattern

3/16/2019

0 Comments


This super simple crochet afghan throw only uses two stitches: chains and single crochet, AND can be completed in under 8 hours!

Picture
This crochet afghan is super simple to make and super soft and cozy!
The finished size is 40" x 60"

Supplies Needed:
  • 3 Skeins of Bernat Blanket Yarn in Vintage White
  • 1 Skein of Bernat Blanket Yarn in Purple Plum
  • 1 Skein of Bernat Blanket Yarn in Taupe
  • 9 mm Crochet Hook
  • Scissors
  • Yarn Needle
Directions - SEE THE VIDEO BELOW!
  • Chain 93
  • Row 1: Single crochet into third chain from hook, chain 1, skip a stitch, and sc in next, chain 1, and reapeat to end of row (a set is one single crochet, and one chain). You will have 45 sets and your last stitch at the end of every row will always be a single crochet.
  • Row 2: Chain 2 and single crochet into the gap created in the first row (every where you had a single chain created a gap so you will be single crocheting into the gaps). Again, at the end of the row you will have a single crochet.
  • Rows 3 - 105 - You will repeat the directions for row 2 in the color pattern as described below the video or in any color pattern of your choosing.
  • Border - Using brown (or color of your choosing) simply repeat the same stitch all the way around the edge but doing two sets (one sc, one ch) in each corner to make the turn.
  • Finish by weaving all loose strings and snipping.
  • SEE THE VIDEO BELOW!
Color Pattern used for this afghan (each number refers to the number of rows in that color):
  • 3 vintage white
  • 1 purple plum
  • 2 vintage white
  • 1 taupe
  • 1 vintage white
  • 3 taupe
  • 2 vintage white
  • 3 purple plum
  • 1 vintage white
  • 1 purple plum
  • 2 vintage white
  • 1 taupe
  • 2 vintage white
  • 3 purple plum
  • 2 vintage white
  • 1 taupe
  • 47 vintage white (this is the center - the bottom colors are just the top reversed)
  • 1 taupe
  • 2 vintage white
  • 3 purple plum
  • 2 vintage white
  • 1 taupe
  • 2 vintage white
  • 1 purple plum
  • 1 vintage white
  • 3 purple plum
  • 2 vintage white
  • 3 taupe
  • 1 vintage white
  • 1 taupe
  • 2 vintage white
  • 1 purple plum
  • 3 vintage white
Thanks so much for visiting! Hope you liked this simple pattern :-)
Sincerely,

Picture
0 Comments

MAKING A BIRCH BARK BASKET CENTERPIECE

1/23/2019

1 Comment

 
Picture

PART 1 OF 2
DESIGNING THE TEMPLATE
Part 2  - Making the Basket - is down below!

This is only my second basket to date, but I am really happy with the results! 

I learned how to make these baskets by watching videos and visiting blogs but they were all pretty complicated, but I like things to be as simple as possible! So, basically I just took some of the simplest parts from everything I saw (and I honestly  have no clue where I saw anything) and read (or where I might have read it) and designed my own process to create my own original baskets! And it's simple as can be!

I even designed the templates for all my baskets myself and they can be downloaded for FREE by clicking the button below. It is a pdf file and you will get the templates for three baskets shown here (Large oval, Medium oval, and small round):
Picture
Picture
Picture
Picture
PDF BIRCH BARK BASKETS TEMPLATE
Check out my video to see how I designed the template so simply!
WATCH THIS VIDEO  BELOW TO SEE HOW WE HARVESTED THE BARK WITHOUT HARMING THE TREE AND HOW I MADE MY FIRST BASKET EVER!
Thanks for visiting :-)
Please like and subscribe and be sure to check us out on other social media!
​Sincerely,
Picture
1 Comment

CROCHET ADIRONDACK WINTER HAT

1/6/2019

11 Comments

 
FREE PATTERN!
This hat is super soft and warm....especially on those cold Adirondack winter days!
Beginner Level Pattern!
Finish in under an hour!
Easily modified for larger or smaller ADULT sizes OR more or less slouch!
Machine wash and dry with a removable pom pom!
​VIDEO TUTORIAL & WRITTEN DIRECTIONS!

NOTE: directions for leather tags will be coming soon!
Picture
Supplies Needed for hat without Leather Tag (affiliate Links)
  • Bernat Blanket Yarn in Vintage White (makes 2) https://amzn.to/2VwJABi
  • 9 mm crochet hook https://amzn.to/2SFbgBV
  • Scissors
  • Yarn Needle
  • Genuine Raccoon Fur Pom Pom 5" 2 pcs with snaps https://amzn.to/2Astu2A
  • Waxed Thread (optional) https://amzn.to/2LQbSlT
  • Leather Tag/Label (check out our video here)

Stitches Used:
  • Chain (ch)
  • Single Crochet (sc)
  • Single Crochet Back Loop Only (scblo)

Video Tutorial (written directions below):
It is strongly suggested that you watch the full video and/or read the full directions before beginning!
​(video for children's size hat below!)
​Please reach out if you have any questions. I am here to help! Thank you so much for your support :-)

Picture
Directions:
  • Chain 25 (chain 23 for less slouch, or 27 for more slouch) (leave a 4-5" tail)
  • Row 1 - Turn work and single crochet 24 across 
  • Row 2 - Turn work, ch 1, scblo 24 (back loops only - see video below)
  • Rows 3 to 28 - Repeat Row 2 (adjust the number of rows by 2 for larger or smaller adult head size but you must end with an EVEN number of rows). 
  • When you finish your last row, cut a 2 foot long tail and pull it through your last loop to create a knot.​
  • ​Thread the end of the 2 foot tail onto your yarn needle and holding the two sides together, overhand stitch the two sides together so that you end where your beginning 4-5" tail was.
  • Tie the two ends together in a knot. DO NOT CUT ANYTHING YET
  • Once again using the long tail with the yarn needle, you will now cinch the top of the hat closed by using a very long overhand stitch every other row around and pulling it tightly closed. You may still have a small opening in the center when you are done that you can do an "X" stitch across to close. Then pull the both the long and short tail inside the top of the hot and tie into a knot together. ​
Picture
  • Now you can either use the yarn needle to weave the ends into the inside of the hat and then clip them off, or you can use the long tail to sew on the snap for the pom pom. I use waxed cotton thread to sew the snap on, however the yarn would most likely work too.
Picture
Here is how I made the leather label:
Thanks so much for visiting!
Please check us out on our other social media platforms :-)
Sincerely,

Picture
11 Comments

2 RECIPES: Thanksgiving Meatloaf & Old Fashioned Baked Apples

12/9/2018

0 Comments

 
FREE Printable Recipe Cards!
Picture
Thanksgiving is my absolute favorite holiday of the year. I think it is because it's about family and friends getting together to eat great food, talk, and generally spend quality time together. No reason to rush. Eat slow, eat more, and then eat some more. And after we eat all the food, we get to eat dessert! It just goes on and on. Good times and great memories. These two recipes that I am sharing are not food that we had for Thanksgiving, but they are food that simply goes with the season and brings up all those good feelings and memories of the holiday season. I hope you enjoy them as much as I do!

This first recipe is Turkey Meatloaf, but it really is so much more than that because it includes some of my other favorite Thanksgiving foods: stuffing and cranberry sauce!
Picture
And of course, the fall is the time for apples- Who doesn't have some sort of apple dessert for Thanksgiving???

Anyway, many of the apple desserts tend to have a lot of sugar and take time to make so I really like the simplicity (and healthiness) of this old fashioned baked apples recipe! Better yet, watch our YouTube video showing exactly how my daughter made it!
Use the button under the recipe cards to download the pdf file. It will print one sheet of  8 1/2 x 11 paper, preferably cardstock paper.  Cut out each of the 4 x 6 inch recipe cards and put them in your recipe book!  They always come two recipes per sheet in an effort to not waste paper! 

Visit my Recipes Page to print out previous recipes (pdf files) or to download a FREE 4 x 6 Recipe Card Template (.dox file) for your own recipes! 

Don't want to print them?  No worries, just copy them down and enjoy!
Picture
DOWNLOAD PDF RECIPES
Thanks for visiting!
Check out our other printable recipe cards!
Sincerely,
Picture
0 Comments
<<Previous
    Picture
    Hi there! I'm Kathie, the author behind Creating A Simpler Life blog. I'm excited to share our longterm projects (and planning) toward building our future retirement homestead in the Adirondack Mountains of New York. In the meantime I will be sharing all the other little things we do that are part of creating our simpler life!
    Creating a Simpler Life

    RSS Feed

    Visit Creating A Simpler Life's profile on Pinterest.

    Categories

    All
    Adirondack Crafts
    Chickens
    Conservation
    Crochet
    Do It Yourself
    Energy Savings
    Essential-oils
    Essential-oils
    Food-storage-preservation
    Food-storage-preservation
    Gardening
    Health
    Health-wellness
    Health-wellness
    Homemade-remedies
    Homemade-remedies
    Homesteading
    Homesteading Dreams
    Inexpensive Fun
    Minimizing
    Organization
    Products We Sell
    Recipes
    Recycling
    Saving-money
    Saving-money
    Shopping
    Wedding & Shower DIY

    Archives

    July 2020
    June 2020
    April 2020
    March 2020
    March 2019
    January 2019
    December 2018
    October 2018
    August 2018
    July 2018
    June 2018
    April 2018
    March 2018
    February 2018
    January 2018
    November 2017
    October 2017
    September 2017
    August 2017
    July 2017
    June 2017
    May 2017
    April 2017
    March 2017
    February 2017
    January 2017
    December 2016
    November 2016
    October 2016
    September 2016
    August 2016
    July 2016
    June 2016
    May 2016
    April 2016
    March 2016
    February 2016
    January 2016
    December 2015
    November 2015
    October 2015
    September 2015
    August 2015
    July 2015
    June 2015

mrandmrscorbi@gmail.com
Contact Us - Privacy Policy - Disclaimer
Copyright 2022©Creating A Simpler Life, Inc. All rights reserved. Reproduction in whole or in part without permission is prohibited.
  • Home/About
    • What does OFF-GRID mean?
    • MINIMIZING >
      • Home Size
      • Room by Room
      • Get Organized
      • Household Waste
    • MINIMIZE DEBT, MAXIMIZE SAVINGS >
      • Bills & Other Debt
      • Saving Money
      • Shopping Tips
      • Affordable Fun
    • BACKYARD CHICKENS >
      • The Coop
      • The Chickens
      • Feeding the Chickens
      • Fresh Eggs
    • HOME GARDENING >
      • Building the Garden
      • What We Grow
      • Seeds, Weeds, & More
      • Preservation & Storage
    • DO-IT-YOURSELF >
      • Health & Wellness
      • Simple Cleaning & Tips
      • Crafts & More!
      • Printables
    • CROCHET >
      • IDEAS & MORE
      • VIDEO TUTORIALS
  • HOMESTEAD
    • The 5 Year Plan PLUS! >
      • 2017
      • 2018
      • 2019
      • 2020
      • 2021
      • 2022
    • WHY AN EARTH SHELTERED HOUSE?
    • OFF GRID TINY TRAILER
    • BUILDING our HOMESTEAD from Scratch >
      • BUYING LAND & GETTING STARTED
      • BUILDING THE CONCRETE DOME
      • FROM DOME to HOME
      • SURVIVING OUR FIRST WINTER
    • HOMESTEAD MACHINERY >
      • GENERATORS
      • KUBOTA TRACTOR
      • ATV'S & UTV'S
      • WOOD CHIPPER
      • CHAINSAWS
      • LOG SPLITTER
      • POWER TOOLS
      • SNOWMOBILES
      • AUTOMOBILES
    • BUDGETING THE BUILD
    • SUSTAINABILITY >
      • WATER
      • FOOD
      • SHELTER
      • ENERGY >
        • SOLAR POWER
    • The Adirondacks >
      • Wildlife & Nature
      • Insects & Bugs
      • Things to Do
      • Water Fun
    • ADIRONDACK CRAFTS
  • VLOG
    • 2023
    • 2022
    • 2021