CREATING A SIMPLER LIFE OFF-GRID
  • Home/About
    • What does OFF-GRID mean?
    • MINIMIZING >
      • Home Size
      • Room by Room
      • Get Organized
      • Household Waste
    • MINIMIZE DEBT, MAXIMIZE SAVINGS >
      • Bills & Other Debt
      • Saving Money
      • Shopping Tips
      • Affordable Fun
    • BACKYARD CHICKENS >
      • The Coop
      • The Chickens
      • Feeding the Chickens
      • Fresh Eggs
    • HOME GARDENING >
      • Building the Garden
      • What We Grow
      • Seeds, Weeds, & More
      • Preservation & Storage
    • DO-IT-YOURSELF >
      • Health & Wellness
      • Simple Cleaning & Tips
      • Crafts & More!
      • Printables
    • CROCHET >
      • IDEAS & MORE
      • VIDEO TUTORIALS
  • HOMESTEAD
    • The 5 Year Plan PLUS! >
      • 2017
      • 2018
      • 2019
      • 2020
      • 2021
      • 2022
    • WHY AN EARTH SHELTERED HOUSE?
    • OFF GRID TINY TRAILER
    • BUILDING our HOMESTEAD from Scratch >
      • BUYING LAND & GETTING STARTED
      • BUILDING THE CONCRETE DOME
      • FROM DOME to HOME
      • SURVIVING OUR FIRST WINTER
    • HOMESTEAD MACHINERY >
      • GENERATORS
      • KUBOTA TRACTOR
      • ATV'S & UTV'S
      • WOOD CHIPPER
      • CHAINSAWS
      • LOG SPLITTER
      • POWER TOOLS
      • SNOWMOBILES
      • AUTOMOBILES
    • BUDGETING THE BUILD
    • SUSTAINABILITY >
      • WATER
      • FOOD
      • SHELTER
      • ENERGY >
        • SOLAR POWER
    • The Adirondacks >
      • Wildlife & Nature
      • Insects & Bugs
      • Things to Do
      • Water Fun
    • ADIRONDACK CRAFTS
  • VLOG
    • 2023
    • 2022
    • 2021

Blog

A little bit of anything and everything that's part of
​creating, enjoying, and living a simpler life!
Picture

Top 5 Tips to Simplify Your Daily Life Now!

4/13/2017

0 Comments

 
Picture
There are so many ways to start creating a simpler life!  From finances, to house cleaning, to simply how you perceive your surroundings, simplifying your life can be, well..., simple! Here are my five favorite ways to keep my life simpler every day! You might think some of them are sort of 'cheating' but I think they are genius because to me they just make sense. In fact, they make so much sense that you may already be doing some, if not all, of them already! 

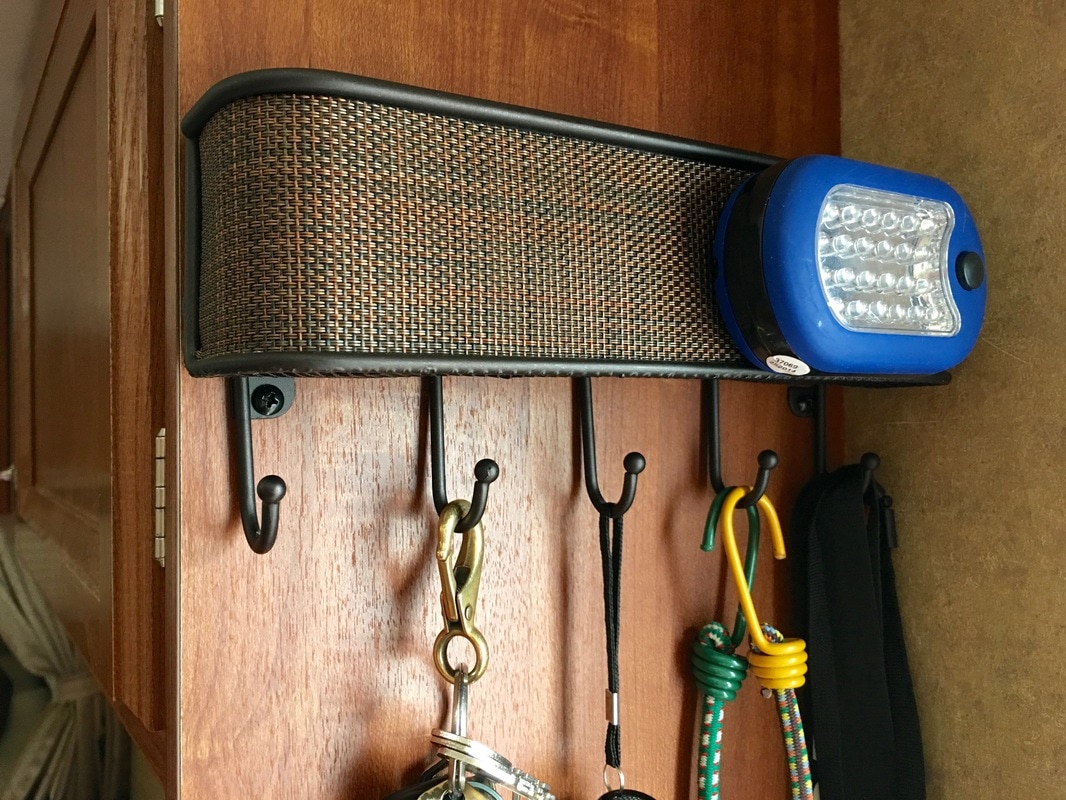
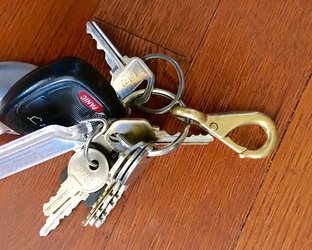
ONE: Car Keys - Nothing makes me crazier than misplacing the car keys. Whether I am home, at the store, or even at work, misplacing, or trying to locate the car keys is a annoying! Here's how I simplified this problem: a hook. What? Yup, a hook. Not just any hook, mind you. My hook is a brass round eye quick snap that is actually used for rope or chain and it can be found in just about any hardware department. I originally tried some hook clips that were specifically made for key rings, but they weren't heavy duty enough for the kind of life I lead. I just happened to spot this one in the hardware department several years ago, and well, the rest is history!  
Heres why it works:
  • I use the hook to attach my keys to my belt loop or back pack when I am on hikes or not carrying a purse for whatever reason. 
  • ​The hook also easily attaches to the handle of my pocketbook while I am at work or shopping. No digging around in the bag searching for keys!
  • Same thing goes for at home. We have a key hanging area in the kitchen so the hook easily hangs there when I am home. This also makes it easy for anyone else in the house to be able to find each others keys if they need to move cars or whatever.​
Picture
Picture
Picture
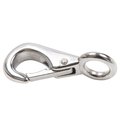
https://www.lowes.com/pd/Blue-Hawk-Stainless-Steel-Round-Eye-Quick-Snap/999971032

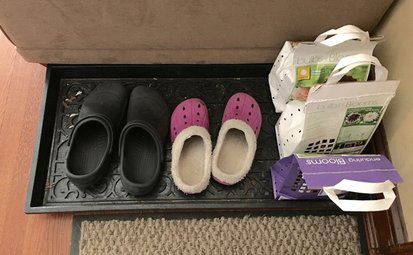
TWO: Crocs - Mine are faux, my husbands are real, but either works great! We each keep a pair of these right by the door on a multi-purpose tray (perfect for winter snow boots too!). This allows us to quickly slip them on to run the garbage out, put the chickens away, get the mail, pick vegetables, take the compost out, etc. No searching all over for shoes, and no wasted time having to tie them. It is so simple to slip them on and run right outside. I don't have to worry about stepping in mud or chicken poop with my good shoes because stepping in that stuff is exactly what these are for! When I come back in the door they immediately go right back on the tray, mud and all! Want to wash them? Simple, just hose them down. No stress, no worries. Notice the ones on the tray are lined for winter use? I have another pair in purple with no lining for the summer :-)
Picture
Check out the bulbs ready for planting!

THREE: All Surfaces Clear - When the surfaces in your house are clear, your home looks, or appears, clean! When the house appears clean, you feel better and have no worries or stress about anyone suddenly visiting or stopping by. How is this accomplished? First, get rid of the knick-knacks that take up space (and collect dust) on tables, shelves, etc. Second, get rid of extra furniture and anything that takes up unnecessary floor space. The same goes for kitchen counters and the top of the refrigerator too! Less is more! The bottom line is that you should be able to easily wipe a rag across any surface in your home to dust, sweep, mop, and or vacuum any time you choose. You shouldn't have to clean, before you clean! This goes a long way towards making the house appear clean even if you haven't recently dusted or swept! Win-win:-)
Picture

FOUR: Make the Bed - I don't really mean make the bed, which if done correctly like in a motel room can take a long time to tuck in the sheets, blankets etc. I mean make the bed appear to be made, or made good enough. First, you need to have a nice headboard. It doesn't have to be expensive, and you can even make your own, but it is 'key' for this tip to work. Then get an oversized comforter or summer quilt and a few matching decorative pillows. Keep the comforter on the bed and use it. Yup, sleep with it every night and in the morning as soon as you get up for the day, straighten it out and throw the decorative pillows at the top by the headboard. It will look great and literally only take a few seconds to accomplish! So simple!
Picture
Picture

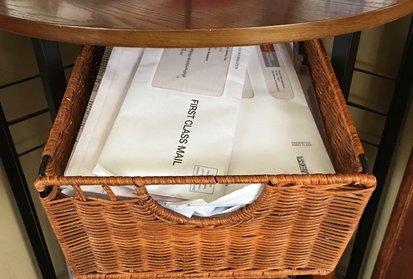
FIVE: Mail (not the 'e' kind) - The mail basically gets delivered every day but Sunday. Most of the time it is junk and bills. Not exactly a pleasant experience. How to simplify? Well, you could get a PO Box and only pick it up once a week, but this costs money. A better way is to just grab it, sort the junk and the bills, simply throw the junk right out and stick the rest in the 'bill basket.' Immediately. Don't let it sit around. Don't waste your time opening it. The 'bill basket' is simply a drawer in a wicker corner unit that I throw all the bills and other 'non-junk' mail into. Once a month when it's time to pay the bills, I go through it. That's when I file the papers that aren't bills but need to be saved (like EOB's) and sort through what bills do need to be paid. Yes, I only do bills once a month. I took the time to make all my bills due on or about the same day each month, and I sit down to pay them all about a week before they are due. It takes less than an hour of my time, on one day only, of each and every month! Thats about 12 hours a year to pay bills! 
Picture

Did you like any of the tips above? Then stay tuned!
Our book "The ABC's of Creating A Simpler Life" is coming soon! It is chock full of tips from A to Z to help in creating your simpler life. There is something for everyone, no matter what stage of your life you are at or where you live. 
​After all, who doesn't want life to be simpler?
Thanks for visiting!
Follow us on social media and/or sign up for e-mail to get notifications of our latest posts and be notified when our book is finally out!

Keep it simple my friends :-)
Sincerely,
Picture
0 Comments

To Reuse or Not To Reuse?

3/6/2017

0 Comments

 
Picture
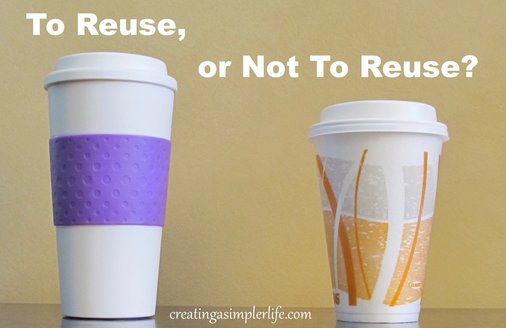
Reusing an item means it is purchased specifically to be used for the same purpose over and over again. For example, a reusable water bottle can just be refilled every day for work.  ​There are so many reusable items out there today that it can be almost dizzying to think about and to choose from!  My advice is if it is simple to use and maintain, then go for it! Some reusable items are not simple and therefore may not work for you, and that is O.K. so long as you are consciously making informed decisions.
​

Reusable Items
These reduce the need to buy something over and over again thereby eliminating or decreasing the amount of household waste!  They save you money and help the Earth!
  • Reusable Water Bottle- just refill and take everywhere you go! Try to choose one that contains no BPA and is good for the environment at the same time!
  • To Go Travel Mug for Coffee or Tea - just fill it at home or at the local convenience store like you would a Styrofoam cup (and pay of course!). Check out this crochet cozy that fits on the Dunkin' Donut reusable to-go cup!
  • Wool Dryer Balls - eliminates the need to buy dryer sheets forever!
  • Cloth Napkins - no need to waste paper every day and they make the table look pretty. You can use the same napkin several times before washing  so long as they are not dirty and so long as they are color coded or have names on them!
  • Refillable Soap Dispenser - allows us to by large quantity refills.  We use them in the bathrooms and the kitchen.
  • Small 10 oz Thermos - I fill it with V-8 and bring it to work every day.
  • Large 24 Thermos - my husband brings boiled water to work every day to make his oatmeal on the go!
  • Spray Bottles - we just re-make the cleaners in the same bottles when we run out (recipes here)
  • Coffee Filter Basket - stop buying paper filters!
  • Swifter Sweeper Covers - make your own homemade sweeper cover! 
  • Swifter Duster Covers - make your own homemade duster cover!
  • Reusable Elastic Bowl Covers - don't buy plastic wrap! Buy them or make your own homemade bowl covers!
  • Bamboo Paper Towels or Cotton Cloths - skip the paper towels!
  • Eco Friendly Dish Cloth - no more disposable sponges! Or make your own homemade crochet dishcloth here!
  • Eco Friendly Dish Scrubber - no more throwaway scrubbers! Make your own crochet scrubby here!
  • Reusable Grocery Tote Bags - I bought a set of 5 extra large and love them!
  • Reusable Handwarmers - are you or do you know a hunter or hiker? Check out how easy Reusable Handwarmers are to use!​
Take a look at this Reusable Pictorial Post!
​Check out our other Recycling Posts:
  • ​RECYCLING PART I - AT HOME BASICS - How to recycling glass, cans, paper etc. at home.
  • RECYCLING PART II - ODDBALL ITEMS - Recycling strange things like wires, cd's, and more.
  • RECYCLING PART III - SELLING & DONATING - Where to sell or donate instead of throwing out.
  • RECYCLING PART IV - REPURPOSING - What else can it be used for?
And check out our Pinterest Boards:
  • Recycling (different ideas on what, how, and where to recycle)
  • Selling & Donating (find ideas and places to sell and donate all kinds of items!)
  • Repurposing (a plethora of unique and creative ideas...)
  • Reusable Items (includes many products you may not have heard of before!)
Thank you for visiting :-)
Sincerely,
Picture
0 Comments

The Art of Repurposing

2/26/2017

0 Comments

 
Picture
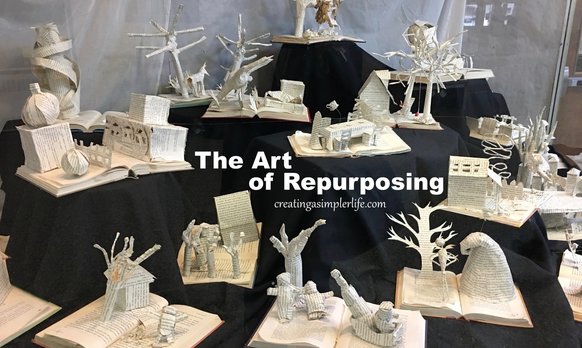
Books repurposed into fairy tale artwork by Commack high school students.
Repurposing - using an item in a way other than its original purpose.  Can be called an art because sometimes it requires a lot of creativity to find a way to repurpose something!

A simple example is reusing Chinese food containers to store magic markers in.  A super creative example is breaking up old cd's to create a mosaic design on furniture or other items. See what I mean? I never would have thought of that on my own! And check out those amazing fairy tale books by high school students above! Super creative :-)

Be careful about what you save to repurpose though! If you don't use it within a certain amount of time, it just takes up space and makes life more complicated!  Either recycle it or give it away
!
Picture
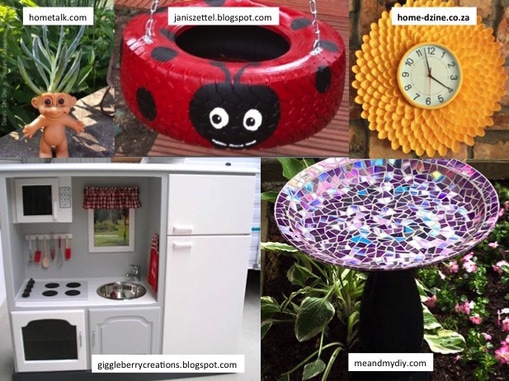
Some Creative Repurposing Ideas:
  • 5 Gallon Water Jugs - great for saving money in!
  • Chinese Food Containers - use for storing pens, pencils, etc.
  • Newspaper Bags - picking up dog waste.  Put your hand in, using it as a glove to pick up the waste, then turn inside out so the waste is inside, and tie it closed!
  • Computer Paper - if it is only used on one side, we cut it in half and staple it in bunches to make pads for lists.
  • Wood - scraps are saved and used for projects or crafts around the house (or firewood if non-toxic).
  • Material - used for crafts, curtains, etc.
  • Ribbon - we keep all ribbons wrapped up in a bin for use on crafts, presents, etc.
  • Plastic jugs (from iced tea or other beverage) - stores chicken feed, seeds, and water.  I really like the heavy duty plastic jugs that have a handle because it makes it easier for me.  We just refill it as needed from the bulk bags we buy.
  • Paper Grocery Bags  - saved and used when needed.
  • Plastic Grocery Bags - used as garbage bags in the small waste containers in the bathrooms. Check out this crochet grocery bag holder.
  • Egg Cartons - used for our backyard chicken eggs, as seed starters, etc.
  • Plastic Zip Lock Bags - cleaned and re-used for household objects (we do not re-use them for food).
  • Glass Jars with Lids - for making our pickles in.
  • Spice Bottles - we just dry our own spices and refill them.
  • Tins - a great way to 'wrap' a present.
  • Milk Crates - we use these in the garage to store pool supplies, garden tools, etc. They stack up nicely too.  Check out how I used them to sun-dry my cherry tomatoes!
  • Plastic 1 lb Coffee Container with Handle & Plastic Snap on Lid - we drill holes in the lid and use the container for saving used coffee grounds in to sprinkle in our garden and another to store winter ice melt salt so it can be sprinkled on the walkways.  We also use one for sprinkling grass seed as well!  One winter we actually had saved so many containers that we decorated them for Christmas, filled them with ice melt salt, and gave them as gifts to our relatives to keep on their front stoops for the winter. They loved the convenience of it..​
  • Ethernet cable - check out this crochet bowl pattern!
  • Dresser Drawers - use for raised garden beds!
Watch this slide-show of repurposing possibilities!
Visit our page Household Waste for additional information
​and
check out our
Pinterest Boards for more great ideas:
Recycling (different ideas on what, how, and where to recycle)
Selling & Donating (find ideas and places to sell and donate all kinds of items!)
Repurposing (a plethora of unique and creative ideas...)
Reusable Items (includes many products you may not have heard of before!)
Thank you for visiting!
Sincerely,
Picture
0 Comments

Recycling 101

2/18/2017

0 Comments

 
Picture
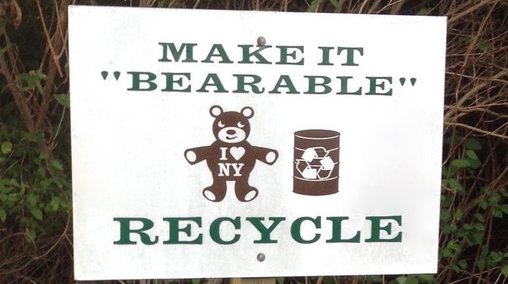
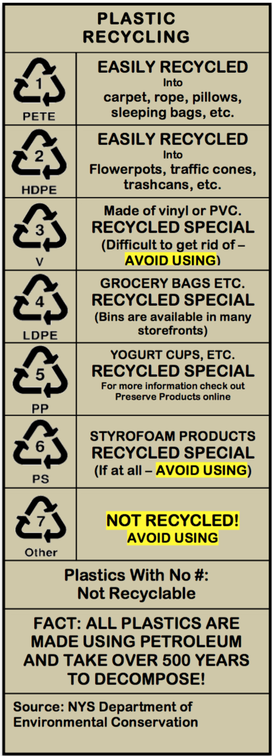
Today recycling is a basic requirement just about  anywhere you live. It can be annoying, but it is important and in some places there are actually penalties for not complying!

​Depending upon where you live the rules are different. Where I live we need to separate our recyclables and put them out on different days.  In other locations they have what is called "single stream recycling" where everything gets recycled together and separated elsewhere. This is in my opinion the best way and if you are lucky enough to live in a 'single stream' town then good for you!  

​Whether you live in a single stream town or an area that needs to be separated like me,  read the series below to learn how to make the process as painless as possible.  And remember, you are helping the Earth and future generations!
  • Read Recycling Part I - At Home Basics to learn more about recycling aluminum and tin cans, plastics #1 and #2, glass jars and bottles, and paper and corrugated cardboard.
  • Read Recycling Part II - Oddball Stuff to learn more about other products that are recyclable in other ways and where and how to get rid of it, and learn about household hazardous waste - stuff that never should end up in the garbage!
Picture
A Note About Recycling:
One thing that drives me crazy is when people reuse recyclable plastic items in ways that make them into non-recyclable items. For example, cutting up plastic bottles and being creative with them is fun, but this removes them from the recycle 'cycle' which in turns creates a need for more new plastic that will itself need to be recycled. Get it? Try to remember to recycle any and all plastic that can be recycled so that we can decrease the need to create more from scratch! Better yet, try to use less, or NO, plastic at all!
Items to Recycle at specific locations:
  • Computers - Apple Re-use/Recycling Program
  • Sneakers - NIKE REUSE-A-SHOE grinds down worn out athletic shoes and turns them into new places to play.
  • Denim Jeans - Recycle through BLUE JEANS GO GREEN
5 cent Deposits:
Don't throw away those nickels!  Recycle the 5 cent deposit bottles.  How do can you make this easy for yourself?  Wash them out immediately and keep a tote/bin in the back of your car.  Line the tote with paper towels so they will dry.  Put them in there at the same time that you take out the garbage or in the morning when you go for a walk. This way when you go grocery shopping, they are first on your agenda and you can't forget them at home!!

Check out our Pinterest boards:
  • Recycling (different ideas on what, how, and where to recycle)
  • Selling & Donating (find ideas and places to sell and donate all kinds of items!)
  • Repurposing (a plethora of unique and creative ideas...)
  • Reusable Items (includes many products you may not have heard of before!)
Thank you for visiting!
​Sincerely,
Picture
0 Comments

My Favorite Skillet!

11/5/2016

0 Comments

 
Picture
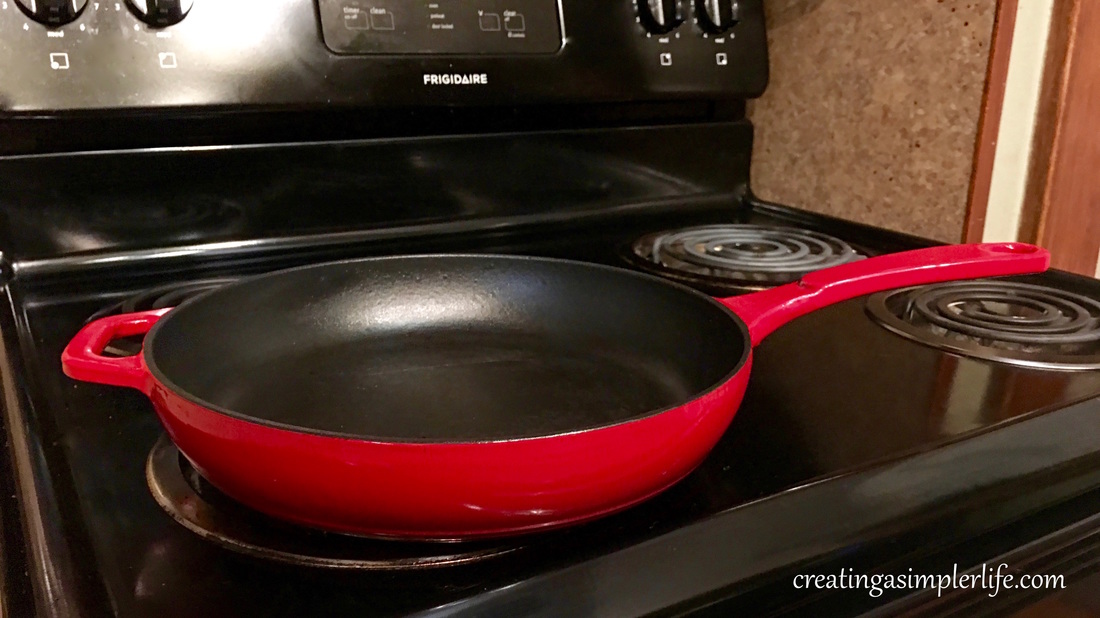
I seriously can't believe I am saying this: "I love my cast iron skillet."  I really do, and believe me,I never thought I would ever even consider using cast iron!  

Using cast iron was really sort of an accident for me. Cast iron is a pan that I have never even attempted to cook with.  In fact, my go to pots and pans have always been stainless steel. But if you have ever had to sit and scrub and scrub and scrub to get a pan clean then you know what I mean when I say stainless can be a real pain in the $%#.  I have also been through multiple skillets coated with teflon.  I say multiple because never has a skillet lasted more than a year in my house before the teflon started to come off. Thats how often we use the skillet!  More recently we were buying and using Green pans. They have a ceramic coating that is much healthier than using teflon and they did last a little longer. The big downside however was the price.  Not cheap by any means and still needed to be replaced after a lot of use.
Above: My absolute first cast iron pan and it's still my favorite!
Cast iron was never an option for me.  I didn't even consider it because I always thought it was cheap, horrible to cook on, and even more horrible to clean. I imagined needing to literally scrape eggs off the bottom of the pan and never really getting it clean....ever.  So imagine my surprise when my daughter and future son-in-law cooked a meal for 8 people using ALL cast iron pans and I volunteered (unknowingly) to do the dishes!  As soon as I saw what I had volunteered to wash I groaned and did my best to go at it with a smile on my face....only to find out how easy they all were to clean!!  In fact, they were easier to clean than the Green pans I had at home which were supposed to be non-stick!  After the simplicity of cleaning those cast iron pans that night, and eating amazing food that was perfectly cooked in them,  I was 'sold' on how awesome cast iron can be!  

I immediately purchased my first cast iron skillet and I have never looked back! I absolutely love cooking in the pan and am able to cook certain foods like steak and chicken indoors better than ever!  I have since added more cast iron pans to my list of must have's for the future.  

Here is a simple list of why I love my cast iron skillet so much:
  • Cooks amazingly well. Meat seers just like it was grilled!
  • Cleans so easy, almost like teflon and way easier than stainless or even ceramic. It really is a non-stick pan!  And my crochet scrubby's clean it perfectly! Buy my scrubby's or get the FREE pattern!
  • *Cooks extremely evenly (see cons below).
  • Great for gas or electric stove tops (not glass), can go in the oven, and can even be used over the camp fire (so long as it is not ceramic coated).
  • Made of extremely simple, all natural, Iron (Fe)!
  • Iron is actually good for your health and does not contain any harmful chemicals or toxins. If a little of it gets into your food, no problem! The same is not necessarily true for other metals such as aluminum.
  • Can be used to cook at much higher temperatures than any other pan material out there.
  • Extremely economical to purchase.
  • Will literally last literally forever so you will only need to buy a skillet once.  Many people are currently using cast iron skillets that belonged to their great-grandparents!
  • Lodge is a United States company! I chose Lodge Cast Iron specifically because of the quality and the fact that I wanted to support US businesses. Read about Lodge Cast Iron here.  Note that all but their porcelain enamel cast iron is made in the US.

Some of the cons:
  • Heavy -  I choose to look at it as a form of exercise.  Using it daily keeps my arms in shape!
  • Will rust if exposed to water for long periods of time - just don't put it in the sink!
  • MUST use potholders and pot handles to touch or move pan.  Good habit to use them anyway especially since it can also go right in the oven. Talk about versatile...
  • *Needs to be preheated in order to cook evenly.  Iron has a high specific heat meaning it takes time to absorb the heat.  This means that I need to turn on the burner and heat the pan for about 5 minutes before I cook on it. But, on the other hand it also means that the pan cools down slowly so I can literally shut the burner off 5 minutes before I am done cooking and it will still continue to cook! 
  • Preheating is also important for the pan to remain non-stick.
  • Must be allowed to cool down before handling to wash it. No problem, I just use a cup to add water to the pan while it is still on the stove cooling. After dinner it's ready, and super simple, to wash!
  • Can't be used on glass stove tops. For me this is no problem. I have regular old electric burner and will be getting gas in the future. Glass top is not even an option for me!
Even the 'cons' aren't so bad!
And check out this video of a comparisson between this skillet and the Lodge seasoned classic skillet in action and the MUST HAVE Kitchen Tools video below it!
Thank you for visiting :-)
If you like what you see please check out our other social media sites and consider following us!
​Sincerely,

Picture
0 Comments

Space Saving Tips for the Kitchen

6/18/2016

2 Comments

 
Have a small kitchen? Are you limited on space for storage?  Our kitchen is 9 x 7 and yes, that is pretty small for us (it is actually smaller because its really 5 x 3 attached to a 7 x 6 for a total square footage of 57 square feet)!  It's because it is so small that we had to come up with some simple ways to make the limited space work the best for us!

Every one of the pictures below was taken in our little kitchen.  Under the pictures is a list of all the ways we use to make the most of our minimal kitchen space! Maybe some will work for you :-)
Kitchen space saving ideas:
  • Pot Rack for pots and pans.
  • Cup hooks under the upper cabinets for mugs.
  • Cup hooks for utensils near the stove.
  • Cup hooks for measuring cups and spoons.
  • Consider smaller appliances (refrigerator, stove, dishwasher, etc.).
  • Store pots and pan lids in the oven drawer.
  • Get rid of what you don't need - for example, we don't have a microwave in our kitchen! 
  • Keep minimally used small appliances in a different location.  For example, our crockpot is in the basement and only retrieved when it is needed.
  • We don't store a lot of food in the kitchen either.  We turned our hall closet into a pantry so that most of our food is stored there.  This frees up our minimal cabinet space for things like dishes.
  • Have a bread drawer.  You can buy an insert to create a bread drawer.
  • Add drawer organizers for utensils and other things you use in the kitchen.
  • Add metal shelving to cabinets to create more upward space.
  • Install a lid holder inside a cabinet door.
  • Cut out the sheetrock between two wall studs to create an in the wall storage for spices and canned goods.  We have this on an outside wall. You can buy thin foam insulation to put along the back if it is an outside wall.  Then put luan over it to act as the back of the shelf (wall).  Add a few simple shelves, put wood trim around it and you have a great little pantry!
  • Keep cooking oil, and other spices etc. close to the stove for cooking convenience.
  • Keep the counters clear so they are always ready for cooking!
  • Hang hooks on the back of the door for outdoor grilling supplies within easy reach after cleaning!
  • Hang a hook for the garden vegetable collecting basket. Easy to grab on the way out, and easy to put away after bringing in the fresh veggies :-)
  • ​Install an under the sink garbage/recyclable slide out.
  • Add slide out drawers under the sink for cleaners, dish soaps, reusable dish sponges, etc.
See more ideas on our Pinterest Home Organization Board!

Thanks for visiting!

Sincerely,
Picture
Like what you see? 

Then please consider following us for more interesting ideas that help in creating and living a simpler life for you and your loved ones!
2 Comments

Five Steps to a Clean Bedroom in ONE Day!

3/24/2016

 
Picture
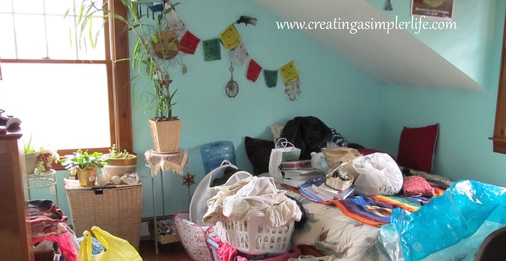
Do you have a messy bedroom or guest room in your home?  Most people do for one reason or another.  I happen to have several since my kids are slowly leaving the 'nest' their bedrooms have become a medley of their belongings and things that have been 'temporarily' stored in there over time.  It is easy for this to get more carried away than anyone ever expected. One day when  you're adding to the pile you actually stop and really look at it and you're like "Oh My Gosh! How on Earth did this happen?"  If you're like me or my daughter whom this post is actually dedicated to, the thought of cleaning is overwhelming so you kind of just keep the door shut.  Out of sight, out of mind, right?  Well that only lasts for so long.  Eventually, for whatever reason, you need something in there, or, like me, you actually have a need to use the room for something other than a bedroom so it's time to clean it!  

We have our new online store starting up (coming soon) so with all the stuff piling up we really needed a room to keep everything together and organized.  My daughter hasn't officially lived (or slept) in her bedroom for a few years so I mentioned to her that I really could use the space.  She completely understood but is overwhelmed by the amount of stuff she has accumulated over the years. She asked me for help and I told her I could have it done in a day if she really wanted me too.  I think she was afraid for me to do it without her, so she's been working on her room a little at a time (the picture above is a work in progress).  But, naturally the fact that I said I could do it in one day is based on experience as I have accomplished this very task several times in the past and this, of course, is what inspired me to write this post!  If you are disciplined and on task, you too can clean a messy room  in one day and if you follow the step-by-step process it should be as simple and painless as possible!
​
So here we go....
STEP 1
  • Gather several large garbage bags or several large moving boxes.
  • Empty the room.  Yes, completely and totally empty if possible.  If you can't remove the large furniture like beds and dressers, then at least empty them completely and move them.
  • This also includes emptying the closet if there is one AND it includes taking all pictures, etc. off of the walls.  NOTHING SHOULD BE LEFT (unless you can't move the furniture).
  • Do your best to put all clothing in a bag, all accessories in another, etc. If you come across stuff that belongs in another room, make a separate bag or box for it or put it in that room immediately (such as dishes and glasses). This is very basic simple sorting and should not take a long time.  You will do a more thorough sorting later.
  • If you know something is garbage, then throw it out!  If you think something is garbage, but aren't sure, then it is probably garbage so THROW IT OUT (or save it in a special bag to be donated or sold).
  • When I empty a room to clean top to bottom, I put the stuff in the hallway and in another room - remember this is only temporary!  However, if you think there is a chance that you will not finish in one day then be sure not to block any exits or rooms that you will need to get into!
STEP 2:
  • ​Clean the room!
  • Dust around the ceilings, walls, hanging lamp fixtures, windows, etc.
  • Wash the windows.
  • Clean the floor (vacuum, mop, etc.)
  • Great chance to re-paint if necessary but note that this will add additional days to the cleaning process!
STEP 3:
  • Put the furniture you want to keep back in the room (if you took it out in the first place) and clean it!
  • Dust and polish the surfaces, vacuum drawers, mattresses, cushions, etc.
STEP 4: 
  • Eat lunch or have a snack!  You are halfway there ;-)
  • This is where you start to put the rest of the 'stuff' back into the room.  This can also be the hardest part....we don't like to let things go but remember the saying "Less is More"?  It is so true!  Most of the stuff we keep just takes up space and causes us stress (hence the reason the room got so messy in the first place).  
  • Doesn't the room look great with nothing but furniture?  This makes it a little easier to get rid of some stuff - you won't want to put it back in and clutter up the room again!
  • Do clothing first - go through it one piece at a time.  If you haven't worn it in 6 months or more, it needs to go.  Anything that you will continue to wear  regularly, hang in the closet or fold into a drawer.  If not, add it to the donation bag!
  • Do the same for accessories like jewelry, knick-knacks, pictures, wall hangings, books, etc.  Most of the stuff has to go (we don't want clutter anymore) so try making it a rule to only keep 15 pieces or less of special jewelry or other special knick-knacks or books (you pick the number).  
  • Remember, everything must have a specific place that it goes in the room!  If it doesn't have a place, then it doesn't belong so 'by-bye' it goes.
STEP 5:
  • Your room should be done and you should be left with a bunch of boxes or bags to get rid of! You need to get rid of it as soon as possible.  You could simply throw it out. That would be the simplest solution, however it is not environmentally friendly and it doesn't help others.  So please, consider either donating the items or, if you think they have a decent amount of value, sell them for some extra money! Check out Recycling Part III: Selling & Donating for more information.
The bottom line: get rid of as much stuff as you can.  Less really is more!  Less stuff to clean, manage, and take care of means less stress and more happiness :-)
Enjoy your clean room!
​

Thanks for visiting!  

Check our our Minimizing and Organizing pages and our Organization board on Pinterest for other ways to help simplify your life!

​Sincerely,
Picture

SIMPLE & MEANINGFUL WALL DECOR

2/20/2016

 
Picture
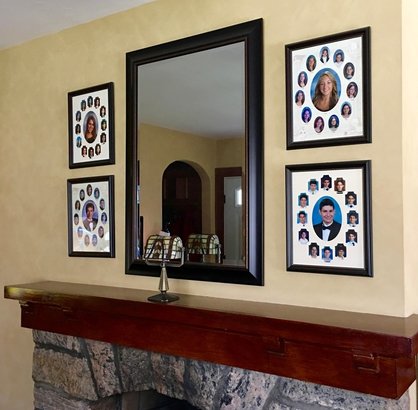
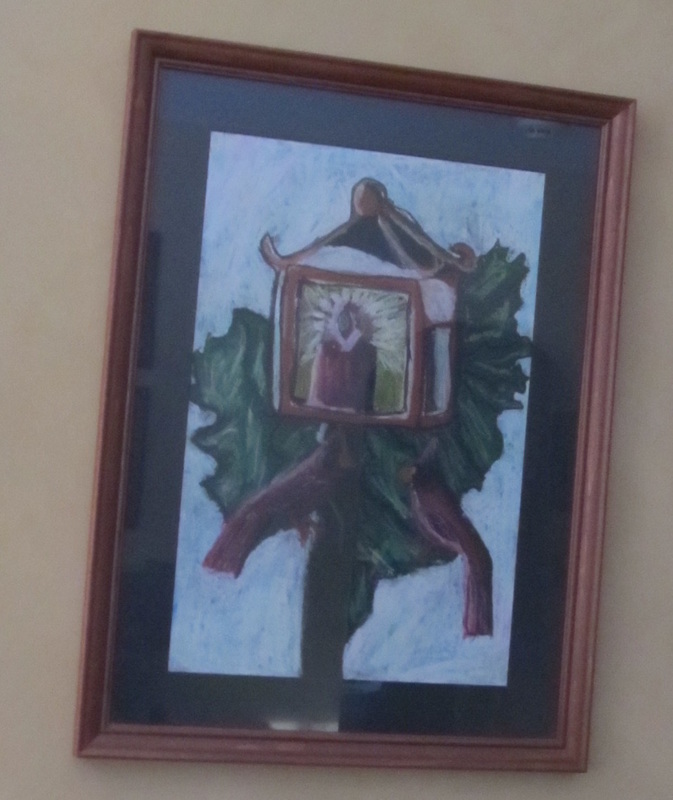
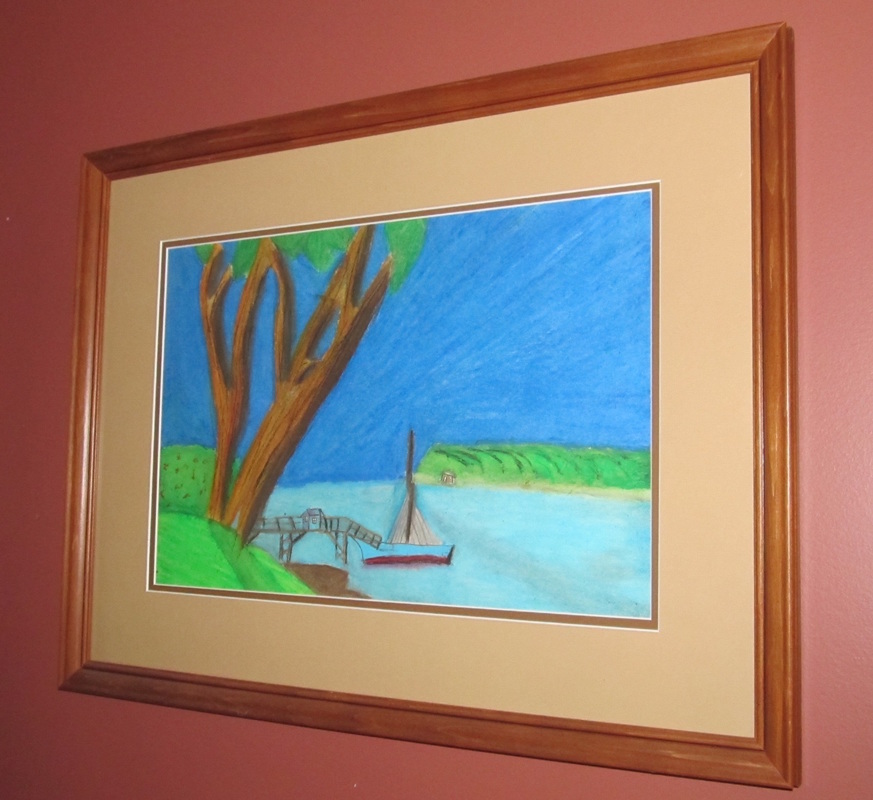
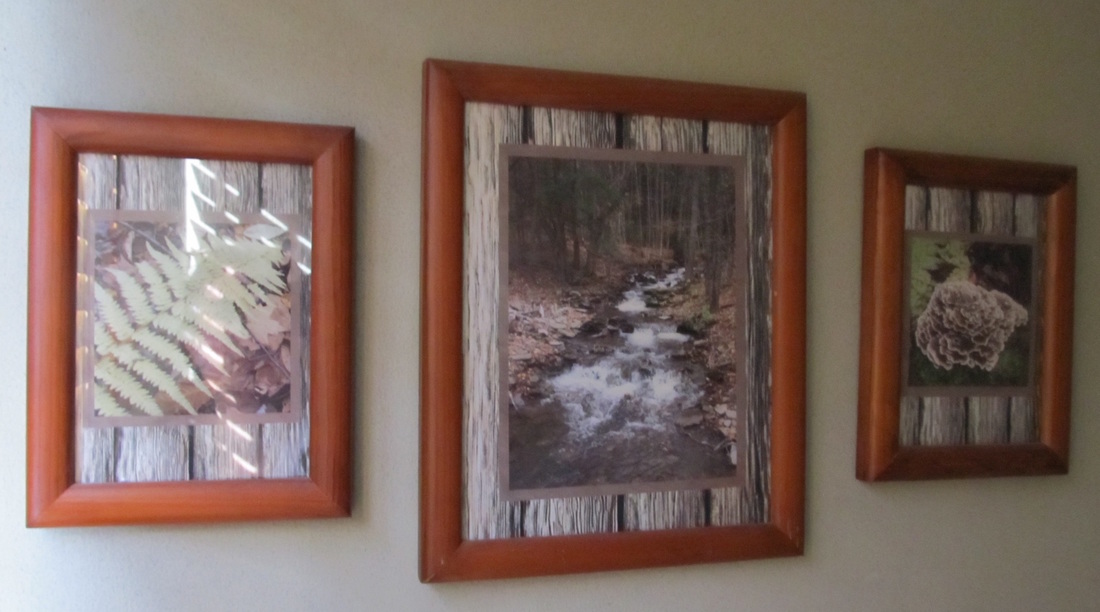
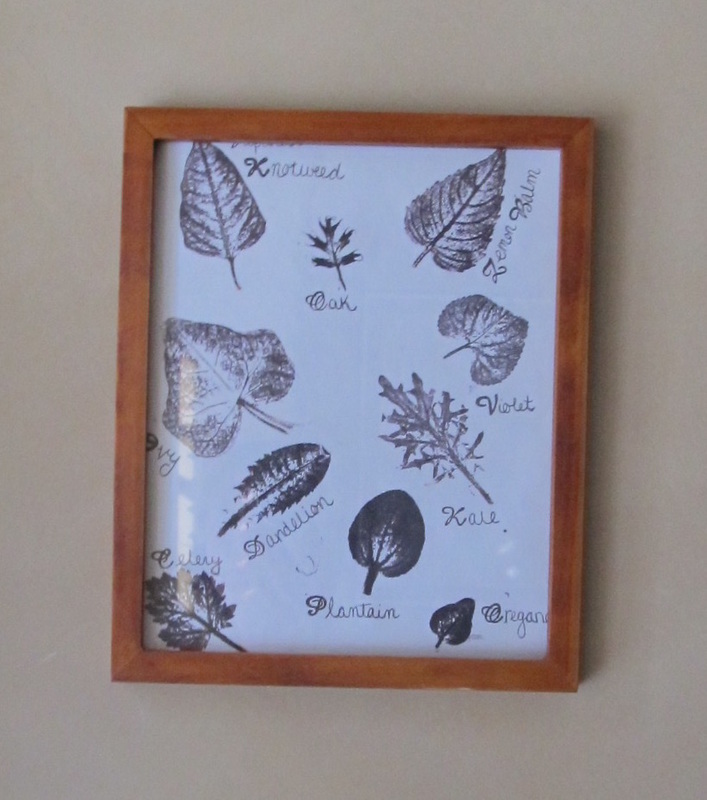
Why hang some strangers art on the wall?  Keep it simple and meaningful by using your children's art or even your own!  What's better than surrounding yourself with yours, your children's, or your relatives creations?

I have been saving my kids artwork since they were in elementary school.  I have switched different pictures for newer ones as the years went on and some have never come down! Some of the pictures were professionally matted and framed and other pictures I have framed myself.  An inexpensive option for matting pictures is Michaels craft stores (they always have a coupon). Whether you frame them yourself or pay someone else to do it, having your childrens, yours, or another special family members pictures on your walls around you is priceless!

Here are a few of my favorites hanging throughout our home:
Picture
Pastels by my daughter in 5th grade.
Picture
Pastels by my son in 5th grade.
Picture
Photographs taken by my daughter.
Picture
Charcoal sketch by my son in high school.
Picture
Ink stamped leaves from nature by my daughter.
Picture
Metal impression made by my son to be used as a mold, but I liked it for a wall hanging!
It feels wonderful to be surrounded by the creative projects of my children!

Thanks for visiting!

Sincerely,
Picture

Minimizing Your Seasonal Decorations

1/23/2016

 
Picture
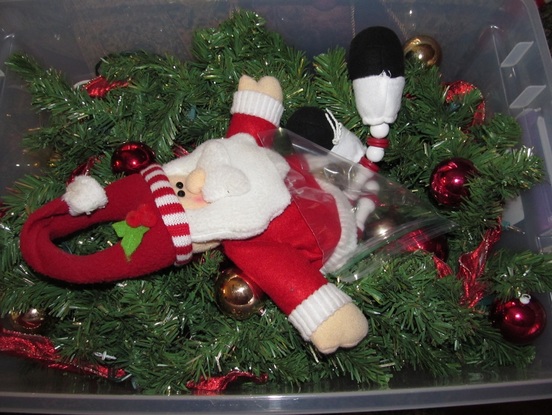
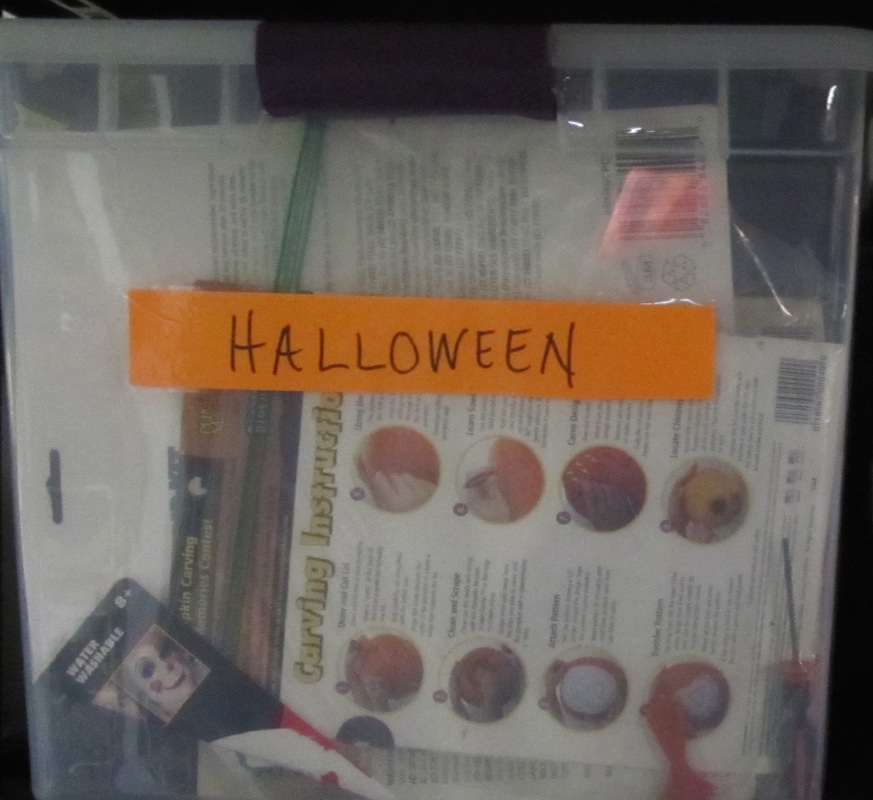
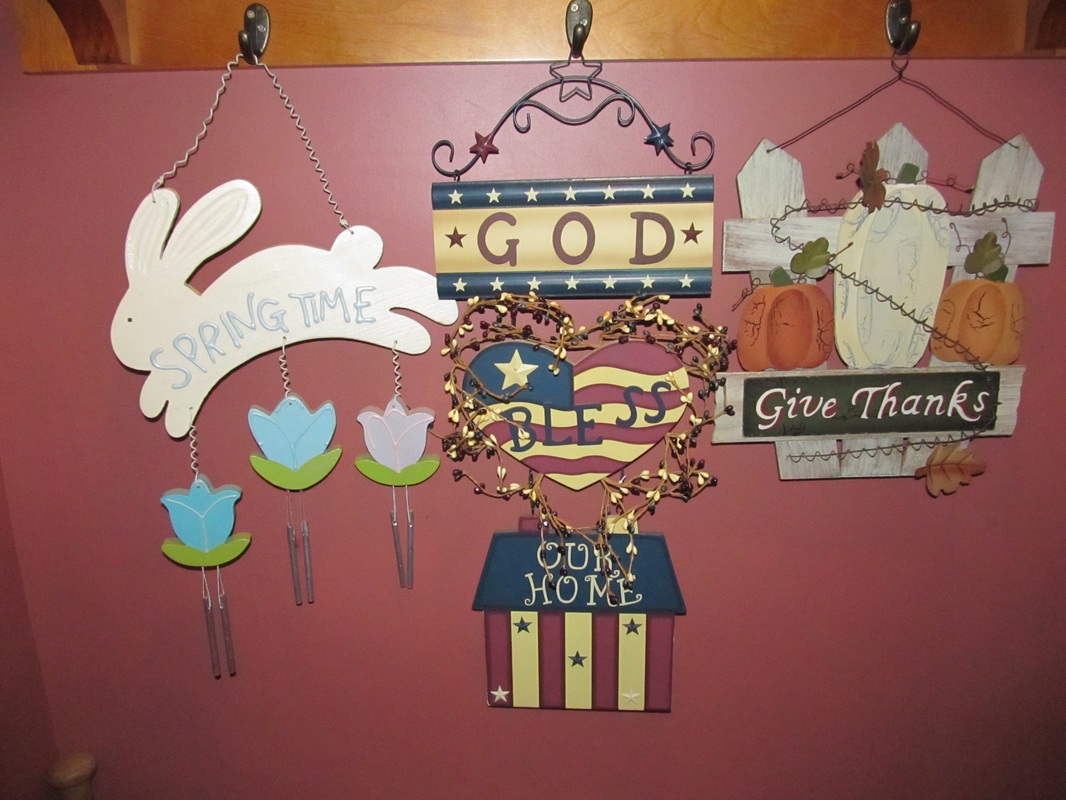
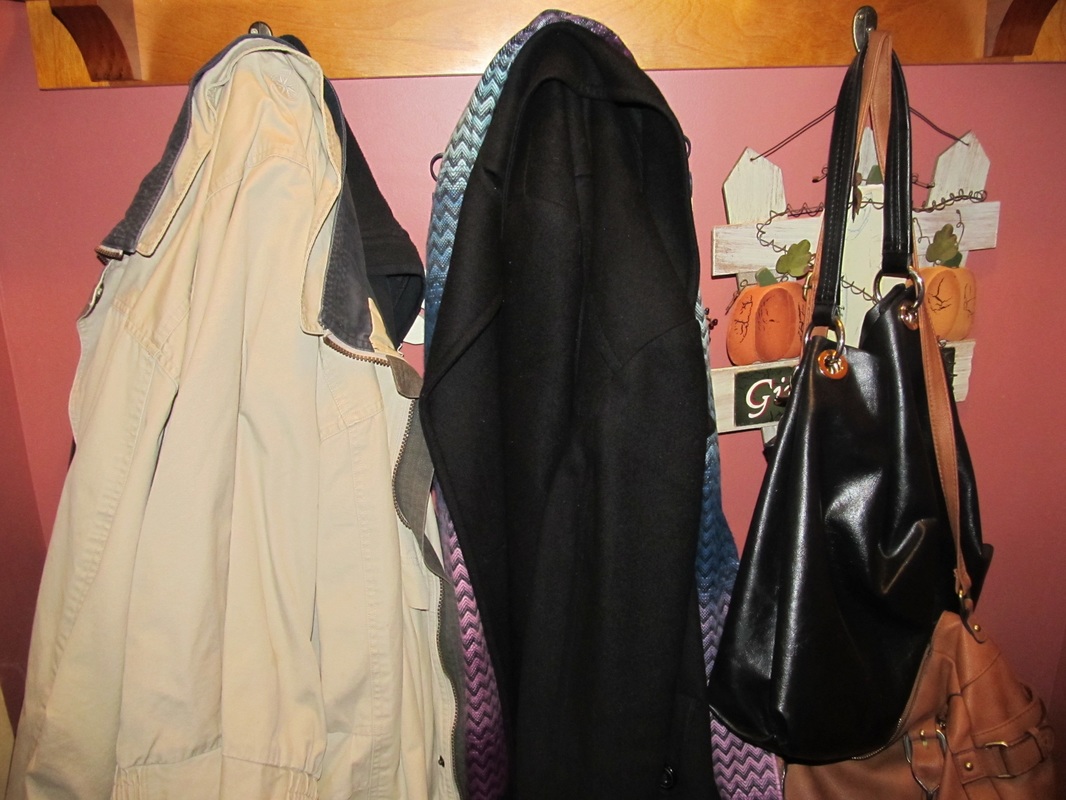
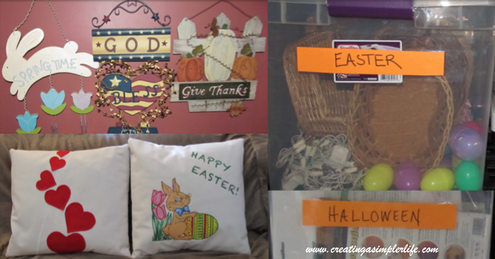
Love decorating for different holidays but discouraged by having too much stuff to decorate with?  Does the thought of decorating make you tired before you begin? Are you running out of room to store all that stuff?  Want to find a simpler way?  Then it is time to minimize and organize! Less stuff = less stress so  here's a simple way to minimize and organize all your seasonal and holiday decorations now.
Where to start?
  • Think about the different seasons/holidays you decorate for and choose which ones you want to continue to fully decorate for (sort of go all out).  We chose Christmas, Easter, and Halloween.
  • Decide how many bins you want to have per holiday, and how big they need to be. We purchased 10 gallon bins with locking lids and decided to have one bin each for Easter and Halloween and two bins for Christmas (one for the tree including ornaments, skirt, topper, and lights and one for indoor/outdoor decorations and stockings).
  • Decide which holiday/season to start with and take out all the decorations for that holiday.
  • Start putting the items you want to keep into the bin one at a time.  When the bin is full you are either done, or you need to take something out in order to put something you want more in!  This is the hard part, but it really makes you look closely at each item to decide what is really important!  It is helpful to have a box ready for all the stuff you decide you do not want.
  • Label the "keeping" bin with the name of the holiday and put it on a shelf out of the way until you need it!
  • What about what  you are not keeping? Donate or sell them! Check out our Pinterest Board Selling & Donating for ideas on where and how to do this!
​
What about the "Binless" Holidays?
These are the holidays you don't go all out for, but still want to acknowledge and celebrate.
  • We have decorations for holidays such as the Fourth of July and Thanksgiving, however we don't need a bin because we don't decorate a lot for them. We just change either the pillow covers, the front door hanging, or both!  Oh, so simple!
Picture
Christmas Cards: Screw one tiny eye hook into each side of a window (2 total). Hang as many loops of string as needed between them each Christmas. Cards with no fold? No problem, just use a piece of tape over the top of the string! Holiday over? Save the string and the hooks with your decorations for next year! Simple :-)
Picture
Keep the decorations for each holiday in a large bin. We use two bins for Christmas: one for tree decorations (skirt, ornaments, star, lights) and one for the house decorations.
Picture
We allow one bin for Easter - if it doesn't fit in the bin, then we don't keep it! Notice the bin is labeled?
Picture
And we allow one bin for Halloween - same rule, if it doesn't fit in the bin, then it doesn't get to stay!
Picture
Hang your door decorations on coat hooks near your door to make switching it easy as 1, 2, 3!
Picture
When coats are hanging on them nobody will even know they are there!
Picture
A simple way to decorate for the holidays that takes up very little space is pillow envelopes! The pillow stays the same, but the cover changes with the season or holiday! These can even be kept in a drawer if you don't have a bin for the holiday!
CLICK ON THE PICTURE BELOW TO GET FREE INSTRUCTIONS AND HEART TEMPLATE TO MAKE THE HEART PILLOW COVER ABOVE! INSTRUCTIONS FOR EASTER PILLOW COMING SOON.
Picture
Thank you for visiting!

​Please like and follow us :-)

​Sincerely,
Picture

START A CHRISTMAS MEMORY TREE NOW!

1/10/2016

 
Picture
It's the start of a new year so what better time than now to start a Christmas memory tree?   A Christmas memory tree is a tree where each ornament has a specific memory associated with it. A few of our special family memory ornaments are shown in the picture above.  As you can see they range from simple items like key-chains to exquisite glass ornaments. But each one has special memory associated with it that we share and remember together every year when we decorate the family tree for Christmas.  

CHECK OUT OUR YOUTUBE VIDEO ABOUT
​OUR MEMORY TREE:
OUR BLENDED FAMILY TRADITION!

Why We Started This Family Tradition
This is a second marriage for both my husband and myself. We each brought our own children into the marriage and we were trying to find ways to create special memories that would help to blend our two families together.  I had already started some new memories and traditions with my children as a single mom, so it was easy to continue doing it as a blended family.  Today, ten years later, it is still a yearly tradition for all of us to get together and even though the kids are 25, 23, and 20, we still laugh and talk about the memories as we decorate the tree.  Sometimes we even get a little teary eyed over the ones that make us a little sad such as the memories of our family dog that passed away this past July. But one thing is for sure, he will never be forgotton!

This is also a great idea because it minimizes the junk around the house.  Everyone is always buying nick-nacks on vacations and has favors from various weddings and parties.  Get rid of all that stuff and choose the special ones to make into ornaments!  The memories are small, they do not sit on a shelf collecting dust, and they will be used (and actually remembered) once a  year!
How To Start A Memory Tree
​

1. Collect Items as Ornaments During the year - 
  • ​Handmade from Children/Grandchildren - over the years we have saved all the little gifts the children have given us and we have turned the choice ones into ornaments to hang on the tree.
  • Vacations - you can purchase an ornament or a key chain from special places you visit such as a trip to Philadelphia.  We prefer key chains because there is a lot more to choose from, they are usually much less expensive, and there is room on the back to write (more on this later).
  • Day Trips - we have taken the kids to the Ducks Baseball games, the Museum of Natural History, a trip to the city to the 2112 Cafe, etc.  During these special trips we pick out a cool ornament or key chain the same as we do for vacations.
  • Events - we have purchased specific ornaments for special events such as the birth of a child, graduations, getting a drivers license, engagement, becoming an EMT, and many more.  I love looking through the possible ornaments to buy at Personal Creations.
  • Parties - I have made it a point to give out party favors that would make a great little memory ornament for sweet 16's, 50th birthdays, etc.  
  • Sports /Activities/Hobbies - is someone a soccer player?  Then purchase an ornament to remember all the craziness involved in attending all those practices and games! How about a kid who just doesn't stop playing video games?  Yup, theres an ornament to remember that too!  Again, check out Personal Creations for the many different personalized ornaments available.
Check out this little slide of a few of our special family ornaments:
2.  Make it into an Ornament -
  • If it doesn't have a hole, then drill one!
  • Buy Ornament Hooks (affiliate link) and make them into an ornament!  
3. Write on the Ornaments -
  • We use a special Sharpie Oil Marker (affiliate link) to write on the ornaments.  We usually write the month and year only because the ornaments we choose are mostly self descriptive as you can see in the pictures.
  • Then put them in a special location to save until it is time to decorate the tree!
4. Decorate the Tree with Memories -
  • Put up your tree with the lights and topper, and schedule a date to decorate!
  • When it is time to decorate the tree, be sure to do it on a day when everyone can get together.  As each person takes a turn hanging an ornament, it is is only natural to share the memories of that time with everyone else!
Picture
Each year there will be more and more ornaments to add to the tree and the memories of all the things that you did will always be remembered :-)  Above is a picture of our family the night that we decorated our tree for 2015.  It's also another tradition to take a family picture in front of the tree after we decorate it and this years picture includes my daughters finance who we will now include in all our future memories!
It is never too late to start!
​Start today and by Christmas you will have memories of the entire year to share!
  • Are you a grandparent?  Then start a special memory tree for your grandchildren as they grow!
  • Are you single?  So what...start a memory tree of all the awesome things you have time to do with your friends!
  • A new couple?  Those memories have already begun...document them on the tree and remember them each year!
  • Young parents?  Well, then it's perfect timing to start that tree and family tradition!
Thank you for visiting :-)

Sincerely,
Picture
<<Previous
    Picture
    Hi there! I'm Kathie, the author behind Creating A Simpler Life blog. I'm excited to share our longterm projects (and planning) toward building our future retirement homestead in the Adirondack Mountains of New York. In the meantime I will be sharing all the other little things we do that are part of creating our simpler life!
    Creating a Simpler Life

    RSS Feed

    Visit Creating A Simpler Life's profile on Pinterest.

    Categories

    All
    Adirondack Crafts
    Chickens
    Conservation
    Crochet
    Do It Yourself
    Energy Savings
    Essential-oils
    Essential-oils
    Food-storage-preservation
    Food-storage-preservation
    Gardening
    Health
    Health-wellness
    Health-wellness
    Homemade-remedies
    Homemade-remedies
    Homesteading
    Homesteading Dreams
    Inexpensive Fun
    Minimizing
    Organization
    Products We Sell
    Recipes
    Recycling
    Saving-money
    Saving-money
    Shopping
    Wedding & Shower DIY

    Archives

    July 2020
    June 2020
    April 2020
    March 2020
    March 2019
    January 2019
    December 2018
    October 2018
    August 2018
    July 2018
    June 2018
    April 2018
    March 2018
    February 2018
    January 2018
    November 2017
    October 2017
    September 2017
    August 2017
    July 2017
    June 2017
    May 2017
    April 2017
    March 2017
    February 2017
    January 2017
    December 2016
    November 2016
    October 2016
    September 2016
    August 2016
    July 2016
    June 2016
    May 2016
    April 2016
    March 2016
    February 2016
    January 2016
    December 2015
    November 2015
    October 2015
    September 2015
    August 2015
    July 2015
    June 2015

mrandmrscorbi@gmail.com
Contact Us - Privacy Policy - Disclaimer
Copyright 2022©Creating A Simpler Life, Inc. All rights reserved. Reproduction in whole or in part without permission is prohibited.
  • Home/About
    • What does OFF-GRID mean?
    • MINIMIZING >
      • Home Size
      • Room by Room
      • Get Organized
      • Household Waste
    • MINIMIZE DEBT, MAXIMIZE SAVINGS >
      • Bills & Other Debt
      • Saving Money
      • Shopping Tips
      • Affordable Fun
    • BACKYARD CHICKENS >
      • The Coop
      • The Chickens
      • Feeding the Chickens
      • Fresh Eggs
    • HOME GARDENING >
      • Building the Garden
      • What We Grow
      • Seeds, Weeds, & More
      • Preservation & Storage
    • DO-IT-YOURSELF >
      • Health & Wellness
      • Simple Cleaning & Tips
      • Crafts & More!
      • Printables
    • CROCHET >
      • IDEAS & MORE
      • VIDEO TUTORIALS
  • HOMESTEAD
    • The 5 Year Plan PLUS! >
      • 2017
      • 2018
      • 2019
      • 2020
      • 2021
      • 2022
    • WHY AN EARTH SHELTERED HOUSE?
    • OFF GRID TINY TRAILER
    • BUILDING our HOMESTEAD from Scratch >
      • BUYING LAND & GETTING STARTED
      • BUILDING THE CONCRETE DOME
      • FROM DOME to HOME
      • SURVIVING OUR FIRST WINTER
    • HOMESTEAD MACHINERY >
      • GENERATORS
      • KUBOTA TRACTOR
      • ATV'S & UTV'S
      • WOOD CHIPPER
      • CHAINSAWS
      • LOG SPLITTER
      • POWER TOOLS
      • SNOWMOBILES
      • AUTOMOBILES
    • BUDGETING THE BUILD
    • SUSTAINABILITY >
      • WATER
      • FOOD
      • SHELTER
      • ENERGY >
        • SOLAR POWER
    • The Adirondacks >
      • Wildlife & Nature
      • Insects & Bugs
      • Things to Do
      • Water Fun
    • ADIRONDACK CRAFTS
  • VLOG
    • 2023
    • 2022
    • 2021