CREATING A SIMPLER LIFE OFF-GRID
  • Home/About
    • What does OFF-GRID mean?
    • MINIMIZING >
      • Home Size
      • Room by Room
      • Get Organized
      • Household Waste
    • MINIMIZE DEBT, MAXIMIZE SAVINGS >
      • Bills & Other Debt
      • Saving Money
      • Shopping Tips
      • Affordable Fun
    • BACKYARD CHICKENS >
      • The Coop
      • The Chickens
      • Feeding the Chickens
      • Fresh Eggs
    • HOME GARDENING >
      • Building the Garden
      • What We Grow
      • Seeds, Weeds, & More
      • Preservation & Storage
    • DO-IT-YOURSELF >
      • Health & Wellness
      • Simple Cleaning & Tips
      • Crafts & More!
      • Printables
    • CROCHET >
      • IDEAS & MORE
      • VIDEO TUTORIALS
  • HOMESTEAD
    • The 5 Year Plan PLUS! >
      • 2017
      • 2018
      • 2019
      • 2020
      • 2021
      • 2022
    • WHY AN EARTH SHELTERED HOUSE?
    • OFF GRID TINY TRAILER
    • BUILDING our HOMESTEAD from Scratch >
      • BUYING LAND & GETTING STARTED
      • BUILDING THE CONCRETE DOME
      • FROM DOME to HOME
      • SURVIVING OUR FIRST WINTER
    • HOMESTEAD MACHINERY >
      • GENERATORS
      • KUBOTA TRACTOR
      • ATV'S & UTV'S
      • WOOD CHIPPER
      • CHAINSAWS
      • LOG SPLITTER
      • POWER TOOLS
      • SNOWMOBILES
      • AUTOMOBILES
    • BUDGETING THE BUILD
    • SUSTAINABILITY >
      • WATER
      • FOOD
      • SHELTER
      • ENERGY >
        • SOLAR POWER
    • The Adirondacks >
      • Wildlife & Nature
      • Insects & Bugs
      • Things to Do
      • Water Fun
    • ADIRONDACK CRAFTS
  • VLOG
    • 2023
    • 2022
    • 2021

Blog

A little bit of anything and everything that's part of
​creating, enjoying, and living a simpler life!
Picture

REDUCE YOUR POOL'S ENERGY USE!

6/29/2015

0 Comments

 
Picture
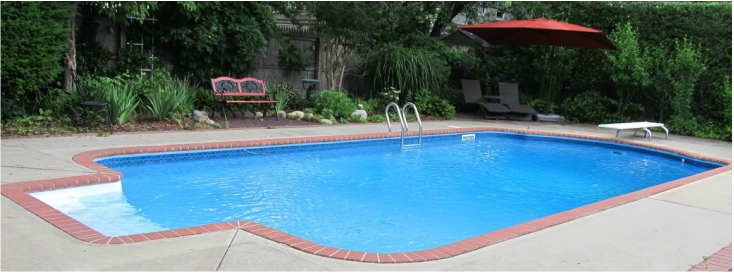
Yes, I know, I’ve heard it before.  How can we be creating a simpler life and have a backyard pool?  And it's a heated pool too!  Well of course for us it’s simple!  This is our BIG family vacation.  You know that big vacation some families take? The one that costs upwards of a few thousand dollars for a family of four?  Well, this is our BIG vacation and so far it has lasted us 10 years! 

Having backyard animals and a garden it is hard to get away for anything more than a few days at a time so we invested our 'vacation' money into a backyard heated pool that we have never regretted, especially when we jump right in after weeding the garden on a hot day!  And despite the initial investment, the pool does NOT have to break the piggy bank every summer, especially when it comes to the amount of energy it uses.  After extensive research I have learned that by making a few simple changes we should be able to save approximately 600 kWh this summer alone!

So what did we change that will save both energy and money?
HOW LONG DOES THE PUMP OPERATE EACH DAY?
In my research to find ways to decrease the cost of running our pool I learned that most people are running their pool filter far too long every day. The goal is to pump all of the water in your pool through your filter once every 24 hours.   In order to figure out how long that would take I needed to answer a few questions first:
  • How many gallons of water does the pool hold?  Pool Volume Calculator
  • What is the residential flow rate of the filter in gpm (gallons per minute)?
  • What is the flow discharge rate in gpm of the pump?
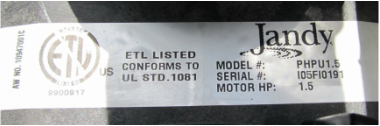
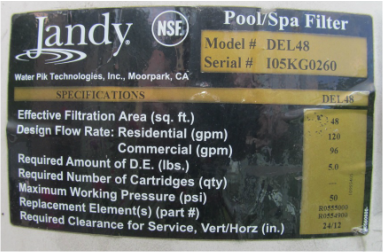
OUR POOL AS AN EXAMPLE:
Our pool holds 23,000 gallons (Pool Volume Calculator).

Our 1.5 HP pump and our filter both have a flow rate of 120 gpm (We had to use the Jandy Model PHPU1.5 manual to figure out the flow rate for the pump.).  Note that if your pump and filter do not have the same flow rate, then use the lower of the two, however they should be perfectly matched if the system was properly designed.

Math:  
23,000 gallons/120 gpm = 192 minutes, or 3 hrs 12 minutes minimum run time per day

Our pump was set to run from 8 AM to 4 PM every day.  Yes, it was set at 8 hours a day as advised by our pool installer! So now we are running it 4 hours instead of 8 hours per day.  

Why 4 hours and not 3.2 as calculated?  Because the California Energy Commission recommends the following:
"Reduce filter operating times to no less than 4 to 5 hours per day during the summer and 2 to 3 hours per day during the winter period. This will reduce annual electrical consumption by 40 to 50 percent. Normal and heavier swimming use may require as much as eight or more hours filtration per day. Should water clarity or chemical imbalance indicate inadequate filtration, immediately operate the filter until acceptable water clarity has again been established.

If additional filtration is still indicated, increase filter operating time in one-half hour increments until the water remains clear and properly balanced chemically. When the pool is being heavily used, it is recommended that the pool be operated manually and that the filtration system be run under such conditions. Under no circumstances should the water quality of any swimming pool be so poor that the main drain cover is not clearly visible from the deck."
Picture
Picture
HOW MUCH ENERGY CAN BE SAVED?
Saving money by using less electricity was the goal so of course I have to know exactly how much will be saved!

How many horsepower (HP) is the pump?
1 HP uses the equivalent of 745.7 Watts

Example: 
Our pump is 1.5 HP so it will use  1.5 HP x 745.7 W = 1,118.55 Watts

To convert this to kW, we just divide by 1,000:  1,118.55/1000 = 1.12 kW used every hour

Amount used in 8 hours:  1.12 kW x 8 hours = 8.96 kWh

By simply decreasing our pumping time from 8 hours to 4 hours a day, we have cut our pool energy use in HALF (saving 4.48 kWh every day)!
WHAT ABOUT THE HEATER?
We have a heat pump which is actually a very energy efficient way to heat the pool.  However it works most  efficiently when the air is warmer.  For this reason we set our pump to run between the hours of 11 AM and 3 PM (generally the warmest time of the day).  Of course there are times that we will override the system and keep it running longer if we want to get the temperature of the pool water higher or if we have a lot of people swimming.  Note that if the pool is at the desired temperature the heater automatically shuts off which is part of what makes it so efficient.
WHAT ABOUT THE ELECTRIC BILL?
Since the heat pump is connected to the same timer as the filter system, the amount of time the heater runs was also decreased by four hours saving an additional 1.5 kWh per day. That brought our savings to an average of 6 kWh/day. Multiply that by how many days the pool is open (about 100 days) and we are saving about 600 kWh’s over the course of the entire summer season.  At a total annual  electricity usage of approximately 12,750 kWh last year, that is a savings of 4.7%!  Definitely worth it J
A FEW MORE TIPS ON SAVING $:
  • If you do not have your pool pump set on a timer, get one now!  This makes life so easy!
  • If you are using the pool more, you will need to filter more (common sense).
  • It is cheaper to have your pump run at ‘off’ times for electricity use.  The early morning is usually best, unless you are like us and need to take advantage of the outdoor temperatures to heat the pool using a heat pump.
  • If you have a heater, keep the temperature reasonable (we keep our temperature set at about 85°F).
  • Additional ways to decrease your pool expenses can be found at Conserve101. 

Watch how we open our own pool every year! It saves money and is really not that difficult :-)

0 Comments

GROW YOUR OWN RASPBERRIES!

6/26/2015

0 Comments

 
Picture
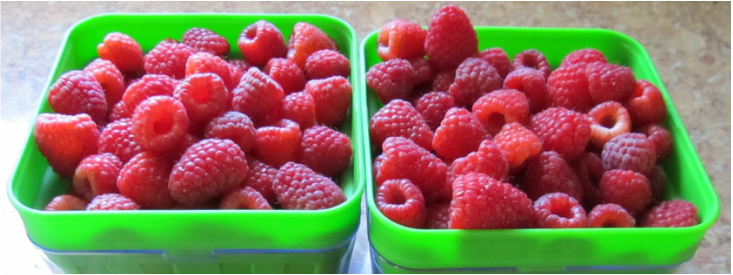
If you love eating raspberries it really is worth it to grow your own.  They are simple to grow, healthy to eat and will save you money too!
Three years ago we planted two small raspberry bushes. Today, we are picking about 3-4 pints of berries a week!  They are so easy to grow and they produce so many berries!  They are eaten right off the bush,  added to salads or smoothies, frozen to be used over the winter, and even shared with our chickens (They are one of their favorite treats!). 
WHAT WE GROW:
  • Everbearing Heritage Raspberries.  

WHY WE CHOSE THEM:
  • We love the heritage raspberries because they produce large red colored berries two times a year.  The June crop grows on the tops of the canes from the previous season and the September crop (which is larger) grows on the new cane from the present season.  Basically, every cane produces fruit twice.  
Picture
Picture
WHEN & HOW TO PLANT THEM:
  • They should be planted in the spring or fall in a full sun location with good drainage in order to grow the most berries.  You can still purchase them and plant them now if you watch them closely. They will grow at a rate of 13" to 24" per year and about 5-6 feet high.  They can also spread to a radius of about four feet .
  • Depending upon where they are planted, they need to have a trellis to keep the canes contained.  We built ours out of conduit and heavy gauge wire.  It is 2 feet wide by 8 feet long by 4 feet high and the wire is wrapped around the bottom approximately 30" high.  This is necessary so that ll root and the plant will spread.  If you want this to happen, then don't worry about the trellis.  The berries will also spread by shoots under ground.  These can easily be dug up and replanted elsewhere or discarded if they grow outside of the boundaries of the trellis or where you do not want them (like in the grass).
  • You should leave approximately one to two feet free on all sides of the rectangular trellis because the canes do grow quite long and will hang over the top.
Picture
Picture
HOW TO MAINTAIN & HARVEST:
  • In the early spring we cut back any dead growth being careful to avoid the canes that will be producing in September and next year.  
  • In June we get our first crop and we harvest about three to four pints each week.  This will last approximately two weeks or so and some days will be more productive than others.  After those canes are done producing they are pruned (This would have been their second crop.). 
  • In September we get our second crop of the season. This second crop grows on the new  cane that began growing in the spring. These are the same canes that will then produce again next year in June for the second time.
  • Freshly picked berries are either rinsed and eaten immediately, kept in the refrigerator, or frozen for the winter ☺.
GROWING YOUR OWN SAVES MONEY!
  • It cost us $30 to buy two Everbearing Heritage Raspberry Bushes ($15 each but we wanted two for better pollination).  After three years they are producing about 10 pints per season.  
  • At Stop & Shop Grocery store, a 1/2 pint of fresh raspberries is currently on sale for $2.99. That is $5.98 a pint!  The 4 pints I have harvested this week already covered the original purchase price of the plants.  
  • We DON'T use pesticides so our homegrown raspberries are ORGANIC, saving us even more money!  Organic raspberries are currently on sale at Stop & Shop for $3.99 for 6 ounces (that is less than a half a pint). That works out to more than $7.98 per pint so growing our own is MORE than worth it!
0 Comments

Bugs-Be-Gone! HOMEMADE INSECT REPELLENT

6/25/2015

2 Comments

 
Picture
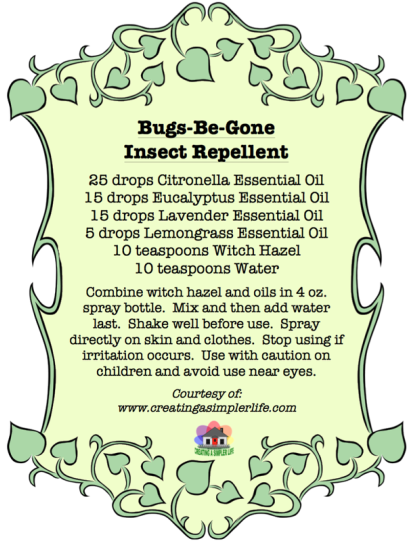
Tired of all those nasty chemicals? Interested in something more natural?  Well here is a recipe we use to battle the bugs that uses all natural essential oils.  If you're not sure what essential oils are, they are basically natural oils usually made by distillation of specific parts of a plant (bark, leaves, stems, etc.).  The resulting oil will have the fragrance and the useful properties of the plant it was extracted from.
Essential oils should not be taken internally.  When applied to the skin they should generally be diluted. The recipe shown will make approximately 4 ounces at a 3% dilution.
Aside from the essential oils and witch hazel, you will also need a mini funnel and a 4 ounce spray bottle (preferably amber colored to preserve the essential oils) to make this simple recipe.  
  • Always be sure to shake the repellent well before using.  
  • Test first on a small patch of skin to see if there is a reaction with any of the ingredients.   
  • If any irritation occurs wash with soap and water immediately.
  • Avoid use near eyes and as with all insect repellents, avoid use when pregnant. 
  • Repellent can be sprayed on skin and clothing (But remember there are oils in it!). Reapply as needed, or about every 3 hours, and enjoy keeping the bugs away!

Cost effectiveness:
It will cost approximately $45 initially (including the funnel & spray bottle), however, you will have enough supplies to make the 4 ounce repellent mixture 24 times - thats 96 ounces total!  Thats only .45 cents per ounce and if you do not get the funnel and spray bottles, it will cost even less :-)
Compare:
  • Homemade recipe:  Cost of approximately .45 cents/ounce
  • Cutter Insect Repellent 6 ounces at $5.99: Cost of approximately $1/ounce  (contains 7% DEET - a manmade chemical called diethyltoluamide)
  • All Terrain Herbal Armor DEET-Free 4 ounces at $9: Cost of $2.25/ounce

Note that the All Terrain brand  includes many of the same ingredients as our homemade recipe (with a few extra), however our recipe, though it costs more initially, is actually less money in the long run.  How many of us really only use one bottle of bug spray over the summer?
Saving money by making the repellent yourself is awesome.

Being healthier by NOT putting potentially harmful manmade chemicals on yourself and your family is PRICELESS.

If you are interested in more information on using essential oils check out "Do-It-Ourselves:  Essential Oils."  
2 Comments

HOMEMADE WEED KILLER - IT WORKS AND SAVES $$$

6/24/2015

0 Comments

 
Recently I had been considering buying a commercial weed killer just to use around my patios and driveways.  You know where I mean – those little cracks where a weed starts peeking through and before you know it you have a full-grown plant in the middle of your patio.  If you let this go on for too long, before you know it you will be weed-whacking your patio once a week!  Being against using any harsh chemicals that might be harmful to animals, humans, or the environment, I usually pick all these weeds by hand (Yes, I really do.).  However, last week a post went around on Facebook for Weed-Be-Gone Homemade Weed Killer.  I was intrigued by the recipe and became determined to try it out. 

Right off the bat I was not thrilled that the recipe called for Dawn dish soap since it contains a few ingredients I prefer not to use for potentially harmful environmental reasons: 
(methylisothiazolinone, sodium lauryl sulfate, and sodium laureth sulfate).  
Picture
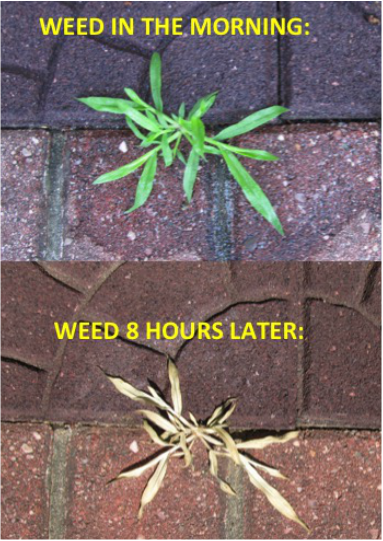
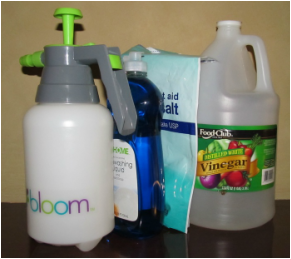
I don't even use regular dish soap in my home anymore (I use Dr. Bronners liquid castile soap instead.). However, after much research, and despite the fact that there are some concerns regarding the environment, I still think using the dish soap is the lesser of two evils when compared to the commercial brand weed killers.  I would choose to have a tablespoon of Dawn dish soap infiltrate into my groundwater rather than RoundUp’s potentially carcinogenic ingredients.

I have modified the recipe to work with a smaller 1-liter pump sprayer as making a gallon or more of the product seemed wasteful (I do not see myself using it that much plus the large sprayers are expensive and need to be stored somewhere.).  Instead I purchased a 1-liter pump garden sprayer (50% off) at RiteAid for $3.99 plus tax.  Also, after much research regarding the ingredients and their purposes, I have determined that this homemade weed killer should only be used on weeds in the patio or driveway or anywhere far away from plants and soil I do not want to harm. In my gardens I will continue to maintain the weeds by pulling them by hand or raking.  

Picture
I learned a tremendous amount about the different recipes:  http://www.garden-counselor-lawn-care.com/vinegar-weed-killer.html

Here is a more detailed explanation of each of the ingredients and the roles they play: http://www.garden-counselor-lawn-care.com/home-made-weed-killer.html
The three  ingredients are vinegar, salt, and dish soap.  The good news is that it does NOT matter what kind (brand, etc.) you use.  
Here’s why:
  • Vinegar – whether it is white, apple cider, distilled or not, it is an acid.  The acid will kill most weeds, but not all since it cannot be absorbed into leaves if they have a waxy type of coating on them.
  • Salt – a natural desiccant (draws out moisture). This will kill what vinegar will not however it is very bad for soil.  It is definitely recommended only for use on driveways and patios. You can use household salt, road salt, melting salt, sea salt, coarse salt, Epsom salt, etc.  
  • Dish soap – the dish soap, being designed to fight grease, will break down the waxy surface of the leaves that would otherwise prevent the vinegar from being absorbed.  The oils in the soap also help to kill the plant as well as making it easy to see what weeds you have already sprayed (shiny leaves after spraying).
Modified recipe:
4 cups vinegar 
½ cup salt 
1 tablespoon dish liquid 

(I used white vinegar,  Epsom salt and blue Rite Aid brand dish soap because it was $2.39 for 25 oz compared to $3.99 for 25 oz of Dawn)
I added the ingredients to a 1-liter pump sprayer and let it sit until the next morning.  Before work I sprayed the weeds on a small patio made of rubber tiles (made from recycled tires!). I returned home 8 hours later and the weeds were DEAD!  Using just a strong bristle brush/broom I was able to sweep the weed away!  The weed killer was a success and definitely saved me MONEY and I still have plenty of the soap left for future batches of weed killer ☺
A couple of last minute pointers:
  • You really want to soak the area a lot where the weed is in order to kill the root.  If you do not do this you might be spraying a lot more often.  This is also another reason why you only want to use this spray on patios and driveways and NOT in or around your gardens.  
  • Spraying in the morning does work best as the addition of sunlight during the day speeds up the killing process. 
0 Comments

BACKYARD CHICKS!

6/20/2015

0 Comments

 
Picture
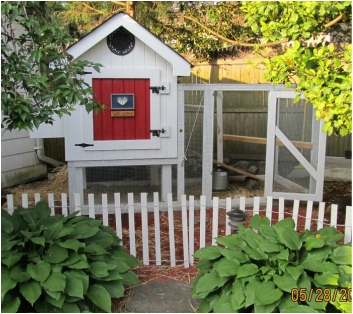
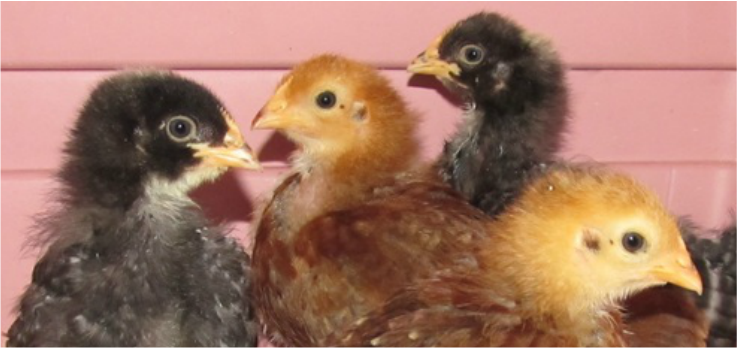
We have raised backyard chickens for about five years now. Our first group of chickens were already full grown when we brought them home about five years ago so they really required nothing but food, water, and a safe place to live and sleep.  We only have one of those original chickens still living so we decided it was time for more so this spring we brought home four baby chicks that were only four weeks old and that meant we had a lot to learn in order to take care of them properly.  

The first thing we learned was that they still needed heat.  For the first week of a chicks life the temperature needs to be about 95 degrees.  The temperature can be decreased by five degrees every week after that so this meant that at four weeks old they still needed to be kept at a temperature of about 80 degrees.  Considering the temperatures were still dropping every night this meant keeping the heat lamp on them for a while.  Lucky for us this was not  a problem since we already had the heat lamp set up in the coop from the winter. 
We also learned that the food needed to be ground up small enough for them to be able to eat. This was annoying, but we did it until we found out that we could buy it ground up already!  This may sound lazy, but it was definitely a bonus since they were eating practically around the clock.  We could barely keep up with them the first few weeks!
As the chicks grew, they were given more and more room to spread out.  Now, at about three months old they are big enough that they can pretty much have the run of the coop.   We let them outside every day and they are full of energy!  Goldie, our last original chicken, has made it clear to all the new babies that she is the queen.  Even though they are growing quickly, they are still smaller than her and they seem to be OK with her being the boss and letting her have first dibs on everything.  It is kind of funny to watch them back off from her. Every one of our chickens has it's own individual personality and that is actually how we can tell the ones of the same breed apart!
Picture
Picture
Having backyard chickens is a wonderful experience that we have never regretted.  The only thing left now is to wait about 3 more months for them to start laying eggs...

If you are interested in raising chickens or learning more about raising chickens, my favorite resource is a website called BACK YARD CHICKENS.  They have all the information you need to learn just about anything and everything related to raising backyard chickens.
Picture
0 Comments

ENERGY STAR REFRIGERATOR SAVES $$$

6/16/2015

0 Comments

 
Is your refrigerator using too much electricity?  Recently, my PSEG electric bill came with an advertisement that said "COOL SAVINGS ARE HIDING IN YOUR REFRIGERATOR."  Basically, if our refrigerator is working, purchased before 2006, and between 10 and 30 cubic feet, we can get a $50 reward for having them pick it up for FREE.

When this offer came with our bill we had already been looking to replace our old refrigerator.  I should say our really old refrigerator since it actually came with the house when we purchased it in January 2001 and even though it is only 14.8 cubic feet, it was using 1020 kWh’s per year to run!  We found out how much energy it was using from a handy little machine called P3 International Kill A Watt that plugs into an appliance and allows you to see the amount of kWh's over time (also called an energy use monitor).  
Picture
When doing research on newer Energy Star certified refrigerators, we learned that not only was 1020 kWh’s per year exceptionally high, but that refrigerator's are one of the top energy hogs in an average home!  I don’t know about anywhere else, but here on Long Island electricity is expensive.  It is probably our next largest bill after our mortgage so anything that can lower it is a bonus.  We used a total of 12,750 kWh’s last year, so the refrigerator usage was about 8% of the yearly bill alone!  According to EIA (The United States Energy Administration) our yearly kWh usage is only a little higher than the average American family as of 2013:

“In 2013, the average annual electricity consumption for a U.S. residential utility customer was 10,908 kilowatthours (kWh), an average of 909 kWh per month. Louisiana had the highest annual consumption at 15,270 kWh, and Hawaii had the lowest at 6,176 kWh.
Thankfully, an energy sucking refrigerator is an easy problem to solve – replace it! After some research and shopping around we found the best deal to be a similar 14.56 cubic foot Frigidaire on sale for $439.97 at PC Richard that only uses an average of 336 kWh’s per year.  There was also a $30 rebate offer!  They did want to charge us $50 for delivery, however the refrigerator was only 220 pounds shipping weight so we did it ourselves.  The final price after deducting the two rebates:  $359.97!  (Not including taxes of course…)
Picture
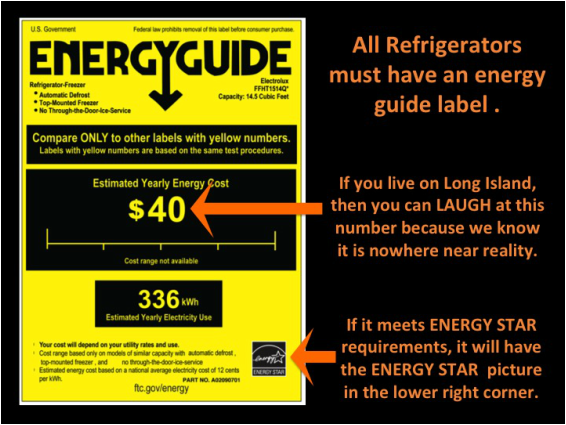
The new refrigerator should save us about 686 kWh’s per year.  At PSEGLI Rate 180 Residential/General Use  that is approximately .18 cents per kWh (of course not including fees and taxes).  So at 686 kWh’s less per year we are saving approximately $123 (More as they raise the rates each year, but we don’t want to think about that.).  The savings may be less if you live where electricity is not so expensive, but here on Long Island, the refrigerator will pay for itself in less than three years – maybe sooner if it keeps our food fresh longer! And, of course the best part is that using less energy benefits the Earth :-)  

Now I just have to wait for the two rebate checks to arrive…

A FEW TIPS FROM CA.GOV IF  YOU'RE THINKING ABOUT BUYING A NEW REFRIGERATOR:
Note that these tips have been shortened for convenience and that the website provides a lot more specifics.
  • Explore the Energy Star Certified Residential Refrigerator Data Base
  • Compare energy use numbers to find the most efficient
  • Top-mount models use 10 to 30 percent less energy than same-sized side-by-side models which the federal government holds to different standards.
  • Purchase the right size for your family - not too big and not too small.  The bigger the refrigerator, the more energy it consumes (also, if it is not full or too full energy is also wasted).
  • Consider skipping the ice-maker and dispenser. These convenient items increase a refrigerator's energy use by 14 to 20 percent.
Before you buy check out the ENERGY STAR REFRIGERATOR SAVINGS CALCULATOR to see what your savings may be if you upgrade!

Find additional information about Energy Star Labels, calculating kWh's of appliances, energy monitors and more at 
ENERGY.GOV.
0 Comments

IT'S NOT TOO LATE TO GROW BEANS!

6/12/2015

1 Comment

 
Picture
Pole string beans are one of the best summer crops my husband and I grow.  They produce so many string beans that not only can we eat them several times a week, but we have plenty to blanch, freeze, and store for the winter!  They take little to no work except for picking the beans regularly.  I actually find picking them quite relaxing.  It is NOT too late to grow them if you want to try. 
 
There are only a few basic requirements:
  1. Seeds
  2. A trellis or pole to climb
  3. Water every other day
  4. Sunlight (south facing is best)
 
Seeds are still available at Amazon.  I purchase the Sweet Garden Organics Kentucky Pole Beans.  These are heirloom seeds.  This means at the end of the season you can save some of the beans (with the seeds in them) to grow the following year!  This is great because it makes it easy to plant them next year without having to buy new seeds!
Picture

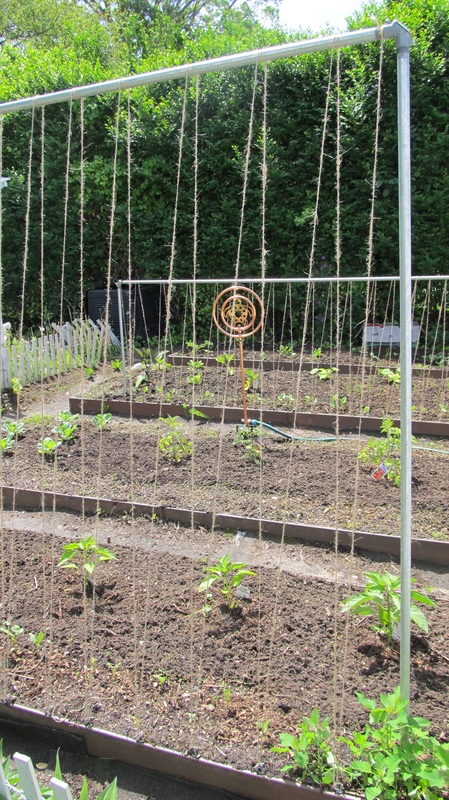
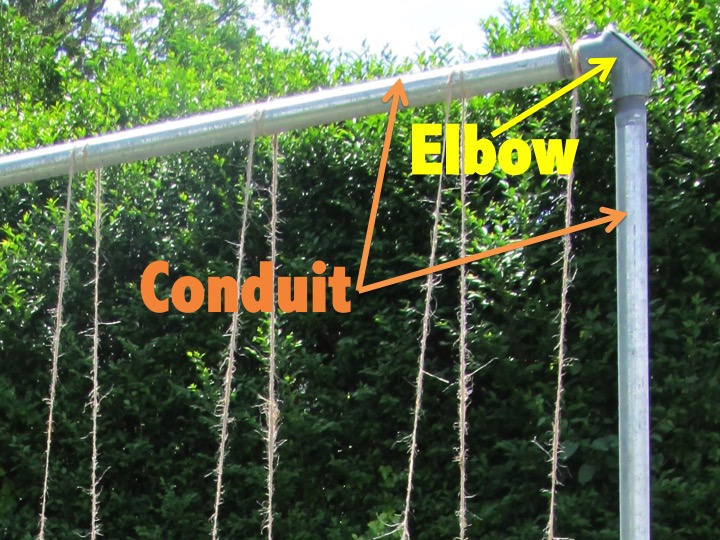
You need a place for the bean plants to grow.  They can grow very high (up to 12’).  Two methods that I have personally tried are the following:
Picture
Picture
  1. If you have a fence that has nothing in the way you can purchase garden trellis netting from Amazon or another store.  This is just hung from the fence and the beans will grow up it.  Works great with the only limitation being that beans can only be picked from one direction.
  2. The method we use is a trellis built using two pieces of 10’ half inch electrical conduit pipe, two pieces of 24” half inch rebar, two 90 degree elbow connectors for the conduit, and twine (or netting).  This method, as seen in the picture above, ends up being about 5 feet tall and allows beans to be picked from both sides.  This can also create a good screen for a porch or patio later in the summer when the plants have grown in. You can find building directions here: http://www.creatingasimplerlife.com/building-our-garden.html
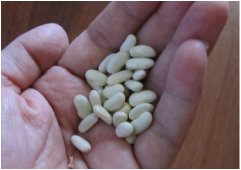
Once you have the seeds and the poles or trellis, you can plant!  We till the dirt along the bottom length of the pole design, mix in some sweet peat, and then plant one seed every three inches about a half-inch deep.  Water every other day and reap the rewards in about 2 months!
 
Picking tip:  Pick them when they are relatively small (3-4 inches long) – they taste better and they will actually produce more beans the more they are picked!  At the end of the season, allow some beans to remain on the vine and grow larger.  These will eventually be harvested to plant for next year.  The longer they stay on the vine, the stronger the seeds will be for planting next year :-)
1 Comment

It's A Start

6/11/2015

0 Comments

 
Picture
Living on Long Island is expensive and because of that can tend to be very stressful. My husband and I live on Long Island and although we both work more than one job each, paying the bills every month can sometimes be a struggle, especially while also trying to save for our retirement.  Despite the fact that we do plan to move upstate when we retire, for the time being we are here and we are doing our best to make the most of it.
 
In order to live a simpler, happier and healthier life here on Long Island we strive to do the following:
·      Pay down debt
·      Decrease monthly bills
·      Put aside money for now and for our future
·      Save money shopping
·      Garden for food and pleasure
·      Raise backyard chickens for eggs
·      Use essential oils for home cleaning products, insect repellents and more
·      Undertake Do-it-yourself projects and crafts in and around the home
 
We feel that all of these things, and more not even mentioned, help us to live a happier and healthier life, especially here on Long Island. However, we believe that they can help anyone living anywhere at any time as well. 
 
Many things that we do to help ourselves can already be found on our website: Creatingasimplerlife.com. However, we still have so much more to learn and to try!
 
That’s where this blog comes in.  It is intended to serve three purposes:
  1. To share all the new things that we personally try and/or experience, whether they work out well or not
  2. As a sort of journal with respect to the trials and tribulations of living on Long Island while ardently saving and planning to move away from it 
  3. To show that it is possible to create and enjoy a happier and healthier life, even when living in the suburbs!
 
Creating a simpler life on Long Island is not  always easy, but we are trying and we are truly happier for it!

0 Comments
    Picture
    Hi there! I'm Kathie, the author behind Creating A Simpler Life blog. I'm excited to share our longterm projects (and planning) toward building our future retirement homestead in the Adirondack Mountains of New York. In the meantime I will be sharing all the other little things we do that are part of creating our simpler life!
    Creating a Simpler Life

    RSS Feed

    Visit Creating A Simpler Life's profile on Pinterest.

    Categories

    All
    Adirondack Crafts
    Chickens
    Conservation
    Crochet
    Do It Yourself
    Energy Savings
    Essential-oils
    Essential-oils
    Food-storage-preservation
    Food-storage-preservation
    Gardening
    Health
    Health-wellness
    Health-wellness
    Homemade-remedies
    Homemade-remedies
    Homesteading
    Homesteading Dreams
    Inexpensive Fun
    Minimizing
    Organization
    Products We Sell
    Recipes
    Recycling
    Saving-money
    Saving-money
    Shopping
    Wedding & Shower DIY

    Archives

    July 2020
    June 2020
    April 2020
    March 2020
    March 2019
    January 2019
    December 2018
    October 2018
    August 2018
    July 2018
    June 2018
    April 2018
    March 2018
    February 2018
    January 2018
    November 2017
    October 2017
    September 2017
    August 2017
    July 2017
    June 2017
    May 2017
    April 2017
    March 2017
    February 2017
    January 2017
    December 2016
    November 2016
    October 2016
    September 2016
    August 2016
    July 2016
    June 2016
    May 2016
    April 2016
    March 2016
    February 2016
    January 2016
    December 2015
    November 2015
    October 2015
    September 2015
    August 2015
    July 2015
    June 2015

mrandmrscorbi@gmail.com
Contact Us - Privacy Policy - Disclaimer
Copyright 2022©Creating A Simpler Life, Inc. All rights reserved. Reproduction in whole or in part without permission is prohibited.
  • Home/About
    • What does OFF-GRID mean?
    • MINIMIZING >
      • Home Size
      • Room by Room
      • Get Organized
      • Household Waste
    • MINIMIZE DEBT, MAXIMIZE SAVINGS >
      • Bills & Other Debt
      • Saving Money
      • Shopping Tips
      • Affordable Fun
    • BACKYARD CHICKENS >
      • The Coop
      • The Chickens
      • Feeding the Chickens
      • Fresh Eggs
    • HOME GARDENING >
      • Building the Garden
      • What We Grow
      • Seeds, Weeds, & More
      • Preservation & Storage
    • DO-IT-YOURSELF >
      • Health & Wellness
      • Simple Cleaning & Tips
      • Crafts & More!
      • Printables
    • CROCHET >
      • IDEAS & MORE
      • VIDEO TUTORIALS
  • HOMESTEAD
    • The 5 Year Plan PLUS! >
      • 2017
      • 2018
      • 2019
      • 2020
      • 2021
      • 2022
    • WHY AN EARTH SHELTERED HOUSE?
    • OFF GRID TINY TRAILER
    • BUILDING our HOMESTEAD from Scratch >
      • BUYING LAND & GETTING STARTED
      • BUILDING THE CONCRETE DOME
      • FROM DOME to HOME
      • SURVIVING OUR FIRST WINTER
    • HOMESTEAD MACHINERY >
      • GENERATORS
      • KUBOTA TRACTOR
      • ATV'S & UTV'S
      • WOOD CHIPPER
      • CHAINSAWS
      • LOG SPLITTER
      • POWER TOOLS
      • SNOWMOBILES
      • AUTOMOBILES
    • BUDGETING THE BUILD
    • SUSTAINABILITY >
      • WATER
      • FOOD
      • SHELTER
      • ENERGY >
        • SOLAR POWER
    • The Adirondacks >
      • Wildlife & Nature
      • Insects & Bugs
      • Things to Do
      • Water Fun
    • ADIRONDACK CRAFTS
  • VLOG
    • 2023
    • 2022
    • 2021