Blog
A little bit of anything and everything that's part of
creating, enjoying, and living a simpler life!
creating, enjoying, and living a simpler life!

|
Before you throw it out or recycle, can it be used for something else? 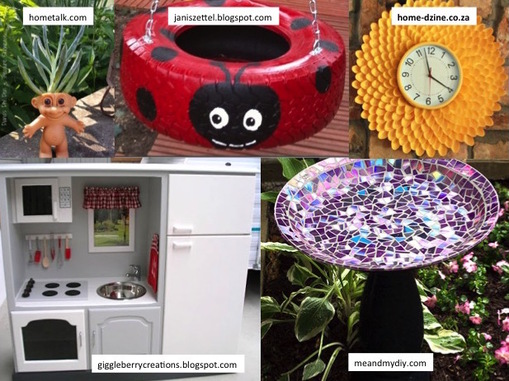 Repurpose - to give a new purpose or use to (as per Merriam-Webster). Why not use your garbage for something else rather than needlessly adding it to a landfill? There are so many ways to repurpose items I couldn't possibly include them all. However, I think I put together a pretty nice assortment of possibilities! Slide Show of Repurposing Possibilities Links to all items in the slide show can be found below. I apologize if you have any problems with the links due to circumstances beyond my control. Links can also be found on my Pinterest Board Repurposing. Repurposing from the Kitchen
Repurposing Out of the Closet
Repurposing Old or Damaged Furniture
Repurposing Old Toys
Repurposing Other Household Items
Repurposing Outdoor Items
Check out our Pinterest Repurposing Board for many more great ideas! Remember, think about what else you might be able to use it for before throwing it away! THIS IS POST NUMBER FOUR (IV) IN A SIX (VI) PART RECYCLING SERIES. COMING SOON: RECYCLING PART V: TRY REUSABLES INSTEAD! CHECK OUT THE PAST RECYCLING POSTS HERE:
Check our our Minimizing Household Waste page on our Website! Please like and follow us on Facebook, Pinterest, Google+, and Instagram!
0 Comments
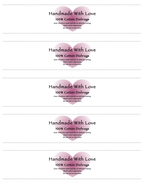
100% cotton yarn and so simple to make! Never have to buy or deal with smelly sponges again! Just wash the cloth when it gets dirty and have a few extra ready to go as backups! These make great gifts as well. Two FREE printable labels for a nice finishing touch are included! 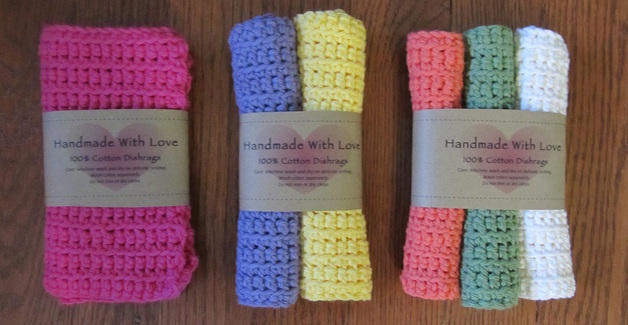 The finished dishcloth measures approximately 6" x 6". It is a little bigger than a sponge, but small enough to not be mistaken as a dish towel! Since this is a dishcloth the gauge is not crucial, however for those of you who need to know, 4 stitches = 1 inch. I will only use 100% cotton yarn to make these. It is more absorbent, natural, and great to crochet with. I purchase the Lily Sugar'n Cream brand from Michaels because it comes in 2.5 oz skeins in multiple color options. It regularly costs $1.99 for a 2.5 ounce skein, however I only buy if it is on sale or I have a coupon for 40% or 50% off. I recently purchased about 40 skeins when they were on sale for $1.19 each. That was a great buy! One 2.5 ounce skein makes three dishcloths with a little yarn left over (I use the scraps to make "scrap" bags. That post is coming soon!). 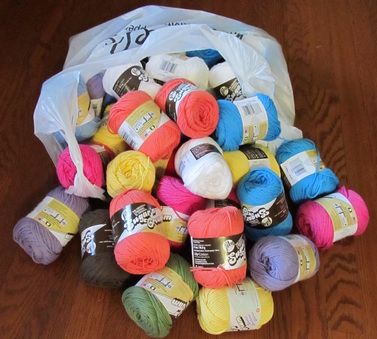 Don't know how to crochet? Then check out the Crochet Guru on YouTube to learn! She has excellent step-by-step videos with no "fluff." She also has videos for both right handed and left handed crocheting so no excuses! I used the single crochet front loop ridge stitch to make these dishcloths but you can easily just use a regular single crochet stitch. 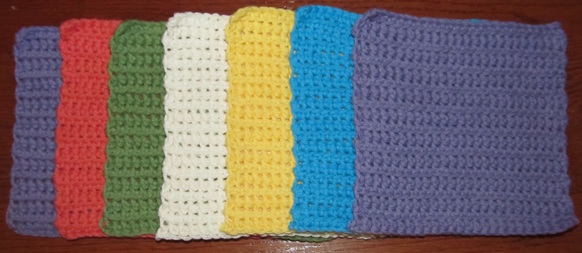 Making the Dishcloths Supplies:
Instructions:
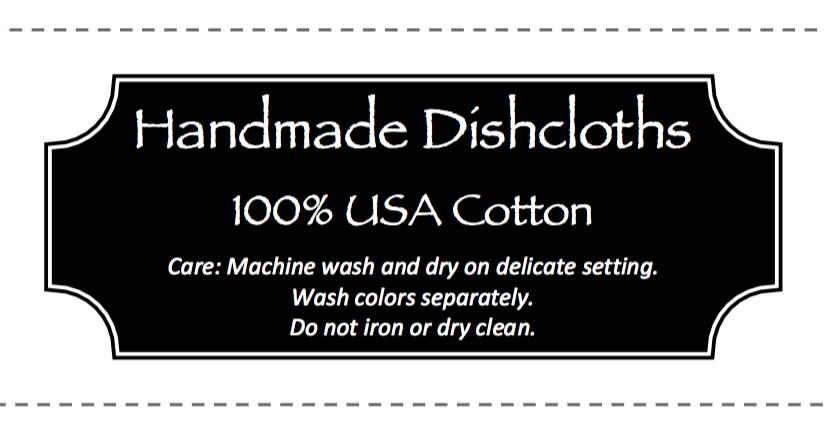
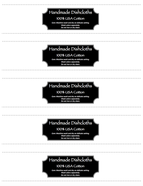
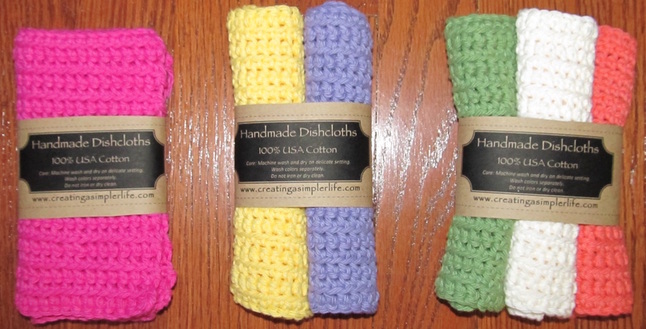 Presentation is everything! If you plan on giving these as gifts it will look better with a nice label. I have included two different labels that can be printed on 8 1/2" x 11" paper. There are 5 labels to a sheet. Just click on the picture of the labels you want to print to download the pdf file. The two styles are separate downloads. I printed them out on Brown Bag Paper (affiliate link) and then cut between the dotted lines.
Click on the pictures to download FREE 8.5" x 11" pdf of 5 labels per page! Each page is a separate download. Please like and follow on Facebook, Pinterest, YouTube, Google+, and Instagram! I appreciate your support!
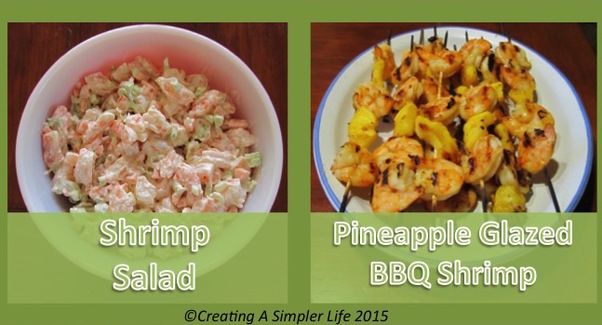 I love shrimp. I can eat it just about any way except raw. These two recipes are so simple and so yummy we make them all summer long. I hope you like them as much as I do! You can click on the recipe cards below or use the button under them to download the pdf file. It will print one sheet of 8 1/2 x 11 paper, preferably cardstock paper. Cut out each of the 4 x 6 inch recipe card and put them in your book! They always come two recipes per sheet in an effort to not waste paper! Visit my Recipes Page to print out previous recipes (pdf files) or to download a FREE 4 x 6 Recipe Card Template (.dox file) for your own recipes! Don't want to print them? No worries, just copy them down and enjoy! 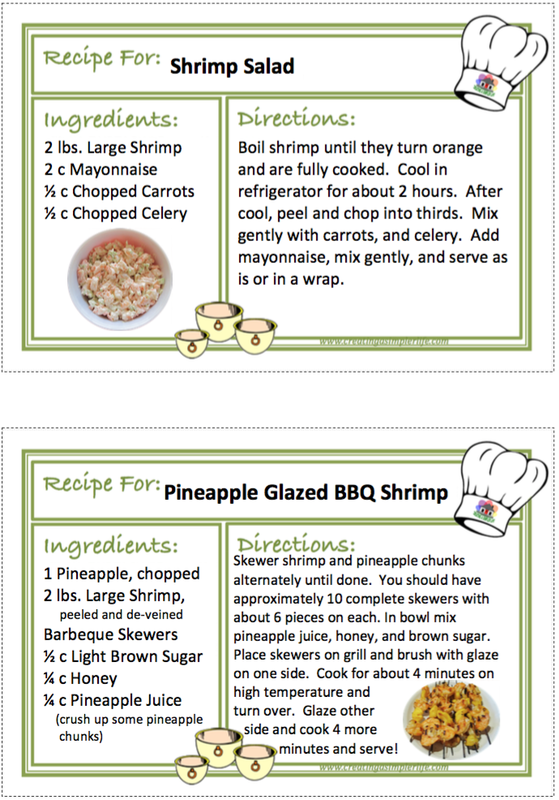 Please 'like' us on Facebook or join our mailing list so you never miss newly shared recipe cards!
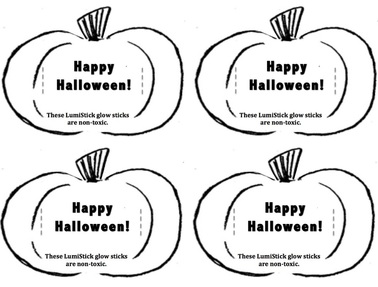
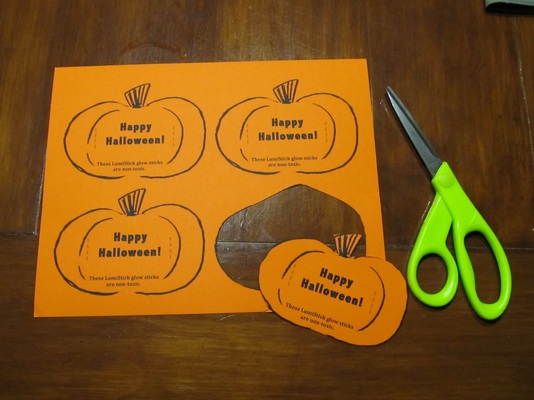
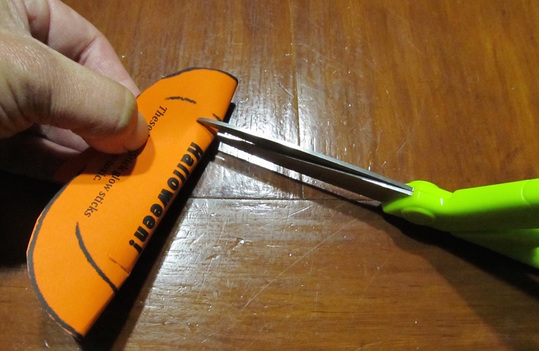
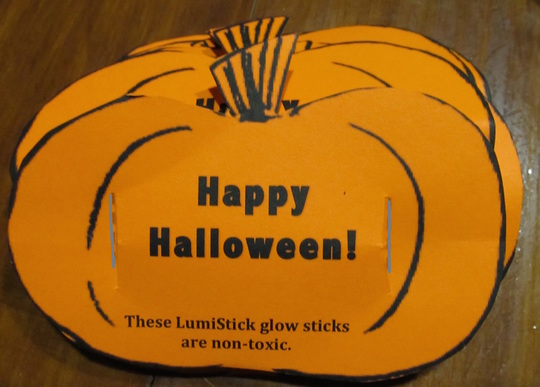
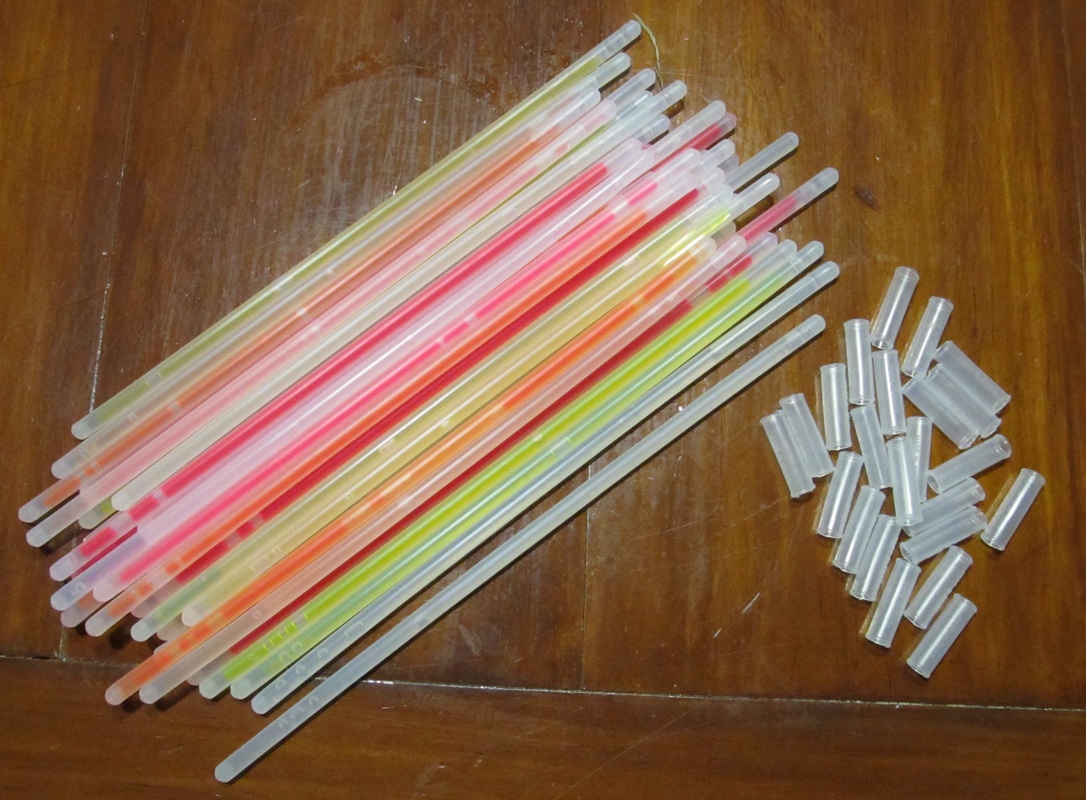
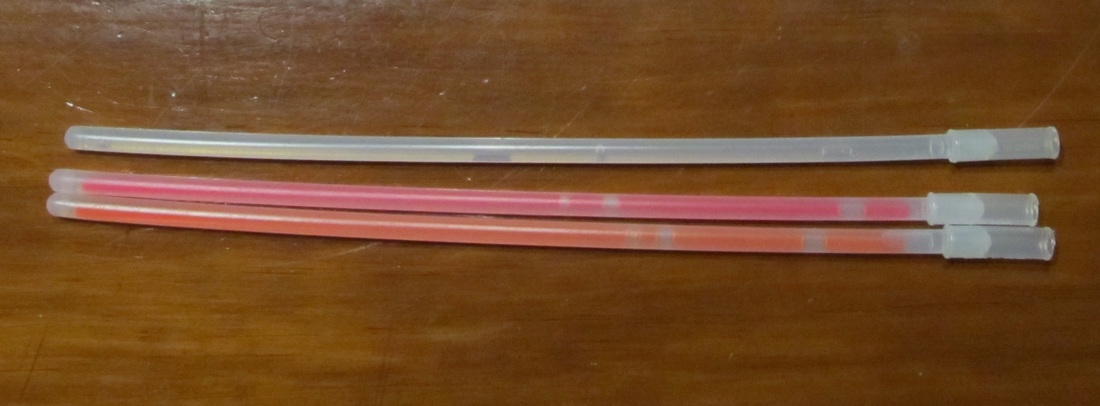
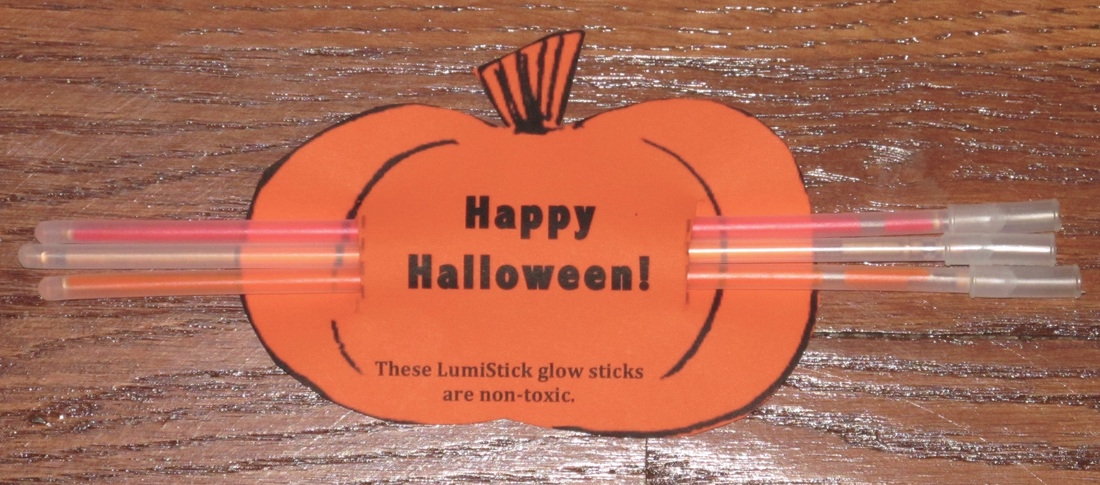
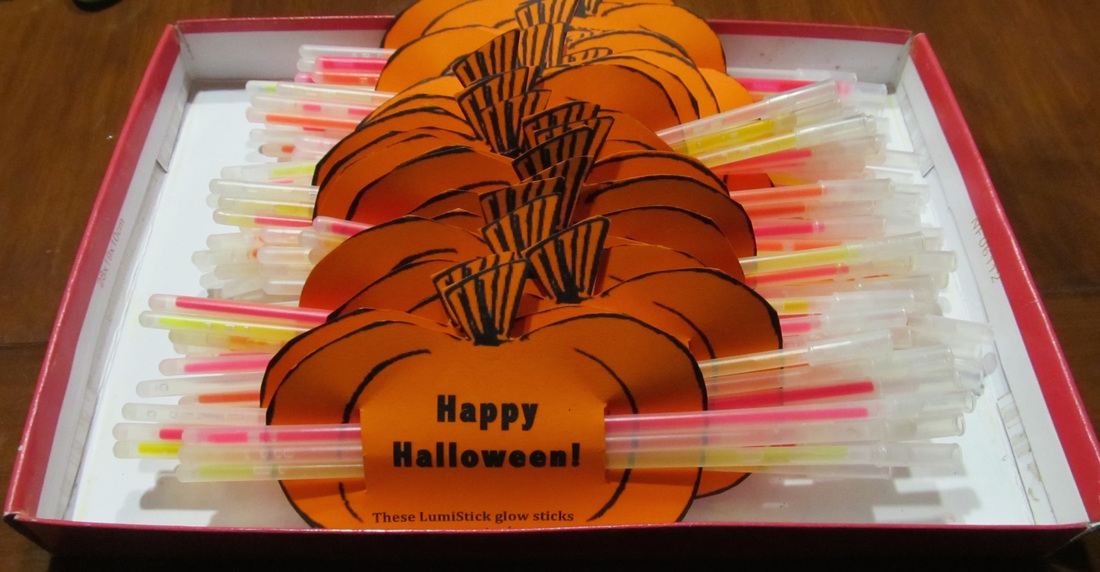
These DIY trick-or-treats would also be great as party favors! FREE printable pumpkin cut-out included! 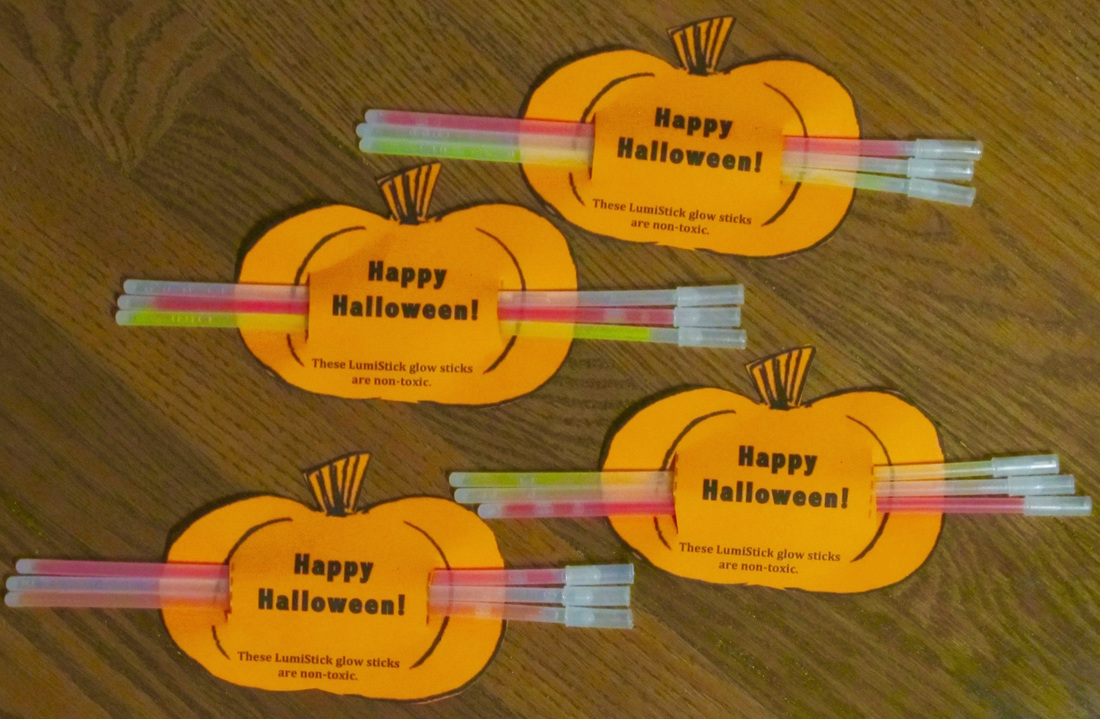 Every year for Halloween I give out candy. Every year for Halloween I eat the candy before Halloween and end up having to buy more. Then I eat that candy and have to buy more again, and so on. I never have leftover candy and it's not because we get a ton of kids knocking on our door. I just have absolutely no willpower. I have even purposely bought candy I don't like so I wouldn't eat it. Guess what? I ate it. Come on, admit it, because I KNOW I'm not alone! Well, this year I was determined to change that pattern and do something different. I wanted it to be fun, so when I saw glow sticks on sale I thought, "Why not? Who doesn't like glow sticks?" Then I realized this year Halloween is on a Saturday and that means kids out after dark. Why not help them be safer by giving them something bright to wear at night? By this time, giving glow sticks as my trick-or-treat give-away was a no brainer. Here's what I did. Supplies Needed:
 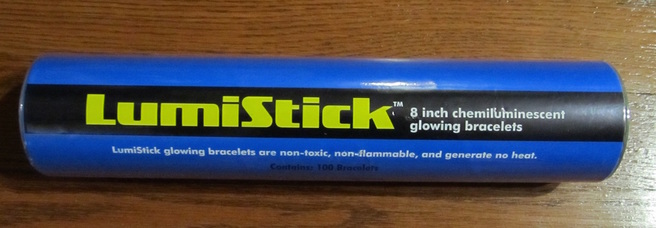 These are the glow sticks I purchased. They come with connectors. Note also that they are non-toxic, non-flammable, and generate no heat.
Where I Purchased Glow Sticks: I purchased WHOLESALE PACK of 300 8" LumiSticks (affiliate link with Amazon) for $21.99 and free shipping on orders over $35. They are Non-toxic and they came with connectors so they could be made into necklaces. I purchased so many because I knew I would be using them for other things (Halloween decorations blog post coming soon!). The 8" LumiSticks can also be purchased in tubes of 100 (affiliate link with Amazon) for $8.99 and free shipping on orders over $35. Please 'like' and follow!
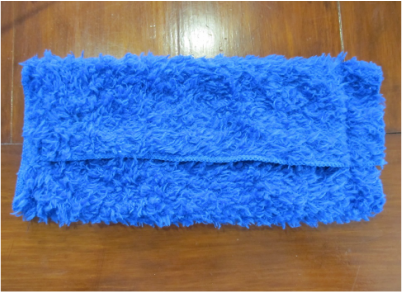
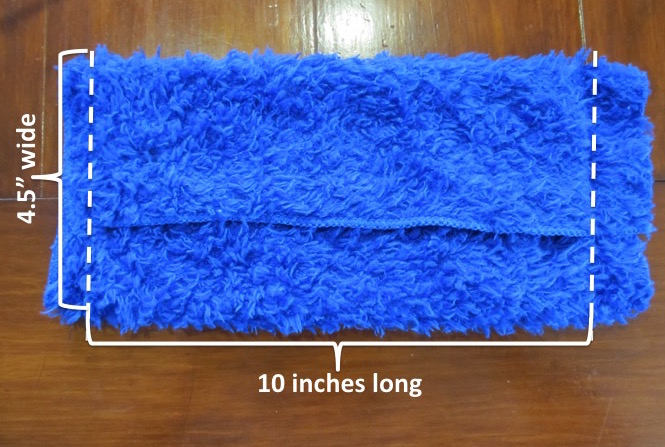
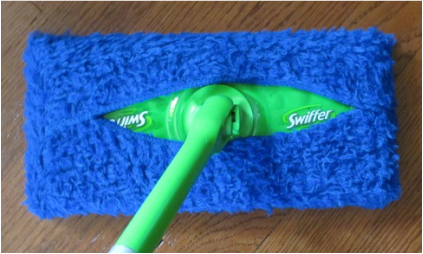
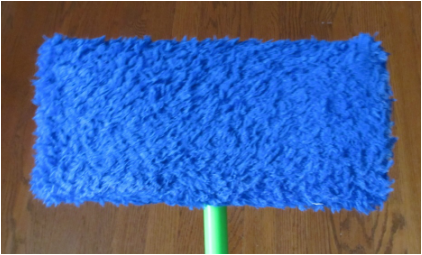
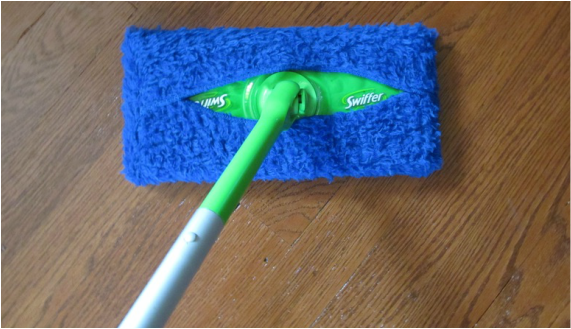 Stop buying and throwing out unnecessary waste! Why buy something that you use once or twice and then throw it away? What a waste of resources, money, and landfill space! These swifter sweeper covers take about 5 minutes to make, cost $1 and can be washed and reused over and over again! I made two for myself so if one is being washed, I have another one that I can use!
So Simple! Thank you for visiting! Please follow us on Facebook, Pinterest, Instagram and Google+
 Don't just throw it out...sell it or donate it if you can! Have you thrown any of the following items in the garbage?
We discussed the basics in Recycling Part I - At Home Basics and in Recycling Part II - Oddball Items we talked about where to recycle household hazardous waste, plastics #4 and #5, e-waste, and other oddball items that did not fit into the basics category. We mentioned that if the item was in good working order to wait for todays post: Selling and Donating Items, because if it's good, why not sell it or donate it to someone who needs or wants it? Selling and Donating Items "One mans junk is another mans treasure." I don't know who originally said that, but it couldn't be more true! If your garbage can be useful to someone else, then please don't just throw it out! Either sell it for some extra money or donate it! It would be a shame to let good stuff take up space in a landfill...
Donating Your Stuff Theres a fine line between donating and recycling...sometimes they call it recycling when it is actually a donation. Bottom line: as long as it stays out of a landfill, who cares what it's called? Donating Basic Items: It' pretty common knowledge that you can donate toys, clothes, and many usable household items to several different charities such as: Most or all of them will even come and pick up directly from your home on a scheduled date. How convenient! Just click on one of the links for more information. Be sure to check the list of items they are willing and NOT willing to take. But what about some of the other stuff? Like old sneakers that aren't even worth donating! How about stuffed animals or old video game systems? Do you want to help children in bad situations? Well, take a look at the list below to see what sort of 'other stuff' can be donated. I think you might find some of them very surprising!
 What's left? For other items, especially large ones, that you think might be worth something to someone else (swing sets, trampolines, sheds, etc.) and even other things you just don't want to be bothered selling or mailing out, make an account and post them on FreeCycle. On this site you can find a group of people in your local area that recycle items by posting them and sharing them for FREE! The first person to respond get first dibs on scheduling a pick-up time and date. You just leave the item out on the agreed upon date and they come and get it! It's better than needlessly adding to a landfill. You can also find items you might want on there rather than buying brand new! Coming Soon - Recycling Part IV - Repurposing Your Garbage! Please remember to like and follow us on Facebook, Google+, and Pinterest!
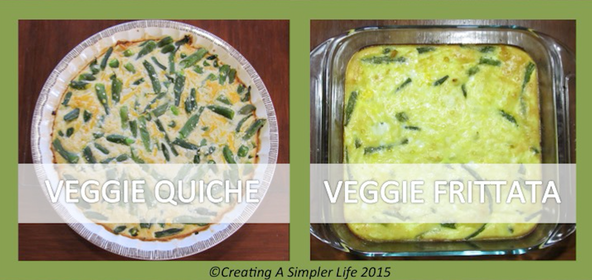 Two very simple recipes that can use a variety of different vegetables depending upon what you have! Of course I always try to use whatever is fresh out of the garden! As you can see in the picture above I used my abundance of string beans in both of them! There was nothing left so I am pretty sure my family liked them! You can click on the recipes or use the button below to download the pdf file and print one sheet of 8 1/2 x 11 cardstock paper. Then cut out each of the 4 x 6 inch recipe cards. They always come two recipes per sheet in an effort to not waste paper! Visit my Recipes Page to print out previous recipes (pdf files) or to download a FREE 4 x 6 Recipe Card Template (.dox file) for your own recipes! Enjoy! 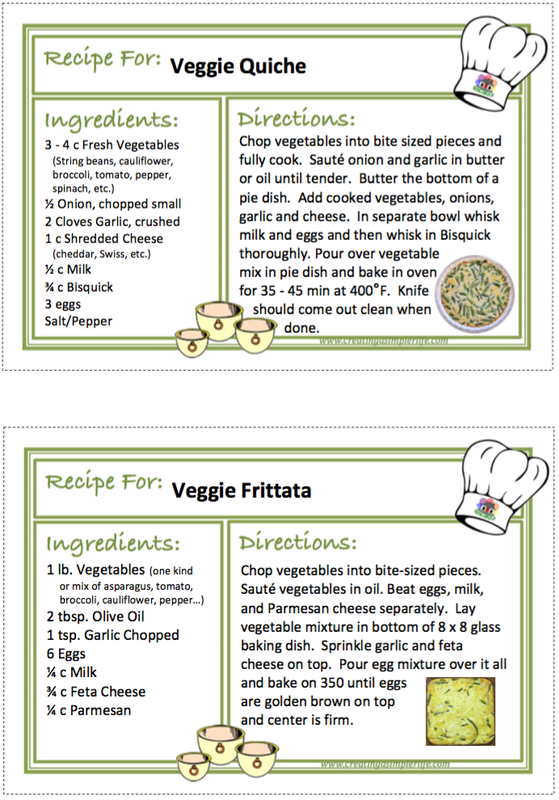 Please 'like' us on Facebook or join our mailing list so you never miss newly shared recipe cards!
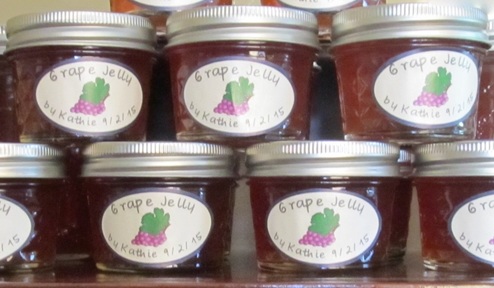
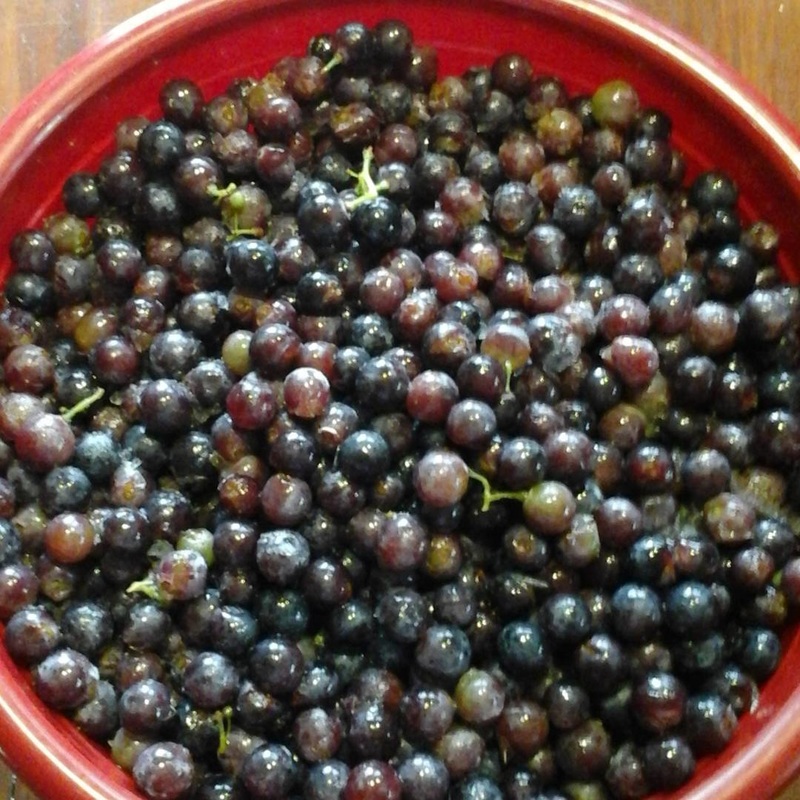
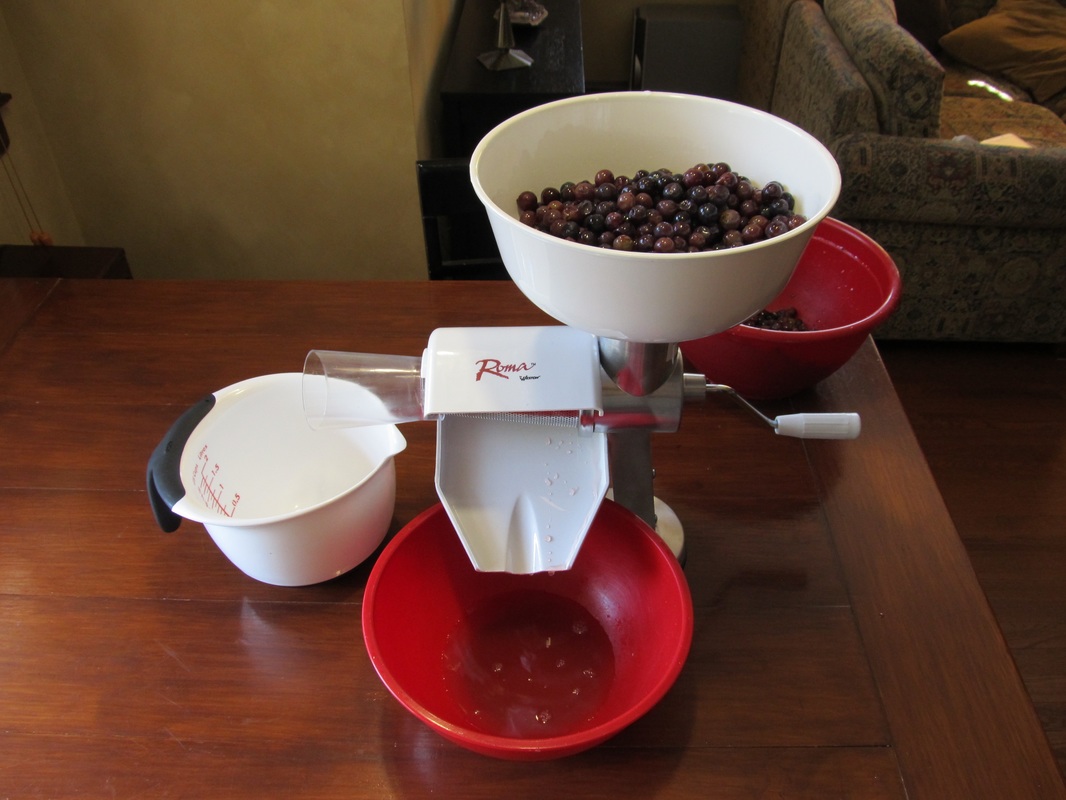
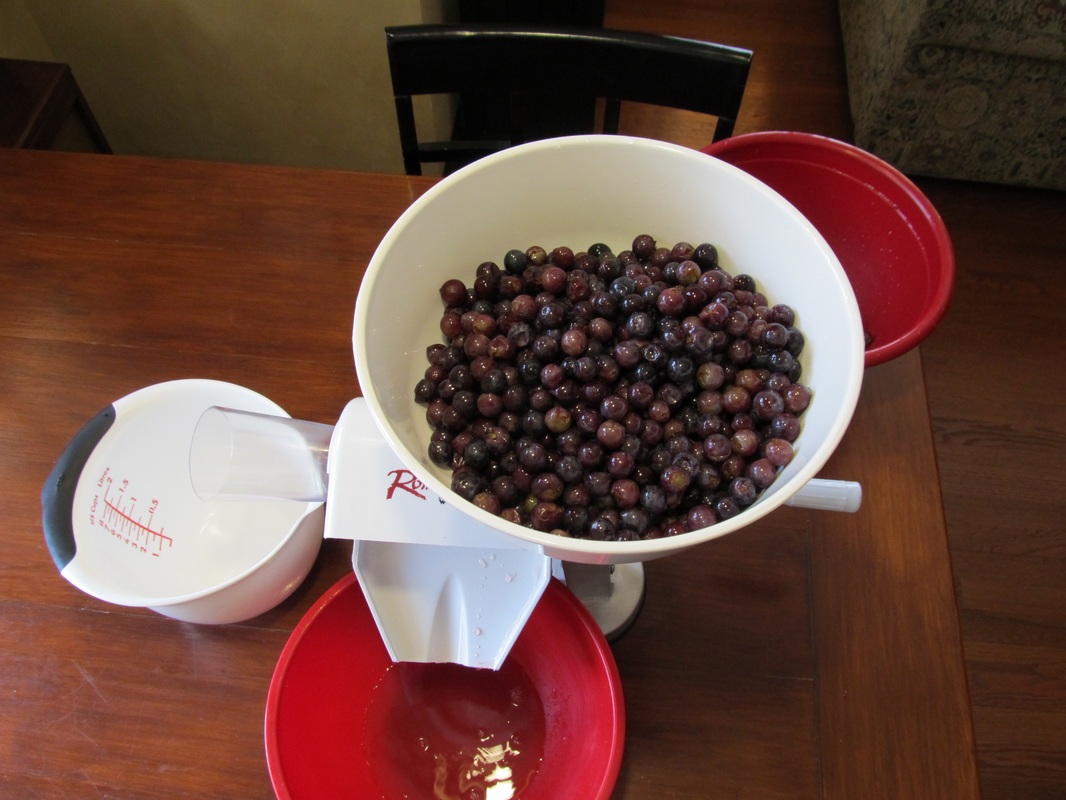
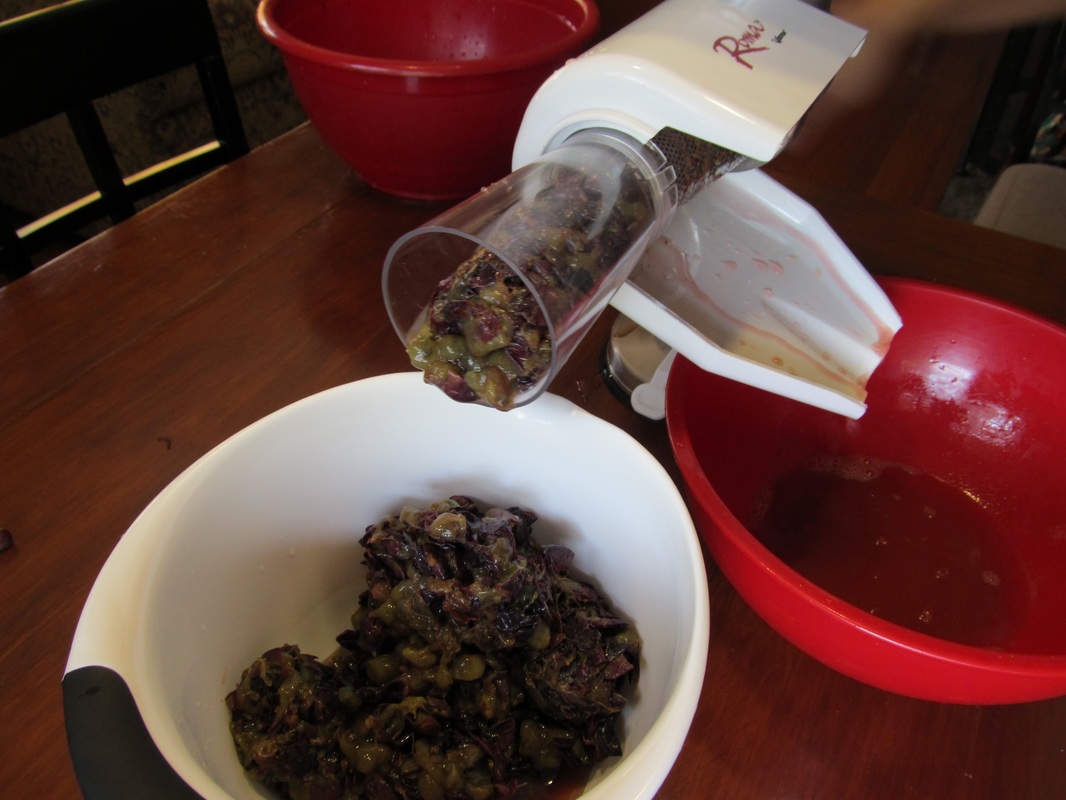
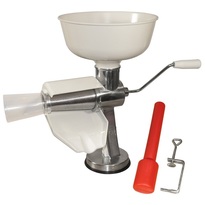
Making jelly is much easier than I thought and I find myself wondering why I waited so long. However, after having to strain all my raspberries through cheesecloth to make my raspberry jelly I decided I did not like that part of the process at all. I knew I needed some help and after a little research ended up splurging and ordering the Roma Food Strainer & Sauce Maker (And I also ordered the additional strainer attachments for berries and grapes.). Making the grape jelly is pretty much the same as making my Homemade Raspberry Jelly, the only difference being the quantities that go into the recipe and the fact that getting the juice out of the grapes was so much easier! The really big bonus for me was that the grapes were FREE! I picked them ripe off the vine in my yard :-)
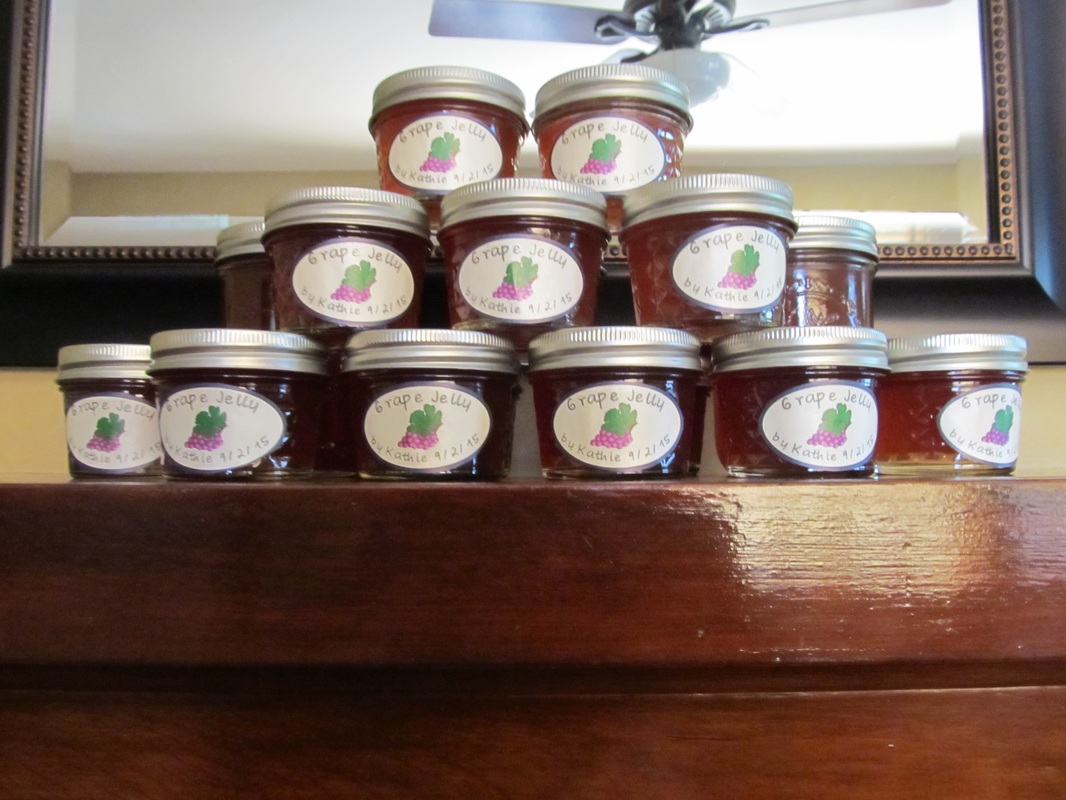
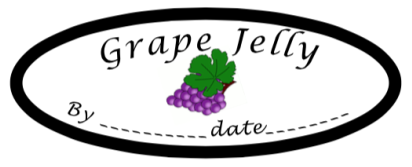
The Ball Classic Pectin recipe on the label does not give the amounts required for making grape jelly so I had to use their Pectin Calculator. It's a very simple and helpful way to get the exact ratio of juice/pectin/sugar that is necessary for any fruit you want to do. They also have a lot of other recipes available if you are combining fruits or are making herb jellies (mint for example). FYI the jelly does NOT come out purple! My husband was a little upset at first, but after he tasted it he realized it tasted just like the regular grape jelly from the store. It's funny how we get used to things being a certain way. Check out the Free Grape Jelly Labels at the bottom of this post! How to Video (written instructions and pictures are below)
Grape Jelly Recipe:
Directions:
Problems, Questions, or Want to Learn More?
Check out Simply Canning for help with Water Bath Canning. Check out The National Center For Home Food Preservation.
Free 4 ounce Jar Printable labels!
This is a pdf file that is designed to be used with Avery White Address Labels 5160/8160 size 1" x 2 5/8". Print a full sheet of labels, write in your name and the date, and choose to cut it out on the line or not! Click on the pictures or button below to download the pdf file.
I am really glad I purchased the products above and can vouch for them 100%! They made the process so much easier and in turn more pleasant. Check them out by clicking on one of the two pictures above or one of these two links: Roma Food Strainer or Roma Strainer Accessory Kit at Amazon (affiliate links).
Please like us on Facebook, follow us on Pinterest and Instagram, and sign up to be on our Mailing List so you never miss a post! Thank you for your support :-)
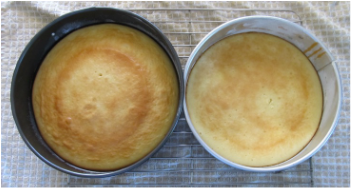
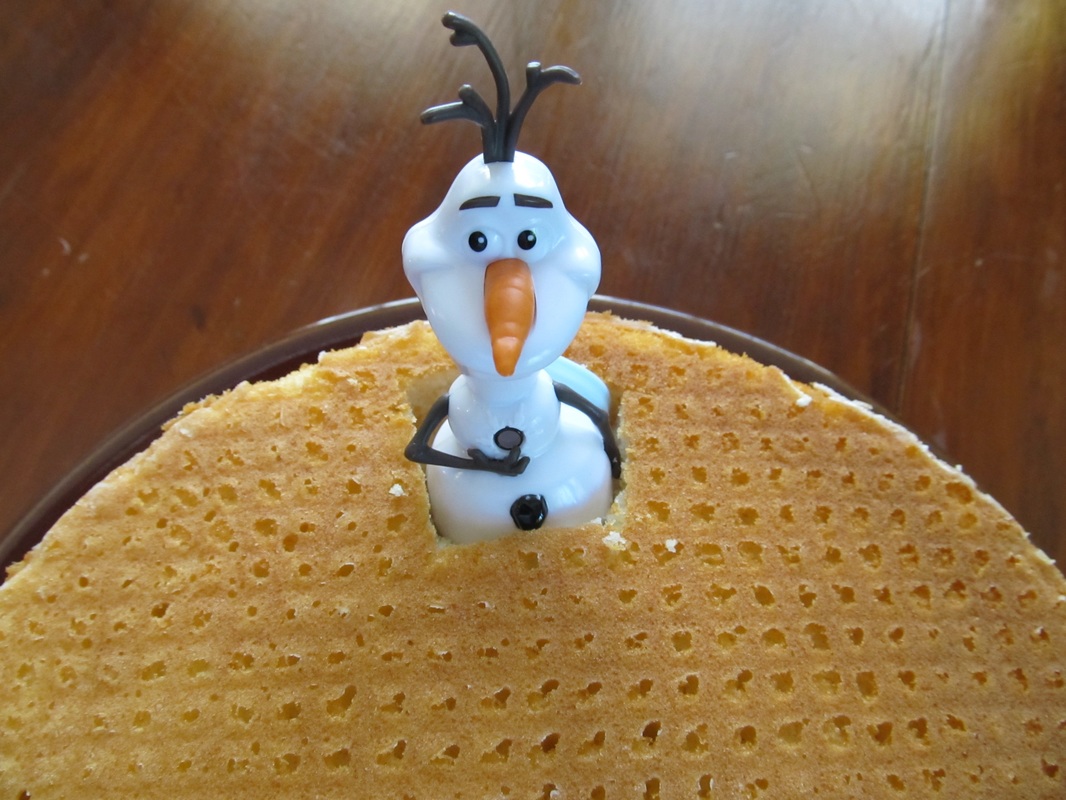
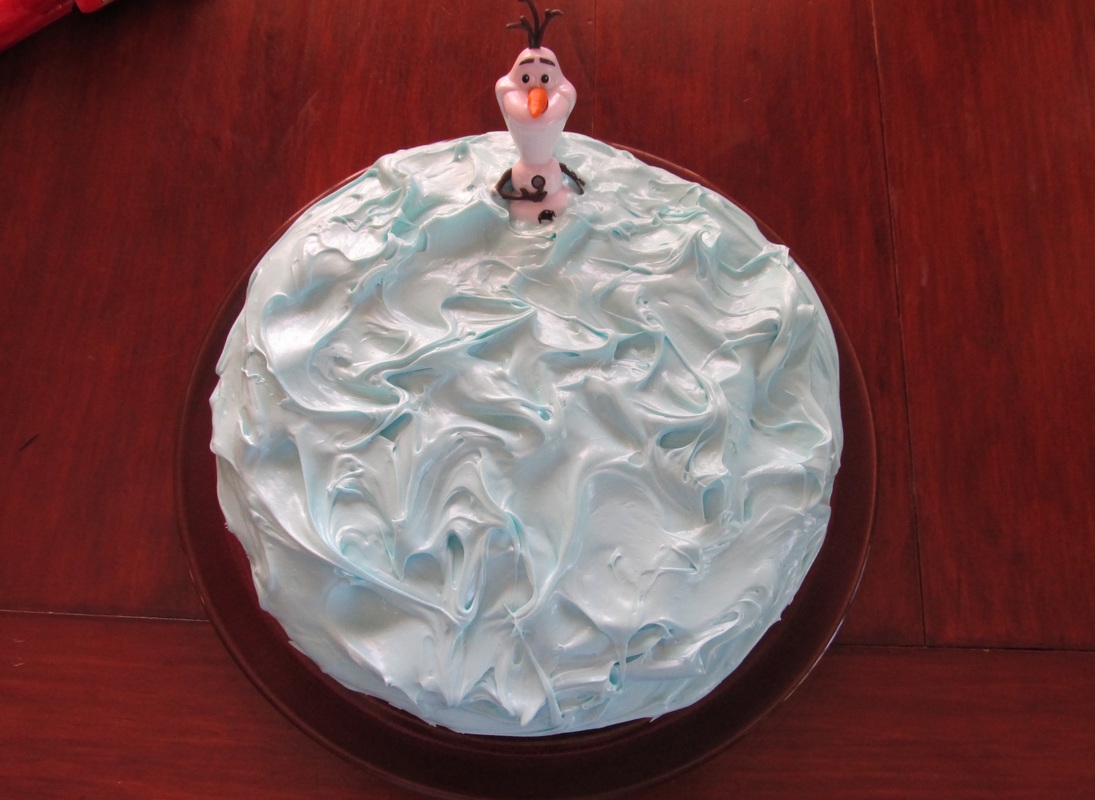
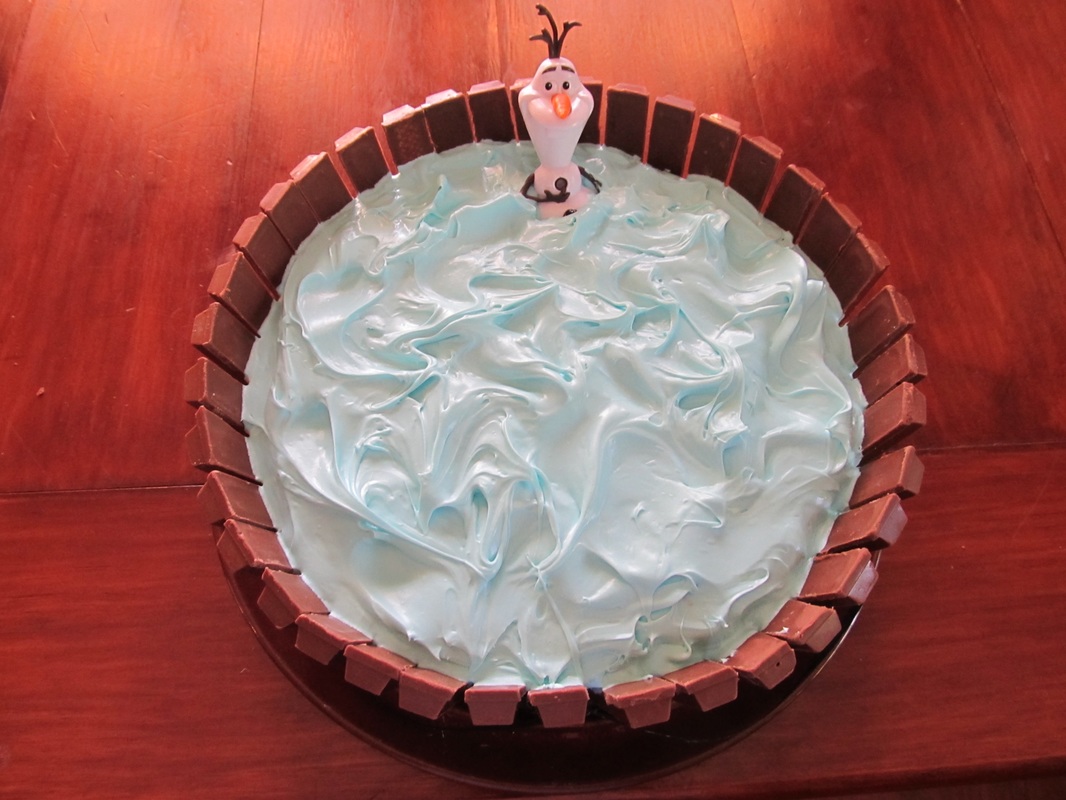
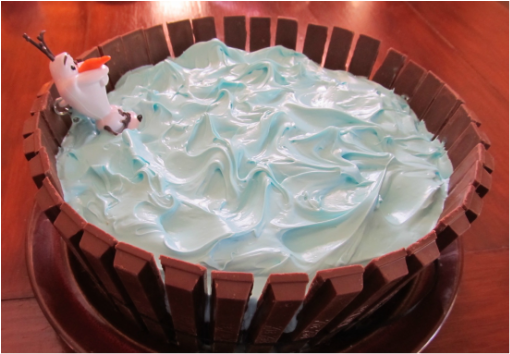 I saw this on Facebook and don't know who the originator of this adorable cake is, but I had to try it after my sister-in-law requested it for her birthday! I made it up as I went along and I think it turned out OK! Here's what I did using a box of cake mix and a container of white whipped icing...
I am very happy with the way the cake turned out! Please like us on Facebook, follow us on Pinterest and Google+, and sign up for e-mail notifications:-)
What's in the vanilla coffee creamer you buy? Does it contain any real cream or vanilla? Check out our video at the bottom of this post! 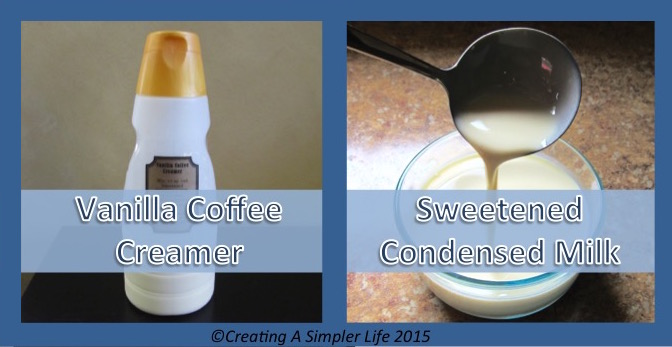 Two FREE printable recipe cards below! We have used vanilla creamer in our coffee for years now. In fact, we have became so used to using it that we got to the point that we would no longer drink coffee without it! One day I happened to just be sitting and drinking my coffee and I started reading the bottle of International Delight. What I read on that bottle led to a total change in the creamer I now use every day. The front of the bottle stated "a rich creamy dream of sweet and mellow French Vanilla flavor." It also says "gourmet coffee creamer." I read the words "creamy" and "creamer" and I think of milk, or cows. So do you, right? That is where we get cream from after all, so one would also assume there's milk in there somewhere, but then you read the International Delight French Vanilla Ingredients and what a surprise!
I see a milk derivative, but I do not see any cream or milk in this so called "Gourmet Coffee Creamer!" The asterisk next to the milk derivative tells us it is NOT a source of lactose, so again, NO MILK. How can it be called a creamer if there is no milk or cream in it? Thats when I realized that they boast the fact that they are lactose free! Of course they can't have any milk in it if it is lactose free! How in the world are they even allowed to call it a creamer? Shouldn't it be called a Milk Free creamer, or a creamer substitute or something instead? But wait, it actually gets better....do you see the word VANILLA anywhere in the ingredients? NO! I saw that the bottle says vanilla 'flavor' on the front and that's when reality hit me, there is no actual vanilla in the 'creamer' either! Then it really hit me...this was all my fault. I am so stupid! I had fallen lock,stock, and barrel for the oldest trick in the book: marketing ploys! We had not become 'addicted' to using vanilla coffee creamer at all. I'm not sure what we became 'addicted' to using in our coffee, but it certainly had nothing to do with actual cream or real vanilla! Sure it tasted good, but what the hell is it made of? So of course I did some research. and here is what I discovered. Ingredients in International Delight Vanilla Creamer: The first two ingredients (water and cane sugar) are pretty much self explanatory. The third ingredient, which apparently makes up a large part of this 'creamer' is palm oil. There is a lot of controversy over palm oil which is apparently found in about 50% of all products produced today. I am not going to go into the controversies, but suffice it to say that it is imported and there's arguments about the way it is grown and harvested (usually not sustainably) and it's huge negative environmental impact. I included a few source links at the bottom of the page if you want to read more. Bottom line for me though: why the heck would I want to put oil instead of cream in my coffee?????? The other "less than 2%" ingredients:
Can you see why I now choose to make my own Homemade Vanilla Creamer? The ingredients are way too complicated and contain no actual cream or vanilla! If you're lactose intolerant I can sort of understand why you would still want to use the International Delight, but if you can drink milk, why not at least try to make your own creamer to see if you like it? It will actually have REAL MILk and REAL VANILLA in it! And of course, the ingredients are much simpler and much healthier, especially if you choose to use all organic ingredients! Ingredients in Homemade (Organic) Vanilla Creamer:
Oh, and guess what? IT'S STILL GLUTEN FREE! That's right, it is still GLUTEN FREE even with real cream and vanilla!
Is it cost effective? The organic version costs a about 5 cents more an ounce, but remember, it has REAL MILK AND VANILLA and NO PALM OIL! The non-organic version costs about 3 cents less an ounce and still has REAL MILK AND VANILLA! So worth it in my book :-)
What about the calories? The homemade creamer is actually a little LESS CALORIES!
Do yourself a favor and try making it at least once. It's so easy and even though it doesn't taste exactly the same, it is so close (and I believe it's actually better tasting) that I KNOW you will be pleasantly surprised....my husband was and he can be really picky! NOTE: All comparisons were using REGULAR French Vanilla Creamer and WHOLE MILK. I did not look at nor did I do any comparisons with respect to International Delight Fat Free, Sugar Free, or Fat and Sugar Free but be aware that they all contain corn syrup! FREE PRINTABLE RECIPE CARDS: As with all the recipes I share, you can use the picture or the button below to download the pdf file below and print one sheet of 8 1/2 x 11 cardstock paper. You can then cut out each of the 4 x 6 inch recipe cards. They always come two per sheet. Visit my Recipes Page to print out previous recipes (pdf files) or to download a FREE 4 x 6 Recipe Card Template (.dox file) for your own recipes! Enjoy!  Please 'like' us on Facebook or join our mailing list so you never miss newly shared recipe cards! Video about the coffee creamer: Sources: Say No To Palm Oil - What's the Issue? Palm Oil Sustainability - What is it? What is Palm Oil?
|

Hi there! I'm Kathie, the author behind Creating A Simpler Life blog. I'm excited to share our longterm projects (and planning) toward building our future retirement homestead in the Adirondack Mountains of New York. In the meantime I will be sharing all the other little things we do that are part of creating our simpler life!
Categories
All
Archives
July 2020
|


 RSS Feed