CREATING A SIMPLER LIFE OFF GRID
  • Home/About
    • MINIMIZING >
      • Home Size
      • Room by Room
      • Get Organized
      • Household Waste
    • MINIMIZE DEBT, MAXIMIZE SAVINGS >
      • Bills & Other Debt
      • Saving Money
      • Shopping Tips
      • Affordable Fun
    • BACKYARD CHICKENS >
      • The Coop
      • The Chickens
      • Feeding the Chickens
      • Fresh Eggs
    • HOME GARDENING >
      • Building the Garden
      • What We Grow
      • Seeds, Weeds, & More
      • Preservation & Storage
    • DO-IT-YOURSELF >
      • Health & Wellness
      • Simple Cleaning & Tips
      • Crafts & More!
      • Printables
    • CROCHET >
      • IDEAS & MORE
      • VIDEO TUTORIALS
    • Blog
  • HOMESTEAD
    • The 5 Year Plan PLUS! >
      • 2017
      • 2018
      • 2019
      • 2020
      • 2021
      • 2022
    • WHY AN EARTH SHELTERED HOUSE?
    • OFF GRID TINY TRAILER
    • BUILD VIDEOS IN ORDER
    • HOMESTEAD MACHINERY >
      • GENERATORS
      • KUBOTA TRACTOR
      • ATV'S & UTV'S
      • WOOD CHIPPER
      • CHAINSAWS
      • LOG SPLITTER
      • POWER TOOLS
      • SNOWMOBILES
      • AUTOMOBILES
    • BUDGETING THE BUILD
    • SUSTAINABILITY >
      • WATER
      • FOOD
      • SHELTER
      • ENERGY >
        • SOLAR POWER
    • The Adirondacks >
      • Wildlife & Nature
      • Insects & Bugs
      • Things to Do
      • Water Fun
    • ADIRONDACK CRAFTS
  • VLOG
    • 2023
    • 2022
    • 2021

Blog

A little bit of anything and everything that's part of
​creating, enjoying, and living a simpler life!
Picture
http://www.creatingasimplerlife.com

Crochet Bear Lovey Blanket

4/3/2017

2 Comments

 
Picture
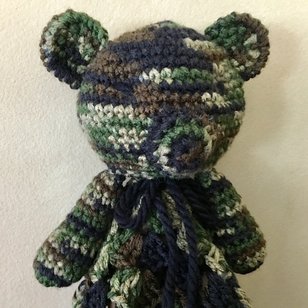
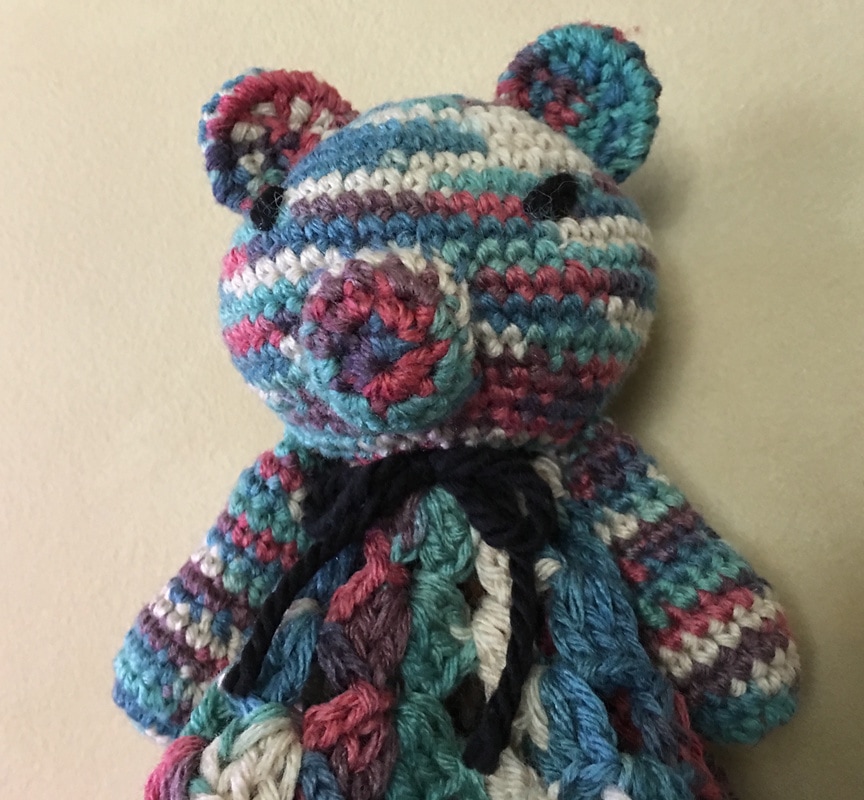
Who doesn't love a lovey blanket? They make great gifts for newborns and are sure to be their absolute favorite! 

This little lovey was inspired by my niece who 'was' expecting - and just recently gave birth to - my first great nephew! After making an adorable crochet camo infant bear hat (free pattern here) for her I decided to make a matching bear lovey (I had so much leftover yarn!).  And then since I had some different leftover yarn from another project I decided to make one out of that too! 
Supplies:
  • 4.5 mm crochet hook
  • Red Heart Camouflage Yarn
  • Yarn Needle
  • Scissors
  • Thick black yarn for eyes and tie around neck

Make the Head:
(I strongly suggest reading all the directions first and then watching the video tutorial if this is your first time making a ball shape).
  • Round 1: Start with a magic circle with 6 single crochets. 
  • Round 2: Single crochet two stitches around in each of the 6 original single crochet stitches. (at this point you should basically have a circle).  Place a marker at your last stitch.
  • Round 3: Do one single crochet in the first stitch, then two in the next, then one in the next, and then 2.  Complete the pattern around.
  • Round 4: Do one single crochet in the next two stitches, then two single crochets in the third, then one sc in each of the next two, then 2 sc in the next one. Repeat pattern around until you come to the marker.
  • Round 5: 3 sc, then two sc in one, 3 sc, then two sc in one (repeat around to marker)
  • Rounds 6 - 8: Basically with each round, you will increase the the number of single crochets in each stitch by one, then do two in one stitch, then repeat the same number of sc again.  You can continue the pattern by adding rounds and increasing the sc by one each time until the bottom of the head is the size that you want. By the 8th round you should be doing 6 sc in a row, then 2 sc in one stitch and repeating that pattern all the way around  to the marker.
  • Rounds 9 - 13: single crochet in each stitch around without increasing.
  • ​Round 14 to end: Start decreasing by one for each round as follows: sc 6 stitches, then do a double decrease stitch (see video) and continue around to marker, next round do 5 sc., then a double decrease stitch and continue pattern around to marker.  You will then do a round of 4 sc 1 dd, then a round of 3 sc 1 dd, and 2 etc. Before you finish be sure to fill it with stuffing.  Lastly, using the yarn needle, thread the yarn around the remaining hole and pull tightly closed. Finish off leaving a long tail.
Make the Nose:
  • Make a magic circle and sc 6 times into it.
  • Continuing in the round, do 2 sc in each stitch (12 total).
  • Continuing in the round again, do 1 sc i the first stitch, then 2 sc in second stitch, continuing all the way around. Finish off leaving a long tail.
  • Sew onto front of face using the yarn needle and finish by pulling the long tail through to the bottom of the head. Knot it to the head tail that is hanging through.
Make the Ears:
  • Row 1: Chain 9, and sc into 8th stitch and all the way down to end, continue around the opposite side with 8 more sc, and slip stitch to connect. 
  • Row 2: 1 sc, then do a decrease sc (go into stitch and pull yarn through, then go through next stitch and pull yarn through both loops on hook). Do 2 more times for a total of three. Single crochet around the end, and do three sc decreases on the opposite side.  Knot off and leave at least 12 inches of 'tail' when cutting for finishing.
  • Use the yarn needle and sew the ears onto the head as shown in the picture. When done going all the way around the ear pull the remaining tail through the bottom of the head and knot it with another hanging tail. Do the same for the second ear.
Make the Arms:
  • Round 1: make a magic circle and sc 6 stitches into it.
  • Round 2:  do two single crochets in each stitch around (you could place a marker here if necessary)
  • Rounds 3 - 10: do one single crochet in each stitch around.
  • Finish with a slip knot and cut the hanging string so there is approximately 12 inches attached to the arm.
  • At this point stuff the arm with stuffing.
  • ​Make a second arm.
  • Then use the yarn needle to sew the arms onto the head, leaving about an inch of space between them. See the picture above. Pull the tails through the hole in the bottom of the head and knot them with other hanging tails.
Sew on Eyes:
  • ​Using black yarn and the yarn needle, go through the bottom of the head and 'embroider' the eyes in place. Do not pull too tight, then bring the yarn back down through the bottom of the head and tie the two ends into a knot.  Make sure you leave the two tails long enough to use as a tie around the neck at the end.
Make the Blanket:
This is a basic granny square blanket. If my directions are confusing, check out this granny square video tutorial. 
The final blanket is approximately 18" x 18".
  • Chain 5 and connect to create a loop.
  • Row 1: chain 3 and double crochet 2 stitches repeating this 3 more times. Connect into the loop created by the first (original) stitch around. 
  • Row 2: slip stitch through two stitches and chain 3 in the corner space. Do 2 more dc, chain 3, and 3 dc (all in the corner). Then chain one, and do the same in the other 3 corners. 
  • Row 3: slip stitch through two stitches to get to the corner. Chain 3, 2dc, chain 3, 3dc (all in corner), ch 1, then do 3 dc in middle space, then do the corner as usual and repeat around.
  • Rows 4 - 12: repeat adding 3 dc in every space around. Remember, all corners get 3 dc, 3 ch, and 3 dc.  Straight runs only get 1 ch in between the 3 dc's.
  • Row 13: chain 1 and do 1 sc in each stitch all the way around.  In the corners do three sc stitches.  Connect to first stitch and repeat once more around and finish off, or instead of second border row, add the decorative border as shown on the pink variable bear above. 
  • Optional Border: Called the picot stitch. Chain 1, 3 sc, chain 4 and slip stitch through the bottom chain, then do 3 sc, and make another picot. Basically there is a picot every three single crochets around. Here is avideo just note that I do three stitches between instead of two.
Finishing:
  • Sew head onto the center of the blanket using hanging yarn tails.
  • Finish by using yarn needle to weave in all loose ends.
  • Lovey blanket can be washed and dried on delicate cycle.
Picture
Picture

Thanks for visiting :-)
Check out the our other FREE crochet patterns here!

Also check out the many crochet project patterns on our Pinterest Boards Crochet ONLY and Crochet for the Kids!
Sincerely,
Picture
2 Comments
Julie
8/31/2018 04:17:05 pm

Is the double decrease just 2 increases, one right after the other, or a special stitch?

Reply
Julie
9/1/2018 06:17:23 pm

Or are you saying there is a single decrease per x-many stitches in the last few rounds? (I.e. rnd 14 - single 6, dec 1, single 6, dec 1, etc)
Going off the video tutorial, it's one stitch per x-many stitches, which I understand to be called just a decrease. Never heard of a double decrease for a single crochet before.

Reply


Leave a Reply.

    Picture
    Hi there! I'm Kathie, the author behind Creating A Simpler Life blog. I'm excited to share our longterm projects (and planning) toward building our future retirement homestead in the Adirondack Mountains of New York. In the meantime I will be sharing all the other little things we do that are part of creating our simpler life!
    Creating a Simpler Life

    RSS Feed

    Visit Creating A Simpler Life's profile on Pinterest.

    Categories

    All
    Adirondack Crafts
    Chickens
    Conservation
    Crochet
    Do It Yourself
    Energy Savings
    Essential-oils
    Essential-oils
    Food-storage-preservation
    Food-storage-preservation
    Gardening
    Health
    Health-wellness
    Health-wellness
    Homemade-remedies
    Homemade-remedies
    Homesteading
    Homesteading Dreams
    Inexpensive Fun
    Minimizing
    Organization
    Products We Sell
    Recipes
    Recycling
    Saving-money
    Saving-money
    Shopping
    Wedding & Shower DIY

    Archives

    July 2020
    June 2020
    April 2020
    March 2020
    March 2019
    January 2019
    December 2018
    October 2018
    August 2018
    July 2018
    June 2018
    April 2018
    March 2018
    February 2018
    January 2018
    November 2017
    October 2017
    September 2017
    August 2017
    July 2017
    June 2017
    May 2017
    April 2017
    March 2017
    February 2017
    January 2017
    December 2016
    November 2016
    October 2016
    September 2016
    August 2016
    July 2016
    June 2016
    May 2016
    April 2016
    March 2016
    February 2016
    January 2016
    December 2015
    November 2015
    October 2015
    September 2015
    August 2015
    July 2015
    June 2015

mrandmrscorbi@gmail.com
Contact Us - Privacy Policy - Disclaimer
Copyright 2022©Creating A Simpler Life, Inc. All rights reserved. Reproduction in whole or in part without permission is prohibited.
  • Home/About
    • MINIMIZING >
      • Home Size
      • Room by Room
      • Get Organized
      • Household Waste
    • MINIMIZE DEBT, MAXIMIZE SAVINGS >
      • Bills & Other Debt
      • Saving Money
      • Shopping Tips
      • Affordable Fun
    • BACKYARD CHICKENS >
      • The Coop
      • The Chickens
      • Feeding the Chickens
      • Fresh Eggs
    • HOME GARDENING >
      • Building the Garden
      • What We Grow
      • Seeds, Weeds, & More
      • Preservation & Storage
    • DO-IT-YOURSELF >
      • Health & Wellness
      • Simple Cleaning & Tips
      • Crafts & More!
      • Printables
    • CROCHET >
      • IDEAS & MORE
      • VIDEO TUTORIALS
    • Blog
  • HOMESTEAD
    • The 5 Year Plan PLUS! >
      • 2017
      • 2018
      • 2019
      • 2020
      • 2021
      • 2022
    • WHY AN EARTH SHELTERED HOUSE?
    • OFF GRID TINY TRAILER
    • BUILD VIDEOS IN ORDER
    • HOMESTEAD MACHINERY >
      • GENERATORS
      • KUBOTA TRACTOR
      • ATV'S & UTV'S
      • WOOD CHIPPER
      • CHAINSAWS
      • LOG SPLITTER
      • POWER TOOLS
      • SNOWMOBILES
      • AUTOMOBILES
    • BUDGETING THE BUILD
    • SUSTAINABILITY >
      • WATER
      • FOOD
      • SHELTER
      • ENERGY >
        • SOLAR POWER
    • The Adirondacks >
      • Wildlife & Nature
      • Insects & Bugs
      • Things to Do
      • Water Fun
    • ADIRONDACK CRAFTS
  • VLOG
    • 2023
    • 2022
    • 2021