CREATING A SIMPLER LIFE OFF-GRID
  • Home/About
    • What does OFF-GRID mean?
    • MINIMIZING >
      • Home Size
      • Room by Room
      • Get Organized
      • Household Waste
    • MINIMIZE DEBT, MAXIMIZE SAVINGS >
      • Bills & Other Debt
      • Saving Money
      • Shopping Tips
      • Affordable Fun
    • BACKYARD CHICKENS >
      • The Coop
      • The Chickens
      • Feeding the Chickens
      • Fresh Eggs
    • HOME GARDENING >
      • Building the Garden
      • What We Grow
      • Seeds, Weeds, & More
      • Preservation & Storage
    • DO-IT-YOURSELF >
      • BABY SHOWER
      • Health & Wellness
      • Simple Cleaning & Tips
      • Crafts & More!
      • Printables
    • CROCHET >
      • IDEAS & MORE
      • VIDEO TUTORIALS
  • HOMESTEAD
    • The 5 Year Plan PLUS! >
      • 2017
      • 2018
      • 2019
      • 2020
      • 2021
      • 2022
    • WHY AN EARTH SHELTERED HOUSE?
    • OFF GRID TINY TRAILER
    • BUILDING our HOMESTEAD from Scratch >
      • BUYING LAND & GETTING STARTED
      • BUILDING THE CONCRETE DOME
      • FROM DOME to HOME
      • SURVIVING OUR FIRST WINTER
      • BURYING THE DOME
      • EXTERIOR FINISHING
      • INTERIOR FINISHING
    • HOMESTEAD MACHINERY >
      • GENERATORS
      • KUBOTA TRACTOR
      • ATV'S & UTV'S
      • WOOD CHIPPER
      • CHAINSAWS
      • LOG SPLITTER
      • POWER TOOLS
      • SNOWMOBILES
      • AUTOMOBILES
    • BUDGETING THE BUILD >
      • BUDGET BUILD TIPS
      • COSTS
    • SUSTAINABILITY >
      • WATER
      • FOOD
      • SHELTER
      • ENERGY
      • AIR
    • The Adirondacks >
      • Wildlife & Nature
      • Insects & Bugs
      • Things to Do
      • Water Fun
    • ADIRONDACK CRAFTS
  • VLOG
    • 2025
    • 2024
    • 2023
    • 2022
    • 2021

Blog

A little bit of anything and everything that's part of
​creating, enjoying, and living a simpler life!
Picture
http://www.creatingasimplerlife.com

Crochet Elephant Lovey Blanket

3/1/2016

15 Comments

 
Picture
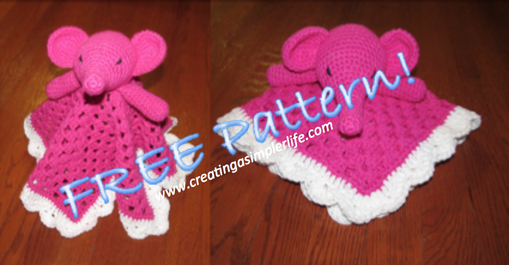
Adorable, right?  What little tyke wouldn't want to cuddle with this 100% cotton pink elephant lovey blanket!  The pattern can easily be adapted to blue, or any color of your choosing!

Please note that you can e-mail me if you have any questions at all about the pattern!  The links to video tutorials for various stitches can be very helpful if needed!

Supplies Needed:
  • *Qty. 3  Hot Pink 2.5 oz. skeins of Lily Sugar'n Cream 100% cotton 4 ply yarn
  • *Black 100% cotton Lily Sugar'n Cream 100% cotton 4 ply yarn (about 1 yard)
  • *Qty. 1 White 2.5 oz. skein Lily Sugar'n Cream 100% cotton 4 ply yarn
  • Crochet Hook size 7 (4.5 mm)
  • Cotton or Poly Stuffing for head, eyes, and arms
  • Yarn Needle

*Best price I can find for the Sugar'n Cream yarn is $1.99 for a 2.5 oz skein at Michaels Craft Stores.  Even better if you print out and use their coupons each week - I print two coupons and bring my husband  (They almost always have a 40% or 50% off one regular priced item!).
Picture
Make the Head and Nose:
(I strongly suggest reading all the directions first and then watching the video tutorial if this is your first time making a ball shape).
YOU WILL BE MAKING THE NOSE FIRST:
  • Round 1: Start with a magic circle with 6 single crochets. 
  • Round 2: 2 sc stitches in each stitch around.
  • Round 3: do 1 sc in each stitch around.
  • Rounds 4-9: continue 1 sc in each stitch around - you should start to see the nose forming.  You can choose to make the nose longer or shorter by adding more or less rows here. PLACE MARKER HERE.
  • Round 10: At this point you will start to make the head.  Do one single crochet in the next two stitches, then two single crochets in the third, then one sc in each of the next two, then 2 sc in the next one. Repeat pattern around until you come to the marker.
  • Round 11: 3 sc, then two sc in one, 3 sc, then two sc in one (repeat around to marker)
  • Rounds 12-16: Basically with each round, you will increase the the number of single crochets in each stitch by one, then do two in one stitch, then repeat the same number of sc again.  You can continue the pattern by adding rounds and increasing the sc by one each time until the bottom of the head is the size that you want. By the 16th round you should be doing 8 sc in a row, then 2 sc in one stitch and repeating that pattern all the way around  to the marker.
  • Rounds 17-20: single crochet in each stitch around without increasing.
  • ​Round 21 to end: Start decreasing by one for each round as follows: sc 8 stitches, then do a double decrease stitch (see video) and continue around to marker, next round do 7 sc., then a double decrease stitch and continue pattern around to marker.  You will then do a round of 6 sc 1 dd, then a round of 5 sc 1 dd, and 4 etc. Before you finish be sure to fill it with stuffing.  Lastly, using the yarn needle, thread the yarn around the remaining hole and pull tightly closed.
Picture
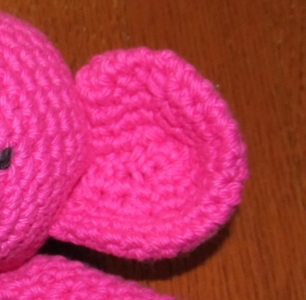
Make the Ears:
The ears are worked from the outside of the ear toward the head in sort of a double layer that will be sewn together at the end....look at the picture to get a better idea if you do not understand, but if you still need help check out the Crochet Elephant Ear Tutorial YOU TUBE video I made...it's not the best, as I made it quickly, but I hope it helps!
  • Chain 21 (this has been updated 8/2017 due to finding this mistake - it said 20 before!)
  • Round 1: sc into 19th stitch and all the way around on both the top and bottom of the chains.  Add one extra stitch at each end for a total of 42 single crochets.
  • Rounds 2 -5: sc in each stitch decreasing twice on each side.  It doesn't matter where on each side you do the decrease, but it is best if they are separated by a few stitches.
  • ​Bend into ear shape and use yarn to sew closed and sew onto head using a yarn needle.​
This is my first tutorial video and I know it's not great, but I tried!
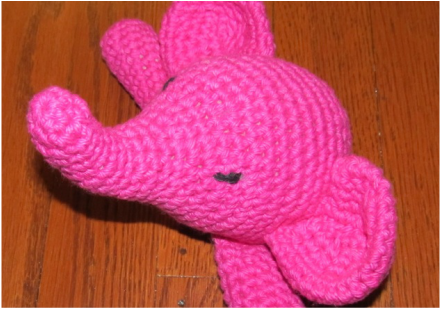
Picture
Sew on Eyes:
  • ​Using black yarn and the yarn needle, double the yarn and embroider eyes on using two stitches each.  
Picture
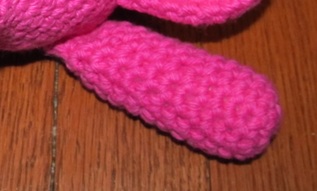
Make the Arms (optional):
  • Round 1: make a magic circle and sc 6 stitches into it.
  • Round 2:  do two single crochets in each stitch around (you could place a marker here if necessary)
  • Rounds 3 - 10: do one single crochet in each stitch around.
  • Finish with a slip knot and cut the hanging string so there is approximately 12 inches attached to the arm.
  • At this point stuff the arm with stuffing.
  • ​Make a second arm.
  • Thread  the 12 hanging inches of yarn through the yarn needle and use it to sew each arm onto the head.  Check out this video tutorial on how to sew the arms closed and sew them on.  
Picture
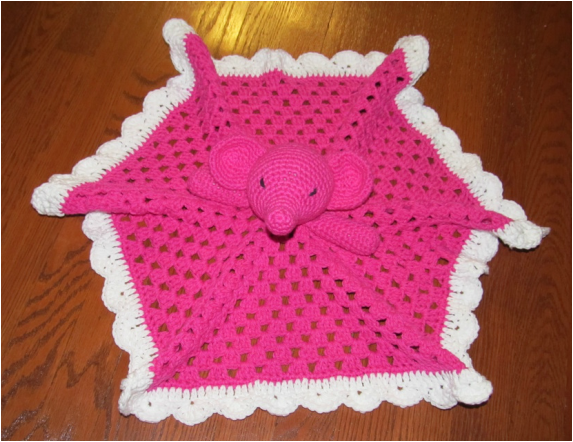
Make the Blanket:
The final blanket is approximately 18" x 18".
**PATTERN UPDATED AS OF 3/19/18**

This is a basic granny square blanket with 6 corners instead of 4 and 13 rows in pink, then the edging. Watch this video tutorial (below) to make the basic 6 sided hexagon. ​You will do 12 rows in pink. The rest of the pattern continues below.
Finishing the Blanket:
  • Row 13: In pink, chain 1 and do 1 sc in each stitch to the corner. Do three sc in the corner and then 1 sc in each stitch to the next corner. Repeat on all 6 sides. Connect with slip stitch.
  • Row 14:  Switch to white.  Chain 3 and double crochet in every stitch around.  In the corners do 2 double crochets in each of the three single crochets from row 13.
  • Row 15: Make the scallop stitch - chain 3, and double crochet 6 times into the same stitch, skip 2 and single crochet into the third stitch, then skip 2 and dc six times into the third stitch away, etc.  Repeat all the way around.  If you are not sure of the scallop stitch check out this video tutorial - just note that I do six dc instead of 5 like in the video!
Picture
Finishing:
  • Sew head onto the center of the blanket.
  • Finish by using yarn needle to weave in all loose ends.
  • Lovey blanket can be washed and dried on delicate cycle.
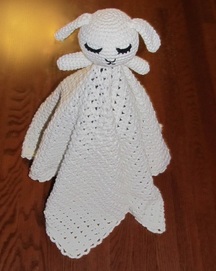
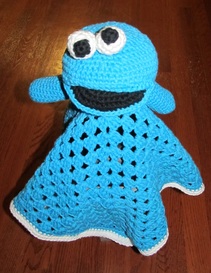
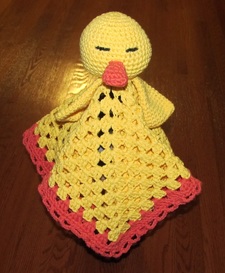
Check out the our other FREE crochet patterns here!

Also check out the many crochet project patterns on our Pinterest Boards Crochet ONLY and Crochet for the Kids!

Check out these other FREE Lovey Blanket Patterns!
Click on the picture to go to the pattern :-)

Picture
LITTLE LAMB LOVEY
Picture
MONSTER LOVEY
Picture
DUCK LOVEY
Thank you for visiting!

​Sincerely,
Picture
15 Comments
sandi
6/28/2017 10:24:41 pm

I can't figure out the ear. I am reading it as working on each side of the chain, so should there be 44 stitches? I have never made an animal before so I guess I'm not use to reading instruction like this. Could you send me help me with this with baby step instructions. Thanks.

Reply
Kathie
6/28/2017 10:36:01 pm

Hi Sandi,
I am sorry that you are having trouble. The ear is worked from the outer edge down to the inner part that will attach to the head. Think of it as being from the outer edge of your ear and working toward the ear canal. You start with a chain of 20 (this will be the outer edge) and crochet around the chain on both sides adding an extra stitch as you turn at each end for a total of 22 stitches the first round. From here on out you will do two stitches less on each round. So you will do 20, then 18, etc. These decreases are what helps to create the curve to the ear. When you have finished the rounds the ear will need to be sewn together down the middle of the front and back to create the full curve. I hope this helps and thank you for letting me know that the directions were difficult. I will try to make more detailed pictures of an ear tomorrow and update the post.
Sincerely,
Kathie

Reply
Kathie
6/28/2017 10:51:20 pm

Hi Sandi,
I was just looking at it and you are correct - there will be a total of 42 stitches around the first round. I was doing the directions for each side but when you add the sides together the total is actually 42. I am making the changes to the directions now and am also working on a video to show you. This means that there will be 42 total for both sides, then you will decrease two times on each side of the ear for a total of 4 decreases per round. Thank you for pointing this out to me! Have a great night.
Kathie

Reply
sandi
6/30/2017 08:13:49 pm

Thank you, that does make more sense to me. Your videos and suggestions of videos are very helpful to a newbie like me.

Tammy
8/2/2017 12:04:30 pm

I wanted to know if u had made a video yet on making the ears, im still new making this stuff and im having a hard time making the ears
thank you

Reply
Kathie
8/2/2017 01:09:48 pm

I did make it but it was really dark. I am going to try to make another one right now. Thank you so much for reminding me?

Reply
Kathie link
8/3/2017 11:44:13 am

OK, I made a sort of video, pictorial combination and posted it on You Tube. I did it quickly and had difficulty with the video part so I did some pictures as well. I hope this helps. If you live on Long Island I would be happy to meet with you and help you! Here is the you tube link:https://youtu.be/_biZX1NXsJY. I also put it in the website directions under the ear as well.

Reply
Candy link
3/17/2018 05:02:44 am

Kathy, 1st I want to thank you for making your Lovey free to the public, I know that from a being creator myself, the time invested in it, is often a huge sacrifice to ourselves and even more for our families. And putting ourselves and our work out there for the world to criticize is not an easy thing to overcome. I myself am not sure that I could do that, but I also find that I am my own personal biggest critic. I am a perfectionist to the very core. So please please please, don’t take what I am about to say the wrong way, only as a tool to improve upon. As I said before I do appreciate the time and effort you have put forth and so this is just to help in seeing it from a persons eyes who is trying to really recreate your artwork. If it’s worth doing even once, then it’s worth taking the extra time and doing it right, especially when you are making it available for others and all should within reason be able to follow those instructions and without fail, be able to clearly understand them and be able recreate that same item.
Now friend I have read and seen a great MANY many patterns since my yarning career has began and in all honesty I taught myself 1st by YouTube tutorials and then I purchased several chrochet learning books with instructions on how to read patterns by all different kinds of pattern designers, and all the books were the same in this sense, for they all come down to the same general rules, with each rule being slightly varied but all within the same general way. I think this would be a great investment for you as you can find them rather inexpensive for only a few dollars at any Walmart, Joanne’s, Miachels or Hobby Lobby (and of course the latter 3 stores have coupons that you can use from either their app or online straight from your phone or you can print from home. )Then study it and pick a plan for your patterns. Proofread your patterns several times before you ever publish them, maybe even have a friend or two to make the pattern up as well, so that you can get their input and find any mistakes. And hopefully you will find yourself extremely successful in all of your ventures. And never ever assume that by reading what you have published, that the reader can see the images that you have envisioned, they should however be able to follow your step by step instructions and be able to put fiber to hook and creat it. Oh and unless the video is per your actual pattern, never refer anyone to a similar video unless you clearly state such, as it will only confuse them even further. And when you do make a video, makes it a complete video. Don’t start with video and then end in pictures, it doesn’t help. Follow through with everything that you do, because as with you, it’s an investment on your clients as well. Be something worth investing our time and money in.
I do say all of this with the greatest respect for you and your art. And hope that you only take this as constructive as it is meant to be. And if I didn’t care and felt that you had no talent, I wouldn’t have taken my time to write. I don’t have time to waist with hatefulness. Just wanted you to know that as well.

And my main issue was trying to follow your pattern for the blanket on the hot pink elephant with the 6 sides. From the very beginning of Rnd 1 it’s just not very clear. Maybe you can go back and have a look see, chain 3, 2 DC , 5 more times, is that a total of 18 DC or is that 6 sets of chain 3s & 12 DC ? Usually I find the patterns calls for chain 3 (1stDC) 2 DC, CH 2 or 3 , * 3 DC, CH 2 or 3 * repeat 4 more times. For a total of 18 DC and 18 ch or 12ch. Anyways wanted to show you where I was having trouble and just couldn’t get it started. Thank you for reading and I hope to hear from you soon. Have a wonderful day.

Reply
Kathie
3/19/2018 07:09:58 pm

Hi Candy,
Thank you so much for your feedback. I have made updates to the pattern, most especially the blanket, which I think was the difficult part. Hopefully this makes it a little easier to understand :-)

Reply
joan
6/2/2018 03:31:41 pm

i tried this and it was for a friend made it and they loved it. i also tried Jeffery the elephant pillow made it for my grandson 4th grade teacher who had noticed it on Pinterest another winner

Reply
Anita Saldanha
2/4/2020 10:50:50 pm

Can you please provide the video or instructions for the double decrease you refer to in Round 21 for the head. Do I do 1 sc in the next 8 stitches, then a dd, 1 sc in the next 8 stitches, then a dd....to end?

Reply
Anita
2/6/2020 11:17:34 am

Please help as I am stuck. What do you mean by a double decrease in Round 21 of the head. I understand a decrease but not sure what you mean by a double decrease.

Reply
Daphne
2/27/2020 02:10:36 pm

I'd like to do the elephant using the Sugar 'n Cream yarn, but would the pattern work out using Bernat Baby Blanket super bulky yarn for the blanket part?

Reply
Mary Ellen
10/10/2020 11:42:22 am

I loved this pattern and it was so easy to do the elephant trunk. Ears were a little tricky at first but got it eventually. How do you print this or is it not made to print. Do you have any black cat laying down patterns. Need one for a friend whos cat died recently. Keep it up it was very easy to follow they way you worded it . I have trouble following others patterns but your was very simple with increases and decreases. thanks

Reply
Lenore
11/24/2020 10:24:36 pm

Would you email me the elephant lovey pattern.

Reply


Leave a Reply.

    Picture
    Hi there! I'm Kathie, the author behind Creating A Simpler Life blog. I'm excited to share our longterm projects (and planning) toward building our future retirement homestead in the Adirondack Mountains of New York. In the meantime I will be sharing all the other little things we do that are part of creating our simpler life!
    Creating a Simpler Life

    RSS Feed

    Visit Creating A Simpler Life's profile on Pinterest.

    Categories

    All
    Adirondack Crafts
    Chickens
    Conservation
    Crochet
    Do It Yourself
    Energy Savings
    Essential-oils
    Essential-oils
    Food-storage-preservation
    Food-storage-preservation
    Gardening
    Health
    Health-wellness
    Health-wellness
    Homemade-remedies
    Homemade-remedies
    Homesteading
    Homesteading Dreams
    Inexpensive Fun
    Minimizing
    Organization
    Products We Sell
    Recipes
    Recycling
    Saving-money
    Saving-money
    Shopping
    Wedding & Shower DIY

    Archives

    July 2020
    June 2020
    April 2020
    March 2020
    March 2019
    January 2019
    December 2018
    October 2018
    August 2018
    July 2018
    June 2018
    April 2018
    March 2018
    February 2018
    January 2018
    November 2017
    October 2017
    September 2017
    August 2017
    July 2017
    June 2017
    May 2017
    April 2017
    March 2017
    February 2017
    January 2017
    December 2016
    November 2016
    October 2016
    September 2016
    August 2016
    July 2016
    June 2016
    May 2016
    April 2016
    March 2016
    February 2016
    January 2016
    December 2015
    November 2015
    October 2015
    September 2015
    August 2015
    July 2015
    June 2015

[email protected]
Contact Us - Privacy Policy - Disclaimer
Copyright 2022©Creating A Simpler Life, Inc. All rights reserved. Reproduction in whole or in part without permission is prohibited.
  • Home/About
    • What does OFF-GRID mean?
    • MINIMIZING >
      • Home Size
      • Room by Room
      • Get Organized
      • Household Waste
    • MINIMIZE DEBT, MAXIMIZE SAVINGS >
      • Bills & Other Debt
      • Saving Money
      • Shopping Tips
      • Affordable Fun
    • BACKYARD CHICKENS >
      • The Coop
      • The Chickens
      • Feeding the Chickens
      • Fresh Eggs
    • HOME GARDENING >
      • Building the Garden
      • What We Grow
      • Seeds, Weeds, & More
      • Preservation & Storage
    • DO-IT-YOURSELF >
      • BABY SHOWER
      • Health & Wellness
      • Simple Cleaning & Tips
      • Crafts & More!
      • Printables
    • CROCHET >
      • IDEAS & MORE
      • VIDEO TUTORIALS
  • HOMESTEAD
    • The 5 Year Plan PLUS! >
      • 2017
      • 2018
      • 2019
      • 2020
      • 2021
      • 2022
    • WHY AN EARTH SHELTERED HOUSE?
    • OFF GRID TINY TRAILER
    • BUILDING our HOMESTEAD from Scratch >
      • BUYING LAND & GETTING STARTED
      • BUILDING THE CONCRETE DOME
      • FROM DOME to HOME
      • SURVIVING OUR FIRST WINTER
      • BURYING THE DOME
      • EXTERIOR FINISHING
      • INTERIOR FINISHING
    • HOMESTEAD MACHINERY >
      • GENERATORS
      • KUBOTA TRACTOR
      • ATV'S & UTV'S
      • WOOD CHIPPER
      • CHAINSAWS
      • LOG SPLITTER
      • POWER TOOLS
      • SNOWMOBILES
      • AUTOMOBILES
    • BUDGETING THE BUILD >
      • BUDGET BUILD TIPS
      • COSTS
    • SUSTAINABILITY >
      • WATER
      • FOOD
      • SHELTER
      • ENERGY
      • AIR
    • The Adirondacks >
      • Wildlife & Nature
      • Insects & Bugs
      • Things to Do
      • Water Fun
    • ADIRONDACK CRAFTS
  • VLOG
    • 2025
    • 2024
    • 2023
    • 2022
    • 2021