CREATING A SIMPLER LIFE OFF GRID
  • Home/About
    • MINIMIZING >
      • Home Size
      • Room by Room
      • Get Organized
      • Household Waste
    • MINIMIZE DEBT, MAXIMIZE SAVINGS >
      • Bills & Other Debt
      • Saving Money
      • Shopping Tips
      • Affordable Fun
    • BACKYARD CHICKENS >
      • The Coop
      • The Chickens
      • Feeding the Chickens
      • Fresh Eggs
    • HOME GARDENING >
      • Building the Garden
      • What We Grow
      • Seeds, Weeds, & More
      • Preservation & Storage
    • DO-IT-YOURSELF >
      • Health & Wellness
      • Simple Cleaning & Tips
      • Crafts & More!
      • Printables
    • CROCHET >
      • IDEAS & MORE
      • VIDEO TUTORIALS
    • Blog
  • HOMESTEAD
    • The 5 Year Plan PLUS! >
      • 2017
      • 2018
      • 2019
      • 2020
      • 2021
      • 2022
    • WHY AN EARTH SHELTERED HOUSE?
    • OFF GRID TINY TRAILER
    • BUILD VIDEOS IN ORDER
    • HOMESTEAD MACHINERY >
      • GENERATORS
      • KUBOTA TRACTOR
      • ATV'S & UTV'S
      • WOOD CHIPPER
      • CHAINSAWS
      • LOG SPLITTER
      • POWER TOOLS
      • SNOWMOBILES
      • AUTOMOBILES
    • BUDGETING THE BUILD
    • SUSTAINABILITY >
      • WATER
      • FOOD
      • SHELTER
      • ENERGY >
        • SOLAR POWER
    • The Adirondacks >
      • Wildlife & Nature
      • Insects & Bugs
      • Things to Do
      • Water Fun
    • ADIRONDACK CRAFTS
  • VLOG
    • 2023
    • 2022
    • 2021

Blog

A little bit of anything and everything that's part of
​creating, enjoying, and living a simpler life!
Picture
http://www.creatingasimplerlife.com

TIE DYE SPIRAL SHIRTS

9/3/2015

0 Comments

 
Picture
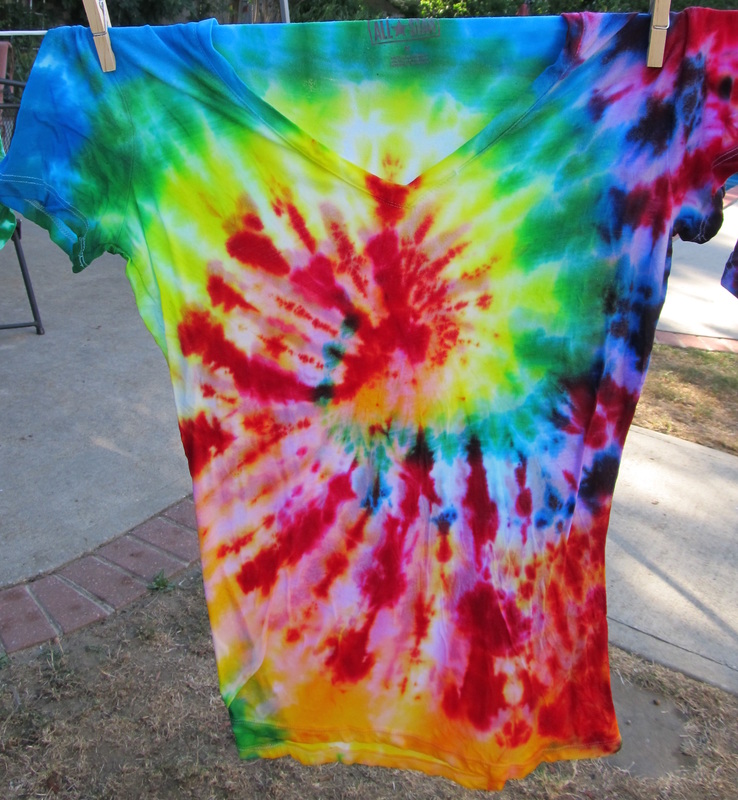
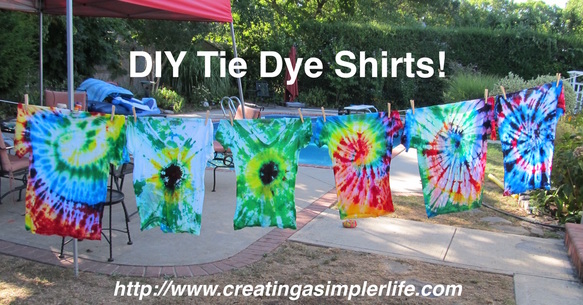
I love tie dyed clothes.  I don't know what it is about them but they just make me feel happy.  Maybe it's the combination of wild colors, or the designs, but whatever it is I really like tie dyed clothes.  That's why I decided to take a day and do some tie dying for fun!  Well, a little for fun and the rest to give as gifts for birthdays or Christmas.  Despite the fact that I hadn't tie dyed in over 20 years I am very happy with the results.
Picture
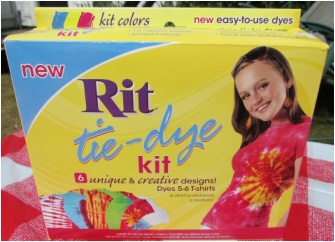
Check out the kit by clicking the picture above or here: Rit Tie-Dye Kit (affiliate link)
Supplies:
  • Rit Tie Dye Kit (This is a one step kit so there is no soaking with soda ash before hand!)
  • Latex (or other) Gloves (the ones that come with the kit are rally crappy)
  • Cheap Plastic Tablecloth
  • Grocery Store Plastic Bags
  • Rubber Bands (some do come with the kit)
  • Water (a hose or a bucket would do)
  • Large rag or towel that can be ruined
  • Crummy clothes or apron
  • About 5 - 6 Shirts or more depending upon the size and how much dye you use on each

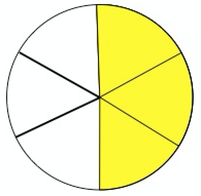
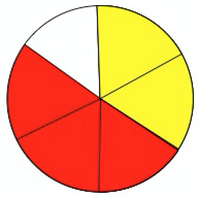
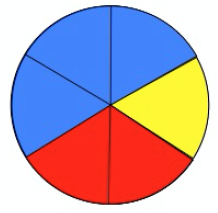
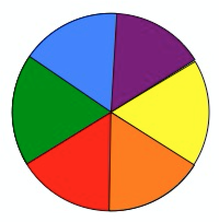
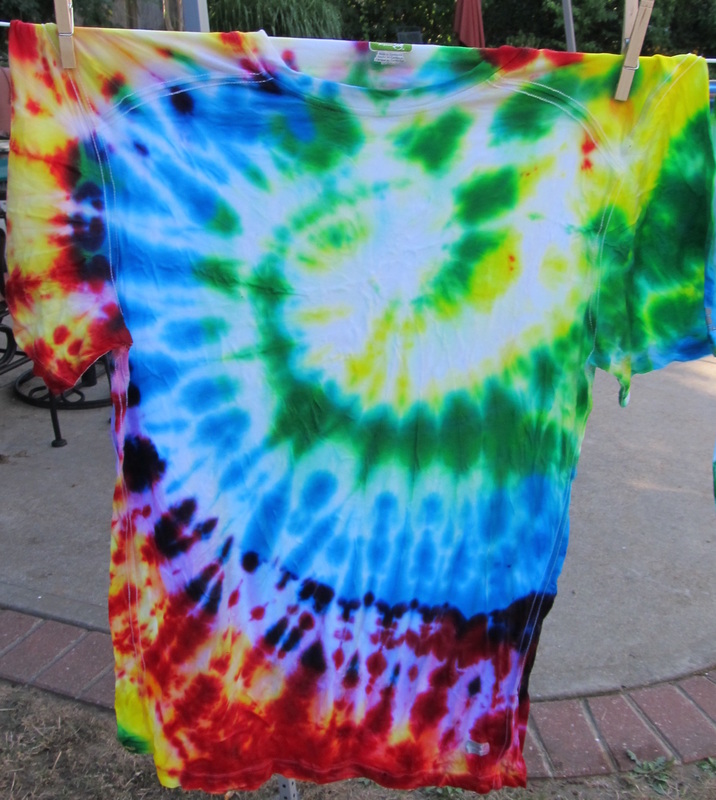
Getting Ready:
You definitely want to do this outside.
Cover a table with the cheap plastic table cloth.

Rubber-Banding the Spiral Design:
I decided to do the spiral pattern for most of the shirts.  I followed the video tutorial below.  I did not follow their instructions for dying though because they had way more colors than I did - I only had three tubes with three colors (red, blue, and yellow). The directions for coloring the rainbow using only three colors are below.
Picture
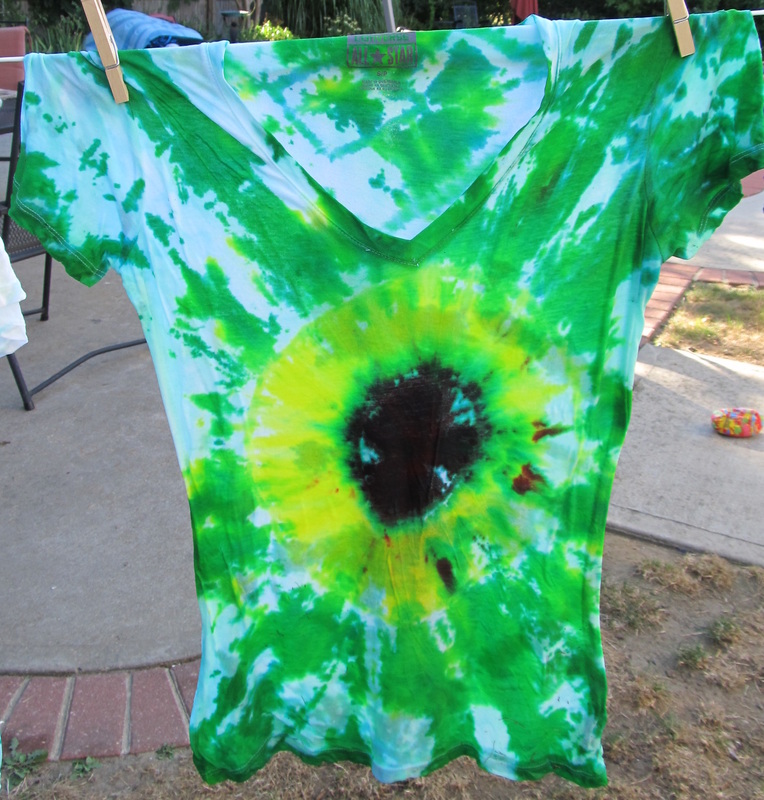
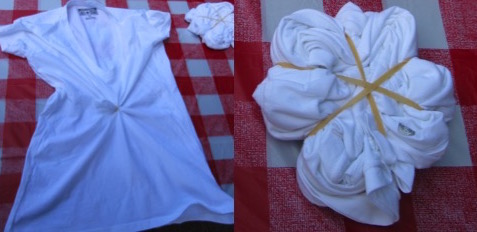
Rubber-Banding the Sunflower Design:
I couldn't find any instructions online, so I kind of made up my own based on what I thought might work. I basically just did the front of the shirt with the design by banding a small portion for the brown center. Then I pleated and banded the next section for the yellow flower petals.  That was it for the flower.  For the rest of the shirt I just banded it however it worked out naturally.  I guess you could say I 'winged' it.  It really didn't matter to me since it was an experiment.
Picture
Picture
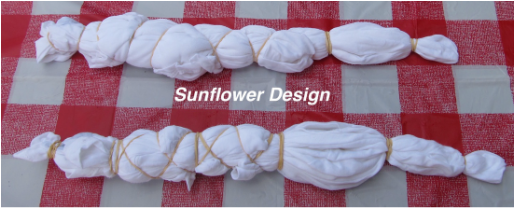
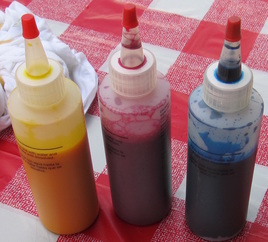
Yellow, Red, & Blue Dye
Dyeing the Spiral Shirts:
  1. Wet the shirt (dip in a bucket or wet it gently with the hose).  It has to be wet for the dye to set in.  Squeeze out the excess water so it is wet, but not soaking. Lay the shirts out on the table.
  2. Put on gloves and fill each bottle of dye to the water line marked on the outside.  Be careful to not get the dye on anything or it will be colored! 
  3. Replace the caps and shake the bottles until all color is dissolved.
  4. The Spiral Design was colored as shown in the pictures below.  The video above shows how quickly the woman dyed each pie piece.  It does not take a lot of skill or dye.  However, note that she had more colors so with only three colors I had to use the method below. Make sure you flip the shirt over and dye the same colors in the same three pie pieces (it will be opposite).  When you flip the shirt over, use the rag to wipe the table clean  before putting it back down.
  5. After shirt is dyed completely place it inside a plastic bag and close it up tightly.  Store in cool place overnight.
Picture
Color three pie pieces yellow.
Picture
Color three pie pieces red. As you can see in the picture, one of the yellow pieces will be colored red (as one of the three total).
Picture
Color three pie pieces blue. The three pieces will include one of the yellow and one of the red slices.
Picture
The colors will not look exactly like this, but they should mix and create other colors. You will then flip the shirt over and color the opposite side pie pieces the same colors (so in reverse). You can look at the sides to see what color goes where if you forget.
Dying the Sunflower Shirts
  1. Color the entire shirt yellow.
  2. Color the end (flower center) with red and blue also (this makes it almost black).
  3. Color the other end with blue (to make green).  Be sure to leave the petals of the flower yellow.
  4. Place colored shirt in plastic bag and close up tightly.  Store in cool place overnight.
NOTES TO CHANGE FOR SUNFLOWER SHIRTS NEXT TIME:  
Stay away from the rubber band area with the colors....it seems to have made a line that I don't really like. I would maybe make the center of the flower smaller and have more yellow for petals.
Somehow I would make the yellow petals more distinct - tighter pleats?  Not sure...

If you know a better way to make the sunflowers, please share.  I found pictures online all over the place but could not find any directions on how to make them so I just made up a method that I thought would work. I am happy with them since it was my first try.
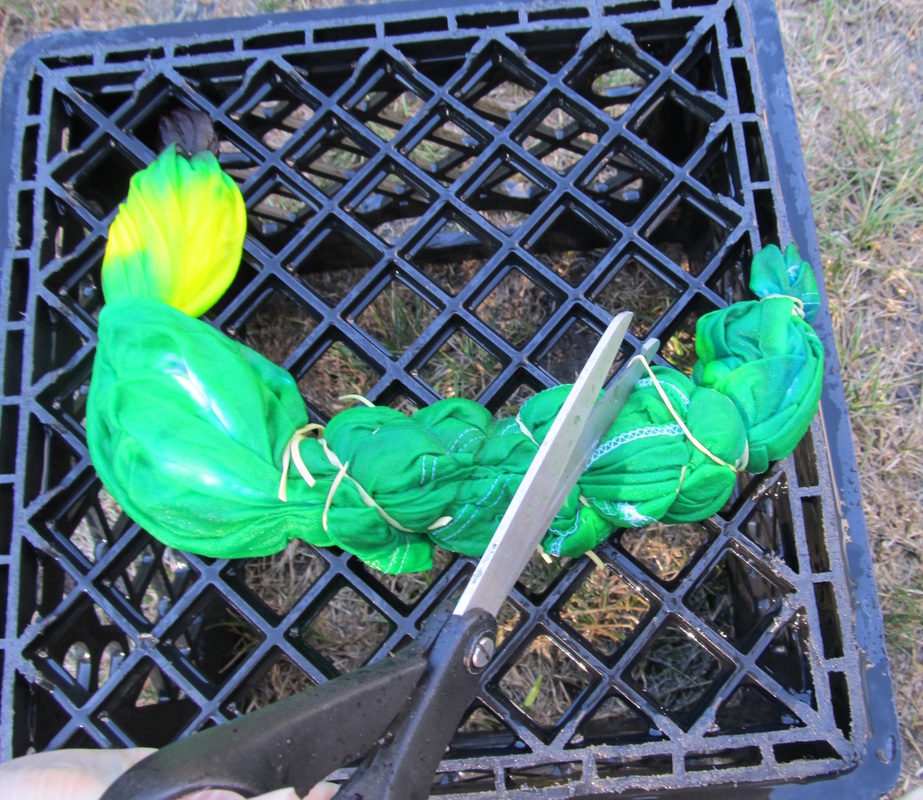
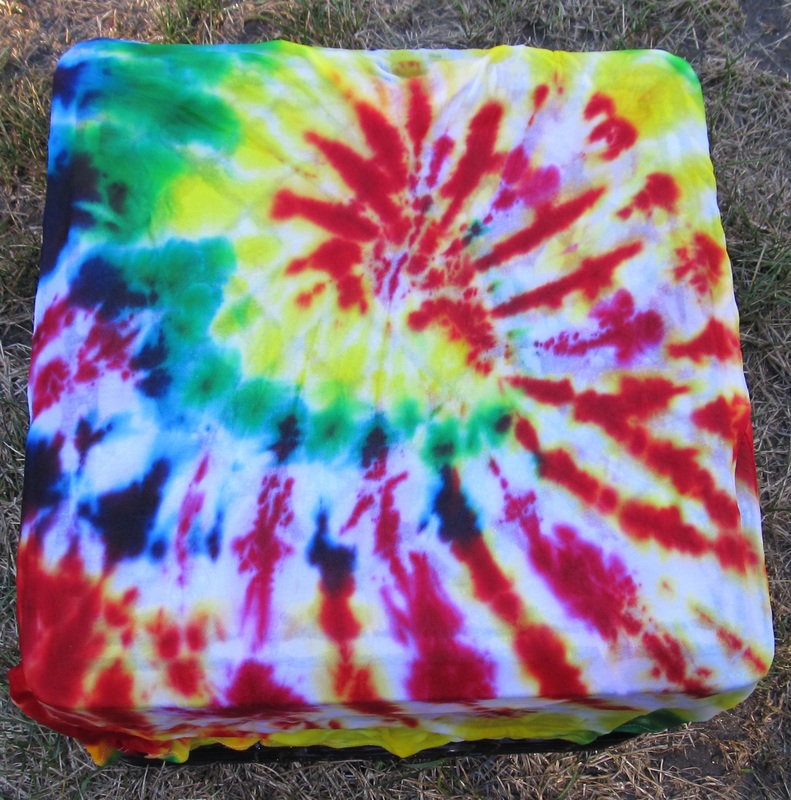
The Next Day
Using a milk crate, gloves, scissors, and a hose, I simply took out one shirt at a time and hosed it down until no more color ran from the shirt.  Then I clipped the rubber bands and removed them and hosed the shirt for a few more minutes to be sure all the color was done washing out.  After all the shirts were rinsed I washed them on hot temperature, short cycle, in the washer machine and hung them out to dry!  All done and happy with the results :-)
Please take a minute to hit like if you genuinely liked this post.
Thank you :-)
0 Comments


Leave a Reply.

    Picture
    Hi there! I'm Kathie, the author behind Creating A Simpler Life blog. I'm excited to share our longterm projects (and planning) toward building our future retirement homestead in the Adirondack Mountains of New York. In the meantime I will be sharing all the other little things we do that are part of creating our simpler life!
    Creating a Simpler Life

    RSS Feed

    Visit Creating A Simpler Life's profile on Pinterest.

    Categories

    All
    Adirondack Crafts
    Chickens
    Conservation
    Crochet
    Do It Yourself
    Energy Savings
    Essential-oils
    Essential-oils
    Food-storage-preservation
    Food-storage-preservation
    Gardening
    Health
    Health-wellness
    Health-wellness
    Homemade-remedies
    Homemade-remedies
    Homesteading
    Homesteading Dreams
    Inexpensive Fun
    Minimizing
    Organization
    Products We Sell
    Recipes
    Recycling
    Saving-money
    Saving-money
    Shopping
    Wedding & Shower DIY

    Archives

    July 2020
    June 2020
    April 2020
    March 2020
    March 2019
    January 2019
    December 2018
    October 2018
    August 2018
    July 2018
    June 2018
    April 2018
    March 2018
    February 2018
    January 2018
    November 2017
    October 2017
    September 2017
    August 2017
    July 2017
    June 2017
    May 2017
    April 2017
    March 2017
    February 2017
    January 2017
    December 2016
    November 2016
    October 2016
    September 2016
    August 2016
    July 2016
    June 2016
    May 2016
    April 2016
    March 2016
    February 2016
    January 2016
    December 2015
    November 2015
    October 2015
    September 2015
    August 2015
    July 2015
    June 2015

mrandmrscorbi@gmail.com
Contact Us - Privacy Policy - Disclaimer
Copyright 2022©Creating A Simpler Life, Inc. All rights reserved. Reproduction in whole or in part without permission is prohibited.
  • Home/About
    • MINIMIZING >
      • Home Size
      • Room by Room
      • Get Organized
      • Household Waste
    • MINIMIZE DEBT, MAXIMIZE SAVINGS >
      • Bills & Other Debt
      • Saving Money
      • Shopping Tips
      • Affordable Fun
    • BACKYARD CHICKENS >
      • The Coop
      • The Chickens
      • Feeding the Chickens
      • Fresh Eggs
    • HOME GARDENING >
      • Building the Garden
      • What We Grow
      • Seeds, Weeds, & More
      • Preservation & Storage
    • DO-IT-YOURSELF >
      • Health & Wellness
      • Simple Cleaning & Tips
      • Crafts & More!
      • Printables
    • CROCHET >
      • IDEAS & MORE
      • VIDEO TUTORIALS
    • Blog
  • HOMESTEAD
    • The 5 Year Plan PLUS! >
      • 2017
      • 2018
      • 2019
      • 2020
      • 2021
      • 2022
    • WHY AN EARTH SHELTERED HOUSE?
    • OFF GRID TINY TRAILER
    • BUILD VIDEOS IN ORDER
    • HOMESTEAD MACHINERY >
      • GENERATORS
      • KUBOTA TRACTOR
      • ATV'S & UTV'S
      • WOOD CHIPPER
      • CHAINSAWS
      • LOG SPLITTER
      • POWER TOOLS
      • SNOWMOBILES
      • AUTOMOBILES
    • BUDGETING THE BUILD
    • SUSTAINABILITY >
      • WATER
      • FOOD
      • SHELTER
      • ENERGY >
        • SOLAR POWER
    • The Adirondacks >
      • Wildlife & Nature
      • Insects & Bugs
      • Things to Do
      • Water Fun
    • ADIRONDACK CRAFTS
  • VLOG
    • 2023
    • 2022
    • 2021