CREATING A SIMPLER LIFE OFF-GRID
  • Home/About
    • What does OFF-GRID mean?
    • MINIMIZING >
      • Home Size
      • Room by Room
      • Get Organized
      • Household Waste
    • MINIMIZE DEBT, MAXIMIZE SAVINGS >
      • Bills & Other Debt
      • Saving Money
      • Shopping Tips
      • Affordable Fun
    • BACKYARD CHICKENS >
      • The Coop
      • The Chickens
      • Feeding the Chickens
      • Fresh Eggs
    • HOME GARDENING >
      • Building the Garden
      • What We Grow
      • Seeds, Weeds, & More
      • Preservation & Storage
    • DO-IT-YOURSELF >
      • BABY SHOWER
      • Health & Wellness
      • Simple Cleaning & Tips
      • Crafts & More!
      • Printables
    • CROCHET >
      • IDEAS & MORE
      • VIDEO TUTORIALS
  • HOMESTEAD
    • The 5 Year Plan PLUS! >
      • 2017
      • 2018
      • 2019
      • 2020
      • 2021
      • 2022
    • WHY AN EARTH SHELTERED HOUSE?
    • OFF GRID TINY TRAILER
    • BUILDING our HOMESTEAD from Scratch >
      • BUYING LAND & GETTING STARTED
      • BUILDING THE CONCRETE DOME
      • FROM DOME to HOME
      • SURVIVING OUR FIRST WINTER
      • BURYING THE DOME
      • EXTERIOR FINISHING
      • INTERIOR FINISHING
    • HOMESTEAD MACHINERY >
      • GENERATORS
      • KUBOTA TRACTOR
      • ATV'S & UTV'S
      • WOOD CHIPPER
      • CHAINSAWS
      • LOG SPLITTER
      • POWER TOOLS
      • SNOWMOBILES
      • AUTOMOBILES
    • BUDGETING THE BUILD >
      • BUDGET BUILD TIPS
      • COSTS
    • SUSTAINABILITY >
      • WATER
      • FOOD
      • SHELTER
      • ENERGY
      • AIR
    • The Adirondacks >
      • Wildlife & Nature
      • Insects & Bugs
      • Things to Do
      • Water Fun
    • ADIRONDACK CRAFTS
  • VLOG
    • 2025
    • 2024
    • 2023
    • 2022
    • 2021

Blog

A little bit of anything and everything that's part of
​creating, enjoying, and living a simpler life!
Picture
http://www.creatingasimplerlife.com

Giant Wedding Dream Catcher

8/30/2017

5 Comments

 
Picture
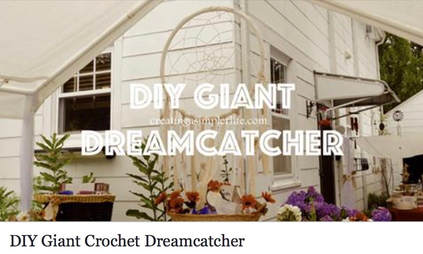
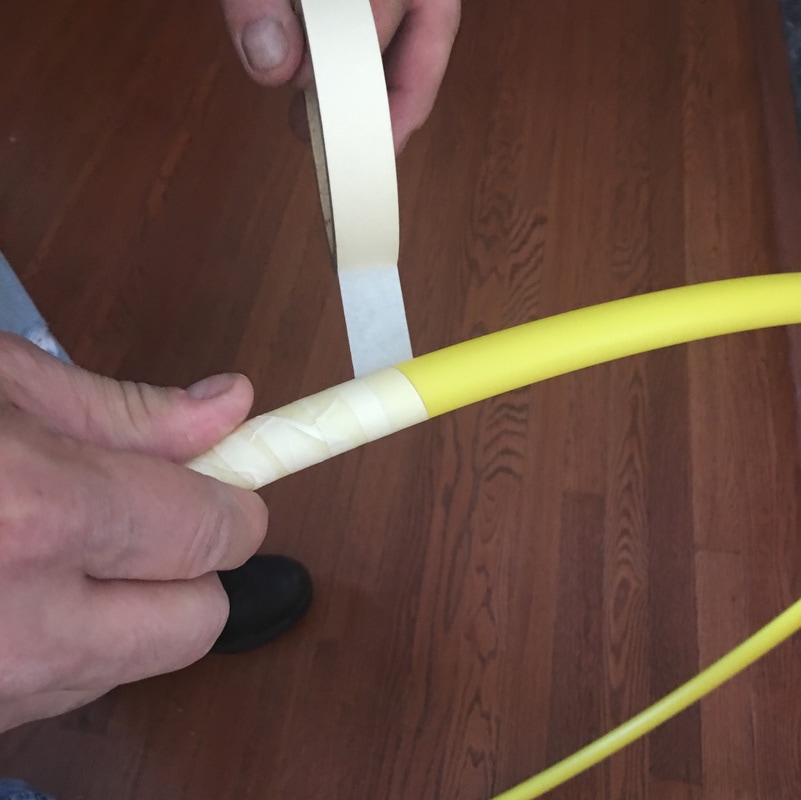
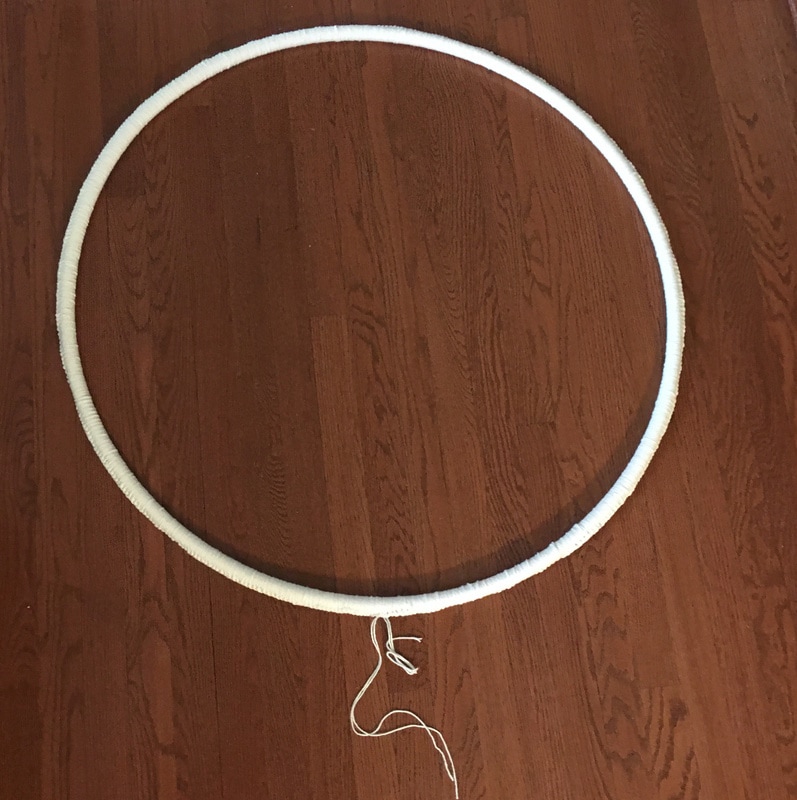
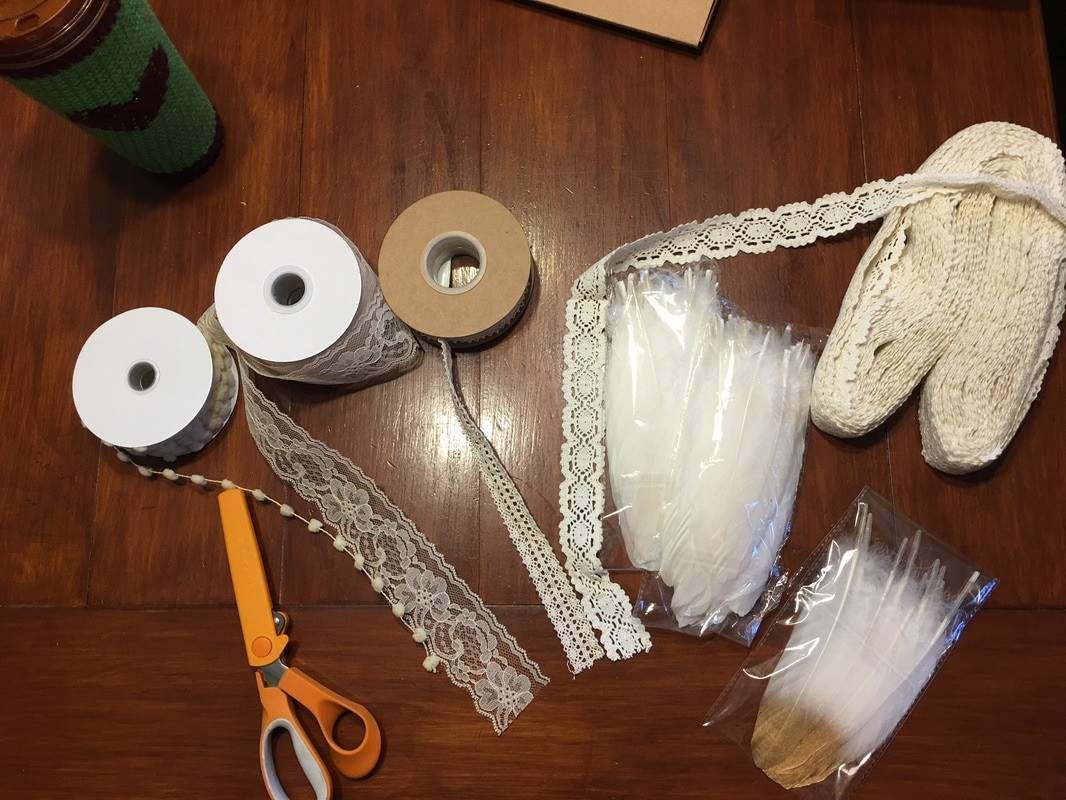
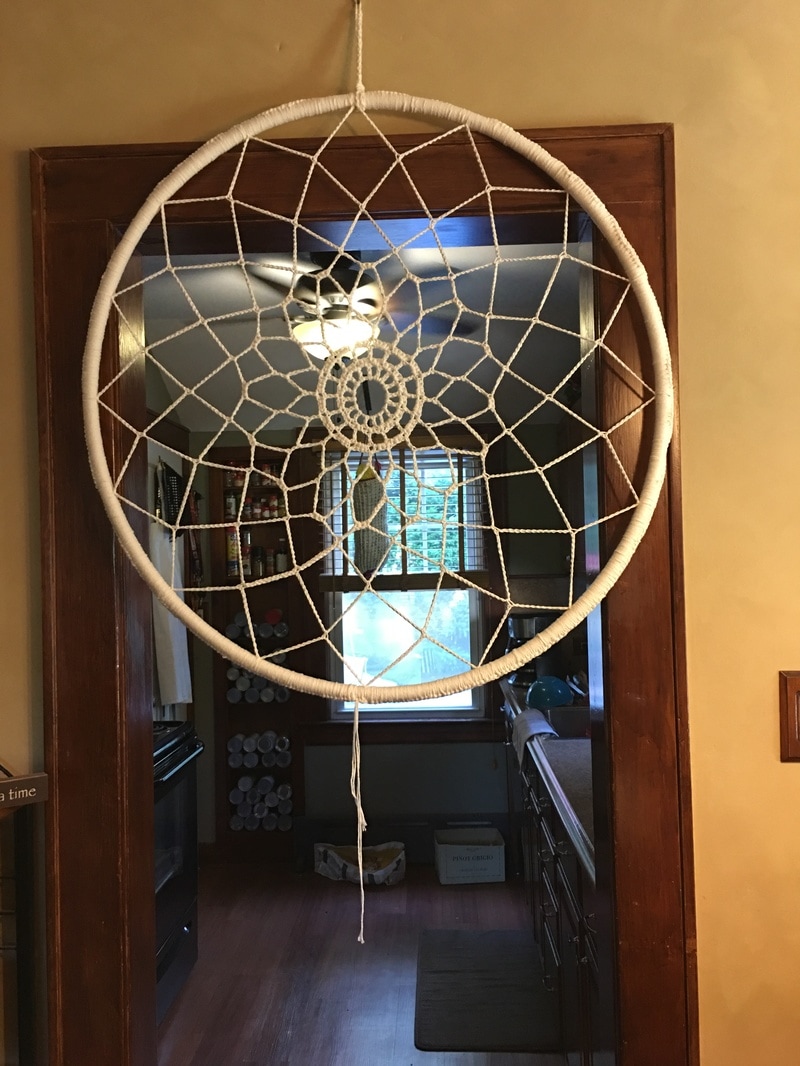
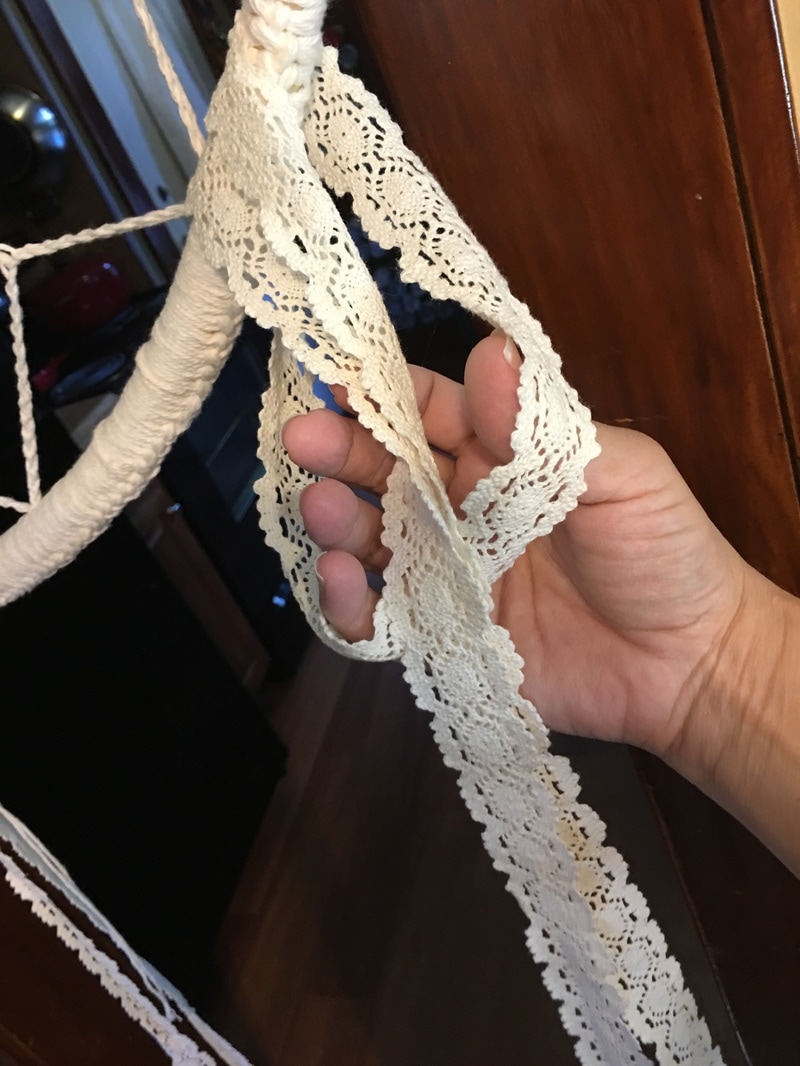
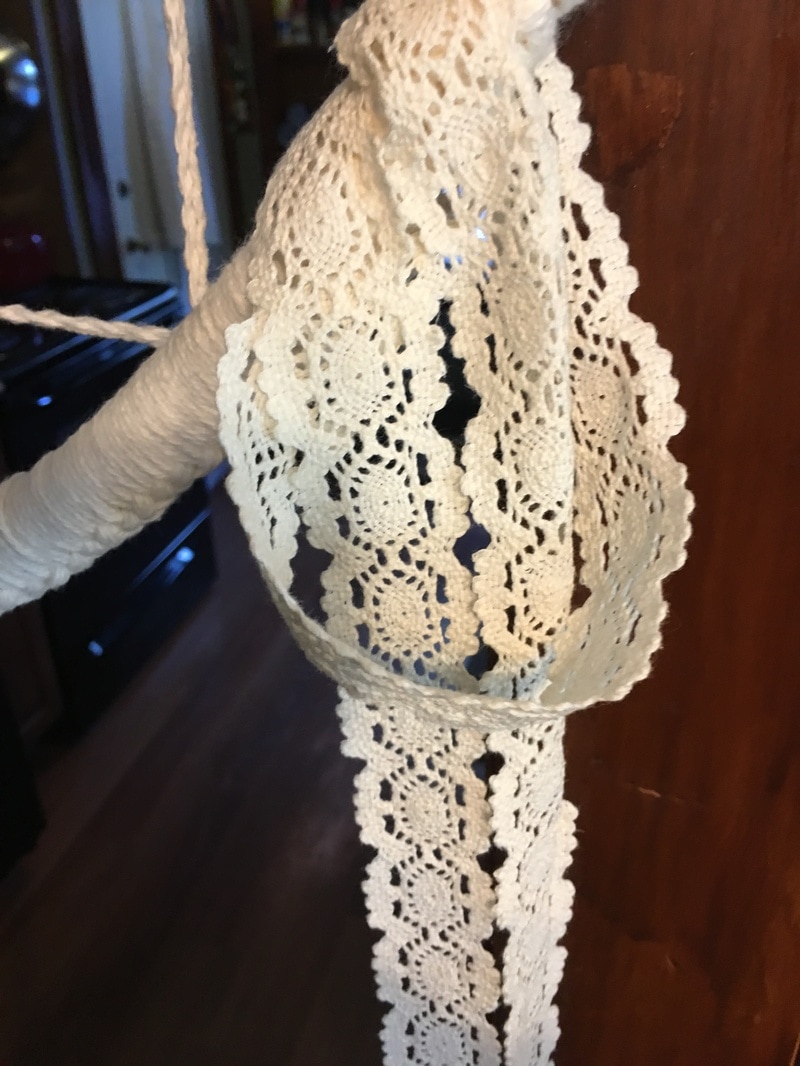
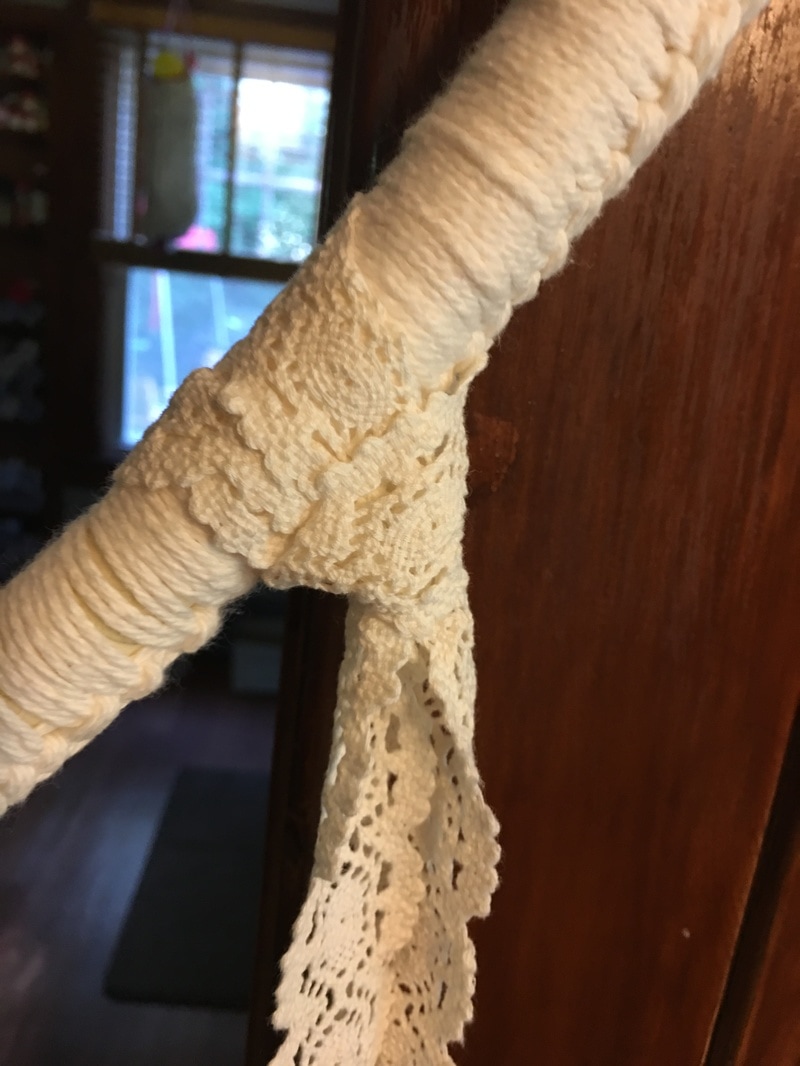
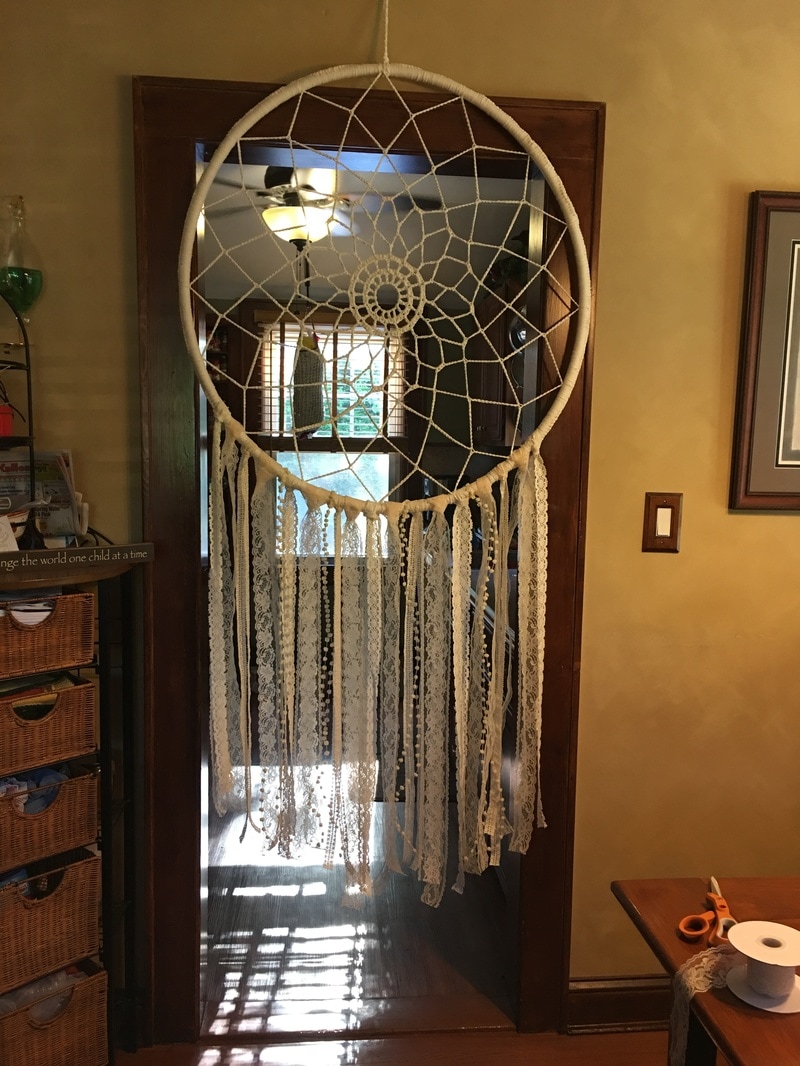
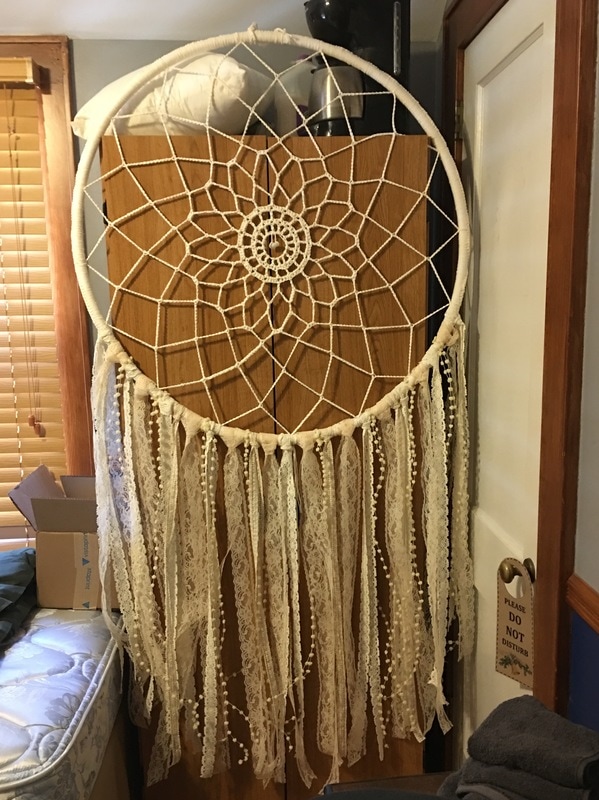
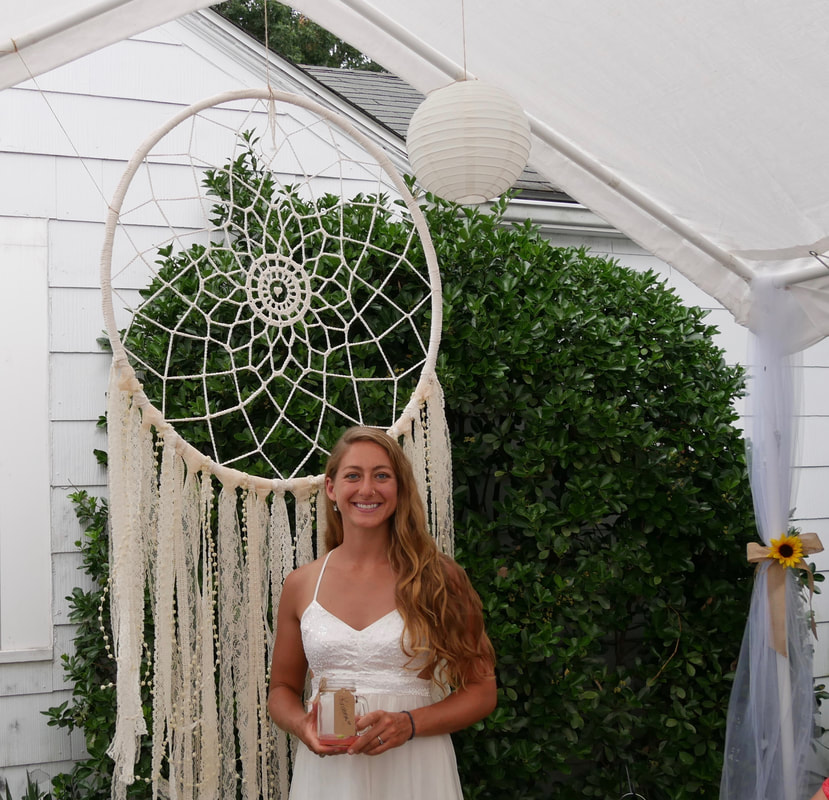
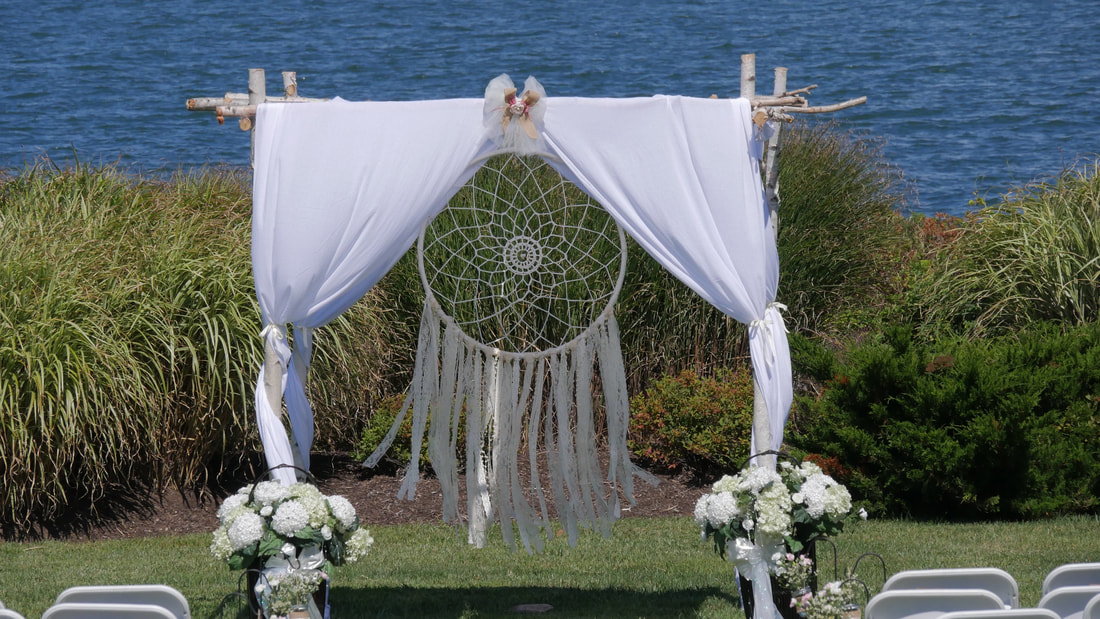
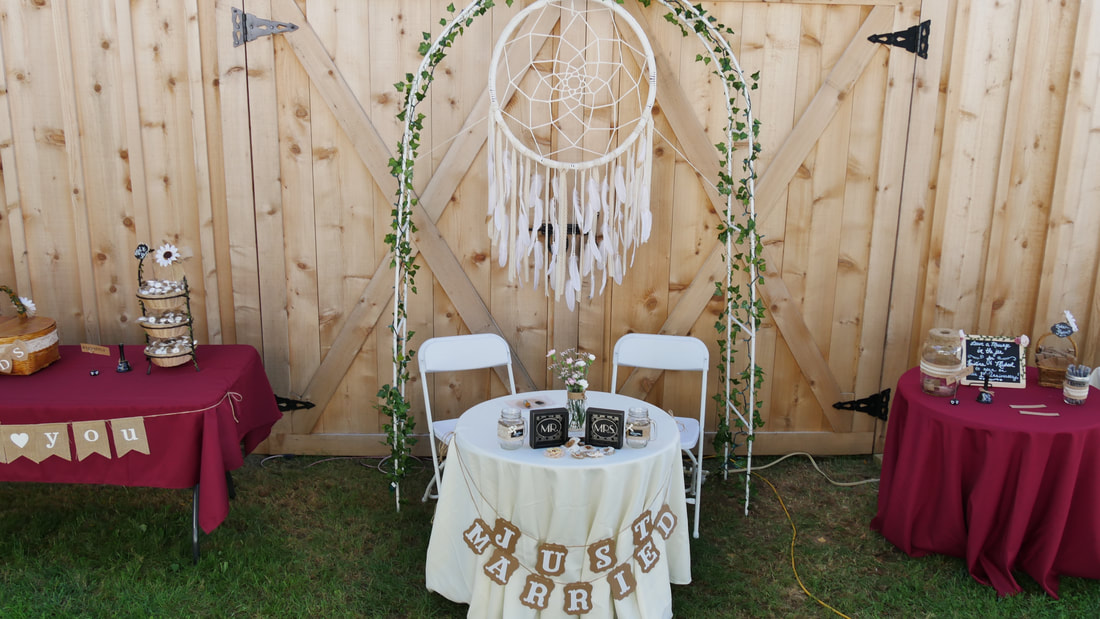
My daughter is getting married and we are so excited to welcome her fiancé into our family.  They have plans to get married down by the beach and hopefully the weather will be beautiful that day because my daughters father-in-law to be is making a birch arbor for them to be married under with this giant wedding dream catcher hanging at the back of it behind them. This is why the dream catcher had to be big. Really big. When all was said and done this beauty measured in at 3 feet wide and 5 feet tall! Wow!

But of course none of that mattered to me as long as my little girl  is happy. I made another simpler, and smaller, model that uses feathers to be hung behind their seats at the reception. Read more about DIY Giant Dreamcatcher with Feathers!
​
Supplies Needed:
  • Hula Hoop (Great way to repurpose an old one!)
  • Masking tape
  • 3 skeins of cotton Lily Sugar n' Cream Yarn. I used Ecru.
  • 4.5 mm crochet hook (to crochet center)
  • 6.5 mm crochet hook for wrapping hoop with yarn
  • Yarn needle
  • Scissors
  • Small sea shell or other trinket for center (optional)
  • Feathers (see affiliate links below)
  • Lace and pom-poms (see affiliate links below)
Video "How-To"
​
(crochet directions and more pictures below):
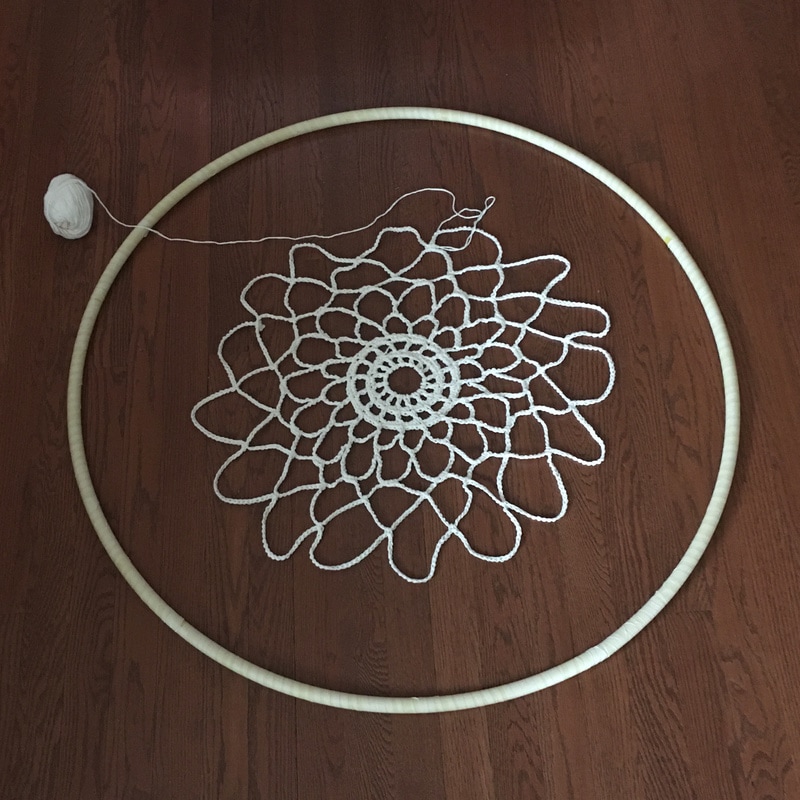
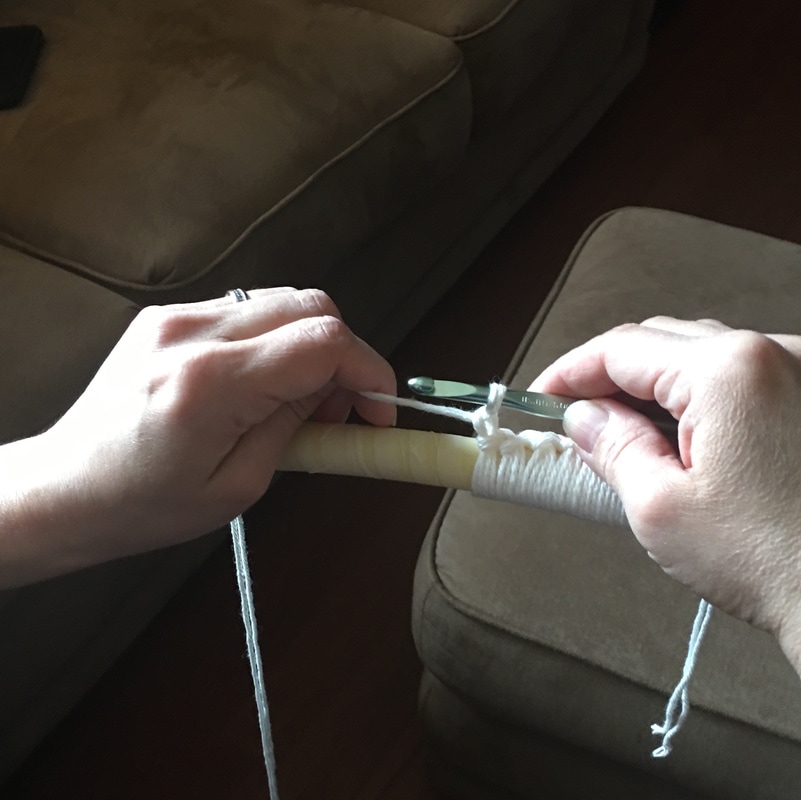
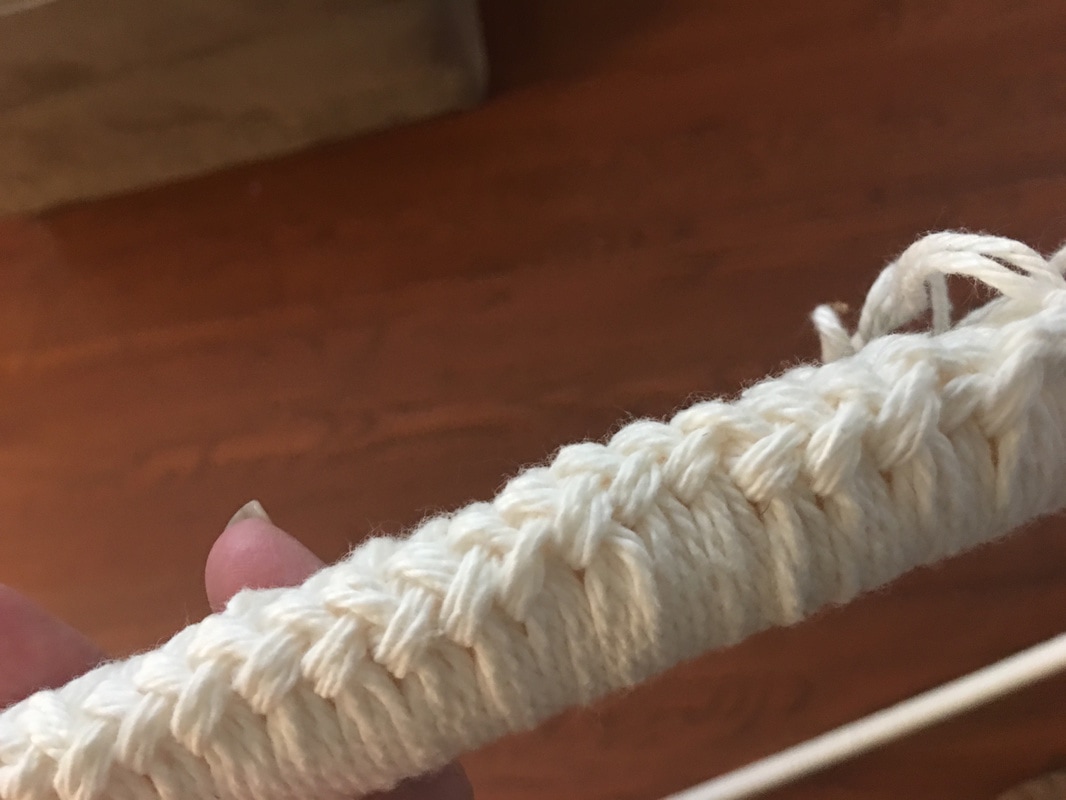
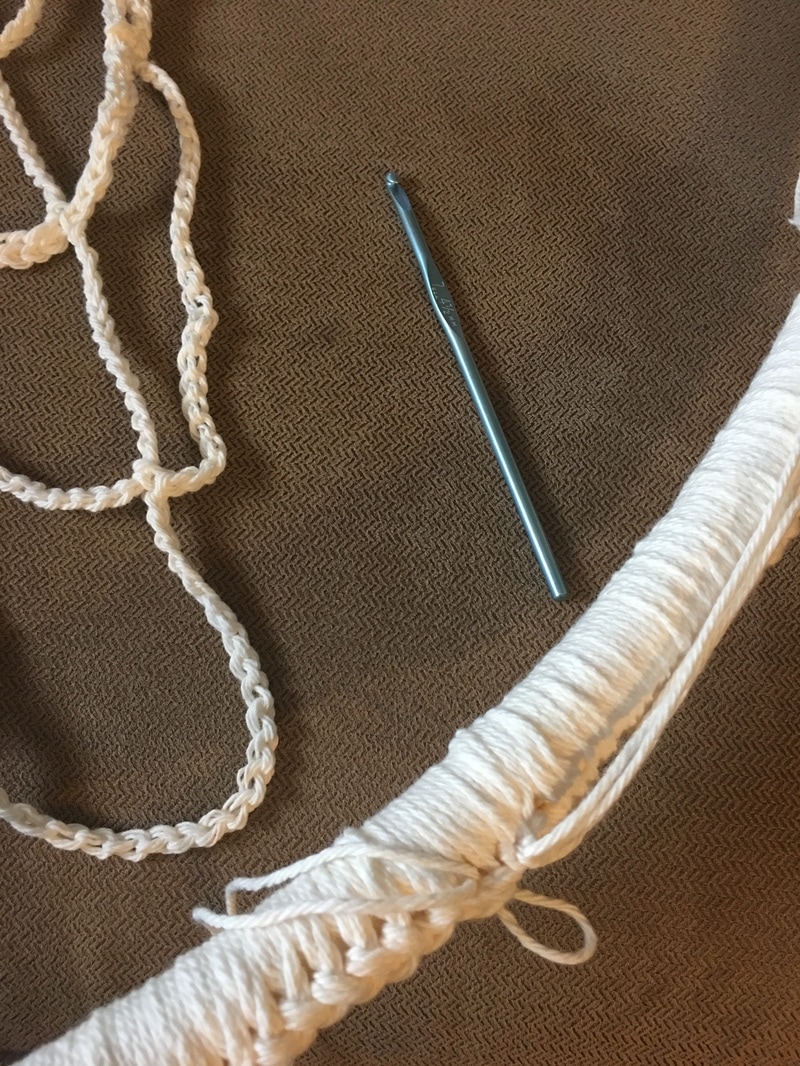
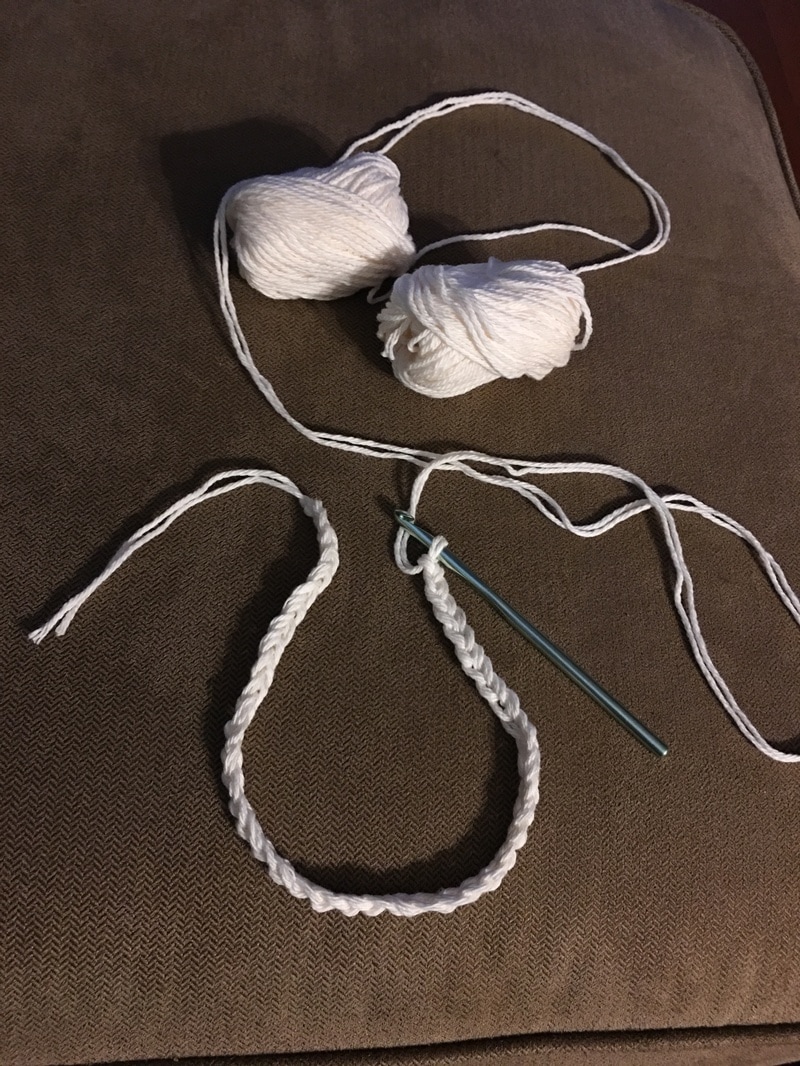
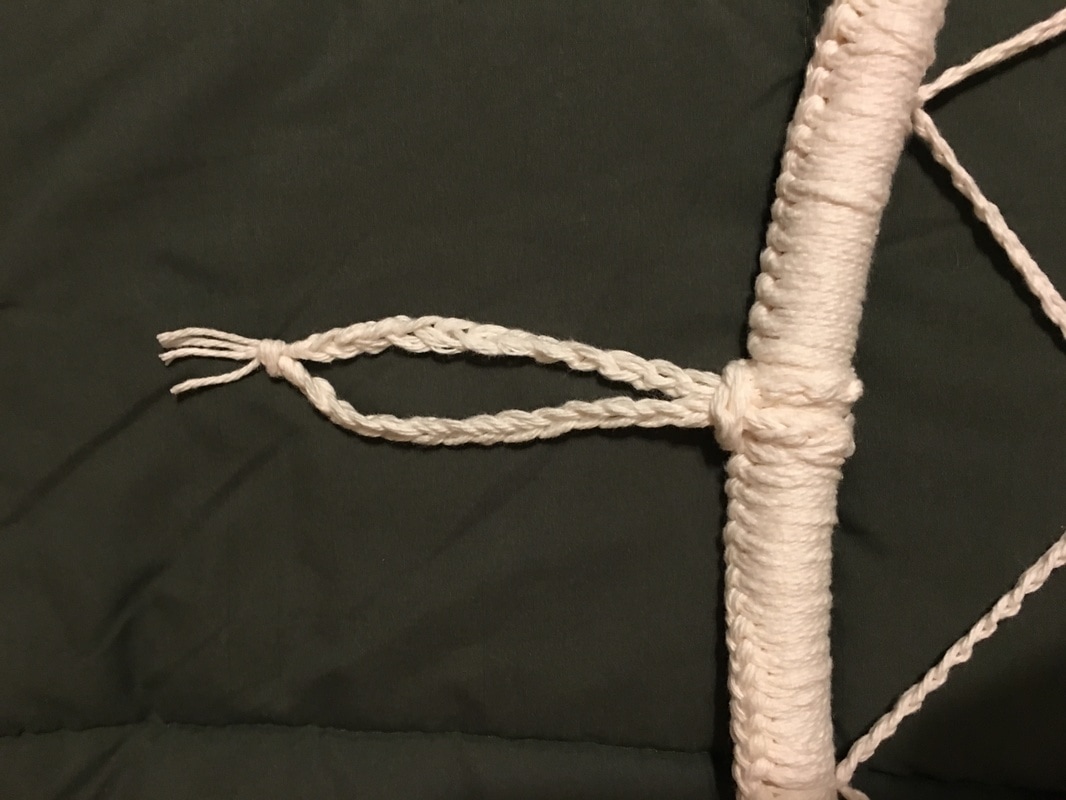
Picture
I repurposed an old hula hoop from our garage that would probably have ended up being thrown out!
Picture
We wrapped the hula hoop with masking tape to keep the bright yellow color from showing through.
Picture
Crochet the center. General directions below.
Hoop Crochet Center Directions:
​I really don't have directions per-say, I can just give you an idea of what I did. A couple of pointers ahead of time:
 - All stitches are into spaces, not into other stitches. This is important for spacing later on.
 - When you are finishing up your final loops to connect, make sure you have an even number. It helps to have an even number so you can connect the loops equally around the hoop later on.
 - For this reason, every row must be crocheted separately from every other row. You cannot do this pattern in the round.
 - To get to the center of each loop to start the next round I would slip stitch up the side of the first hoop in the level. When all is said and done you can't even see these extra stitches. The directions for this are in row 6 below.
  • Chain 25 and connect to create loop.
  • Row1: Chain 4, and dc into center of circle. Chain 2 and dc into center of circle. Repeat until you have a total of 16 loops around the circle in total. Note that your last chain 2 will connect with slip stitch to your original chain 4. You will have to manipulate the stitches to be evenly spaced around the 25 chain circle.
  • Row 2: Chain 1 and do 2 sc in next space (again, not in the stitches), chain 2, then 2 sc in next space, etc. around. Slip stitch to connect.
  • Row 3: Chain 6, and dc into next space, chain 4, dc into next space, etc. all the way around. Slip stitch to connect.
  • Row 4: Repeat directions for row 2 around. Make sure you have an even number of spaces around at this point. If you do not, you need to go back and work it so that you do.
  • Row 5: chain 10, slip stitch into space, and continue all the way around and slip stitch to connect. 
  • Row 6: Now you have to work your way to the center of the loop by slip stitching in the first 5 chains to get to the center of the loop, then sc into loop center and chain 15, then sc in the center of the next loop etc., repeat around until you reconnect to the start of your first loop. 
  • Row 7: Repeat row 6, but you will slip stitch 7 times to get to the approximate center, then sc into center and chain 20, then sc into center of next loop and continue same around.
  • You can continue this pattern increasing your stitches each row until the center stretches nice and tight to fit into your hoop. You can also vary it a little by connecting with dc instead, or doing two sc in a loop as well.  Note that cotton yarn tends to stretch quite a lot. If you are using a different yarn the stretch will vary. Either way, the center should look way too small to fit the hoop when you are done, but trust me it will stretch! It may take some trial and error to get it right the first time (it did for me!).
Picture
Then I wrapped the hoop with a yarn. I used a double strand (so two skeins at once). It was more like macrame because I wrapped from front to back, then from back to front, etc. see the video below.
Picture
Completed wrapped hoop.
Picture
A closeup of what the hoop edge ended up looking like.
Picture
Next I connected the crochet center to the hoop. I simply used a piece of cut string, and tied each loop by alternating. In other words I did the top, then the bottom. Then one side, and the opposite side. This is what kept the distances correct. At the end I simply used a yarn needle to side the hanging strings under the yarn of the hoop and snipped off any extra.
See how to connect the crochet center to the hoop on my other Giant Dream Catcher with feathers Instructions!
Picture
Completed dream catcher hoop part....now to add the lace and feathers!
Picture
Crochet a chain 0f about 75 stitches using doubled up yarn.
Picture
Tie the chain to the hoop so you now have a way to hang it!
Picture
I gathered my supplies and cut strips of lace approximately 38" long.
Picture
I hung the dream catcher in the doorway between the kitchen and dining room to make it easier to work.
Picture
Fold a cut strip of lace in half and loop the folded portion over the dream catcher. Pull the ends through the loop gently.
Picture
Do not tighten until you are sure it is positioned where you want it. I do approximately four of each type of lace at a time so that they are evenly distributed.
Picture
Then tighten and switch to the next type of lace and do four more. I continue to do this until it is pretty full. NOTE: I save the pom pom for the absolute very end as a filler.
Picture
This is what it looked like at the end, however my daughter and I both felt that it needed some more on the sides.
Picture
Here is the finished product! Note, that is a small seashell hanging in the center. I just have to find a way to make it balance a little better.
Picture
Picture
Dream catcher used for the ceremony!
Picture
And the feather dream catcher was used behind their sweetheart table at the reception!
Check out my other Giant Dream Catcher made with Feathers!
Picture
Thanks for visiting!
Check out our other crochet patterns and ideas on our website or on our Pinterest boards and our DIY Shower & Weddings!
Have a wonderful day:-)
Sincerely,
Picture
5 Comments
Laura
1/17/2018 05:47:35 am

Dear,

I'm just in love with your explainations !
Could you make a video "how to make the Crochet Center" Directions please ?

With love,

Laura

Reply
Kathie
1/30/2018 11:57:53 am

Great idea! I will let you know when it's done?

Reply
Kaya
12/28/2018 12:21:53 pm

I am learning how to crochet to make this! I am done with all the parts except the center, I am trying to figure out how to connect the 25 chains, and how to connect the raws with each other, and I didn’t understand well the coupel of pointers you wrote before the center crochet steps... I am kind of lost and I really want to do it. Can I know when are you going to upload the video? And can you make the steps slow and clear for beginners like me? Thank you.

Anna
6/23/2018 09:47:56 am

What a beautiful piece. I am going to make one for my bedroom. I think that my daughter would like some small one's also for her bedroom l
Thanks for sharing your creativity ❤

Reply
Kathie
6/23/2018 09:59:16 am

Thank you! I do plan on making a video of how I crocheted the center part but I just haven't had a chance yet. Please let me know how yours turns out!

Reply


Leave a Reply.

    Picture
    Hi there! I'm Kathie, the author behind Creating A Simpler Life blog. I'm excited to share our longterm projects (and planning) toward building our future retirement homestead in the Adirondack Mountains of New York. In the meantime I will be sharing all the other little things we do that are part of creating our simpler life!
    Creating a Simpler Life

    RSS Feed

    Visit Creating A Simpler Life's profile on Pinterest.

    Categories

    All
    Adirondack Crafts
    Chickens
    Conservation
    Crochet
    Do It Yourself
    Energy Savings
    Essential-oils
    Essential-oils
    Food-storage-preservation
    Food-storage-preservation
    Gardening
    Health
    Health-wellness
    Health-wellness
    Homemade-remedies
    Homemade-remedies
    Homesteading
    Homesteading Dreams
    Inexpensive Fun
    Minimizing
    Organization
    Products We Sell
    Recipes
    Recycling
    Saving-money
    Saving-money
    Shopping
    Wedding & Shower DIY

    Archives

    July 2020
    June 2020
    April 2020
    March 2020
    March 2019
    January 2019
    December 2018
    October 2018
    August 2018
    July 2018
    June 2018
    April 2018
    March 2018
    February 2018
    January 2018
    November 2017
    October 2017
    September 2017
    August 2017
    July 2017
    June 2017
    May 2017
    April 2017
    March 2017
    February 2017
    January 2017
    December 2016
    November 2016
    October 2016
    September 2016
    August 2016
    July 2016
    June 2016
    May 2016
    April 2016
    March 2016
    February 2016
    January 2016
    December 2015
    November 2015
    October 2015
    September 2015
    August 2015
    July 2015
    June 2015

[email protected]
Contact Us - Privacy Policy - Disclaimer
Copyright 2022©Creating A Simpler Life, Inc. All rights reserved. Reproduction in whole or in part without permission is prohibited.
  • Home/About
    • What does OFF-GRID mean?
    • MINIMIZING >
      • Home Size
      • Room by Room
      • Get Organized
      • Household Waste
    • MINIMIZE DEBT, MAXIMIZE SAVINGS >
      • Bills & Other Debt
      • Saving Money
      • Shopping Tips
      • Affordable Fun
    • BACKYARD CHICKENS >
      • The Coop
      • The Chickens
      • Feeding the Chickens
      • Fresh Eggs
    • HOME GARDENING >
      • Building the Garden
      • What We Grow
      • Seeds, Weeds, & More
      • Preservation & Storage
    • DO-IT-YOURSELF >
      • BABY SHOWER
      • Health & Wellness
      • Simple Cleaning & Tips
      • Crafts & More!
      • Printables
    • CROCHET >
      • IDEAS & MORE
      • VIDEO TUTORIALS
  • HOMESTEAD
    • The 5 Year Plan PLUS! >
      • 2017
      • 2018
      • 2019
      • 2020
      • 2021
      • 2022
    • WHY AN EARTH SHELTERED HOUSE?
    • OFF GRID TINY TRAILER
    • BUILDING our HOMESTEAD from Scratch >
      • BUYING LAND & GETTING STARTED
      • BUILDING THE CONCRETE DOME
      • FROM DOME to HOME
      • SURVIVING OUR FIRST WINTER
      • BURYING THE DOME
      • EXTERIOR FINISHING
      • INTERIOR FINISHING
    • HOMESTEAD MACHINERY >
      • GENERATORS
      • KUBOTA TRACTOR
      • ATV'S & UTV'S
      • WOOD CHIPPER
      • CHAINSAWS
      • LOG SPLITTER
      • POWER TOOLS
      • SNOWMOBILES
      • AUTOMOBILES
    • BUDGETING THE BUILD >
      • BUDGET BUILD TIPS
      • COSTS
    • SUSTAINABILITY >
      • WATER
      • FOOD
      • SHELTER
      • ENERGY
      • AIR
    • The Adirondacks >
      • Wildlife & Nature
      • Insects & Bugs
      • Things to Do
      • Water Fun
    • ADIRONDACK CRAFTS
  • VLOG
    • 2025
    • 2024
    • 2023
    • 2022
    • 2021