Blog
A little bit of anything and everything that's part of
creating, enjoying, and living a simpler life!
creating, enjoying, and living a simpler life!

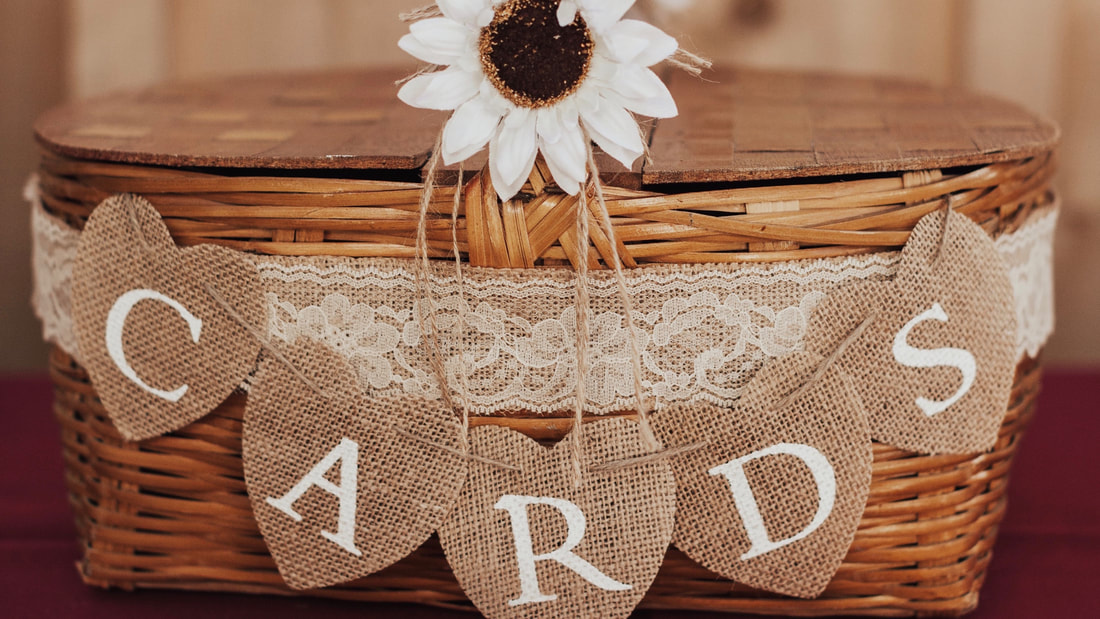
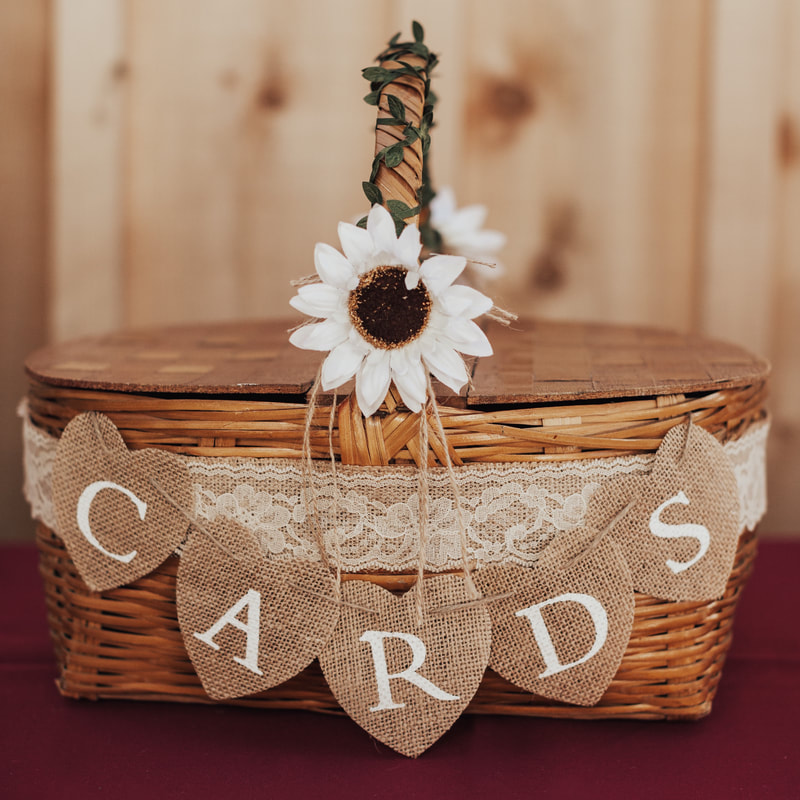
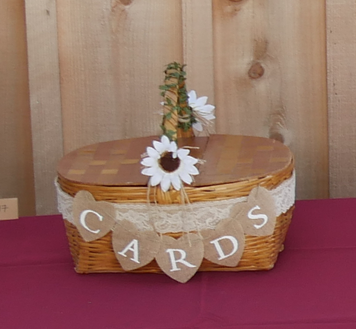
This was a super simple project to make. It was also probably one of the easiest out of all the projects I did for my daughters wedding last September. Not only that, but I also think it was one of my favorites because it used something that was just literally taking up space in my garage!
I used an old picnic basket to make this DIY Wedding Card Holder, but no worries if you don't have one. You can simply decorate just about any container. Look around and see what containers you have that might work. Do you have an old suitcase? Maybe a small trunk...be creative, think outside the box, and please share your ideas (and pictures) with me! Check out my how-to video on YouTube:
Materials purchased from Amazon (affiliate links):
- 2" Lace Ribbon - Green Leaf Ribbon - 2" Burlap - Burlap "Cards" Hanging
Note that the flowers were from the dollar store and I used hot glue to secure the burlap, lace, and flowers in place!
Check out more wedding ideas on our YouTube Playlist and on our website at https://www.creatingasimplerlife.com/...
Have a great day!
2 Comments
One of the many projects I completed in anticipation of my daughters wedding day. And what a day it was! Simply perfect in every way :-)
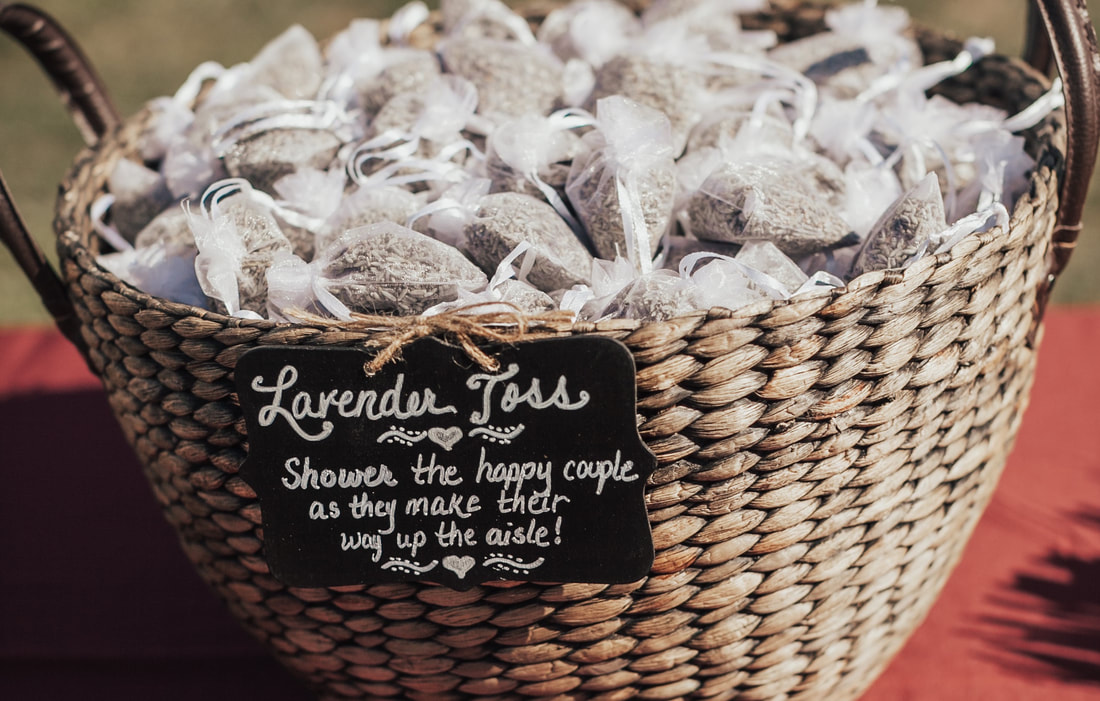
Check out how easy it was to make these little bags of lavender to toss as they walked back up the aisle! Watch the video below, or scroll down for a pictorial explanation. Supplies list is below the video. Note that links to products are affiliates which means that if you click on them and make a purchase I receive a small commission for directing you to their site. This does not affect the price of the item it any way. The expense to you does not change.
Supplies list:
Directions:
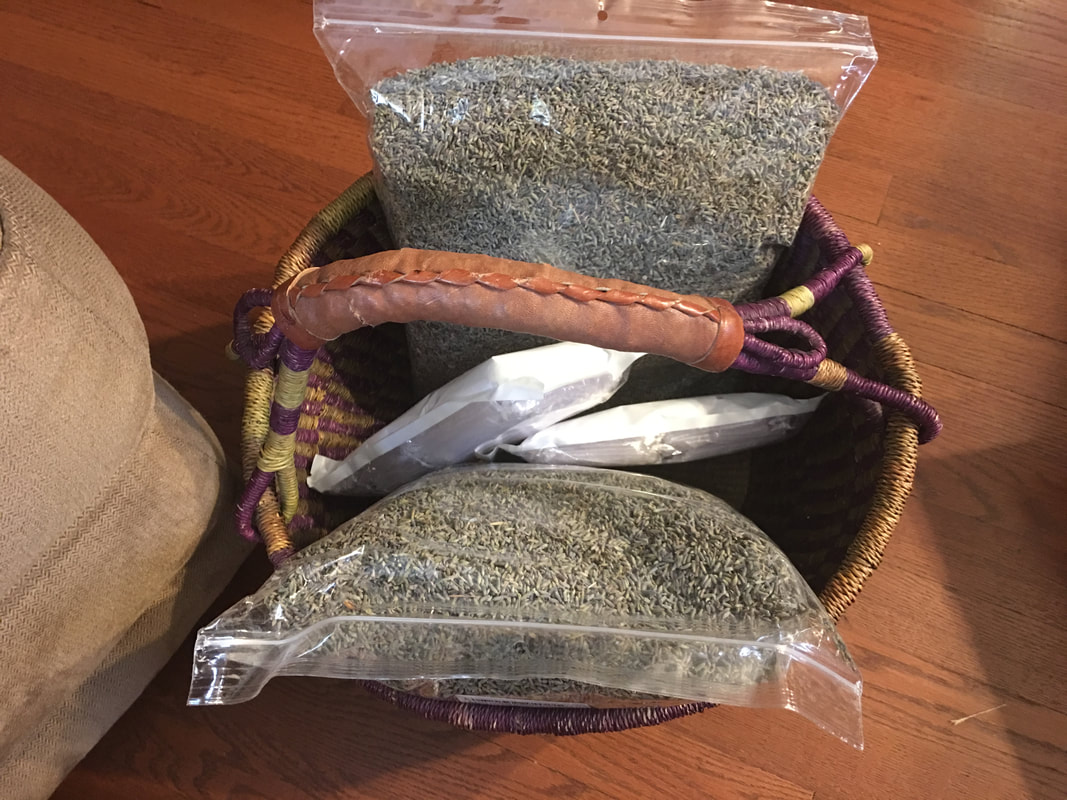
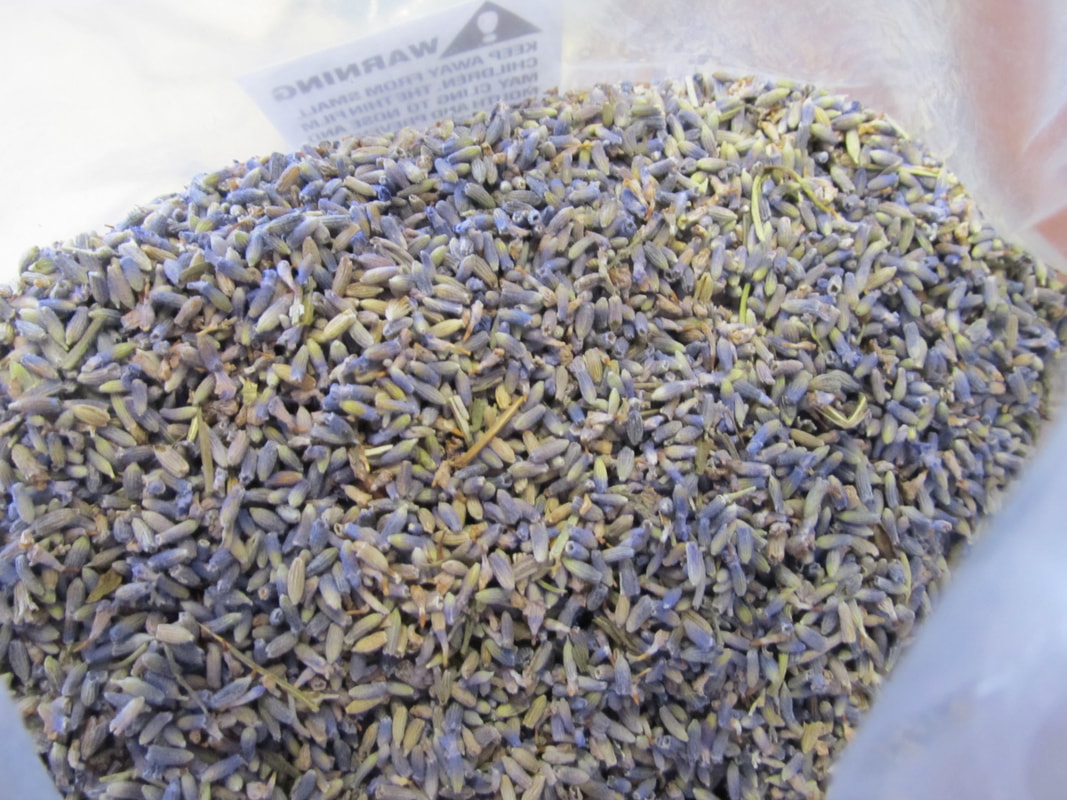
Gather dried lavender buds, 2.8" x 3.5" organza bags, and a basket.
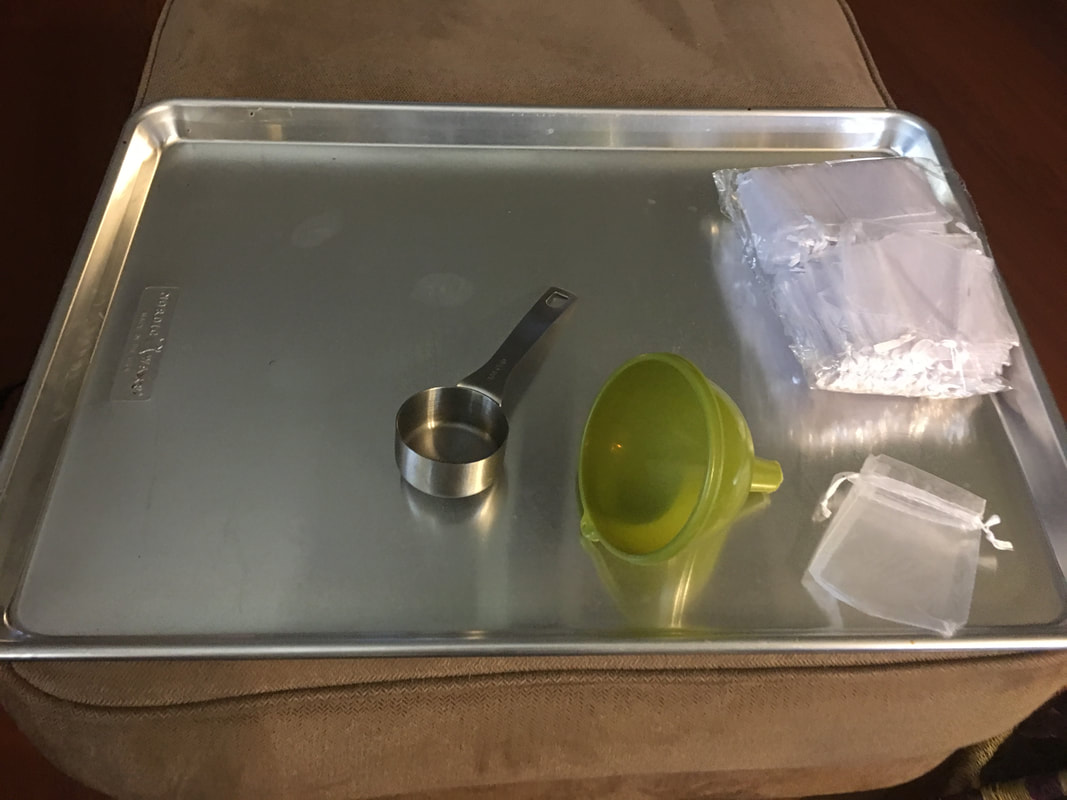
Use a 1/4 measuring cup and a funnel.
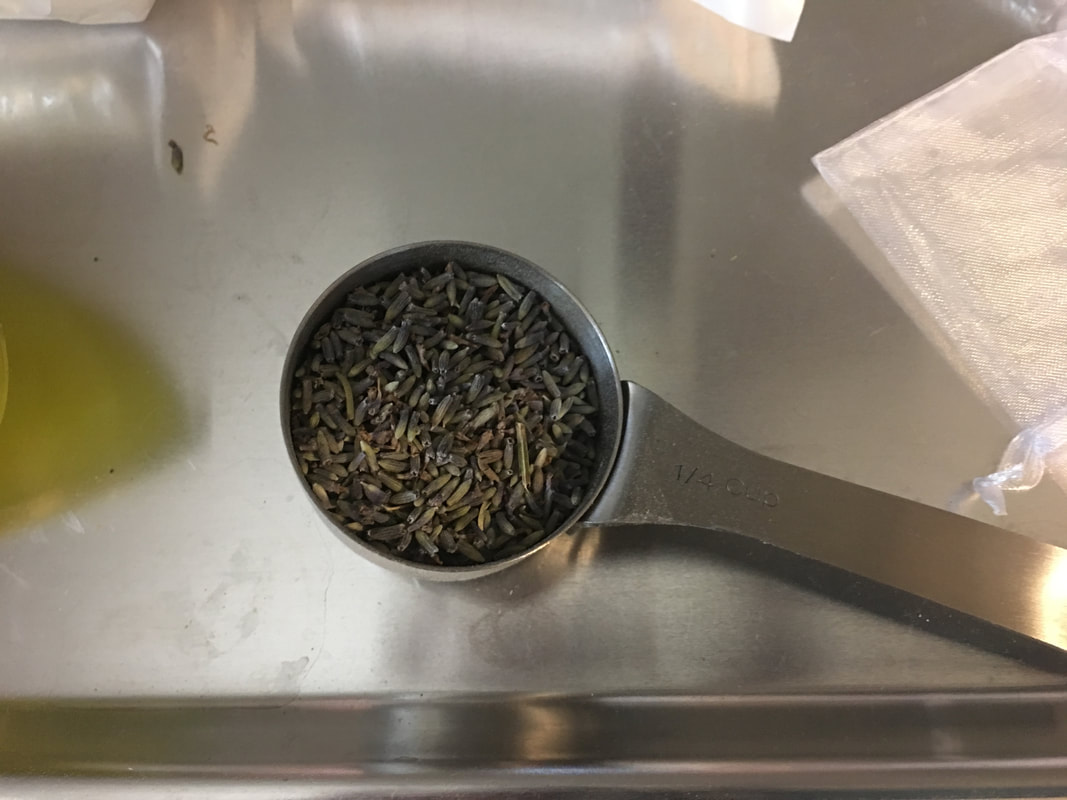
Don't fill the measuring cup all the way....
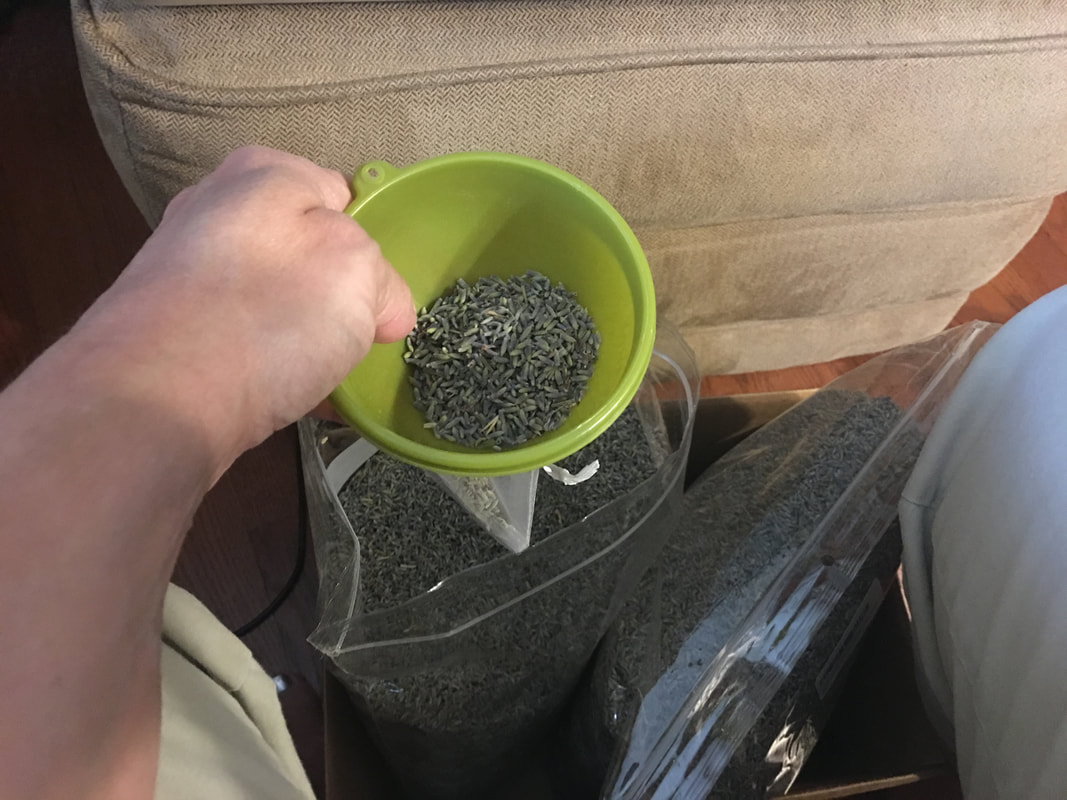
Funnel the lavender into the bags. Of course you don't need the funnel, but I had less mess this way.
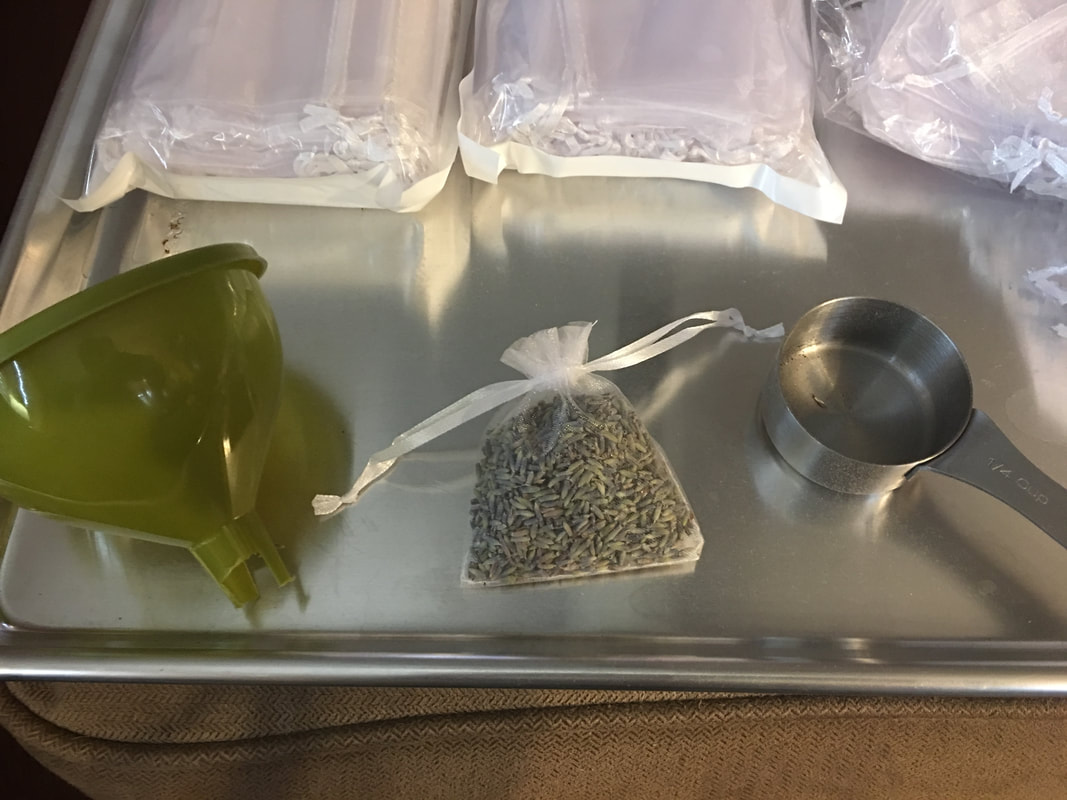
Pull the strings closed, however DO NOT tie them. If you tie them they are nearly impossible to re-open.
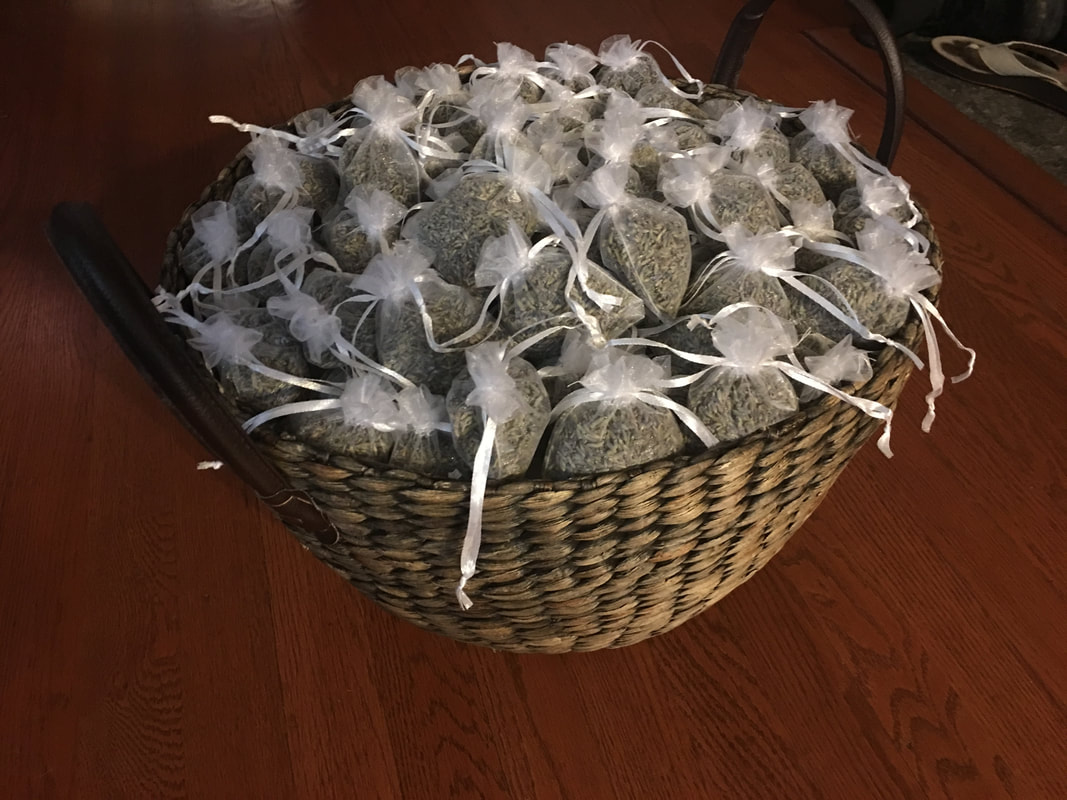
I made 200 and they fit great in a nice large basket!
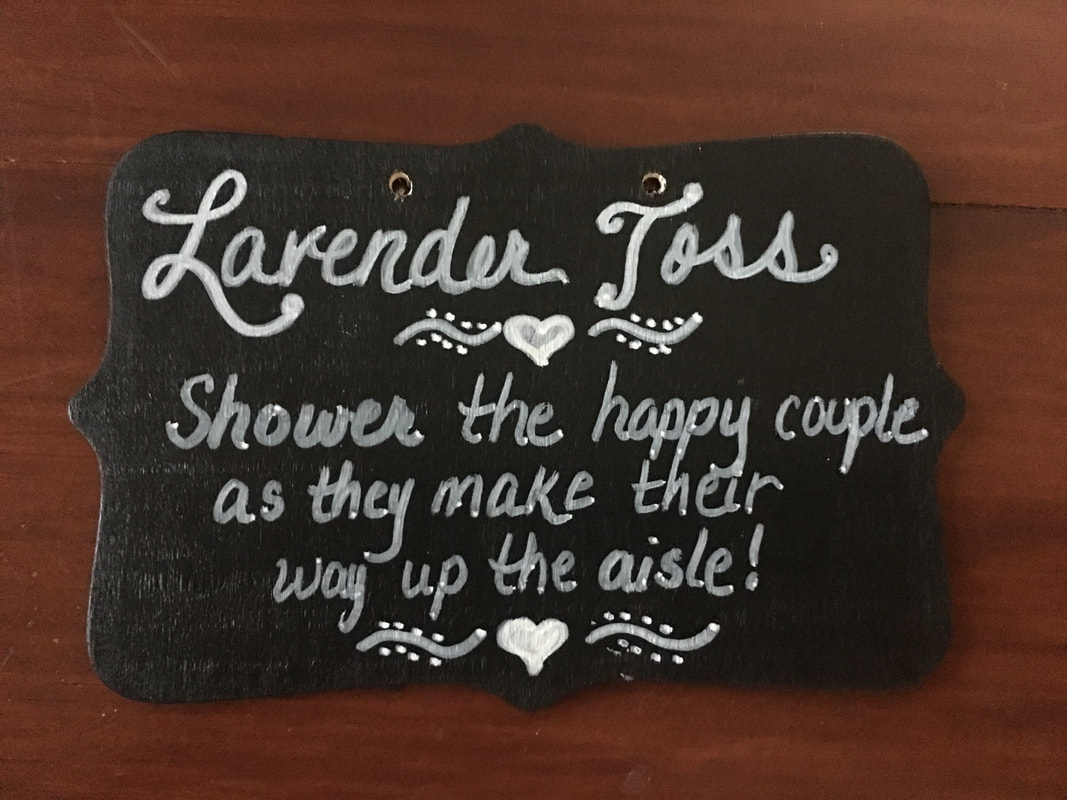
I used a simple chalk sign. We drilled two holes so we could tie it to the basket.
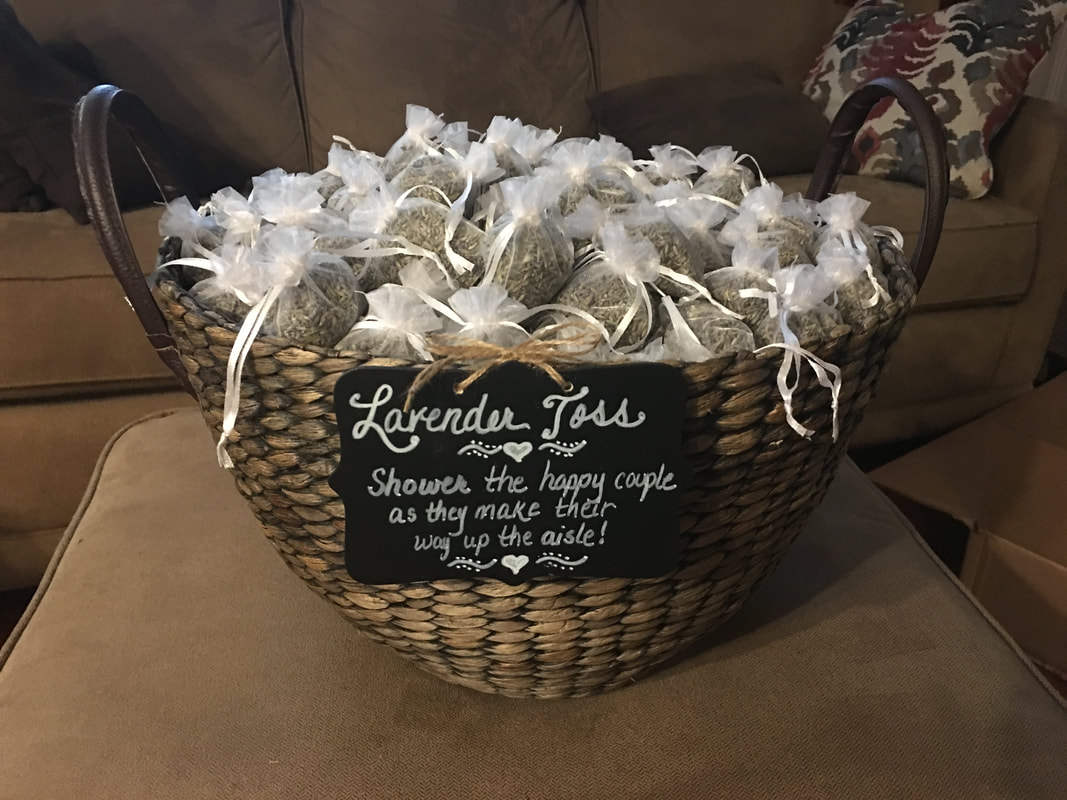
Ready for the big day!
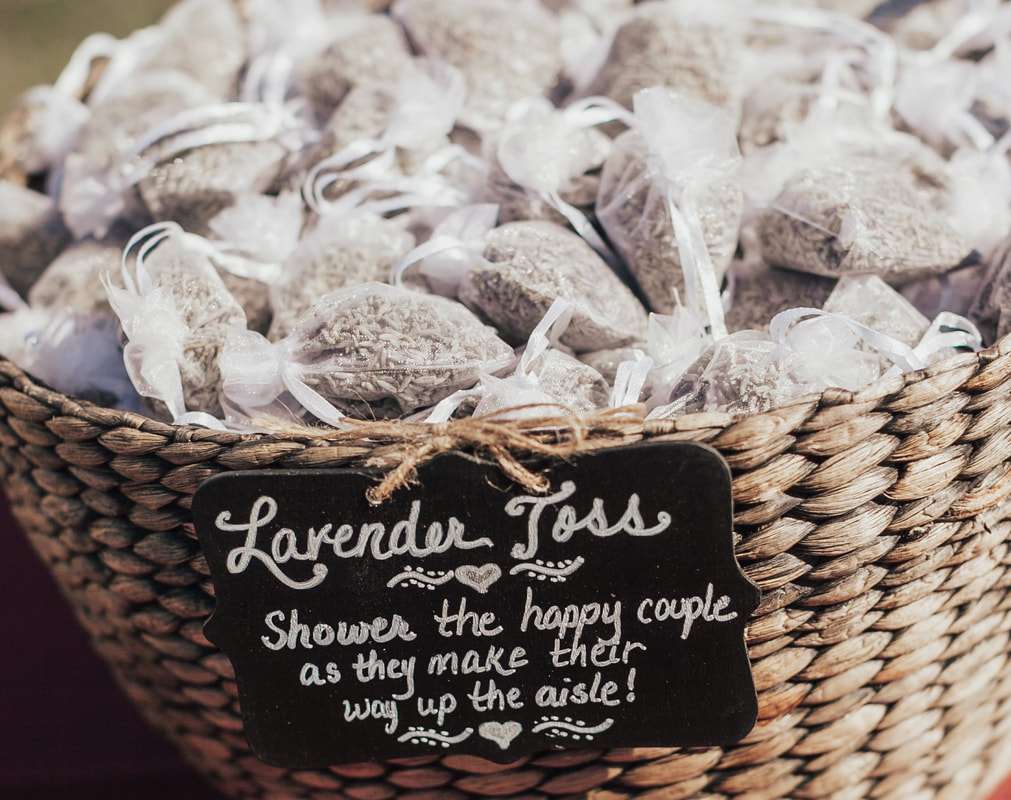

They worked out beautifully. If you watch the YouTube video at the top of this post you can see a video clip of the lavender being tossed at the happy couple :-)

FREE Printable Recipe Cards!
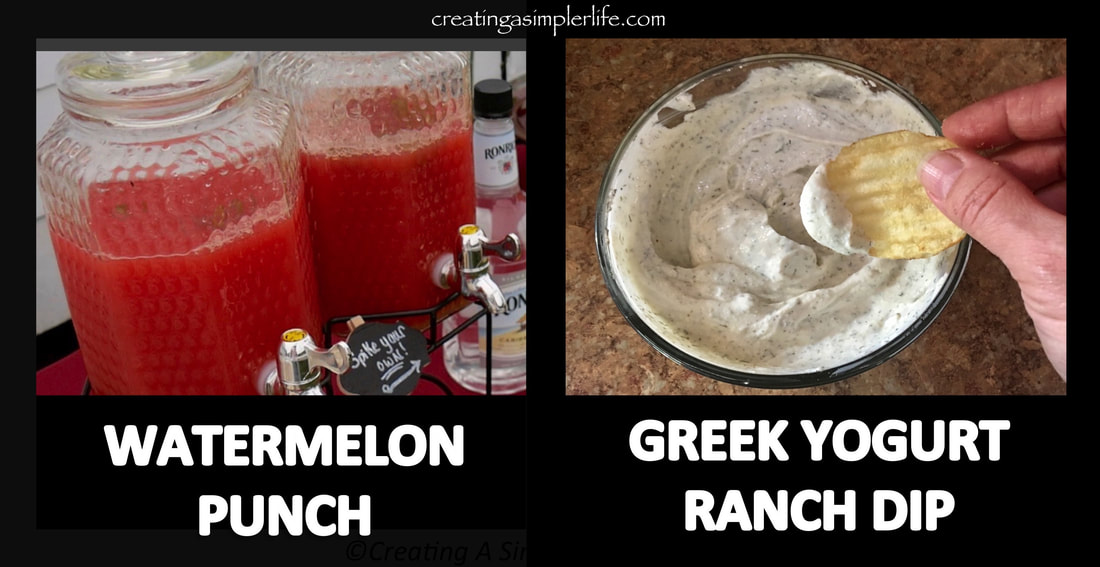
I love parties and I love them even more when I am providing healthy beverages and snacks that are suitable for most, if not all, of the guests! Check out these two party favorites!
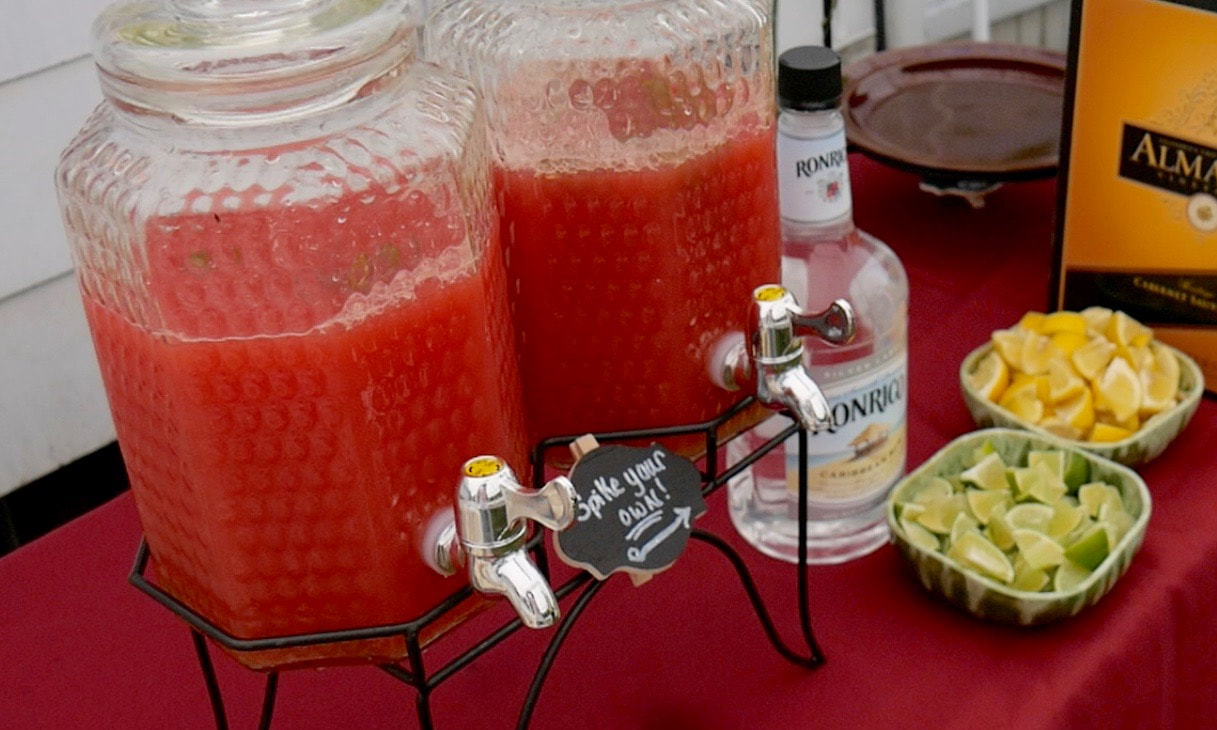
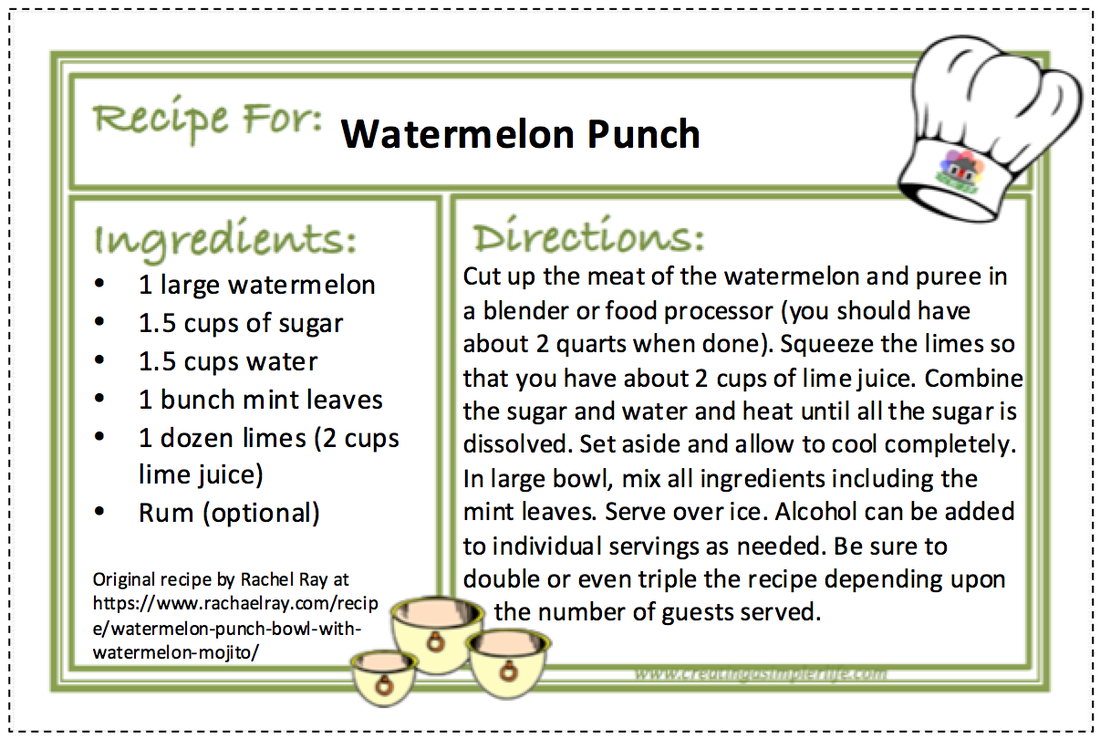
WATERMELON PUNCH is a healthy and delicious beverage that is sure to make any party, especially an outdoor summer party, extra special! My daughters mother-in-law made it for the backyard bridal shower last summer and it was an absolute hit with the guests!
The original recipe comes from Rachel Ray who is known for her fabulous, and simple, recipes, however a few minor changes were made. The watermelon was not used as the bowl and the alcohol was not added. Instead, the punch was provided in beverage dispensers (see photo above) and a bottle of rum was on the side to be added if guests chose to spice up their drink! Extra limes and lemons wedges were also included in bowls on the side for added flavor if desired. Honestly, it was delicious and refreshing with or without the alcohol! 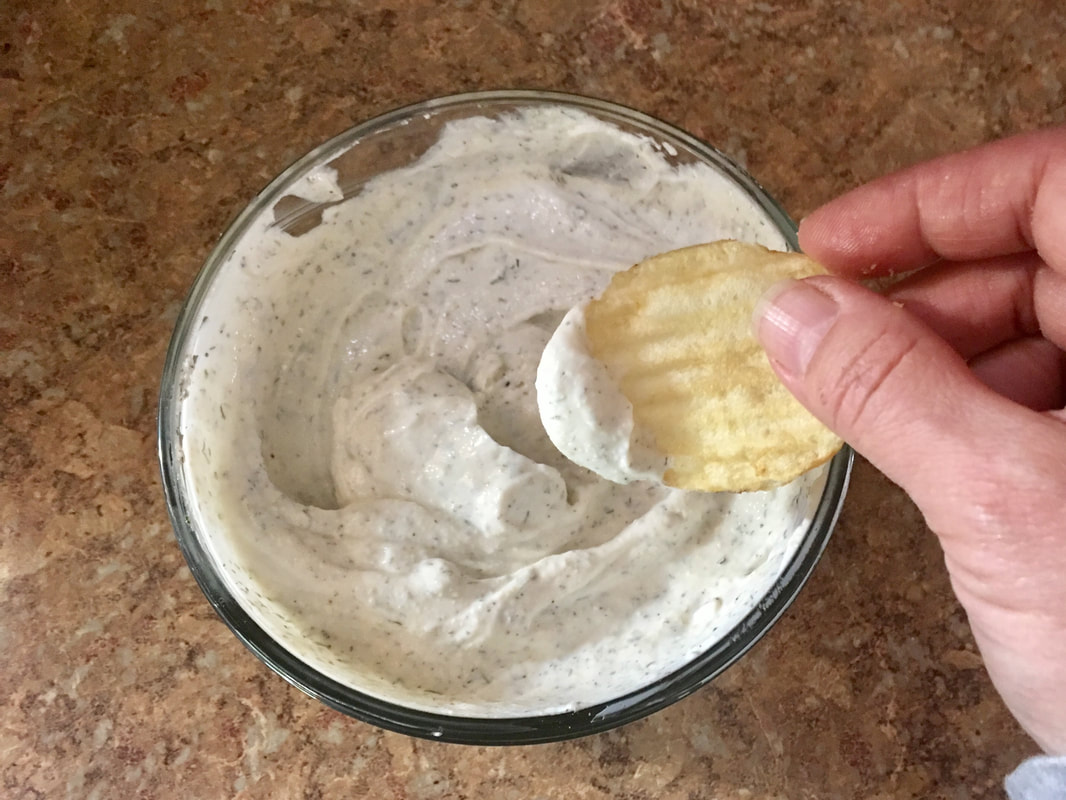
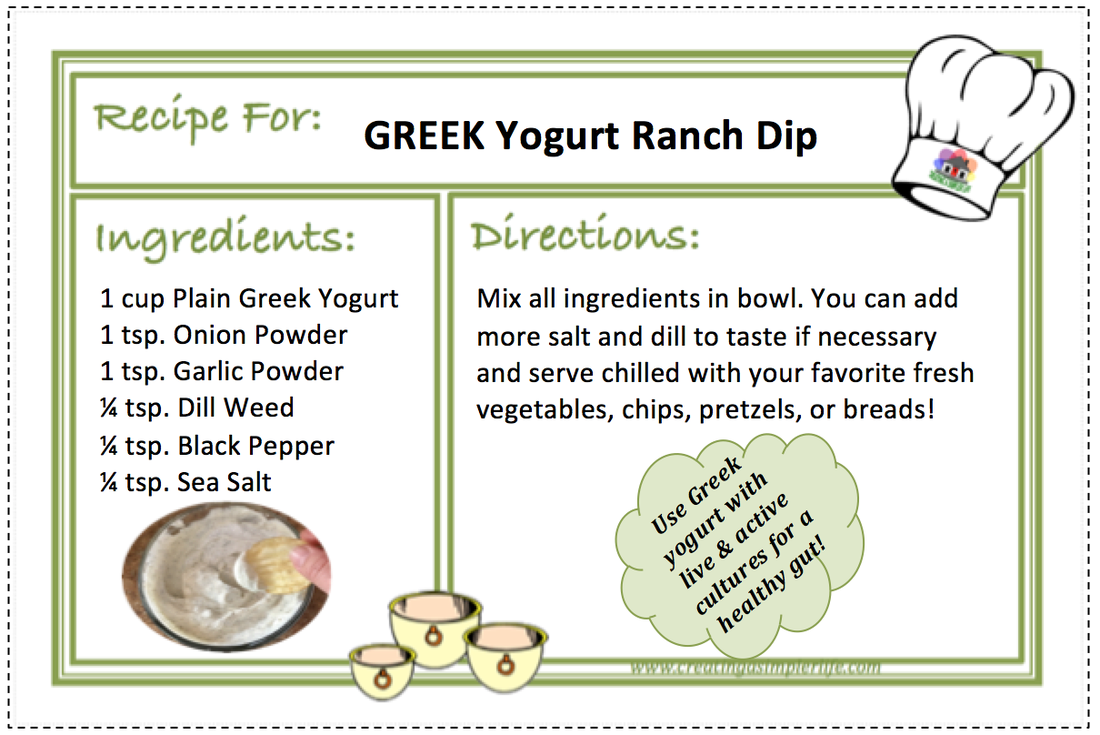
GREEK YOGURT RANCH DIP is a healthier, and in my opinion, better alternative to all other ranch dips because it is high in protein and low in calories. It's made of all natural (preferably organic by choice) ingredients and if you buy a high quality yogurt with live and active cultures it is a giant plus for the digestive system! It can also be eaten by anyone that is lactose intolerant because apparently the good bacteria takes care of any lactose for them. Definitely another bonus for guests, including any lacto-vegetarians!
Print out these two FREE 5x7 Recipe Cards Now!
Simply click on either of the recipe cards below or the link above to download an 8.5" x 11" pdf document. Then simply print it on 8.5" x 11" card-stock paper (affiliate link) and cut them out! I always include two recipes at a time so theres as little paper waste as possible :-)
Thanks for visiting!
Check out our other printable recipe cards and/or our Weddings & More page for more great party ideas. Sincerely,
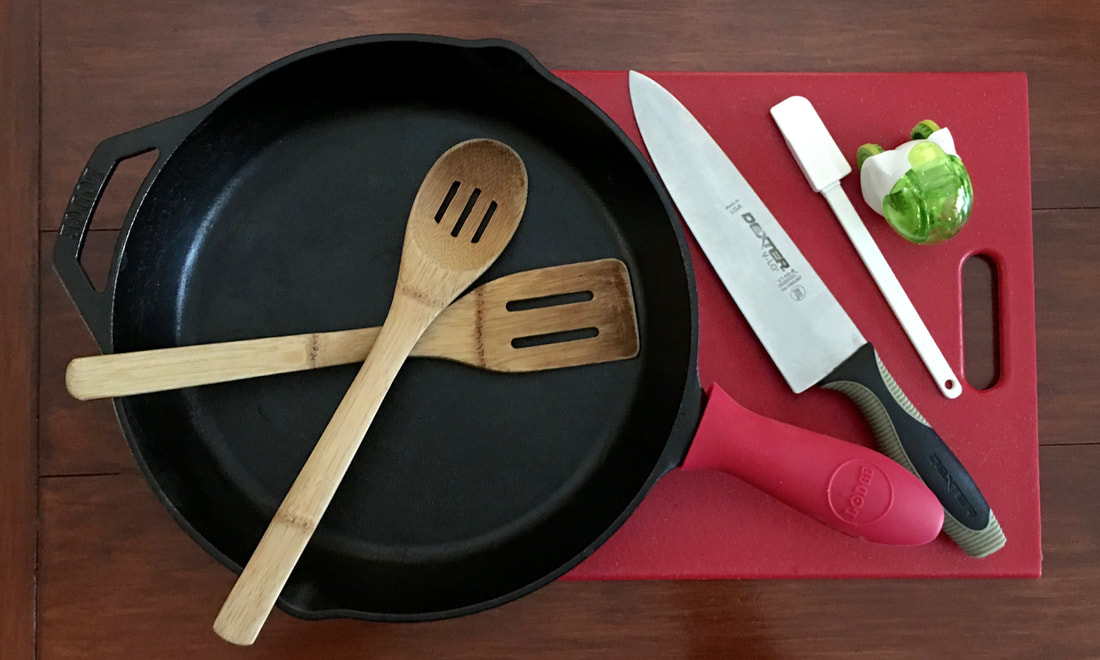
I don't know about you, but I spend an inordinate amount of time in my kitchen. Whether it is cooking, baking, or cleaning, I am always doing something in there so if there's a way to make it simpler, then I'm all for it! These are my 'go to' kitchen tools to get it all done!
You can watch this video or skip down to pictures, descriptions and affiliate links to products. P.S. We are sort of following a Plated Recipe for three adults that we doubled so that we could feed five adults instead!
Tool Descriptions & Links
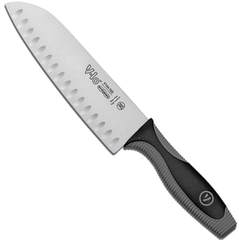
Dexter Knife - This is my favorite knife for everything from cutting fruits and vegetables to cutting meat. It is super sharp and perfect for cutting anything you can think of! Sort of a one-knife-does-it-all that I couldn't imagine not having in my kitchen. Not only that, but it is made in the USA and literally will last forever. For less than $40 I have had mine for over 10 years now so it was, and is, worth every penny! How much simpler can it be to have one knife that does everything? Dexter-Russell V-LO 7-inch Carbon Steal Duo Edge Santoku Style Chef's Knife on Amazon (affiliate link).
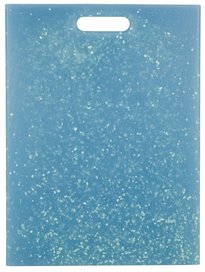
Recycled Plastic Cutting Board - I was sick of all those smelly, ugly cutting boards that just did not ever seem clean enough no matter how hard I scrubbed and sterilized it. This one cutting board solved that problem! It cleans up wonderfully, lasts a super long time (much, much longer than wood), can be put in the dishwasher for sterilization, and can be recycled with the company it was purchased from when you are done with it! Less than $20 will get you the best cutting board out there that will last nearly forever! Oh yeah, and it is made in the USA! Eco Smart Cutting Board on Amazon (affiliate link). The one I have is red and my daughter has a beige one...but it is the same company and they all work great!
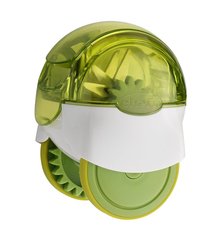
Garlic Chopper - OMG. I love garlic. I mean love it. But as much as I love it, I hate having to chop it up. Talk about annoying. I solved this problem with this handy little tool....seriously, just pop the clove in, close it up, and roll it around. A few, literally, seconds later you will have perfectly chopped garlic that can easily be added to any meal! Roll it around a little more and you can have minced garlic too! Want to do more than one clove at a time? Then buy the extra large size model. Either way, simply rinse in hot water when done and it's ready for next time! At a cost of under $10, it is worth it just in the time you will save alone. Check out the small size garlic chopper here on Amazon (affiliate link).
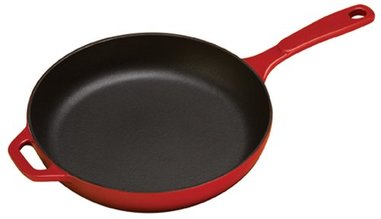
Cast Iron Skillet(s) - I use them to cook anything and everything on a daily basis. They will literally last forever, are actually good for your health, and clean better than any non-stick pan I have ever owned! I simply pour some water in immediately after cooking (only for certain foods like eggs), let it sit, and it cleans right out. For less than $50 you will have it for the rest of your life and your children will have it for the rest of theirs too! Read more about My Favorite Skillet here or check out the 11" Cast iron skillet on Amazon (affiliate link) and the 12" Cast Iron Skillet (affiliate link) and if you are going to use these skillets it's a good idea to have the silicone handles shown below so you don't get burned. I have the in both red and black and the color really doesn't matter, however I do prefer the red because at a glance it is easy to know it is there.

Aluminum Baking Pans - These pans are fabulous. I wish someone had told me years ago how great these were. I could have avoided years of using nasty cookie sheets! I use these aluminum pans for roasting any type of vegetable, for cooking chicken, pork shrimp, fish, etc. in the oven. Sometimes I put the meat and the vegetable on the same pan! They are also amazing for baking things like yummy cookies! What makes these pans so particularly awesome is two things. First, they have a lip around the edge so you can add some oil or other sauces with no worries. This is great for cooking the meats and veggies in the oven. But even more importantly, they clean up amazing. Seriously, like new! I won't be needing to replace them. Ever. I don't know what I would do without these great pans. For less than $25 for two bakers half sheets, they are definitely worth it! Check them out on Amazon! I also have the full bakers sheet and depending upon how many people I am cooking for it comes in handy as well!
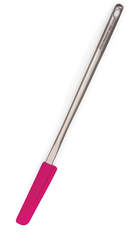
Extra long handled thin silicone spatula - These let you get to that absolute last drop of anything! Whether you are trying to reach the far corner at the bottom of a container, scrape the last drop out of a bowl, pot or pan, this tool is amazing. An invaluable tool for reaching those hard to reach corners at the bottom of all those jars. Stop going nuts trying to get that last little bit of almond butter or mayonnaise out for under $10! Extra long silicone spatula on Amazon (affiliate link).
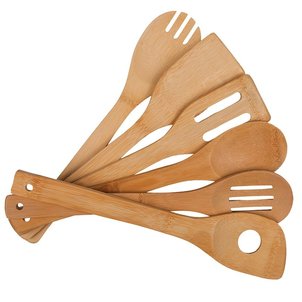
Bamboo Utensils - These are a must have for stirring up food in those cast iron pans. You can use plastic or metal, but I prefer bamboo. I don't cook without them! Here is the set of 6 Bamboo utensils that I have (affiliate link).
Thanks for visiting!
Sincerely,
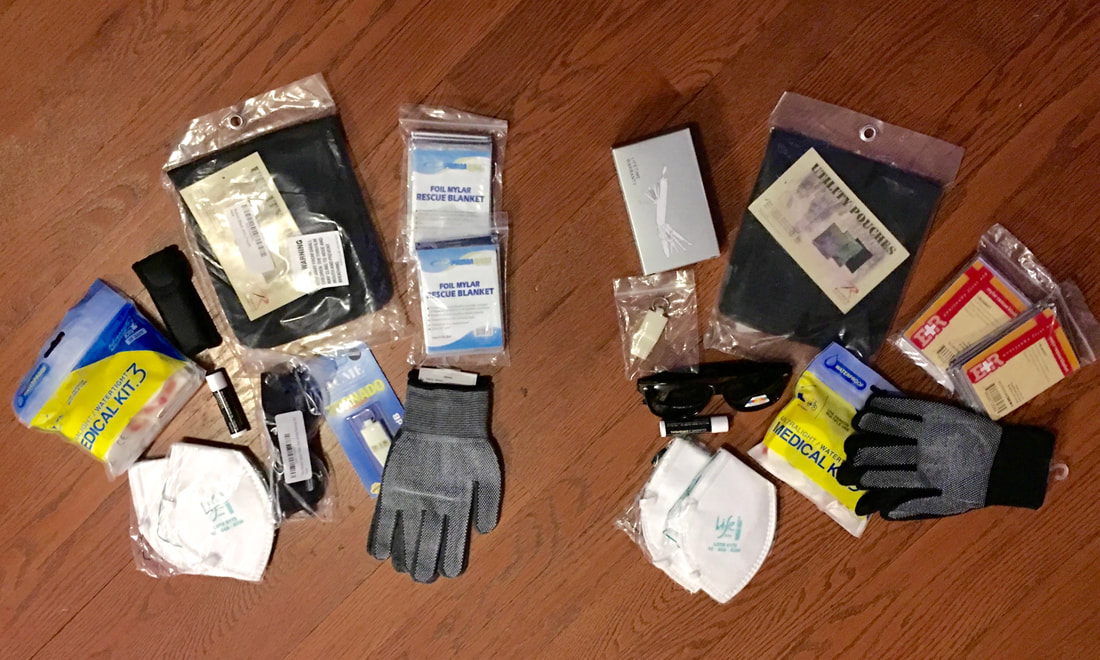
Supplies for two kits are shown above.
We LOVE the Adirondacks and if you've read anything about our Future Homesteading Dreams then you know we have 30 acres in the Adirondack Park that we will be moving to permanently when I retire. We really can't wait...especially for the cold winters where we can ride snowmobiles on the trails that run right through our land! How convenient:-)
But the Adirondacks get cold. Really cold lately. And there are hundreds of miles of snowmobile trails that are very often not within easy walking distance of anyone or anything. And of course it's hit and miss with the cell phones. So I started thinking about safety. My parents are both in their 70's and still out there snowmobiling. Oooh. What if...what if....Nope. Instead of thinking about the 'what ifs' I decided to do something. I made them each a simple 'survival' kit to keep on their snowmobiles. It's not a perfect kit, but for it's easily portable size it has the basics that could save a life if necessary and that is all that matters to me. Nobody in their right mine goes out there snowmobiling alone anyway. At least they shouldn't :-) Snowmobile 'Survival' Kit (affiliate links): 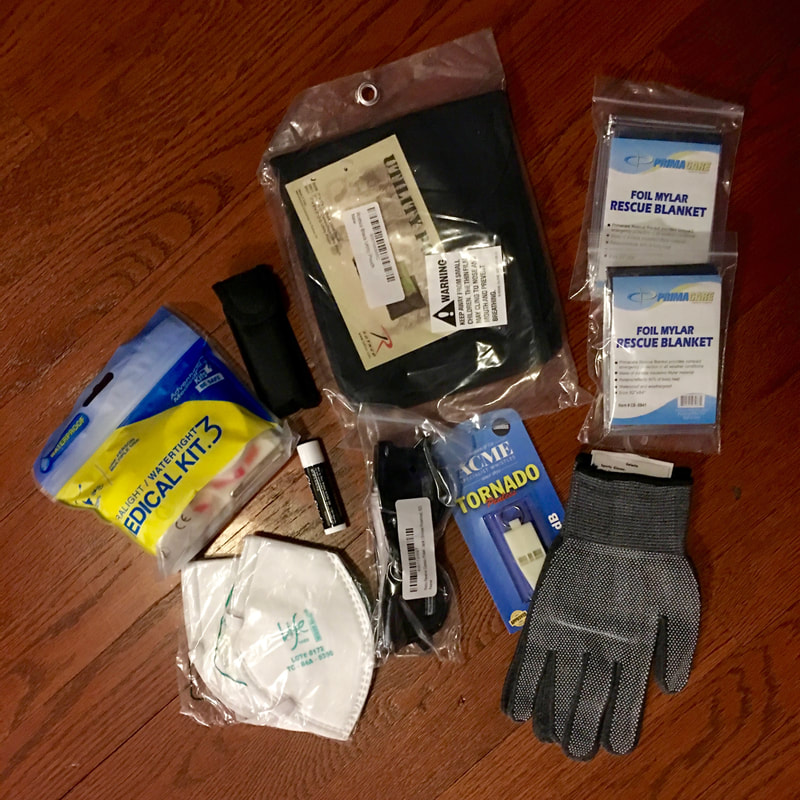
Of course these mini 'survival' kits have multiple other uses besides snowmobiling. Depending upon what you add or remove from them they can be suited to fit any activity. I made similar kits for bike riding (straps to the bike), hiking (fits right in the backpack), and for the cars (they fit in the glove box). Each kit is pretty much the same with a few minor differences because who knows? And why not be ready just in case?
What a thoughtful way to show your family how much you love them! God bless and have a wonderful day.
Sincerely,
FREE Template!
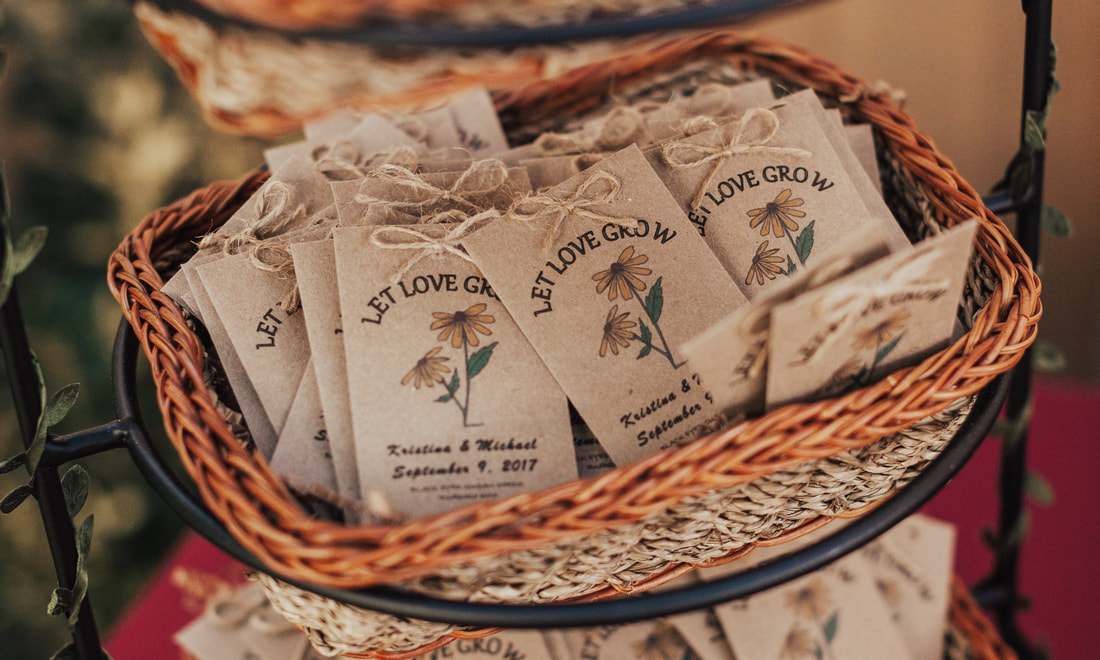
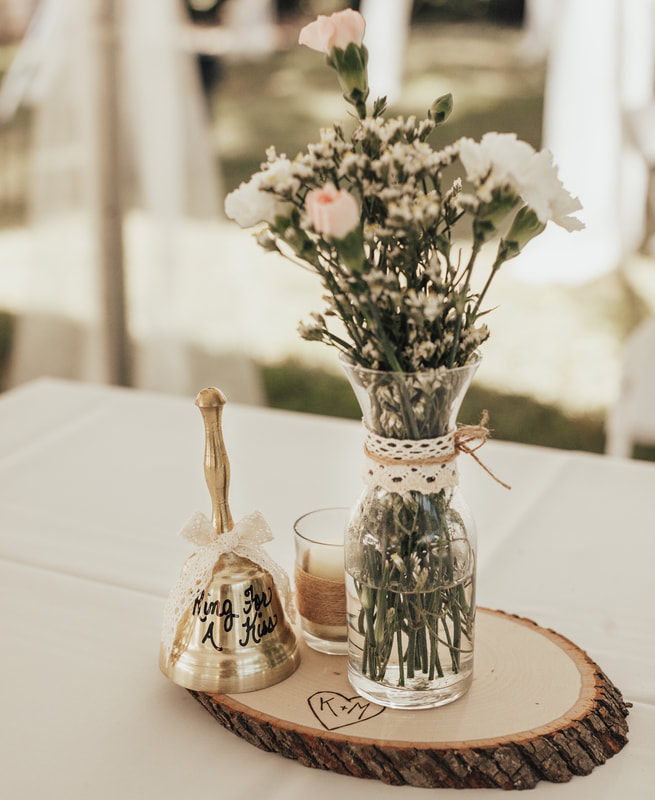
Photo by Samantha Brancato Photography
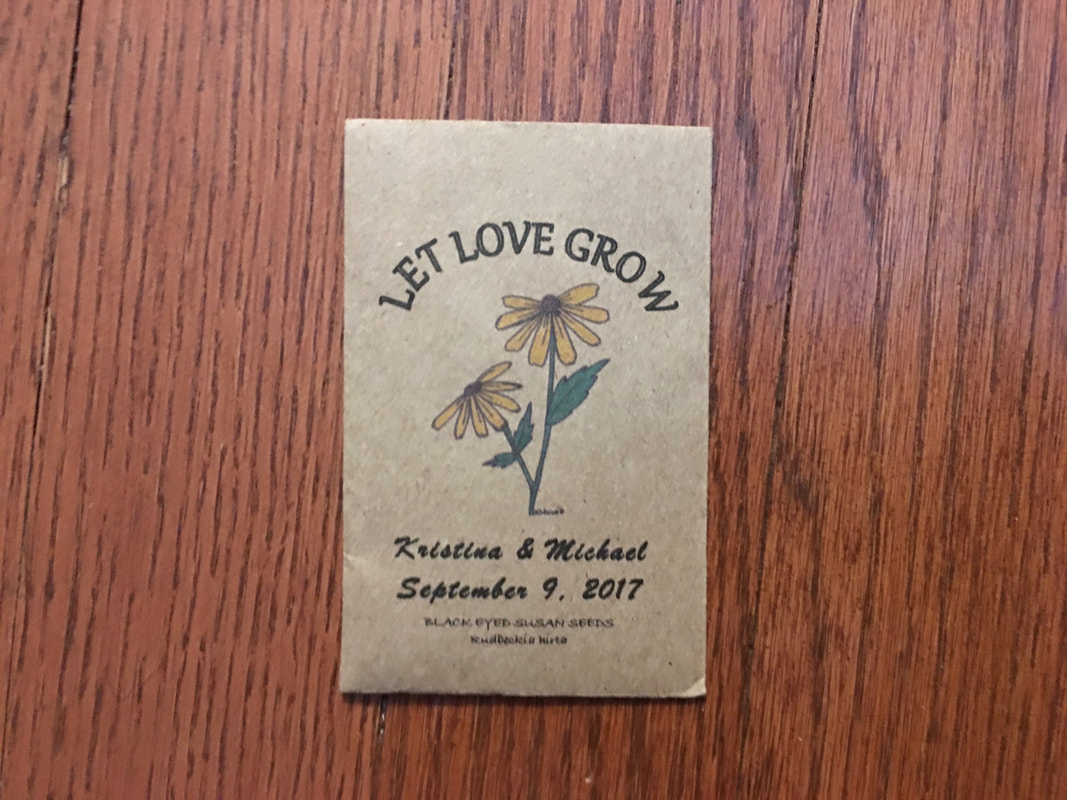
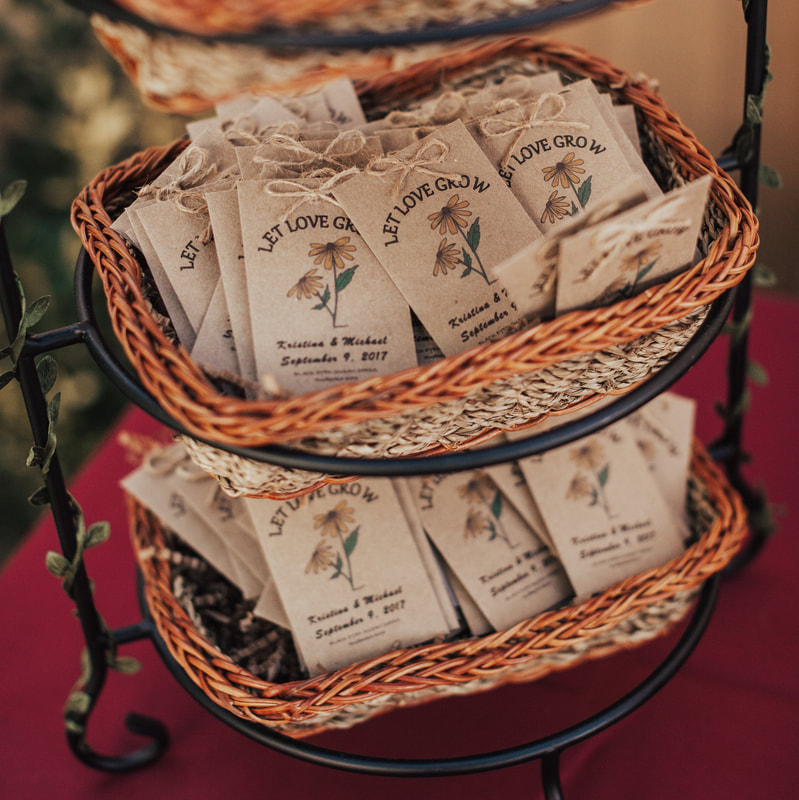
This was a simple project to make and they are absolutely adorable! I made these seed packet favors for my daughters wedding this past September but they can easily be altered for bridal showers, baby showers, and more!
Watch our quick YouTube video below, or check out the pictorial instructions farther down! The materials list and templates with detailed instructions are below the video. Thanks for visiting!
Materials (affiliate links through Amazon.com):
Seed Packet Front Download
(Download using button below) 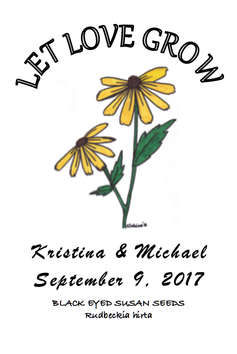
Instructions:
Print the Planting Instructions (download using button below)
Directions:
Pictorial Directions:
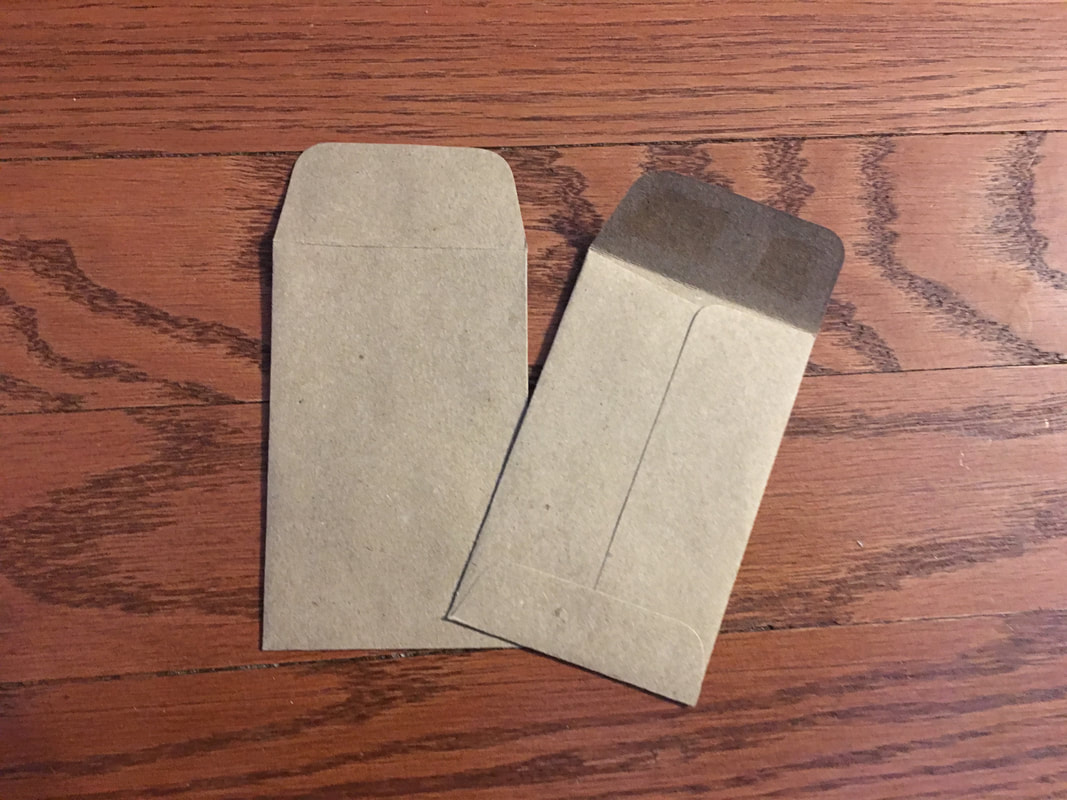
Print the envelopes.

I used black-eyed susan seeds. because they grow easily and re-seed themselves every year!
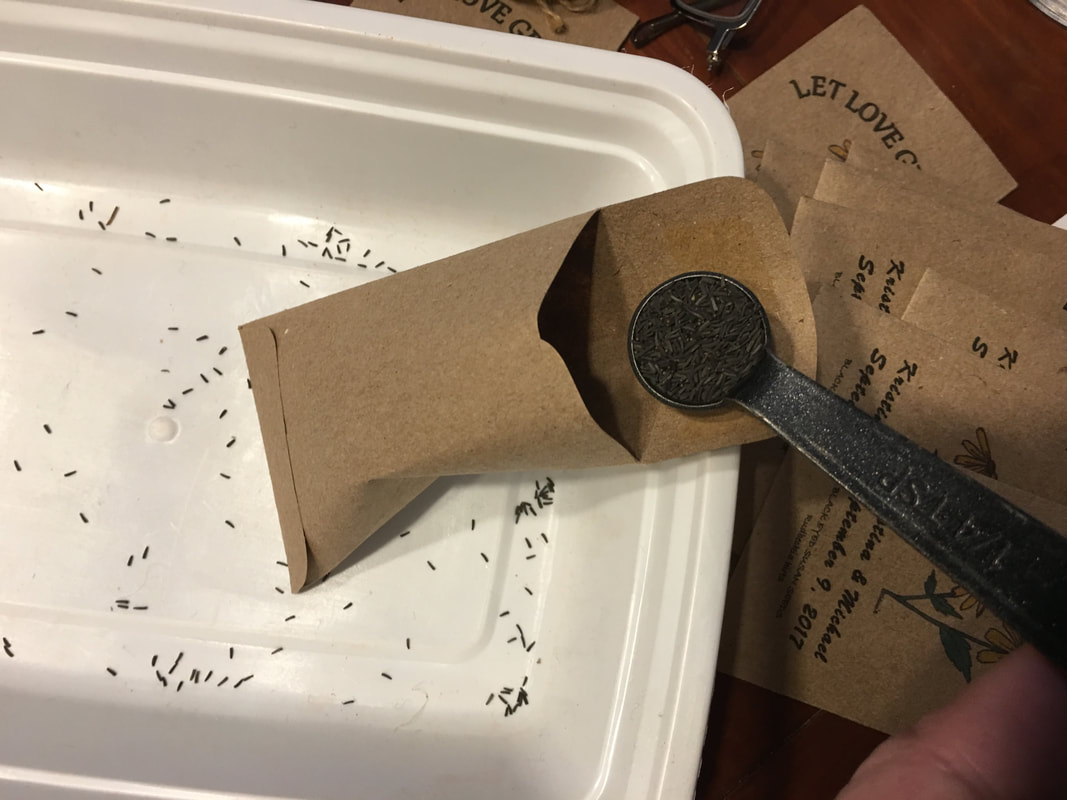
Add 1/4 teaspoon of seeds to each packet.
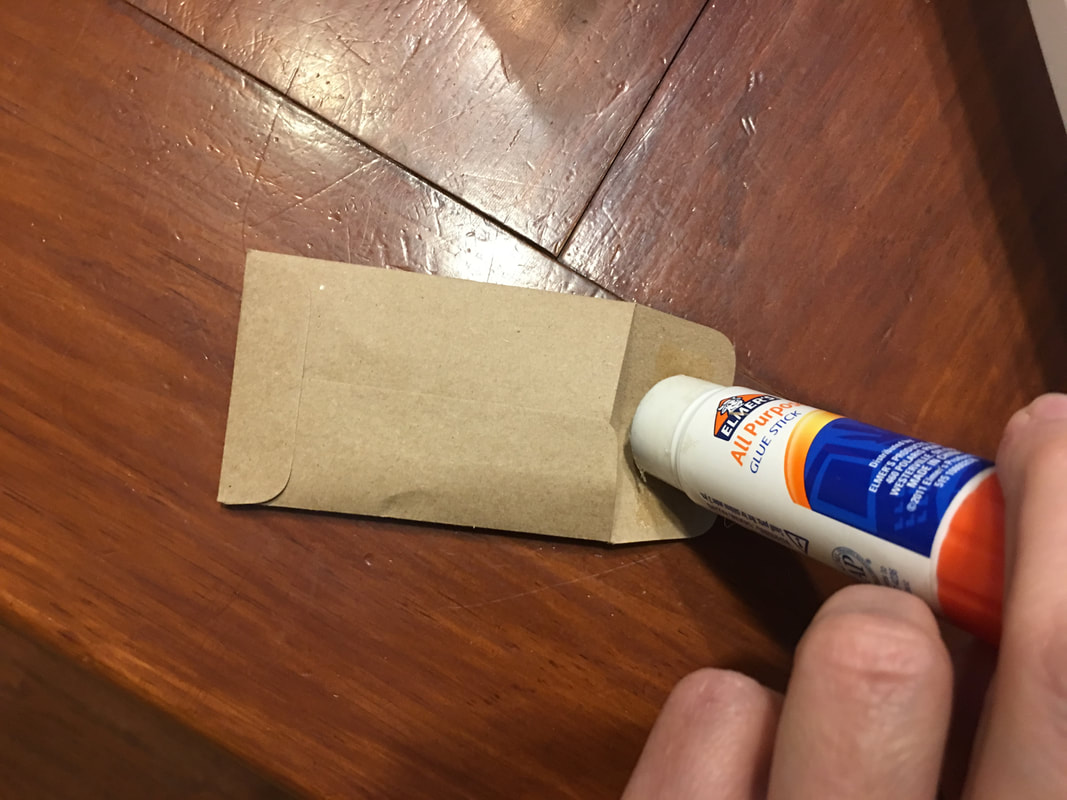
Glue the flap closed. NOTE: I could have licked the glue on the envelope but I prefer not to.
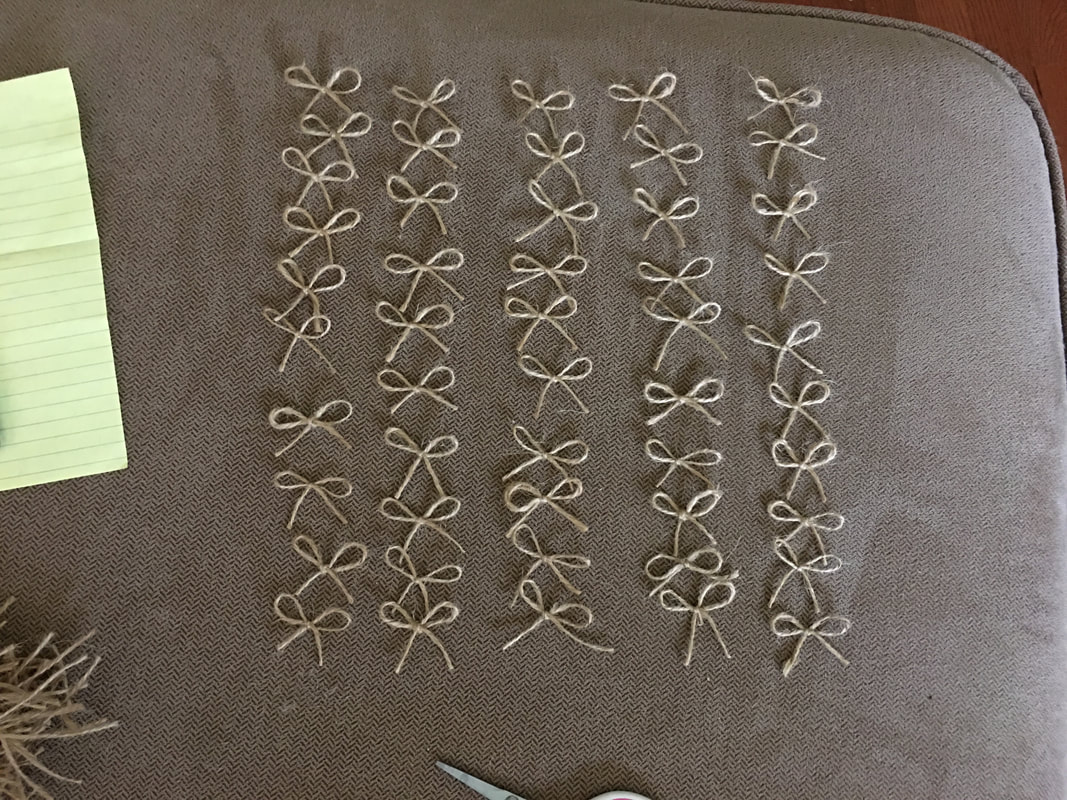
Cut string and tie small (approximately 1") wide bows.
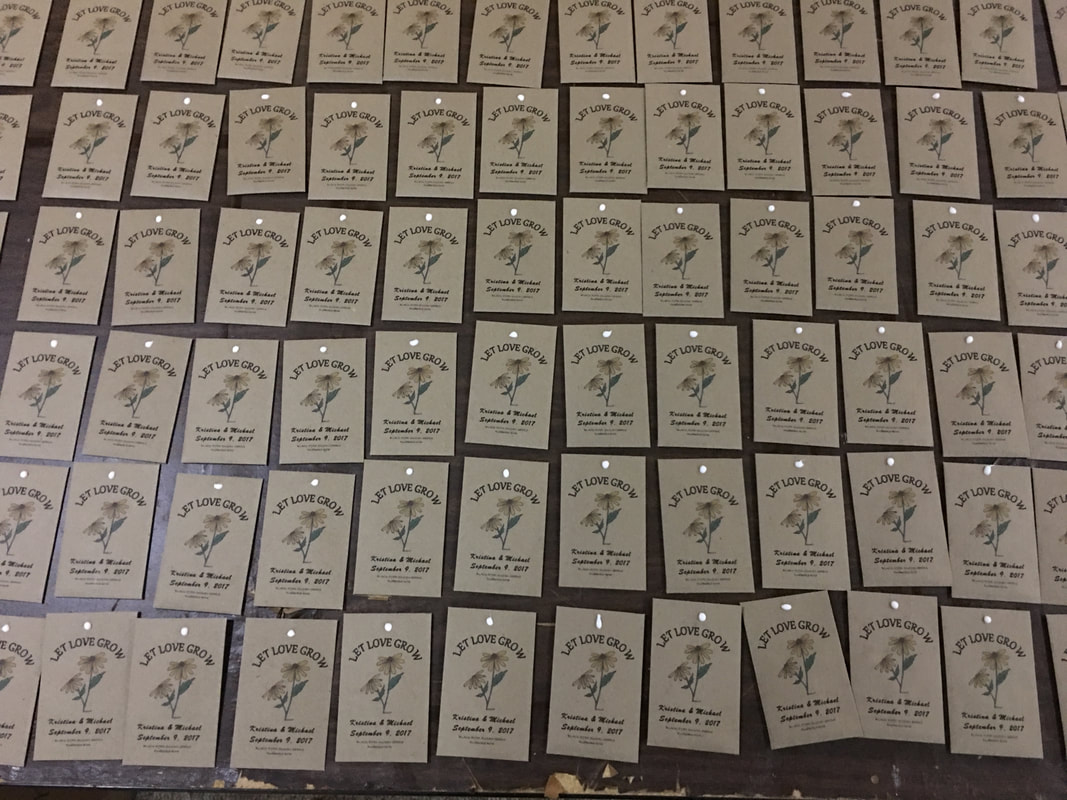
Lay all the packets out and add a single drop of glue at the top center.

Stick a bow onto each drop of glue and allow to dry overnight. I use Aleenes craft glue because it is very strong and dries clear.
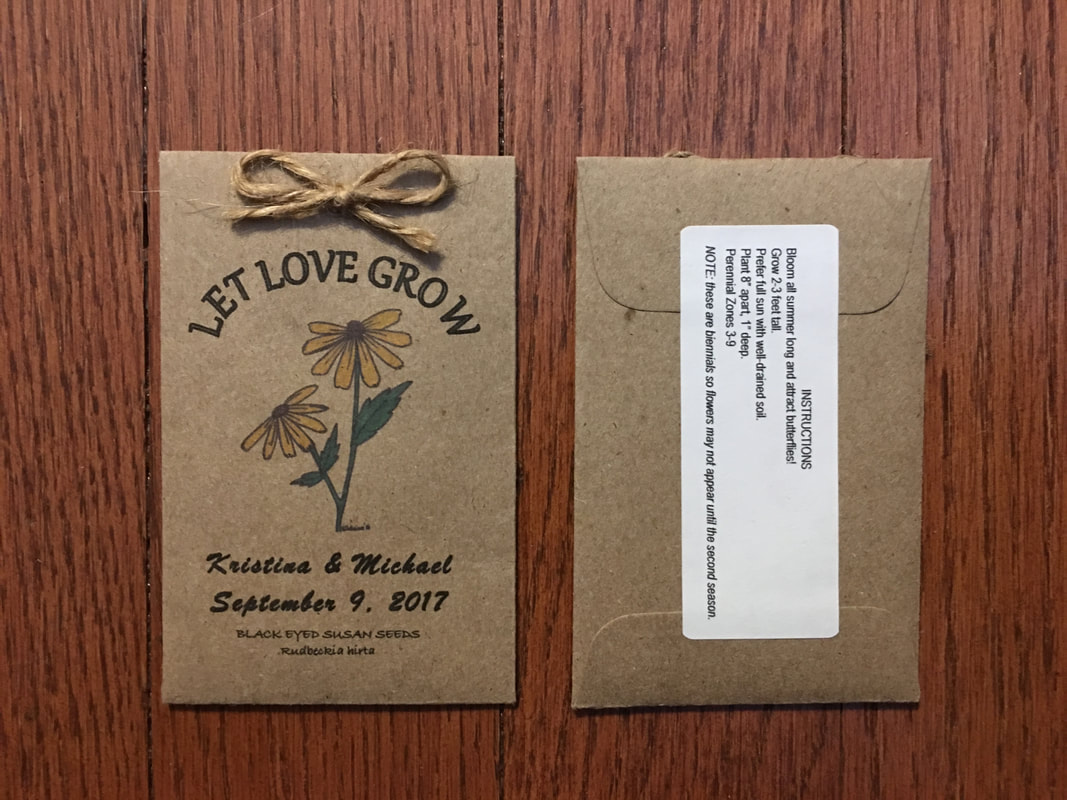
Stick the planting instruction labels on the back.
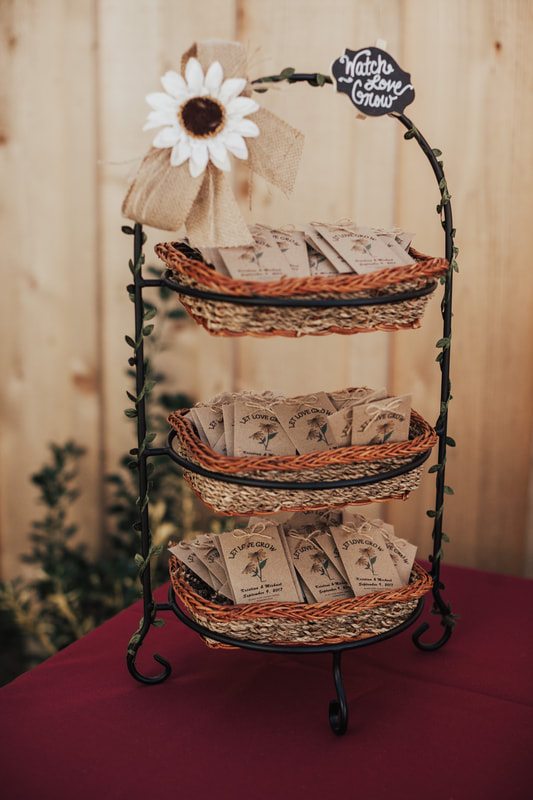
Create a display for guests to help themselves! But there are many other ways to share them with guests.
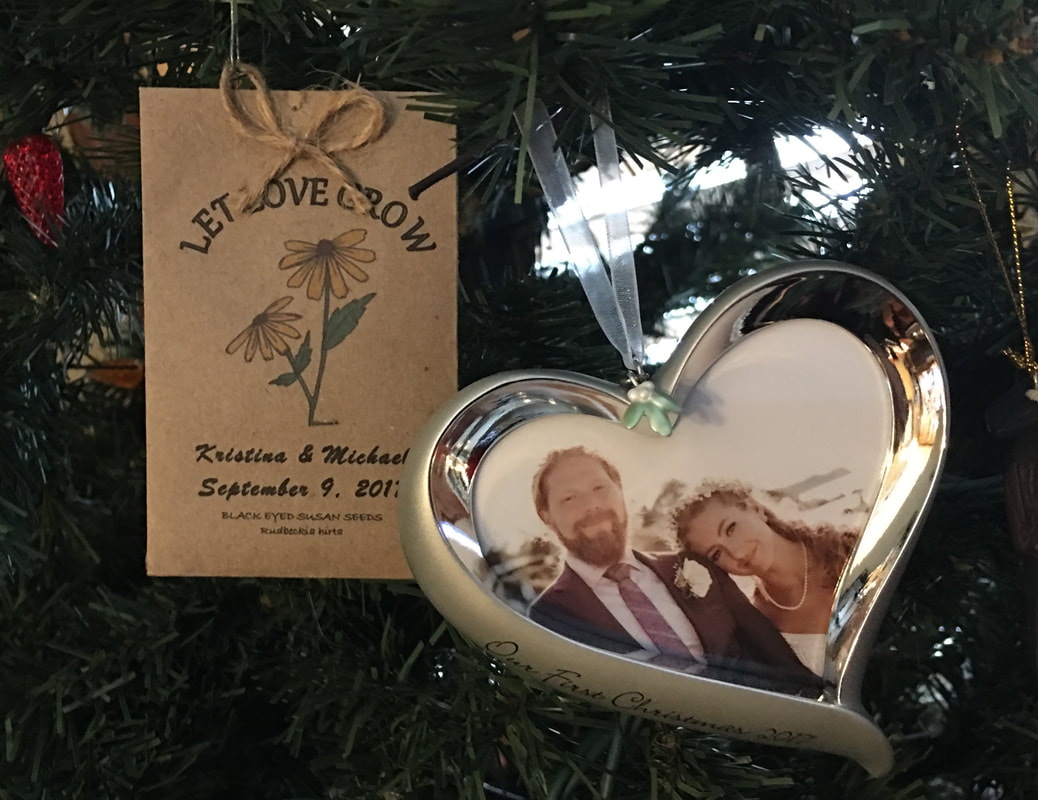
After planting the seeds I reused it by by turning it into a Christmas ornament for our memory tree! Link to memory tree blog post below.
Please feel free to contact me with any questions or comments below!
This favor was simple to make and can be edited to used for birthdays, showers, and more. Please check out our other DIY Wedding & Shower Blog Posts and our DIY Wedding and Shower videos on our You Tube Channel! And finally, if you want to know more about what a memory tree is, then read DIY Memory Christmas Tree. Thanks for visiting! Sincerely,
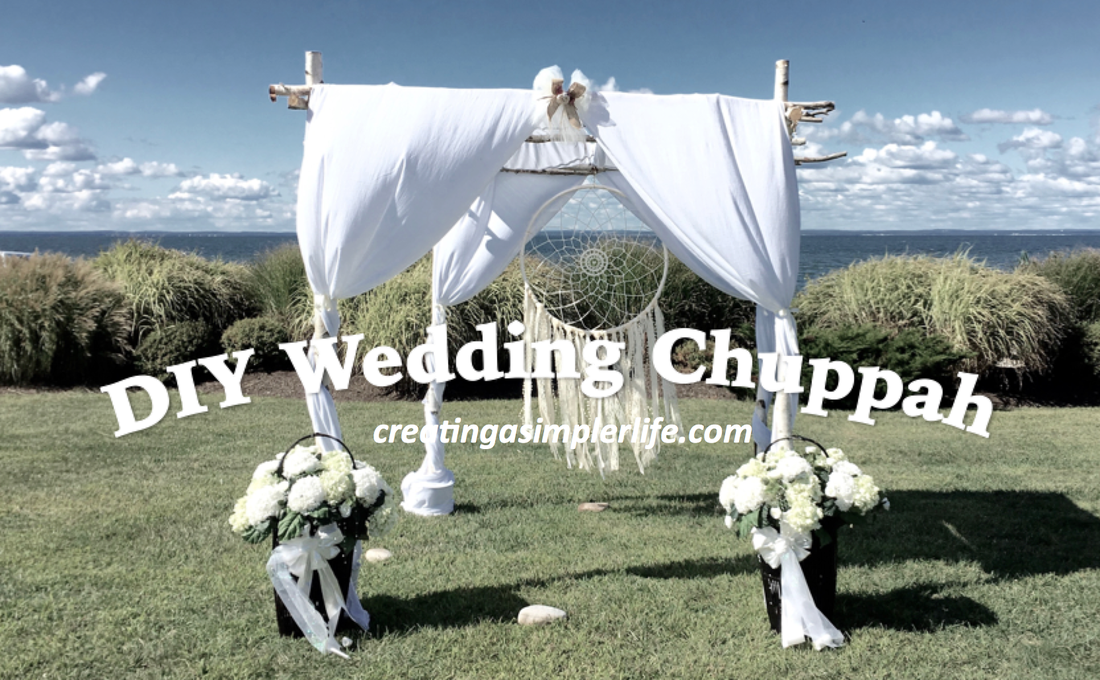
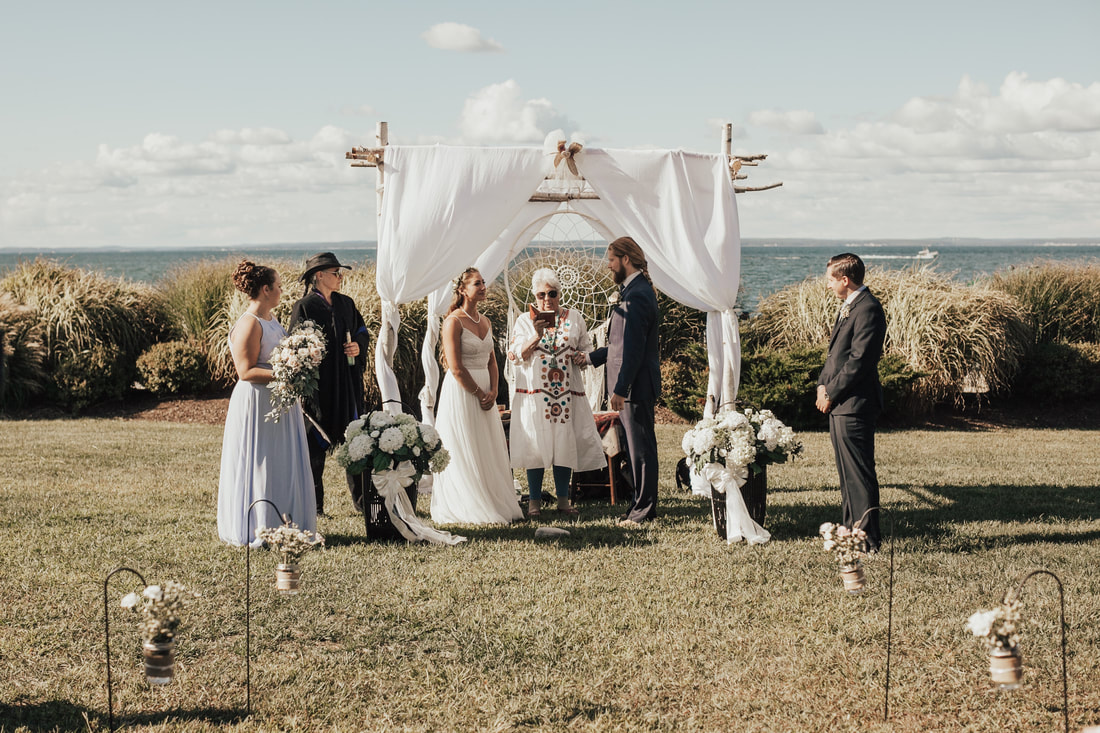
My daughter wanted a beachside wedding with a chuppah. I had never heard the word before, but this is what my daughter and her husband to-be wanted to be married under, so this is what my daughter and her husband to-be got. A wedding chuppah. The best part is that it was a joint effort between myself and the parents of the groom! What a great way to get to know the soon to be in-laws better!
Check out the Video I made "Simple Wedding Chuppah" on my YouTube Channel or at the bottom of this post!
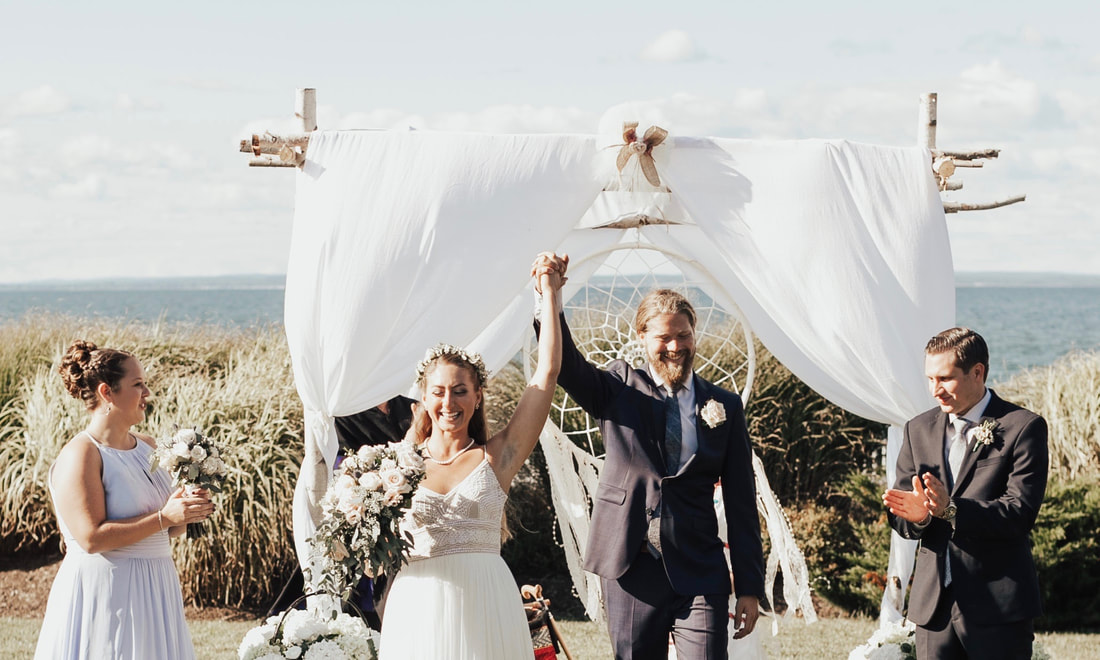
My daughters in-laws to-be (official as of September 2017) worked hard to create and build a wedding chuppah made of birch that could be assembled in place at the beach and then disassembled afterwards. The chuppah also needed a way to stay in place and not blow down so not only did they add braces to each corner, but they cemented the corner posts into metal buckets that were painted white to match the white birch bark. The end result was perfect!
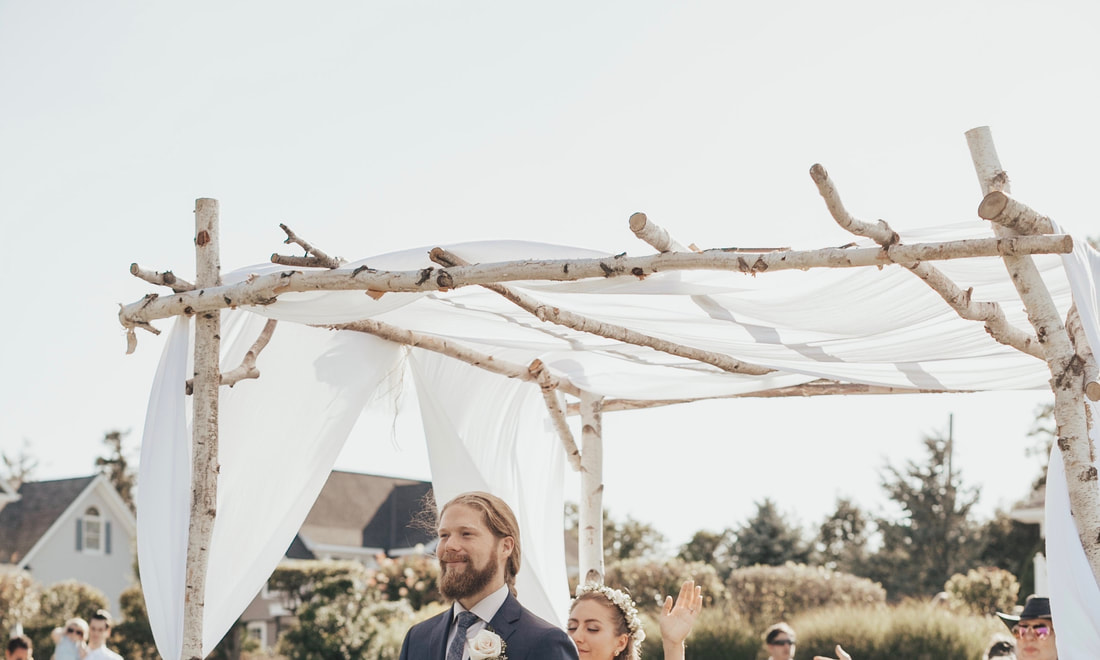
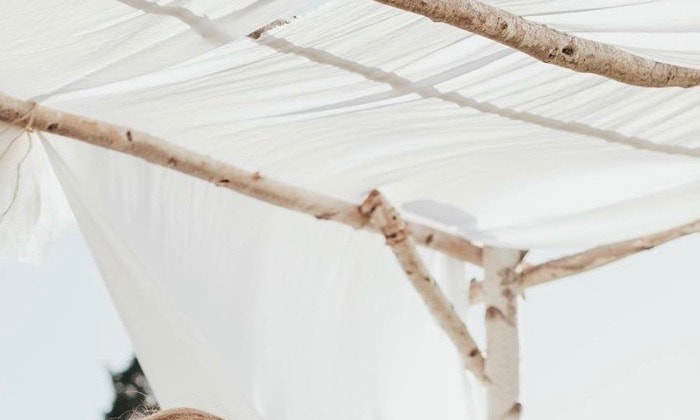
Basic structure made of birch and held together with removable screws for easy assembly.
Corner braces for support.
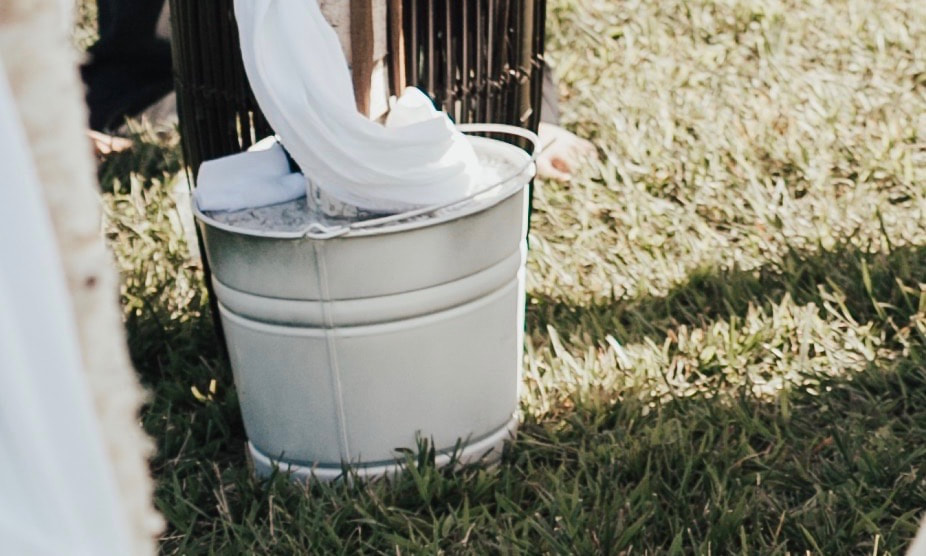
Four corner posts were cemented into metal buckets for both weight and support.
The cover was my job. I needed to do something to create a top that would be appropriate and look nice. After measuring the dimensions of the finished chuppah (we had a trial run in the in-laws backyard), we calculated that we needed approximately 50 feet of material (25' per side). I ordered 18 yards of white gauze with a special request that it be one continuous piece. This allowed for a little extra 'just in case.' The gauze material was absolutely perfect! My husband and I unrolled the 54', folded it in half, cut the center line, and then re-rolled it up doubled to unroll and easily use the day of the ceremony. On the day of the ceremony we simply wove the the two separate pieces of material through the top birtch lattice and allowed it to hang down in the front and the back. With a piece on the right and the left side we created the curtain effect. We tied the material at each of the four corners about half way up the post with off white ribbon. The material at each of the bottom legs was a little long so we wound it around the base of the birch on top of the metal bucket. We also used a staple gun at the front and back center to hold the material in place and added a little bow/flower decoration.
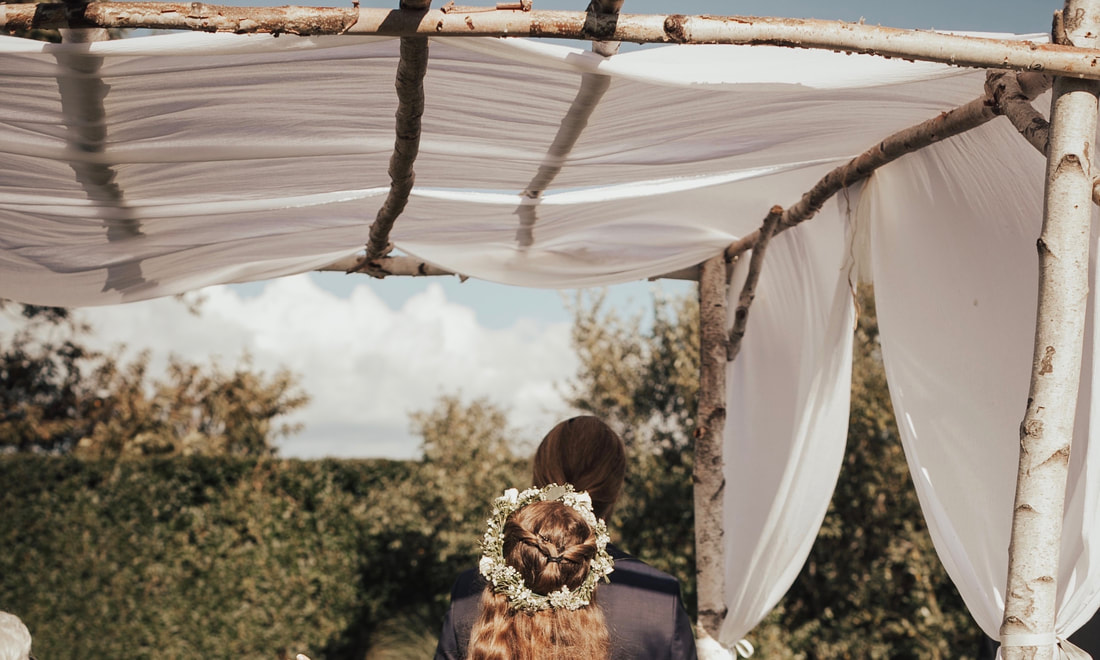
You can see the gauze material woven through the top of the chuppah.
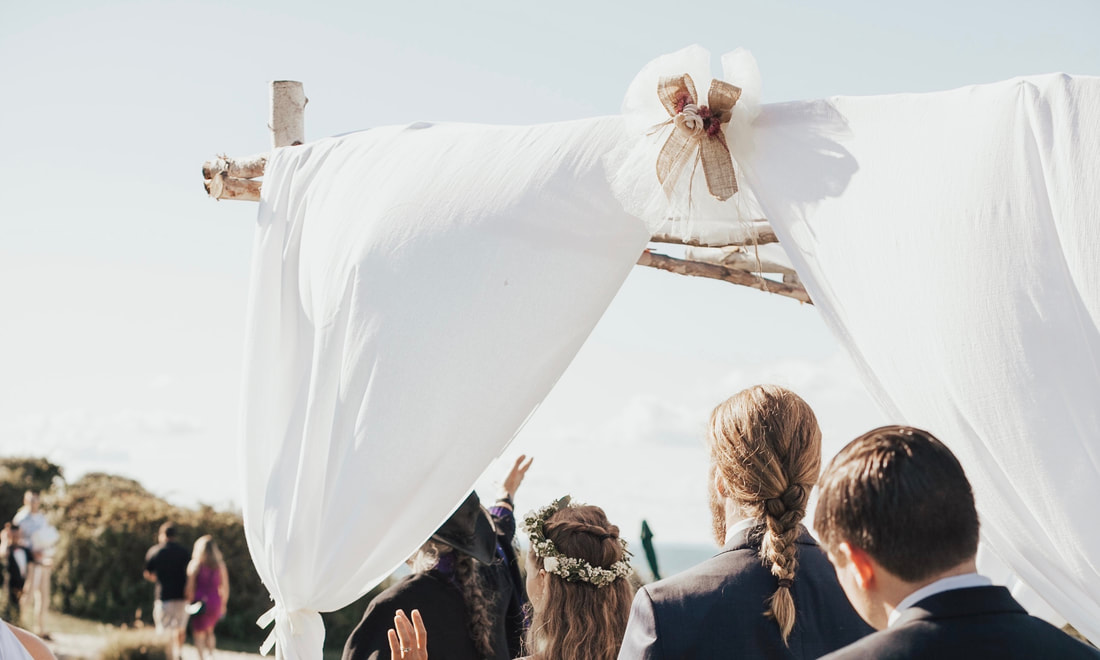
Two separate pieces stapled at the center with a bow/flower created the curtain effect.
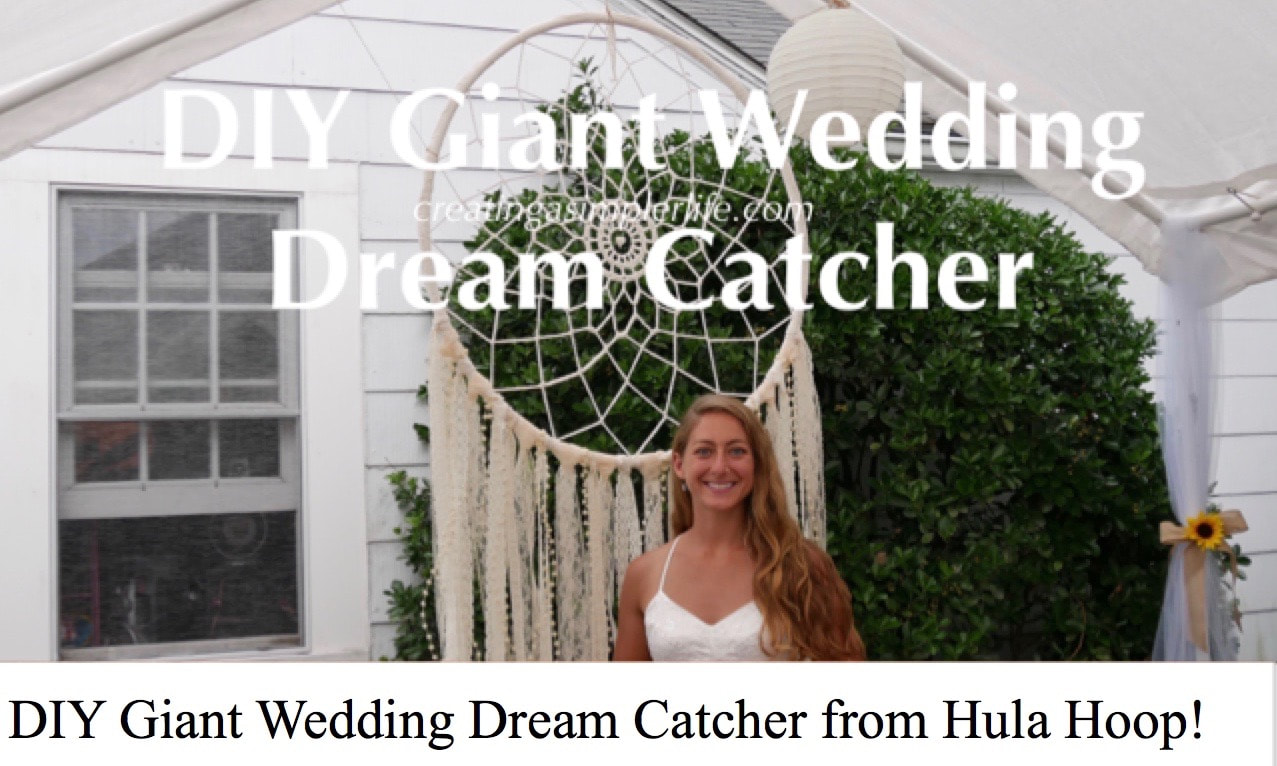
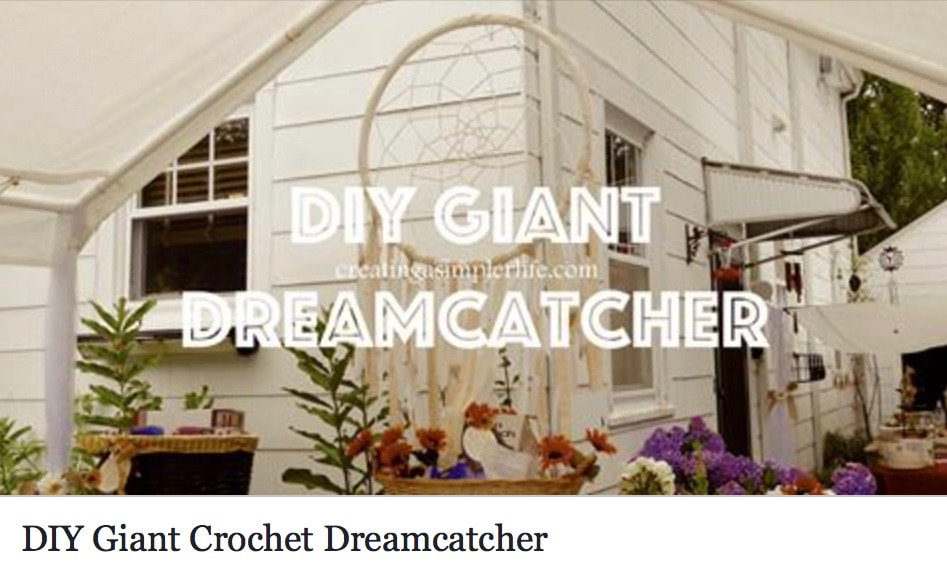
Lastly, I made the giant dreamcatcher for the back of the chuppah. It was hung from the two corners and the sides to prevent the breeze from blowing it around too much. See how to make the Giant Wedding Dreamcatcher here!
This chuppah created the perfect setting for the wedding ceremony! 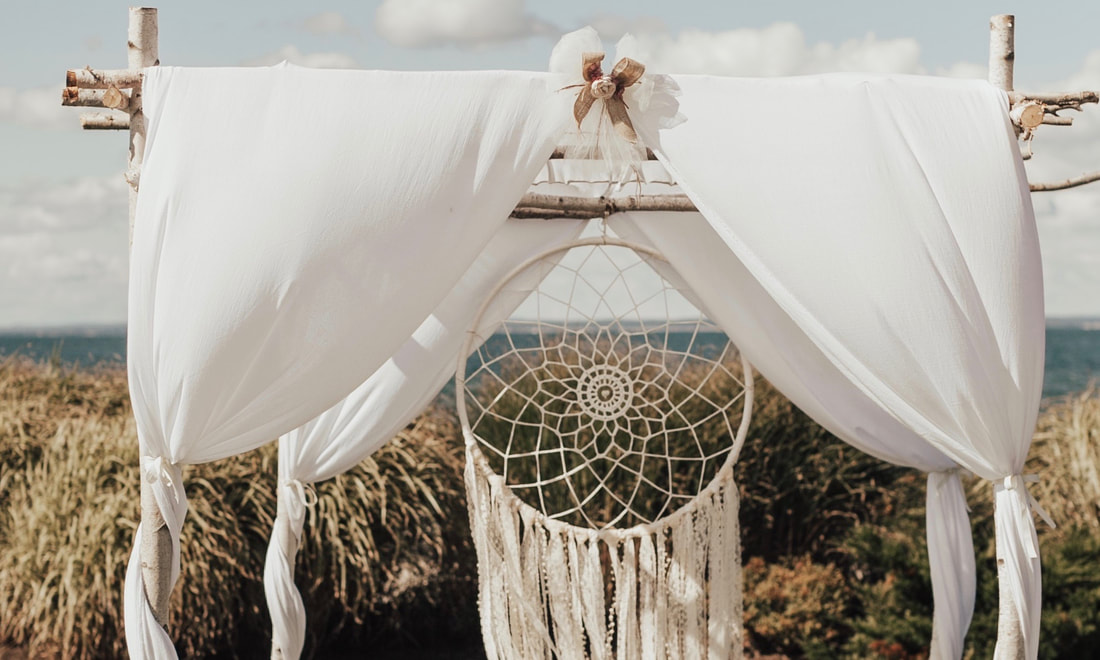
Ribbon was used to tie the material to each of the four posts. The dreamcatcher was hung from the top and the sides at the back.
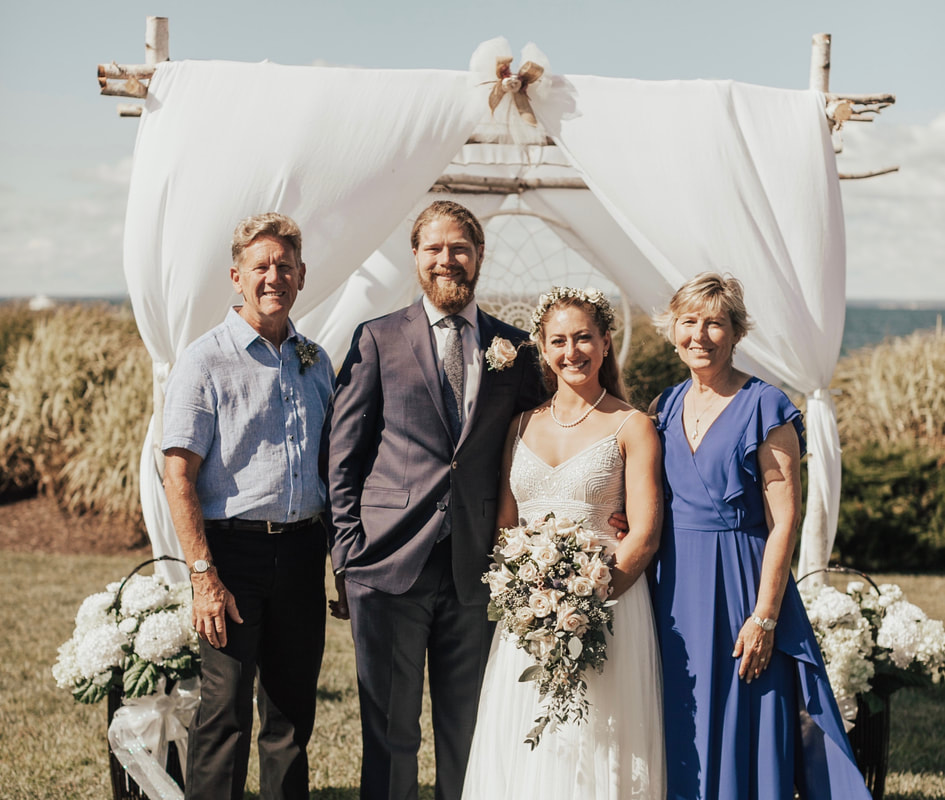
My daughter, her husband, and his parents!
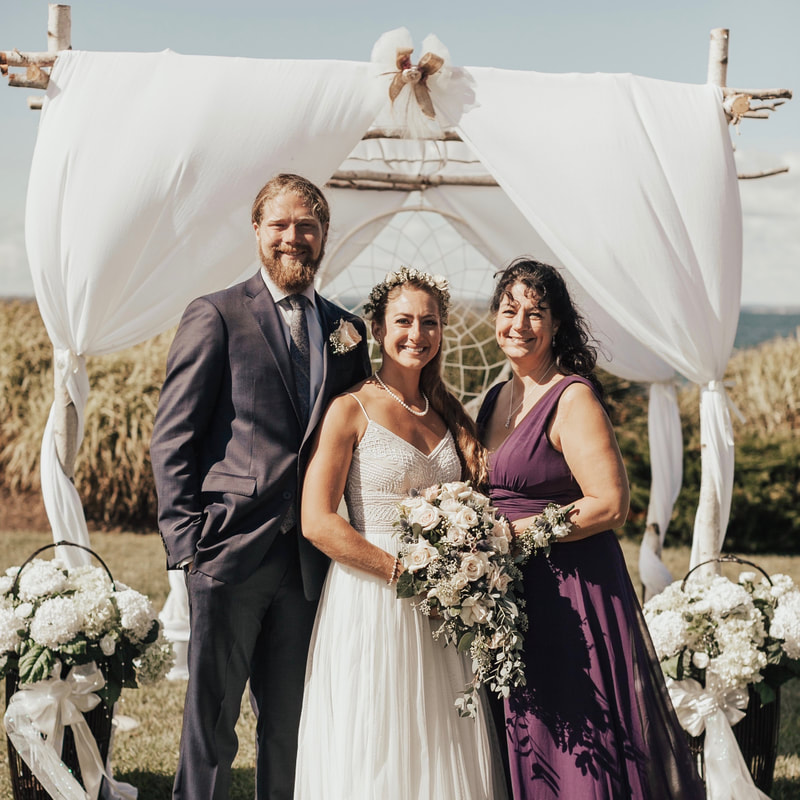
A picture of me with my beautiful daughter and new son!
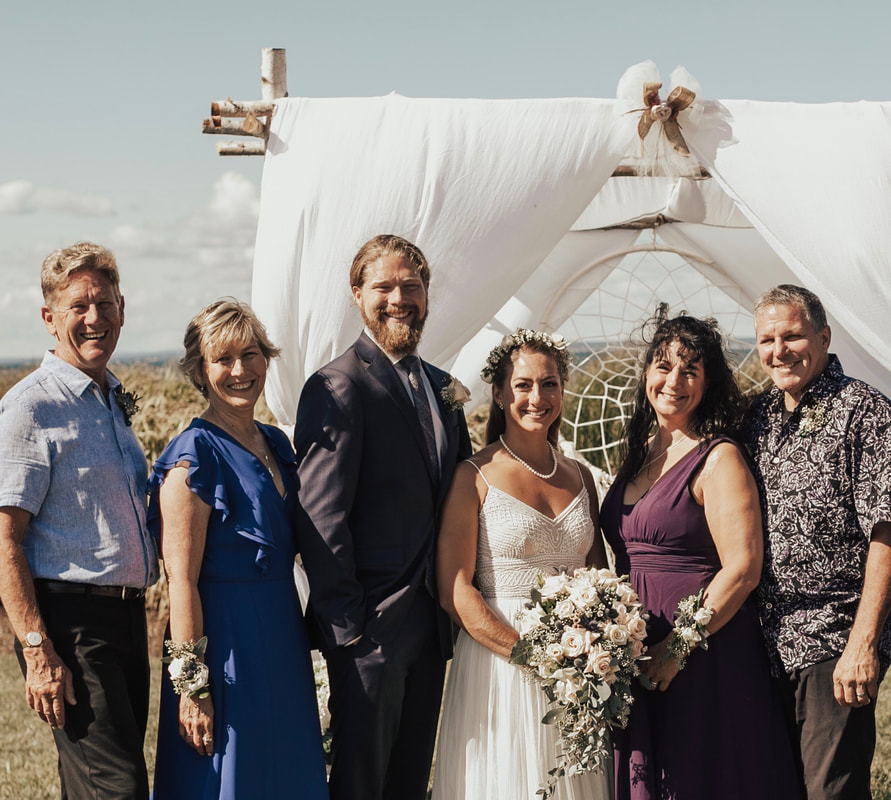
One big happy family :-)
Materials Used (affiliate links):
Upcoming DIY Wedding Projects:
I want to make a special shout-out to Samantha Brancato Photography for taking such amazing photographs! Thank you :-)
Watch the quick video (less than one minute):
Check out our other DIY wedding projects or check out our DIY Shower and Wedding videos on our Youtube channel! We also have several boards of great ideas on our Pinterest Page:-)
Have a great day! Sincerely,
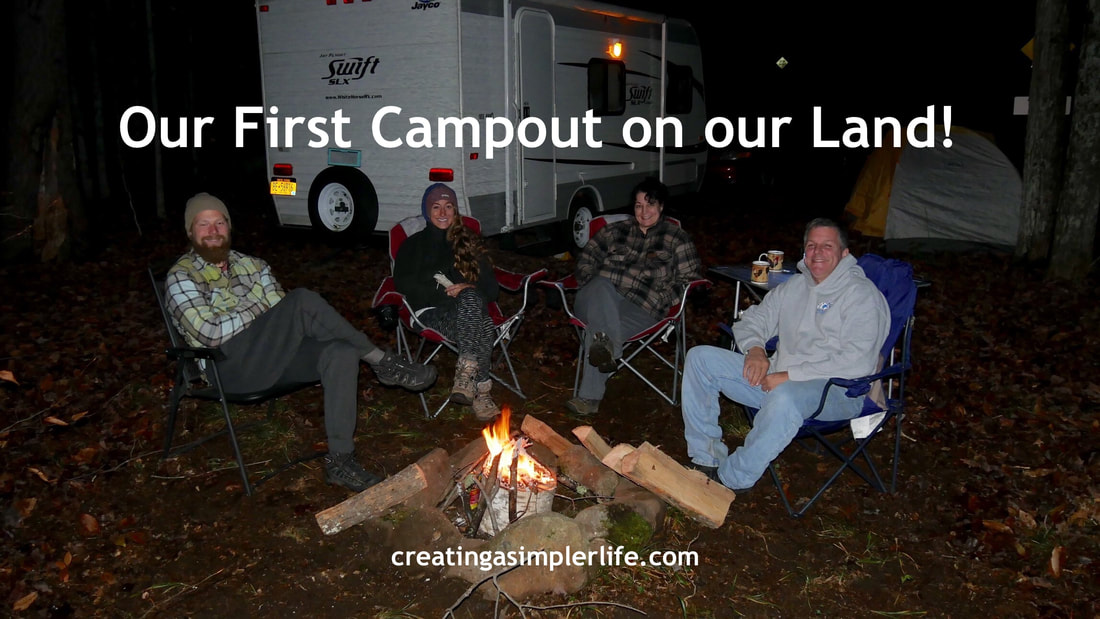
There is simply nothing that compares to sleeping under the stars (sort of) on your own land for the first time! That is exactly what we did recently and I can honestly say we really didn't want the weekend to come to an end. With no cell phone service, no electric and no running water (other than our little creek) we were in our glory staying overnight. Even with the temperatures dipping down below 27°F our newlywed children were perfectly fine sleeping in their little tent!
None of us can wait until we can do it again! Really :-) 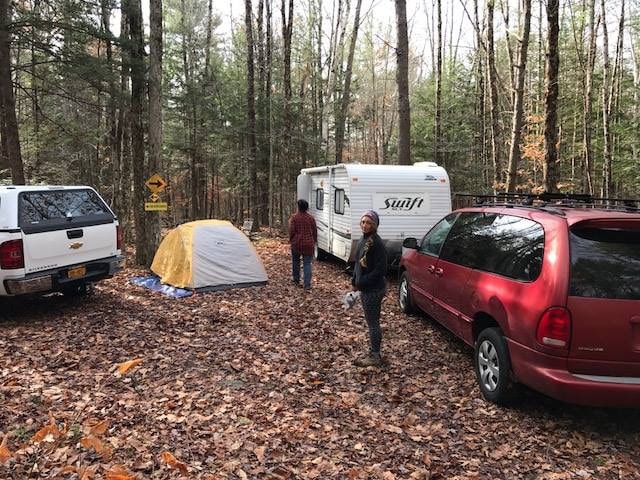
Campsite is set!
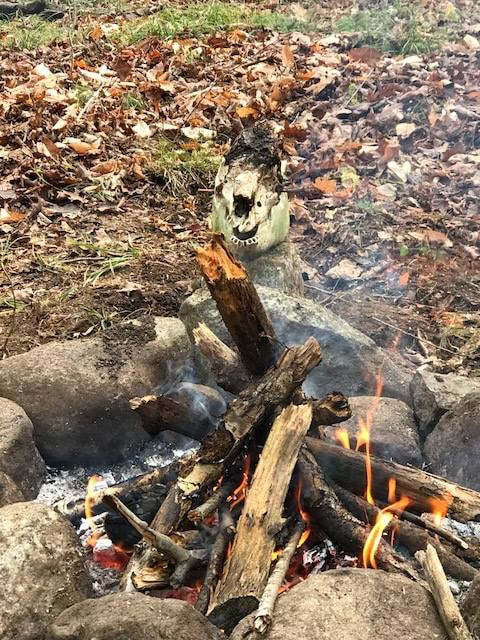
We cleared an area and used some rocks to make a campfire ring. Check out the skull we found on our land!
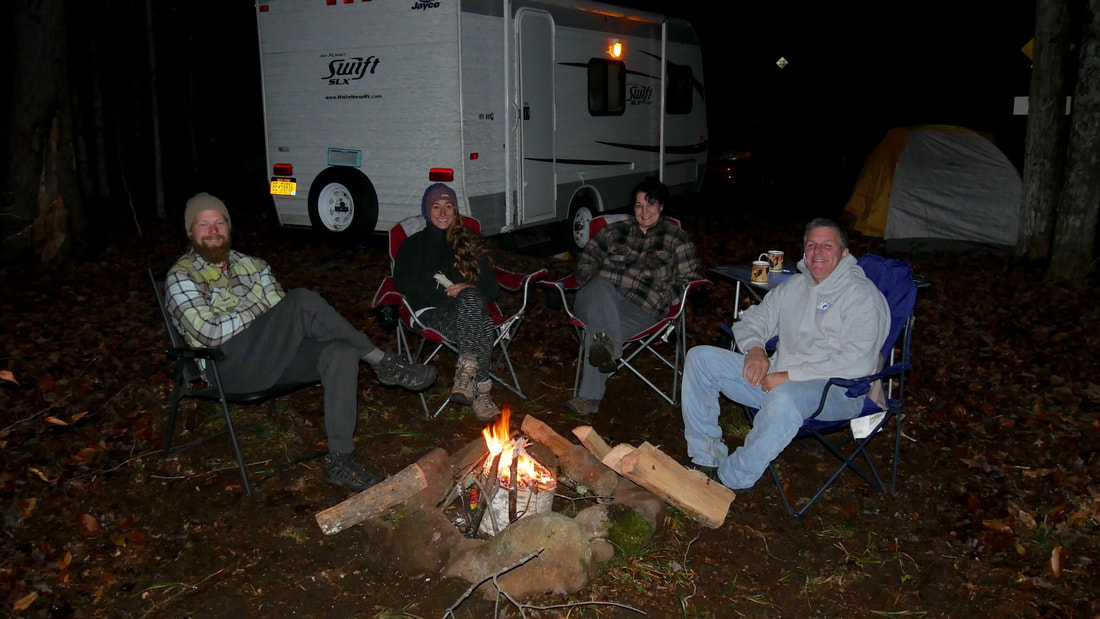
A toasty campfire!
We loved camping out so much that we can't wait to do it again!
Read more about our land and our future Homesteading Dreams here. Sincerely,
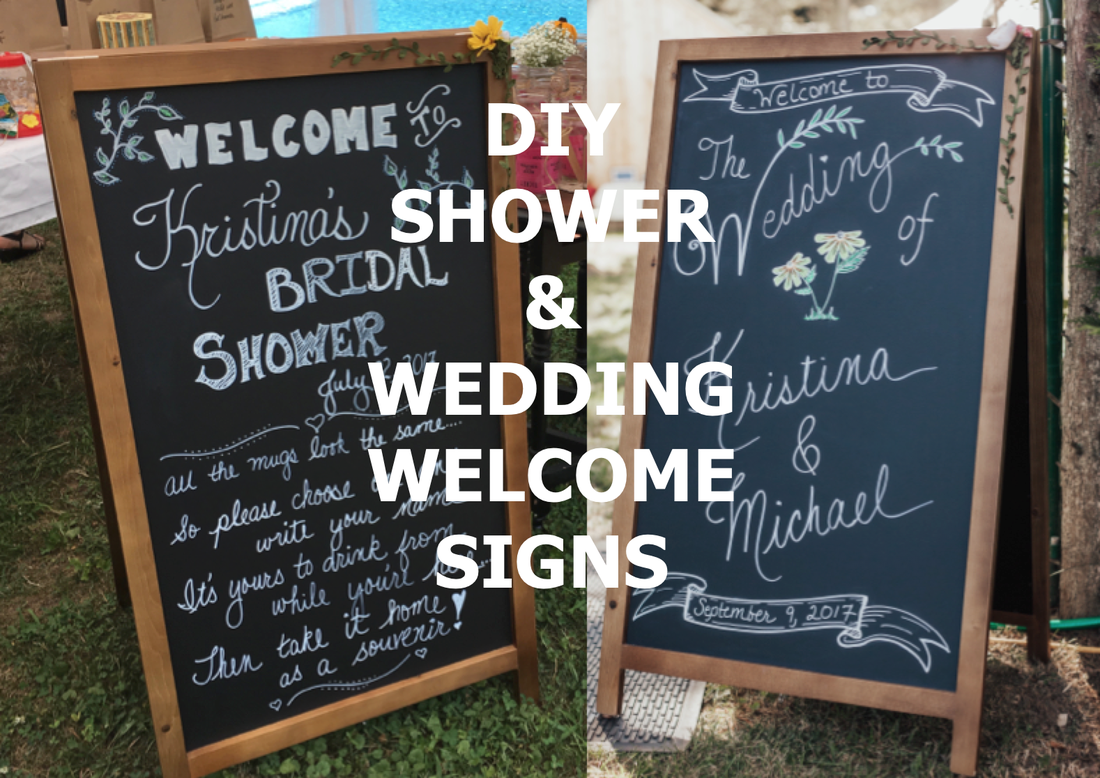
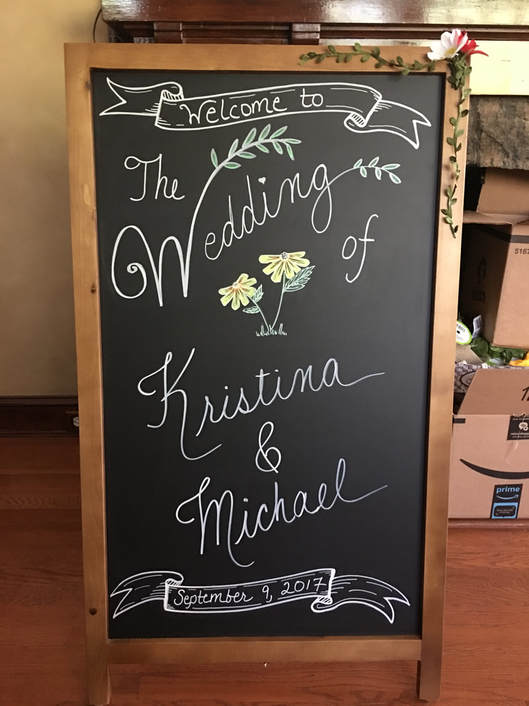
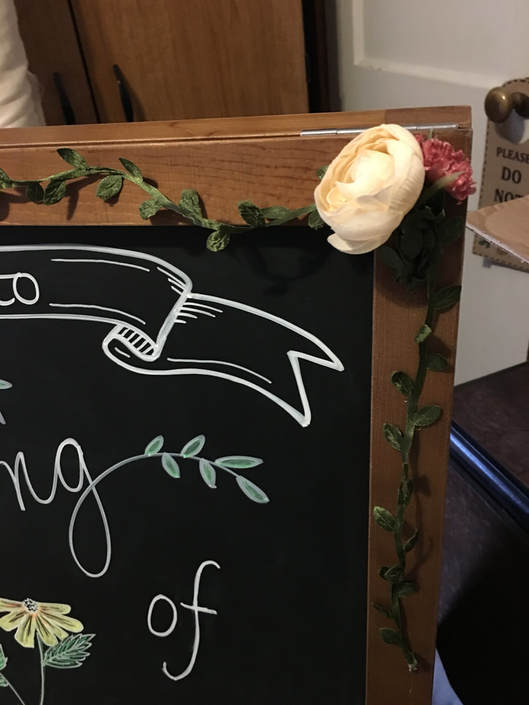
While obsessively searching through Pinterest for ideas for my daughters backyard wedding, one thing that kept coming up again and again was a welcome sign. There were many kinds of signs: some were printed, some were purchased, and some were even printed on wood for a real rustic look. I chose to go with a giant chalkboard sign like you see outside some country restaurants. I just like that rustic/country feel and I really wanted to try my hand at some fancy chalk writing. After some failure, and then a little more trial and error, I came to discover how much I like using chalk paint pens. They come in multiple colors and work really, really well! Beware though: If your surface is porous they may not wash off!
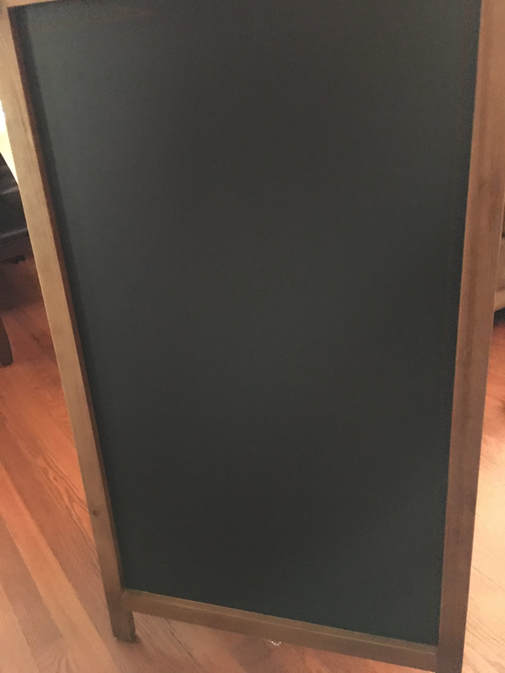
A nice clean surface to start with!

Sign in progress....
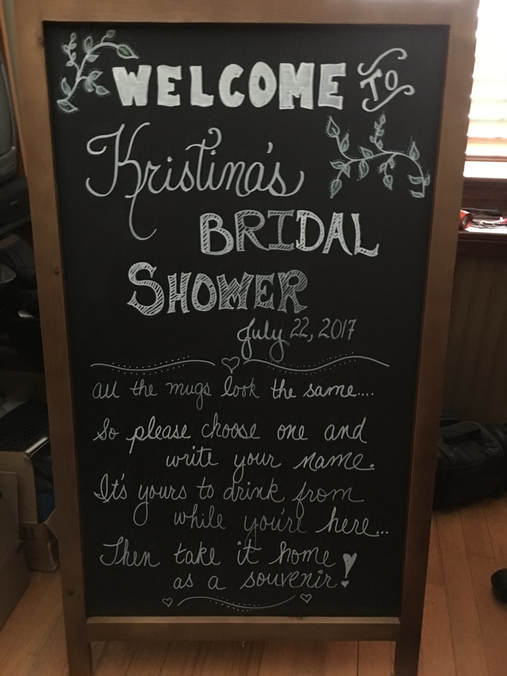
Almost done....
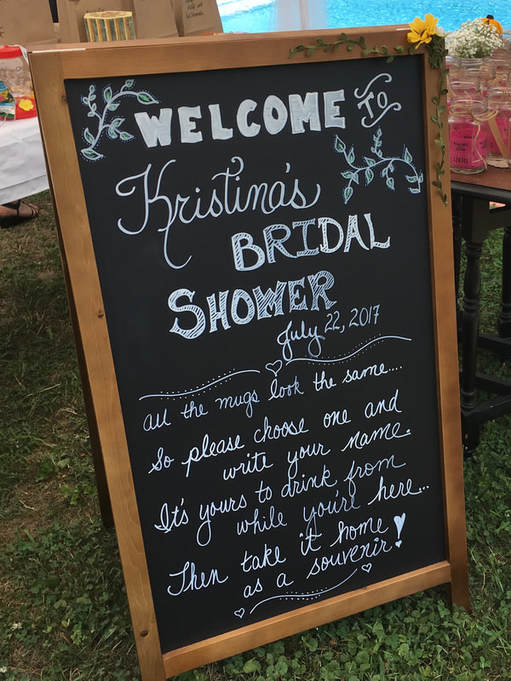
The sign the day of the shower :-)
I can't really teach you how I wrote these signs because I really just winged it. I did do some searching online for different lettering ideas but after trying several of them I decided to just go with what felt and looked right to me.
What I can do however, is share some tips with you that I learned:
Products (affiliate links):
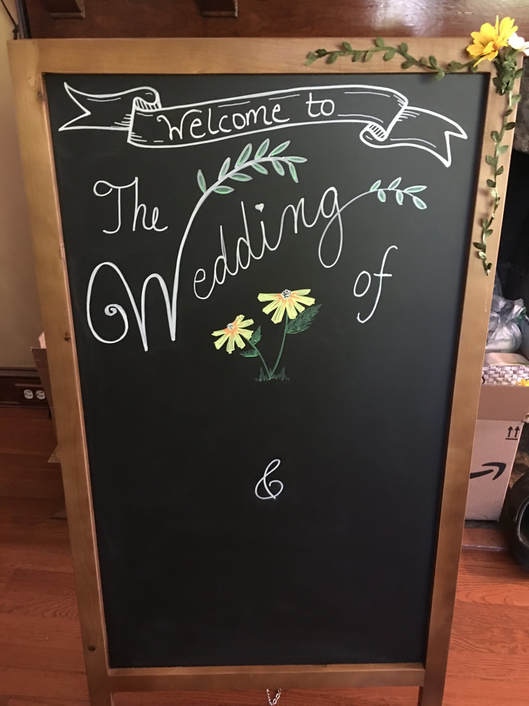
Sign was a work in progress over several days...
Sign almost done!
I changed the flower ;-)

Front of Wedding Sign at the Backyard Reception
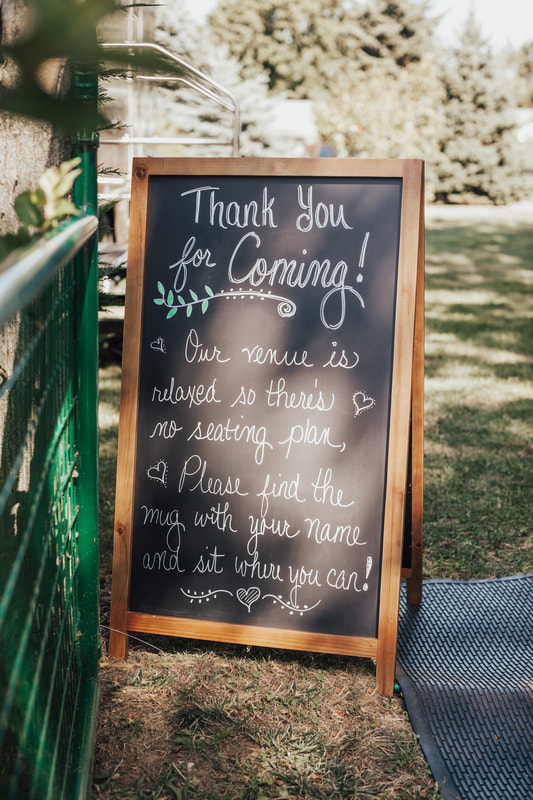
Back of Wedding Sign at the Backyard Reception
I have to say I was really happy with the way the signs turned out for both the shower and the wedding, especially considering I had never made a sign before! I also know it was a lot more economical than paying someone else to do them!
Check out our other Shower and Wedding DIY's here or on our You Tube Channel! Follow us so you don't miss these upcoming posts: Note: These beautiful pictures were taken by my daughters photographer Samantha Brancato.
Thanks for visiting!
Sincerely,
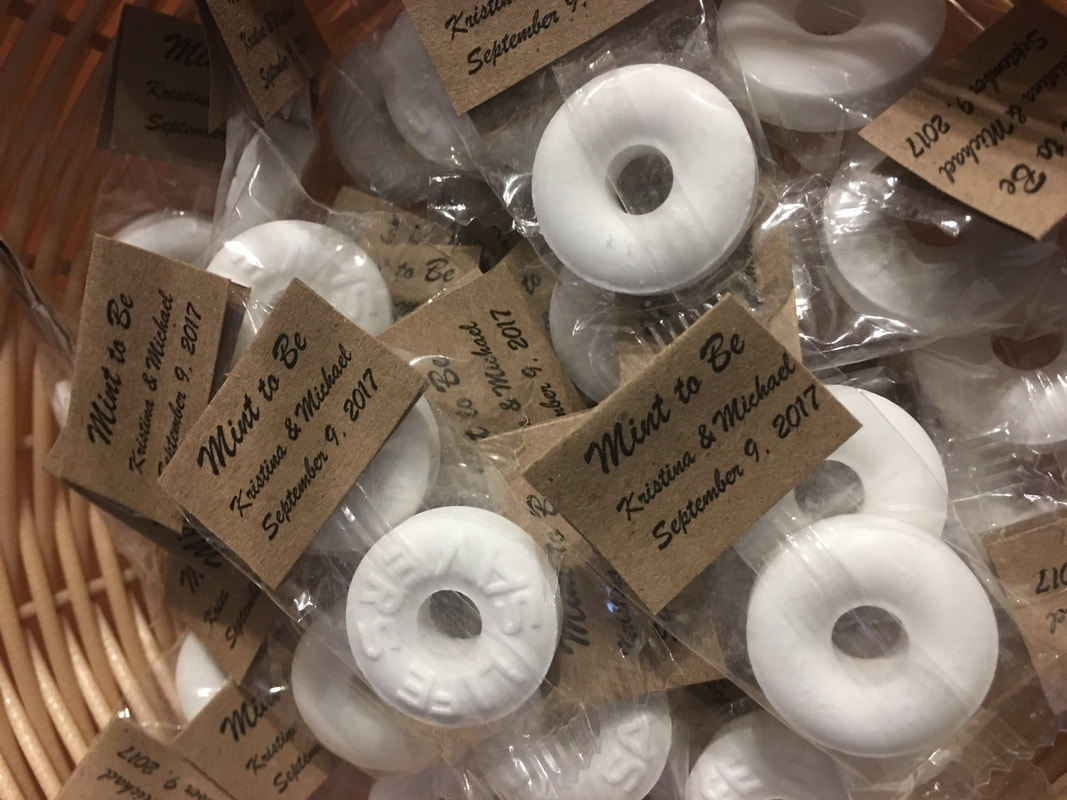
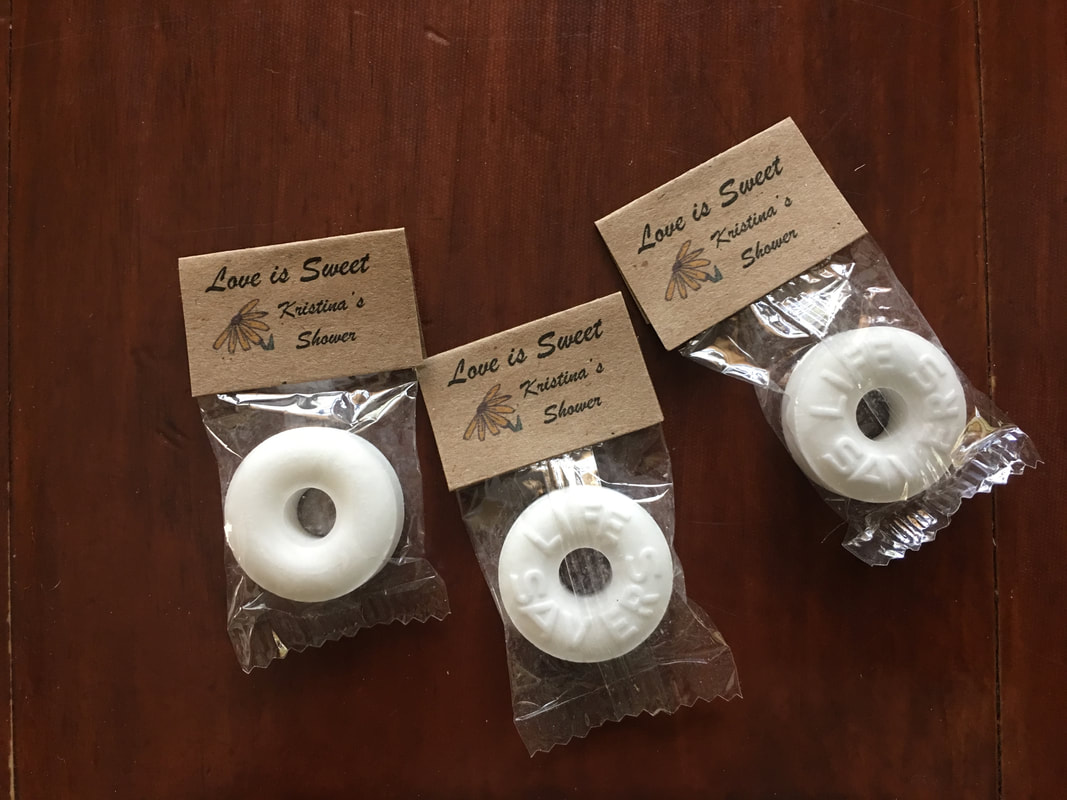
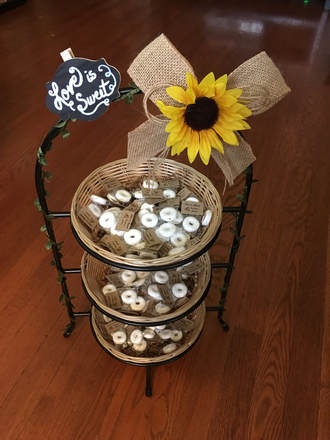
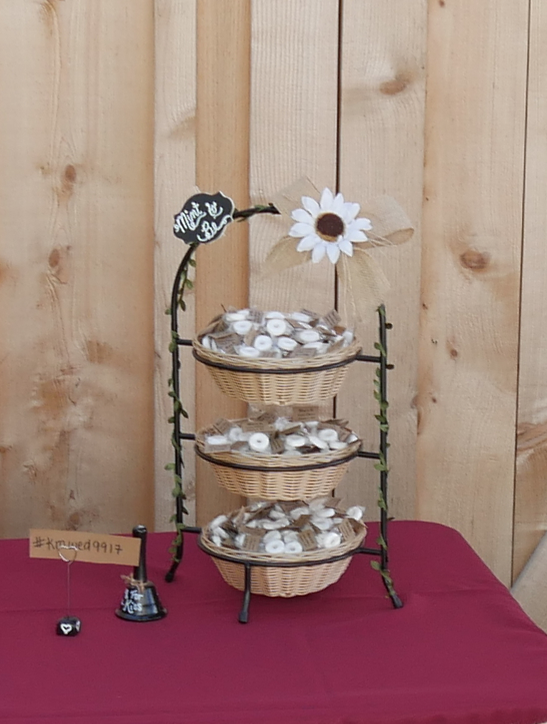
SUPER SIMPLE AND SUPER SWEET!
FREE MS WORD DOCUMENTS FOR BOTH! Why not make them for your next celebration? 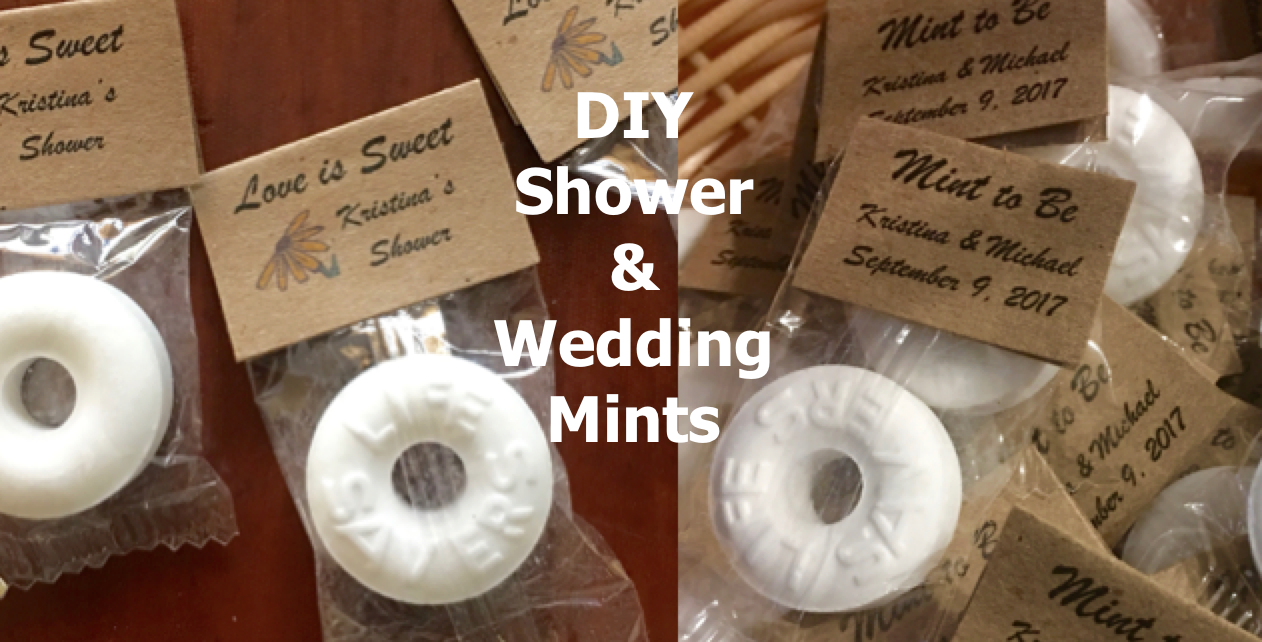
I wanted to make something 'extra' for my daughters bridal shower and wedding and thought mints would be perfect!
Materials purchased/needed/used (affiliate links):
Video "How-To" (pictorial below):
Pictorial:
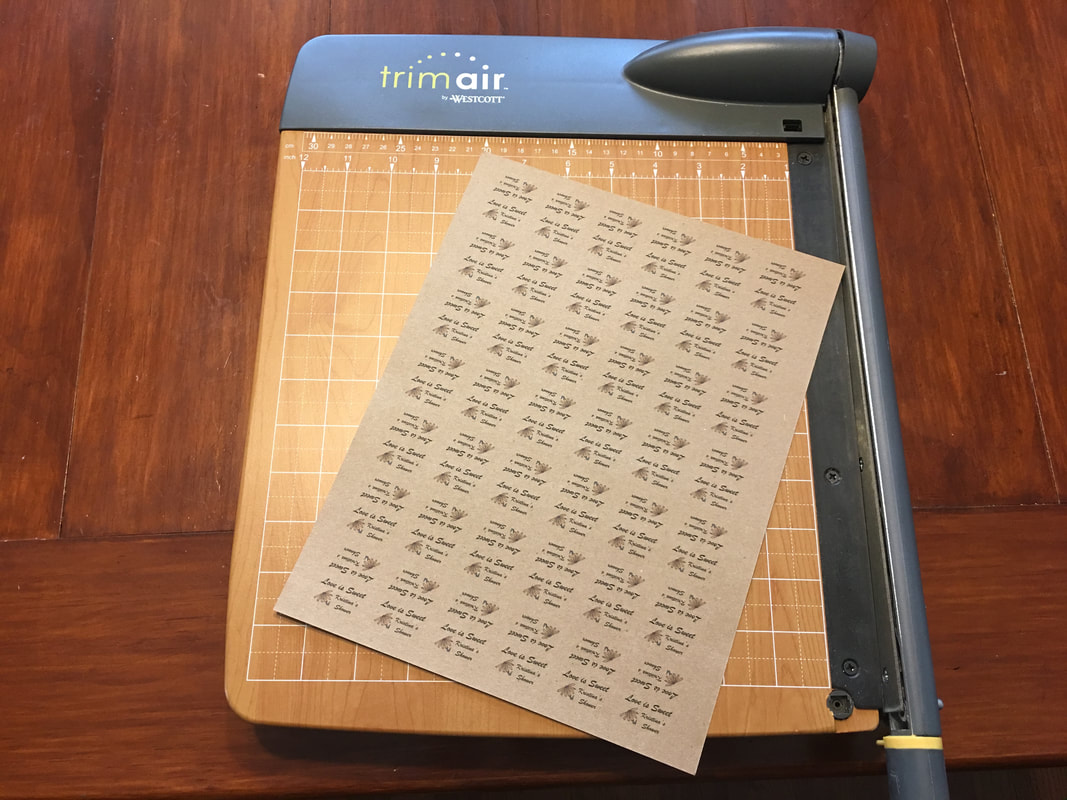
Print labels on craft paper (or any paper you choose).
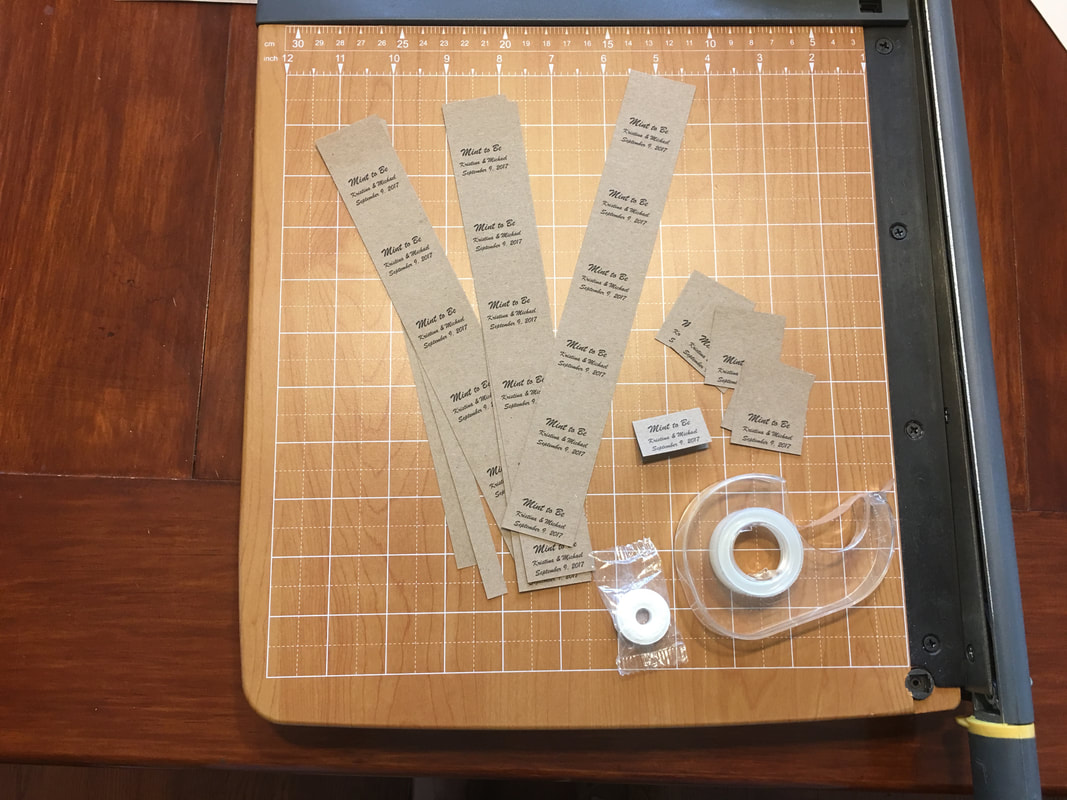
Use paper cutter or scissors to cut labels out.
Use permanent tape across entire back of label and then fold over the end of the mint packaging squeezing tightly together so it holds!
So simple to make!
So sweet a treat to share with guests! And who doesn't want a nice fresh mint after eating? Check out our DIY Showers & Weddings and other DIY crafty ideas! A few DIY's coming soon:
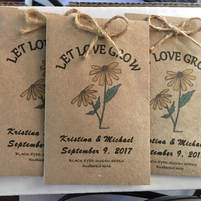
And here are a few that we already posted - click on the picture to read more....
Thanks for visiting.
Follow us on social media or sign up for e-mail to stay up to date on new posts! Sincerely,
|

Hi there! I'm Kathie, the author behind Creating A Simpler Life blog. I'm excited to share our longterm projects (and planning) toward building our future retirement homestead in the Adirondack Mountains of New York. In the meantime I will be sharing all the other little things we do that are part of creating our simpler life!
Categories
All
Archives
July 2020
|


 RSS Feed