Blog
A little bit of anything and everything that's part of
creating, enjoying, and living a simpler life!
creating, enjoying, and living a simpler life!

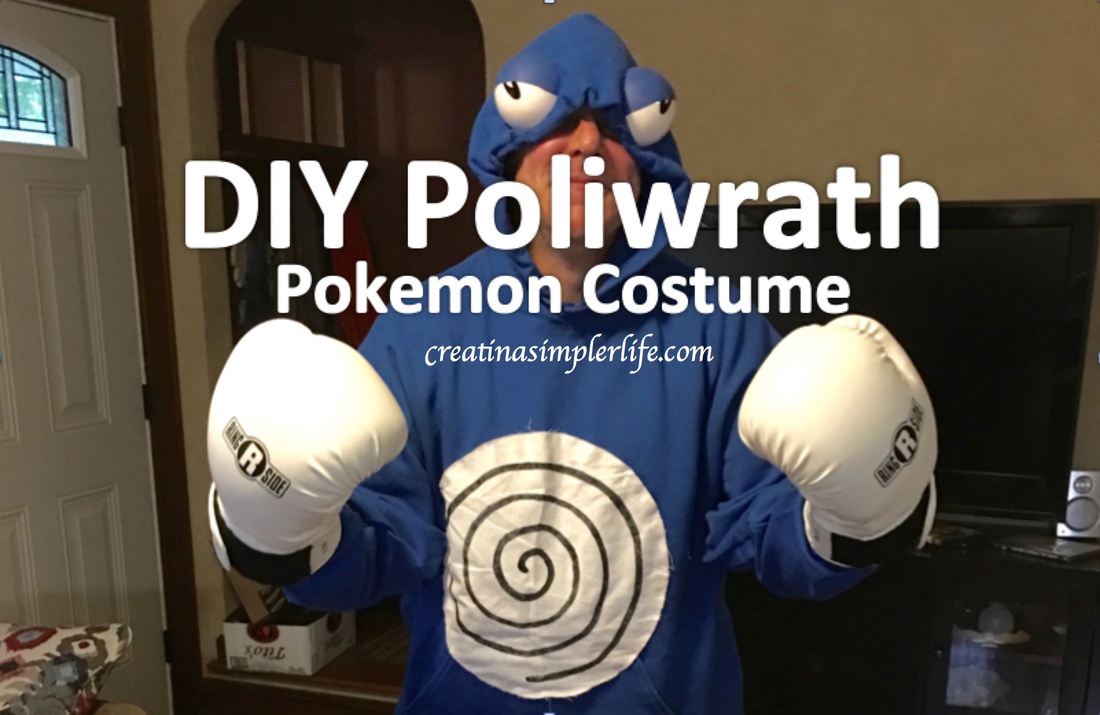
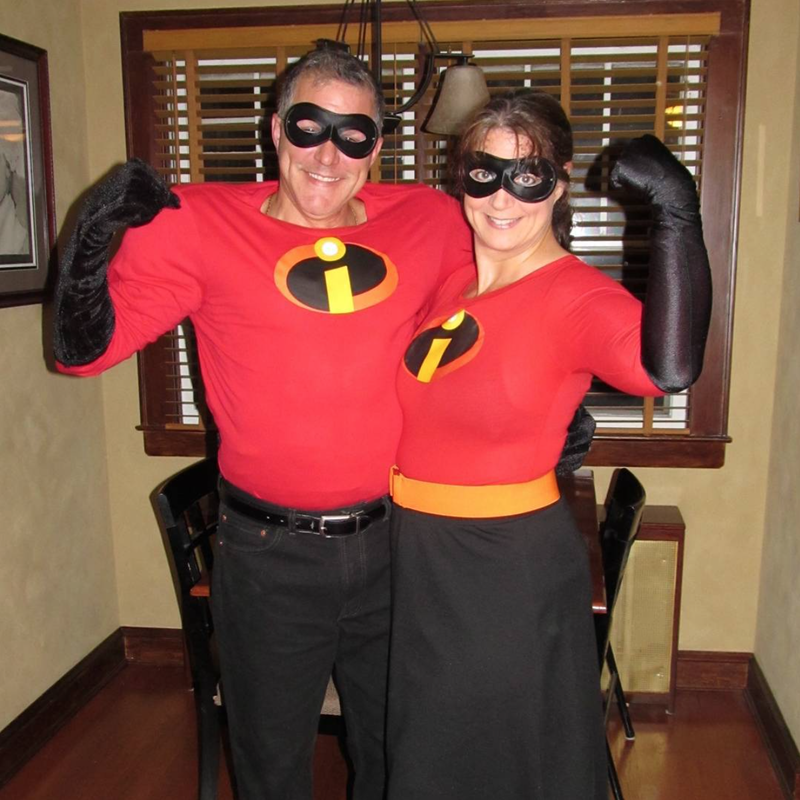
Every year at work we have a departmental costume contest. This means we have to have a theme that is better than all the other department themes and that we all have to participate. Our department happens to have over 30 people so it is often hard to come up with really good ideas. A few years ago our theme was superhero's (Which of course there are plenty of!) so I made myself the mother from the Incredibles - Check out DIY Incredibles Costume here!
That was my favorite costume to date, especially because I always make an accompanying costume for my husband for any parties we go to.
The Poliwrath costume that this post is about would be another favorite but I didn't wear it, it was actually the costume I made for my husband. I made myself a Butterfree costume and that post will be coming soon (see below). 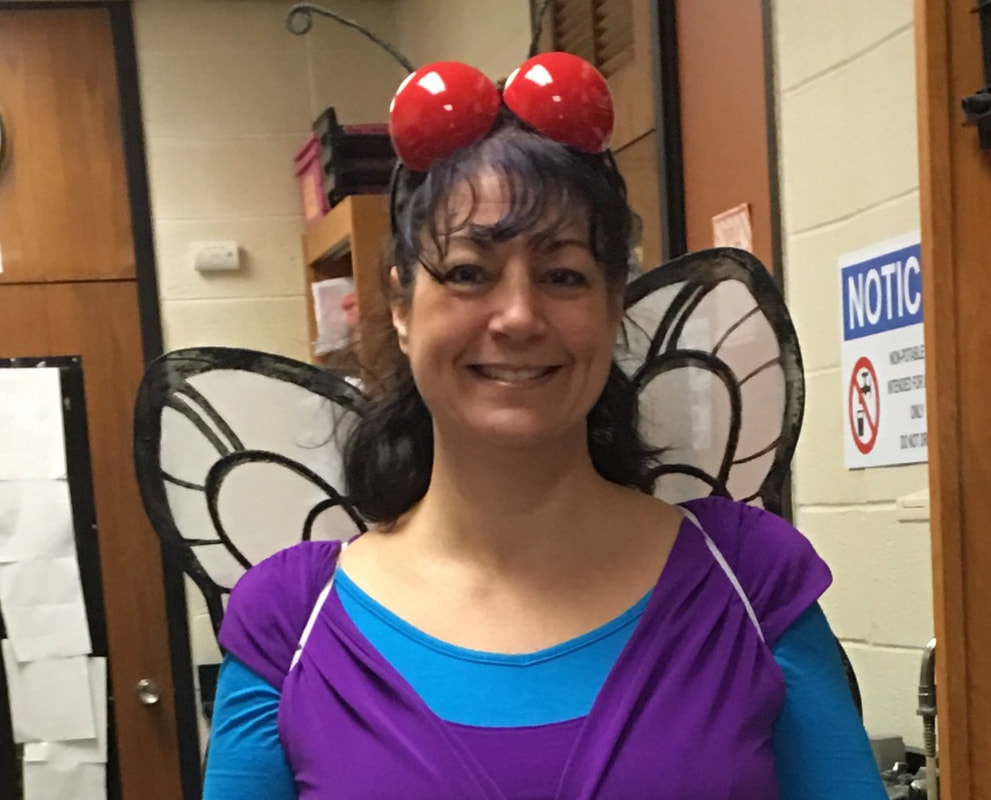
As much as I like the Butterfree costume, I kind of wish I had made myself into Poliwhirl (the happy version of Poliwrath) because it would have been so much easier! You will see what I mean when you read the DIY Butterfree Pokemon Costume coming soon!
Poliwrath Costume Instructions:
Supplies:
How to:
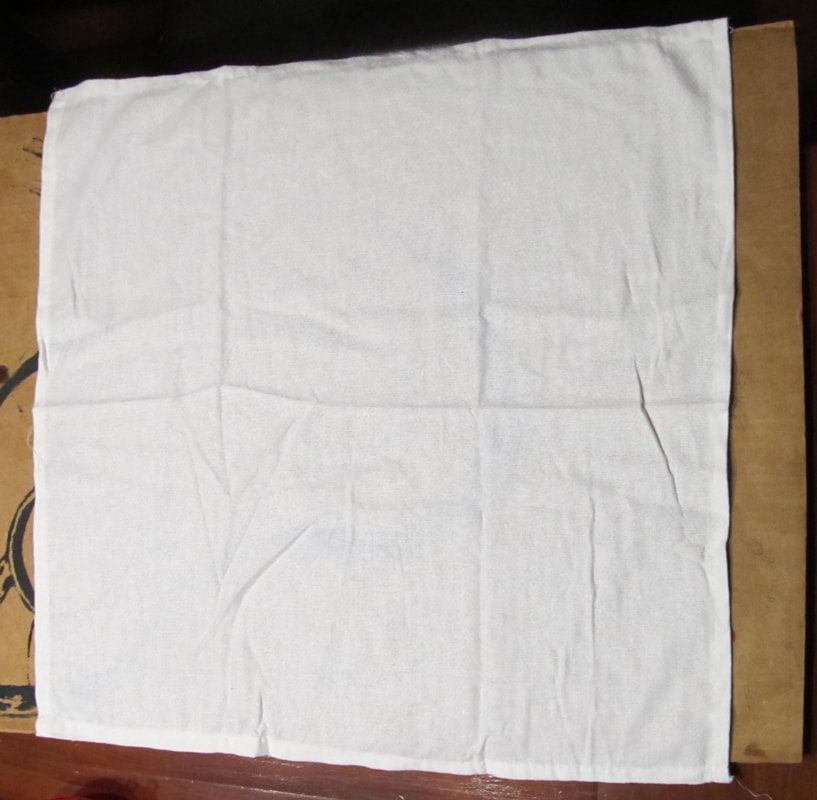
A square of white material. This is simply a white cotton rag used for cleaning (unused of course).
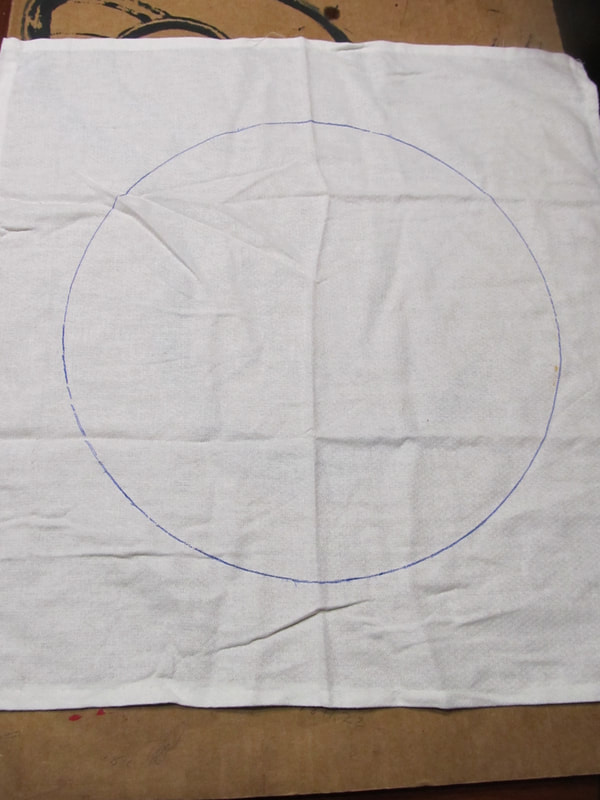
I used a large dinner plate to trace a circle on the cloth.
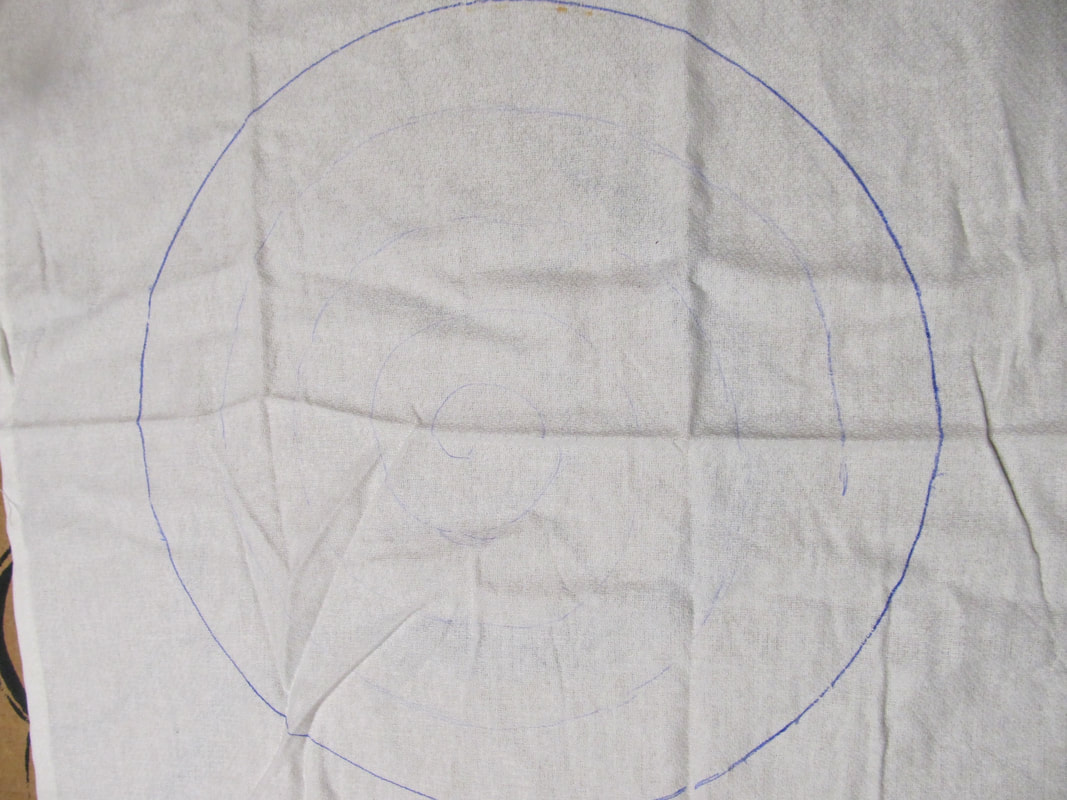
Then I very lightly sketched in a 'swirl.'
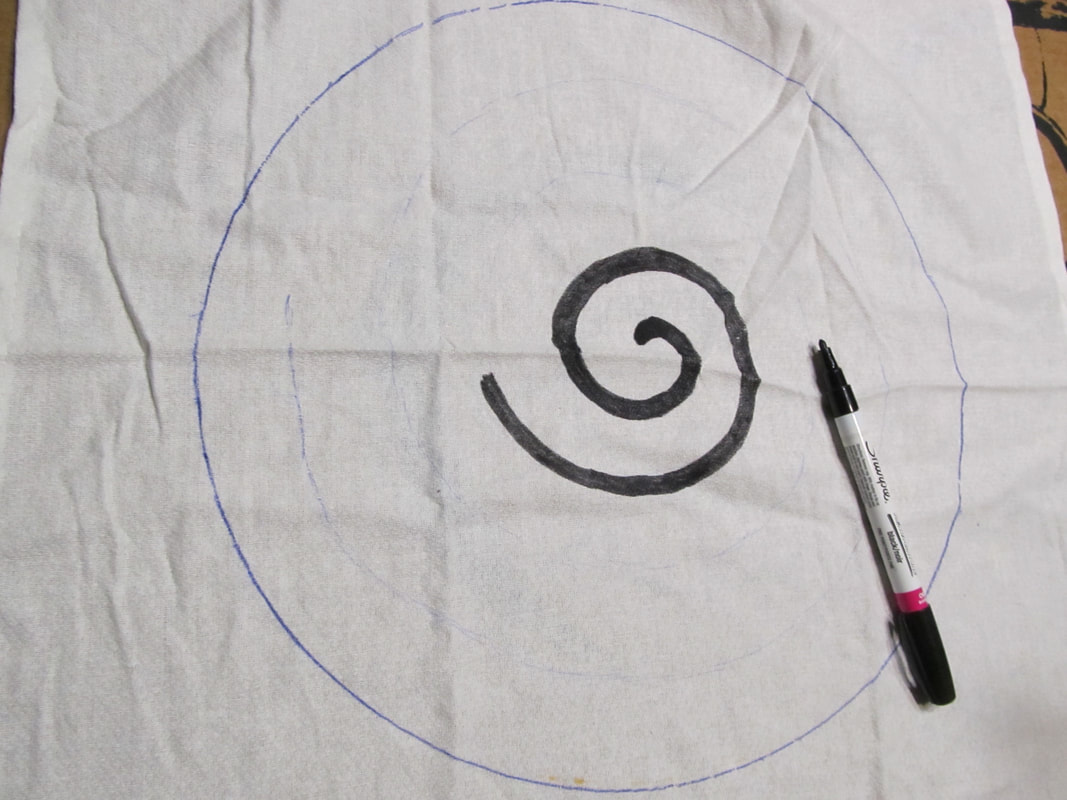
I used a black paint marker to draw in the swirl and make the line a little thicker.
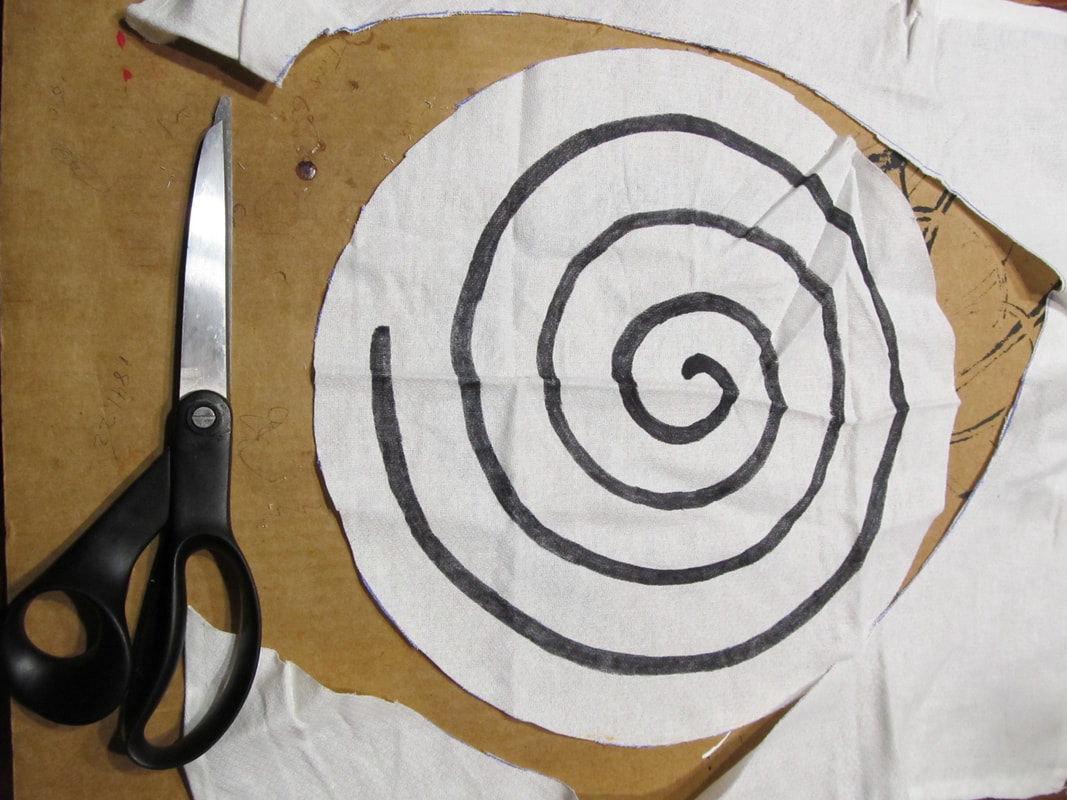
Cut it out....
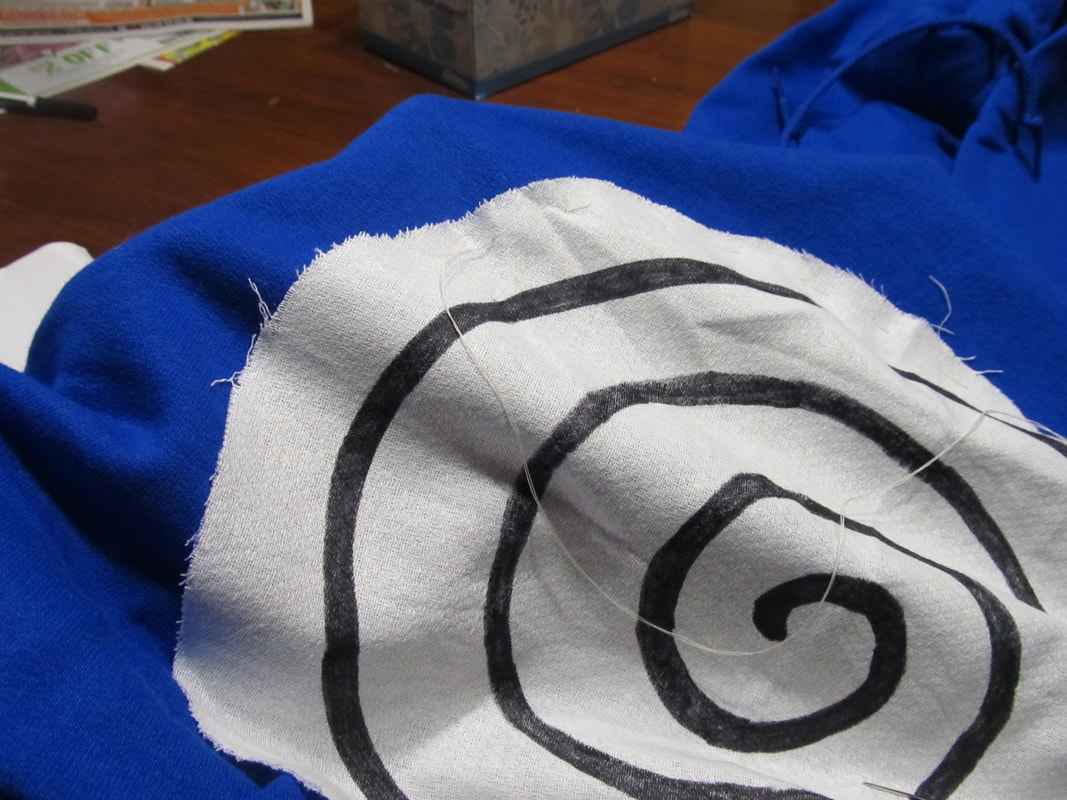
And sew it onto the front of the sweatshirt!
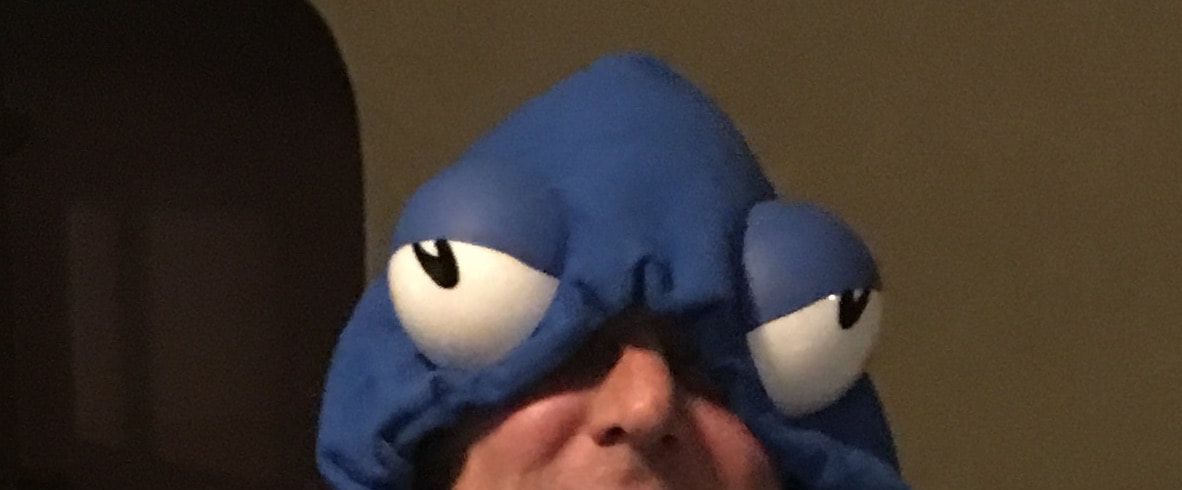
I don't know why I didn't take pictures of how I made the eyes!
Heres what to do:

A quick shoutout to my husband for being such a good sport! xoxo
0 Comments
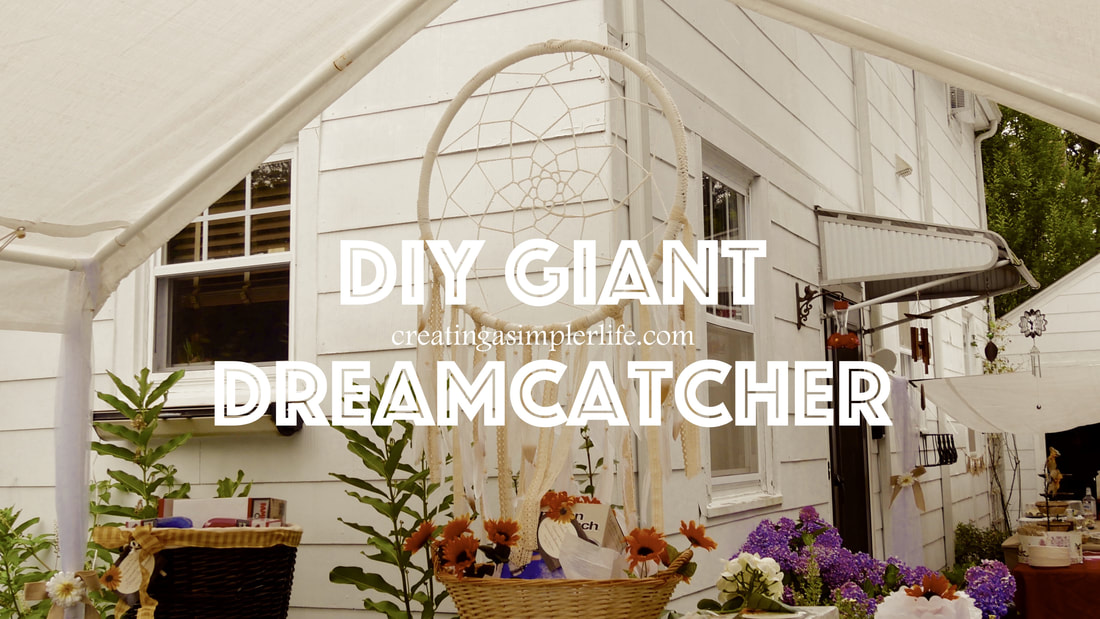
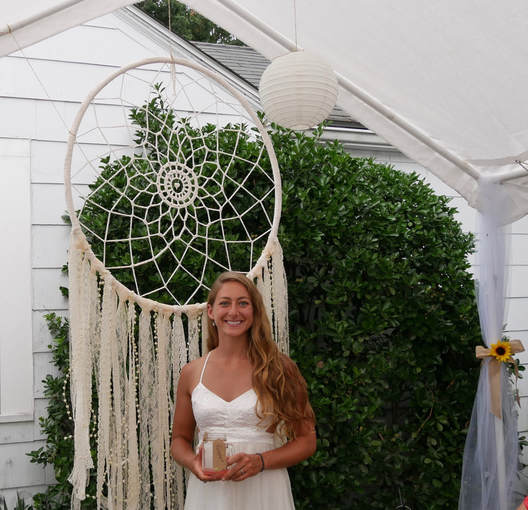
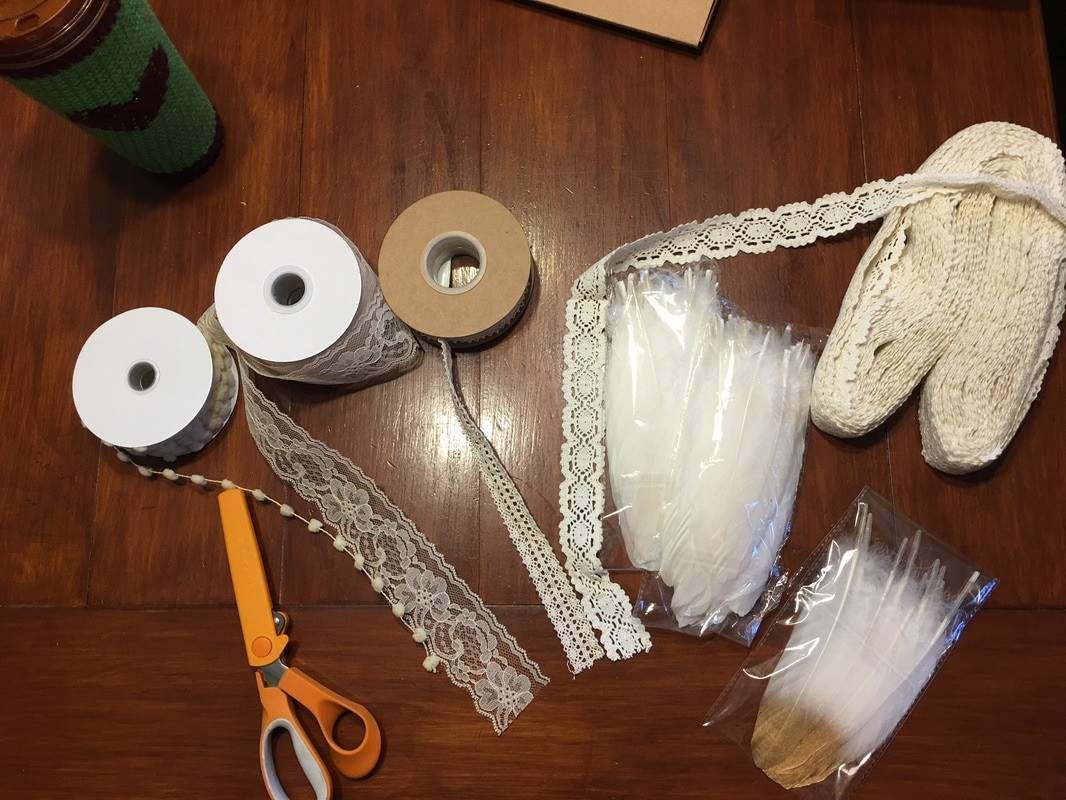
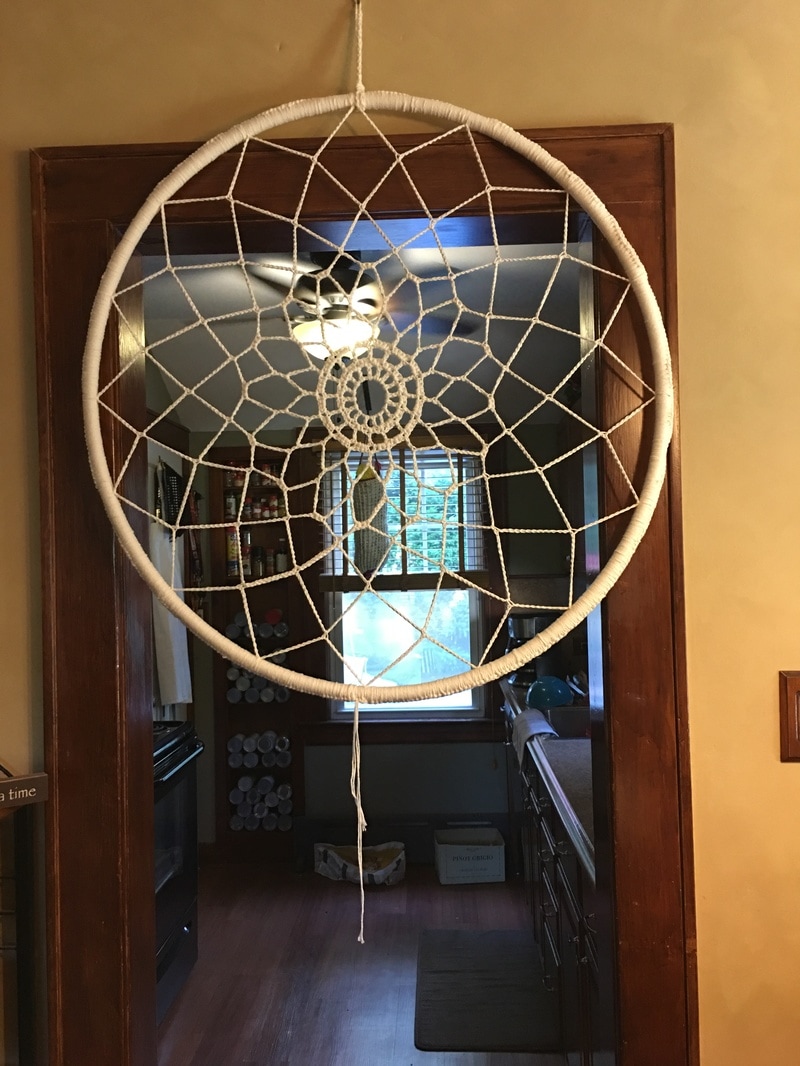
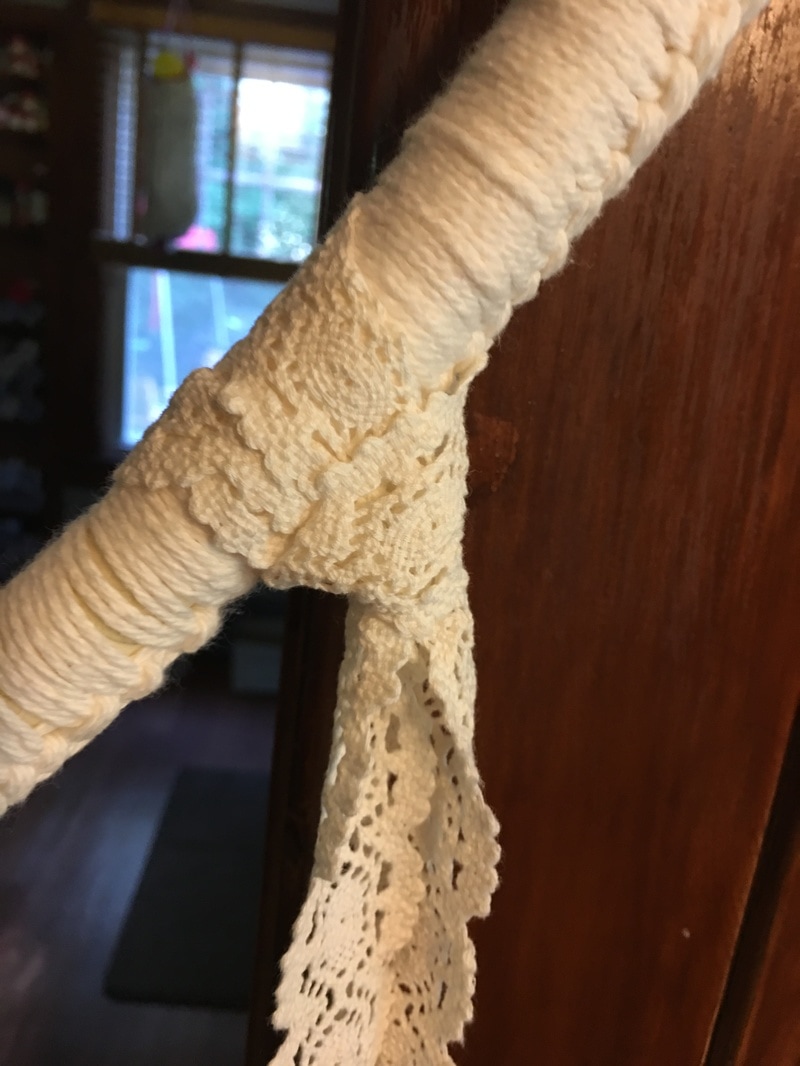
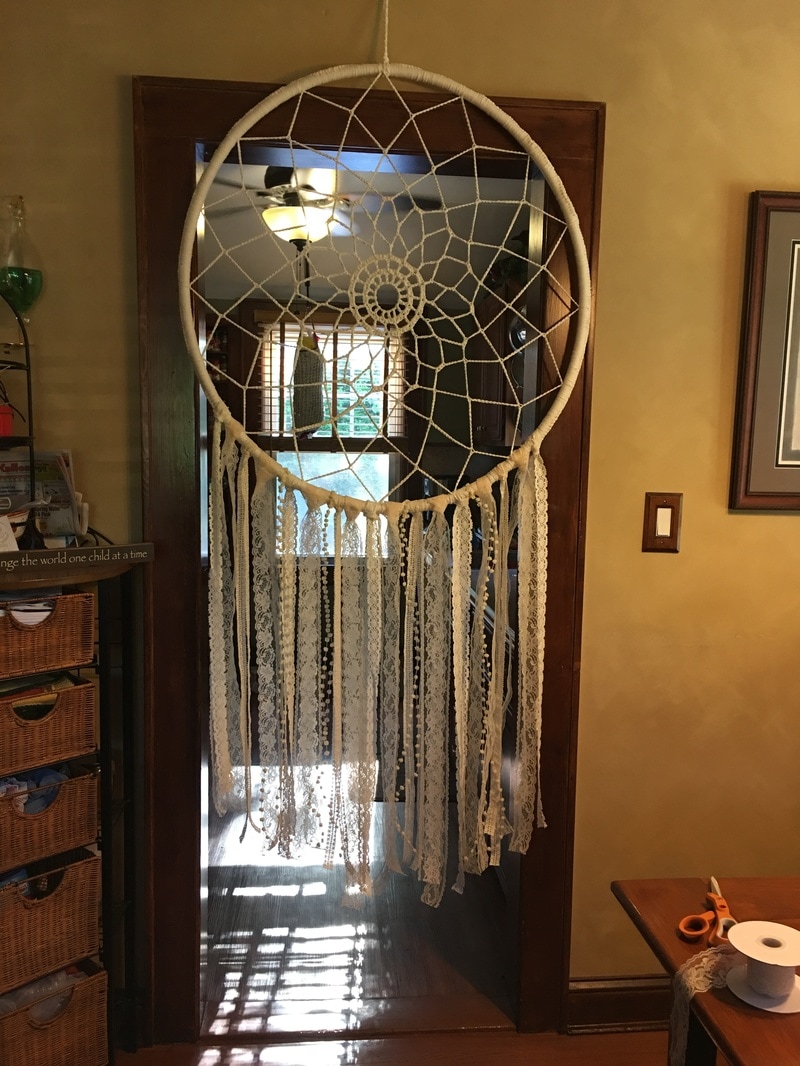
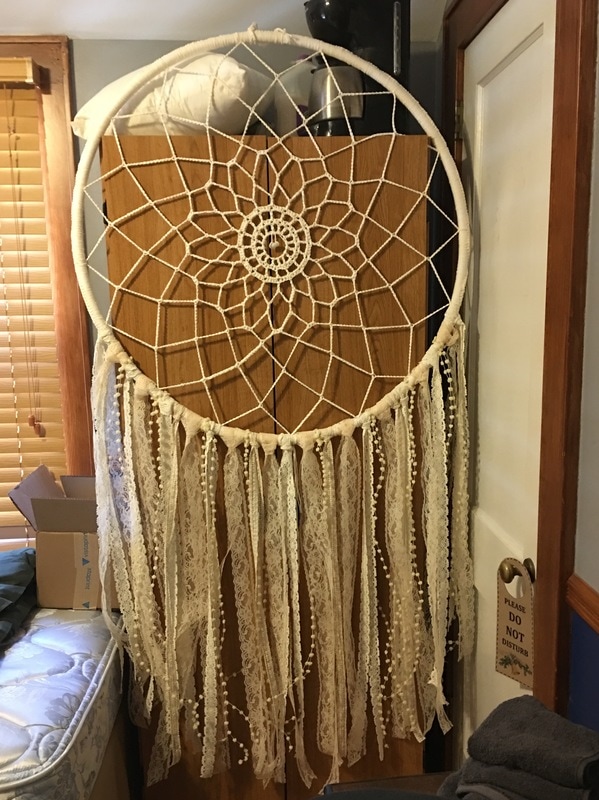
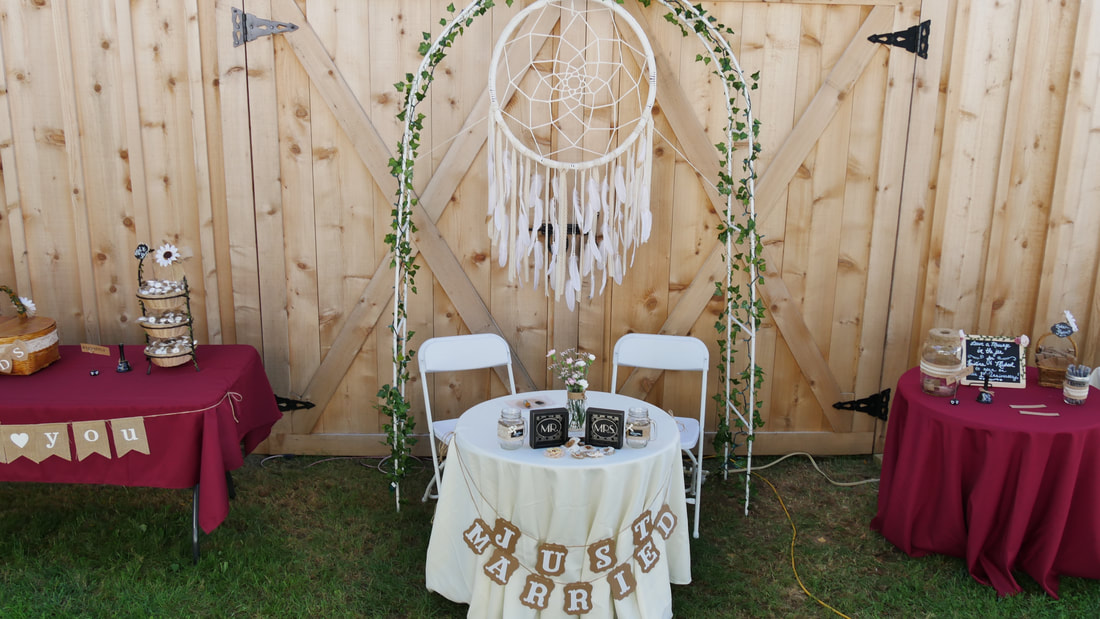
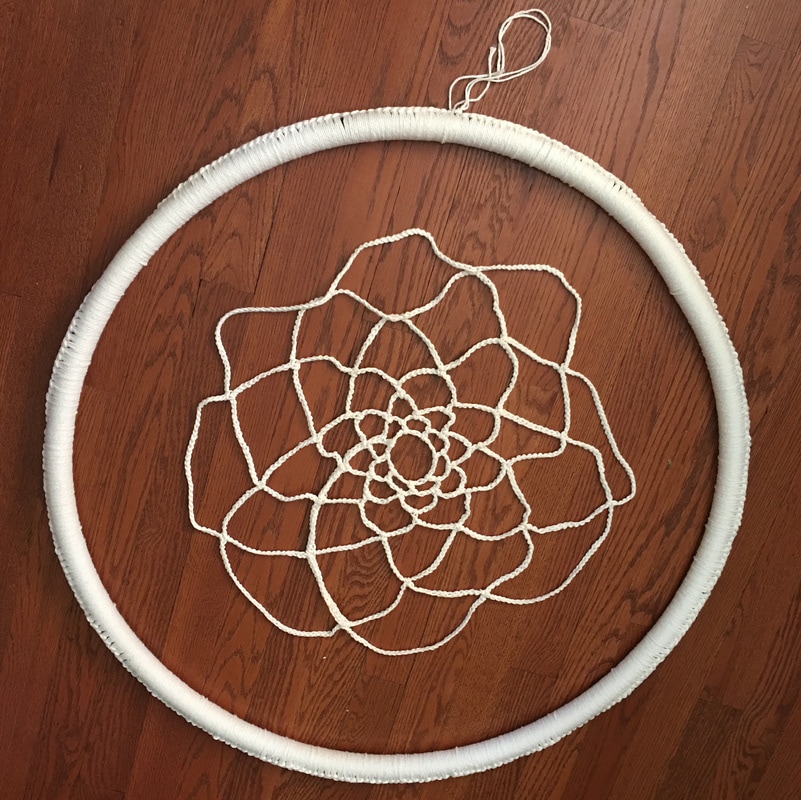
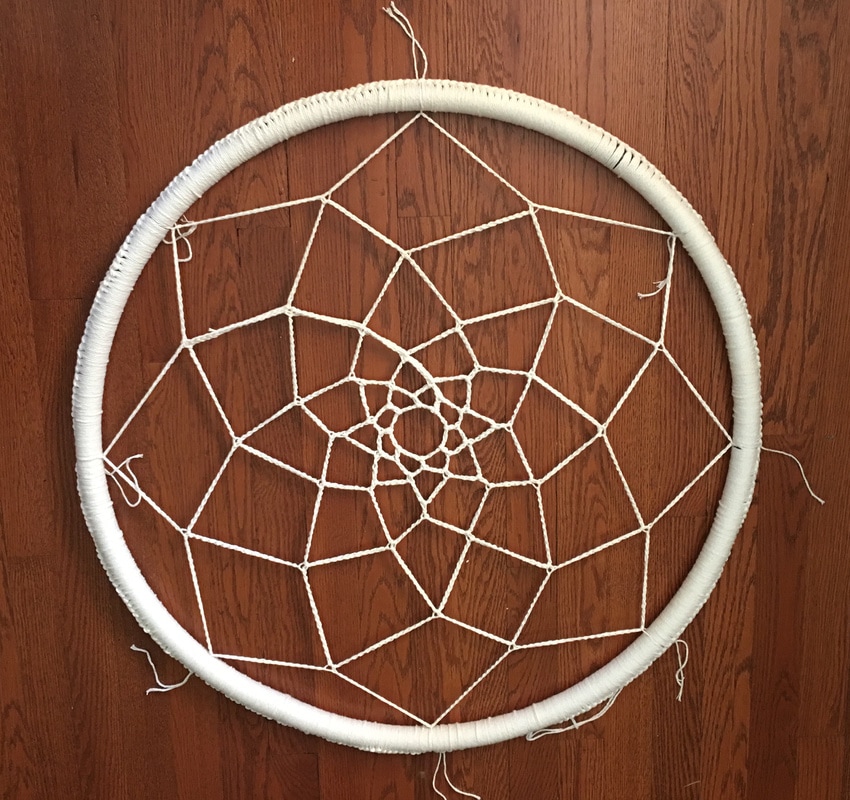
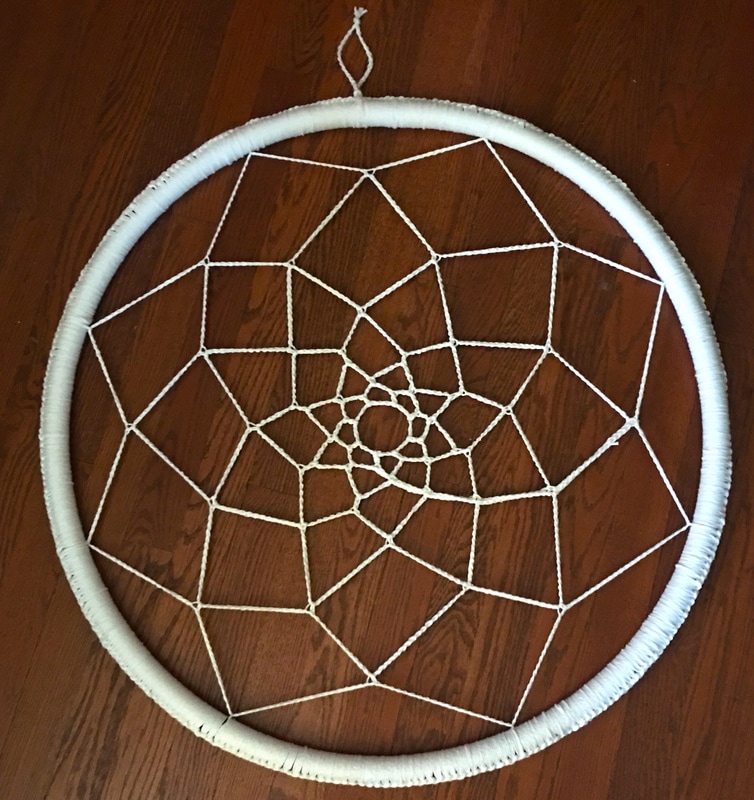
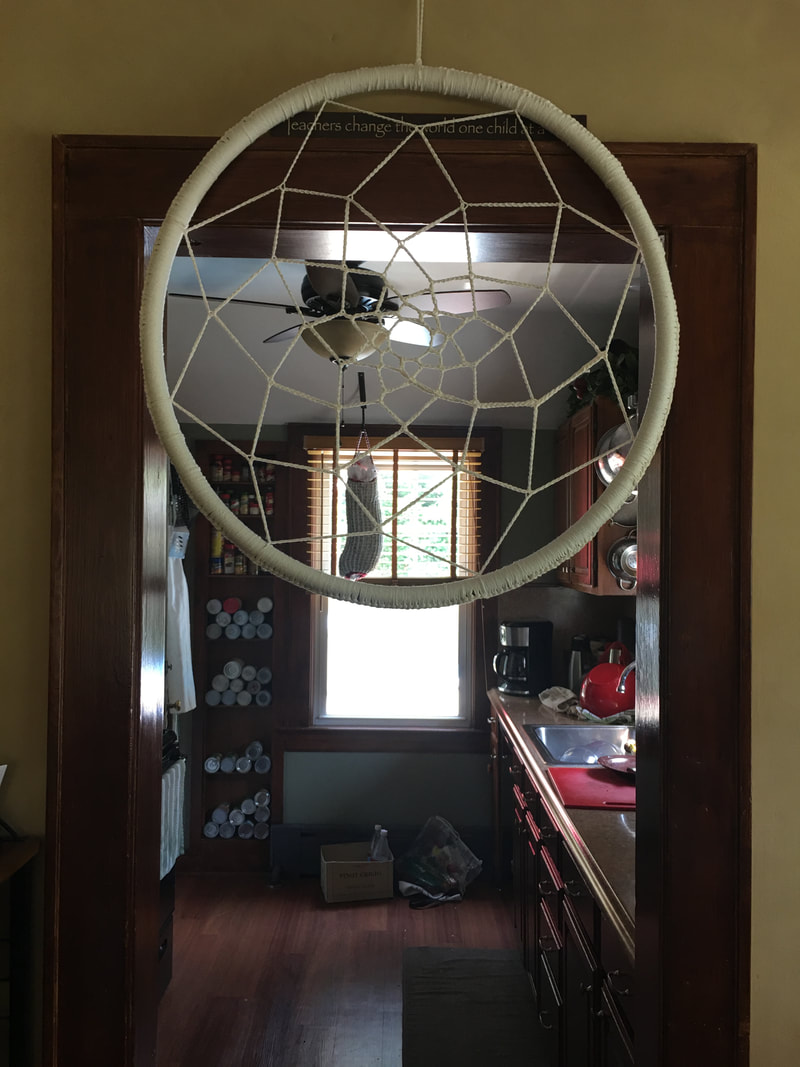
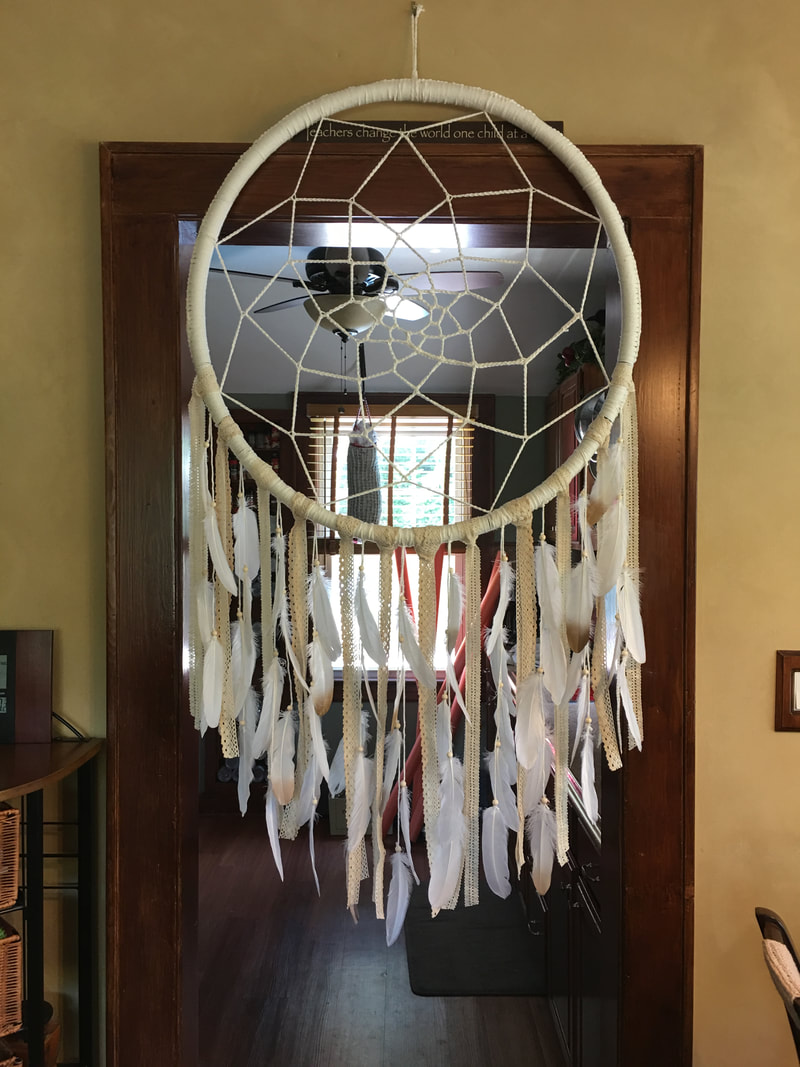
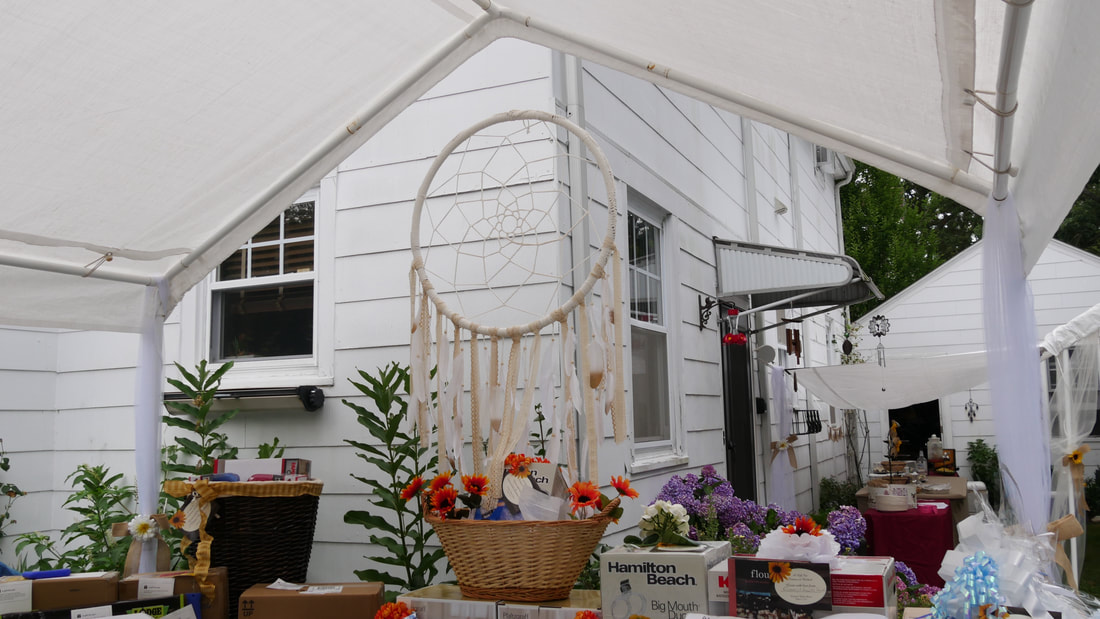
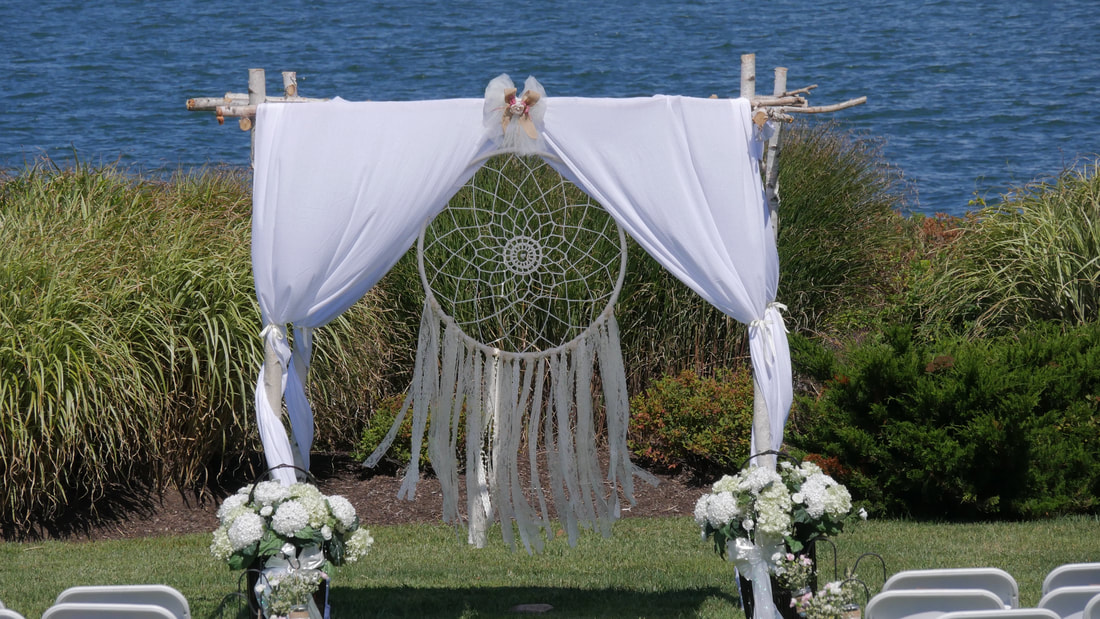
 My daughter is getting married and we are so excited to welcome her fiancé into our family. They have plans to get married down by the beach and hopefully the weather will be beautiful that day because my daughters father-in-law to be is making a birch arbor for them to be married under with this giant wedding dream catcher hanging at the back of it behind them. This is why the dream catcher had to be big. Really big. When all was said and done this beauty measured in at 3 feet wide and 5 feet tall! Wow! But of course none of that mattered to me as long as my little girl is happy. I made another simpler, and smaller, model that uses feathers to be hung behind their seats at the reception. Read more about DIY Giant Dreamcatcher with Feathers! Supplies Needed:
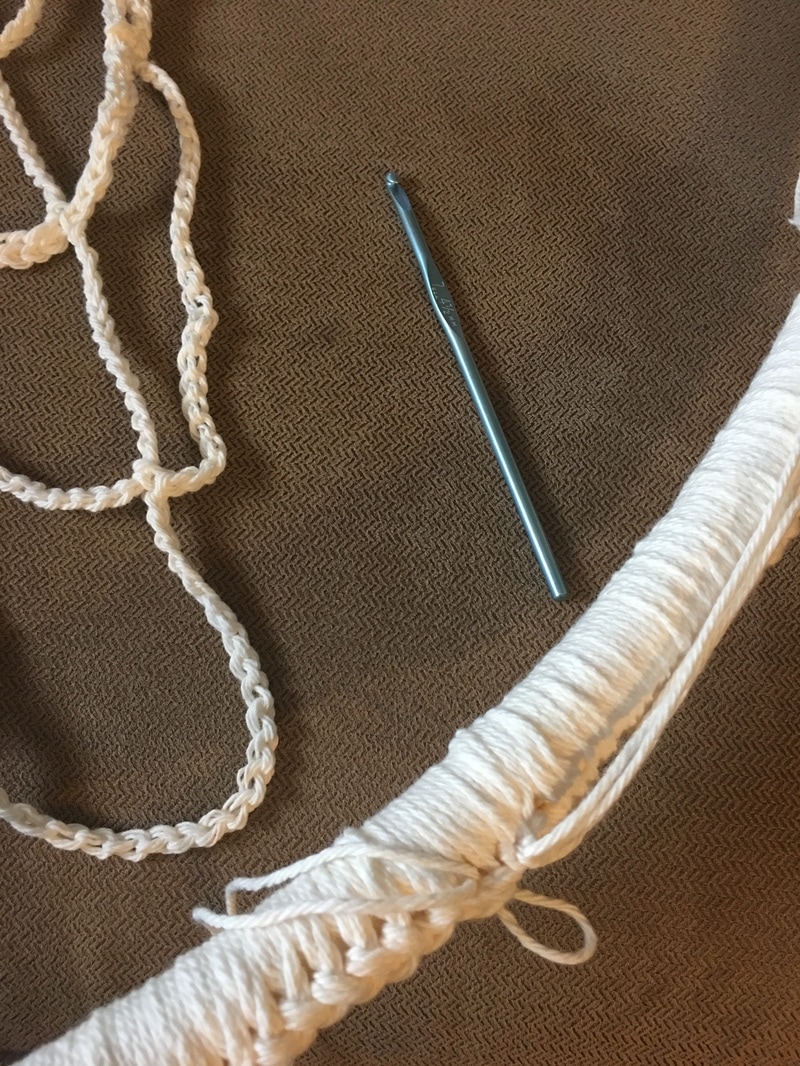
Video "How-To" (crochet directions and more pictures below):
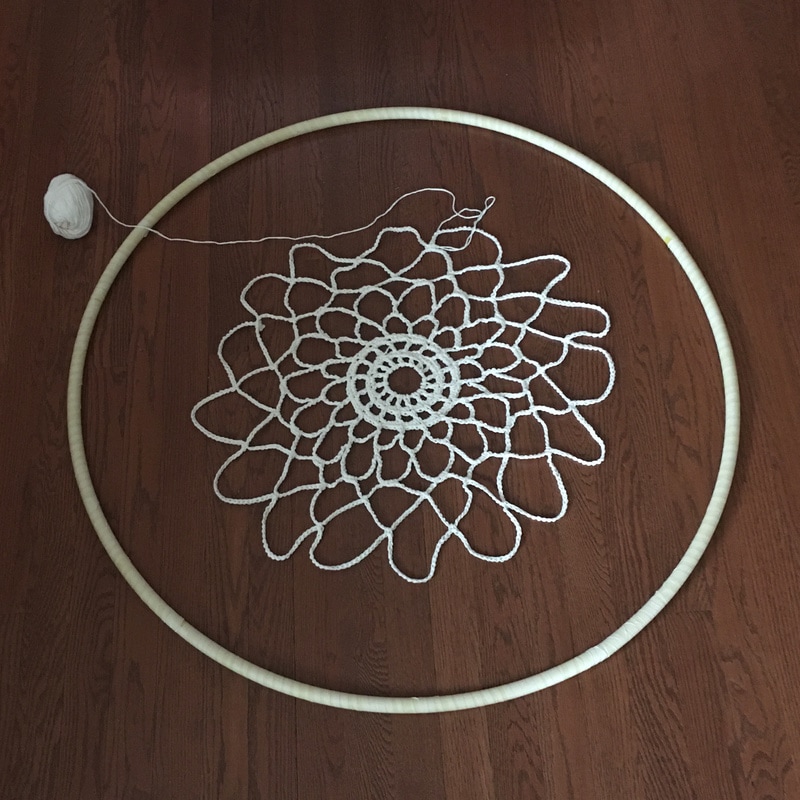
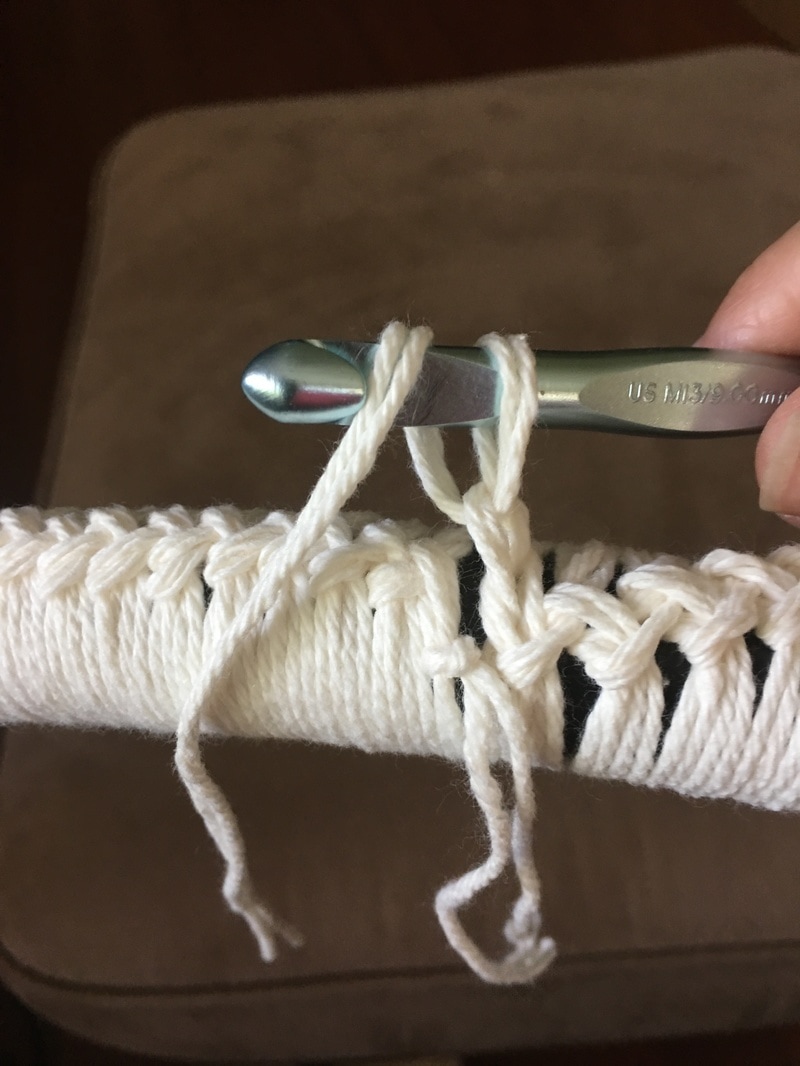
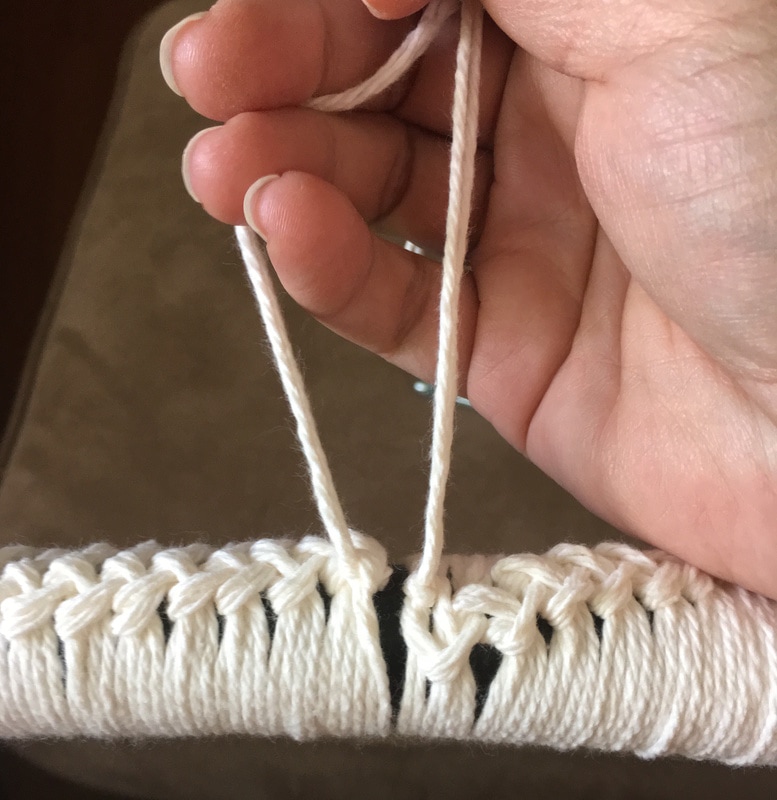
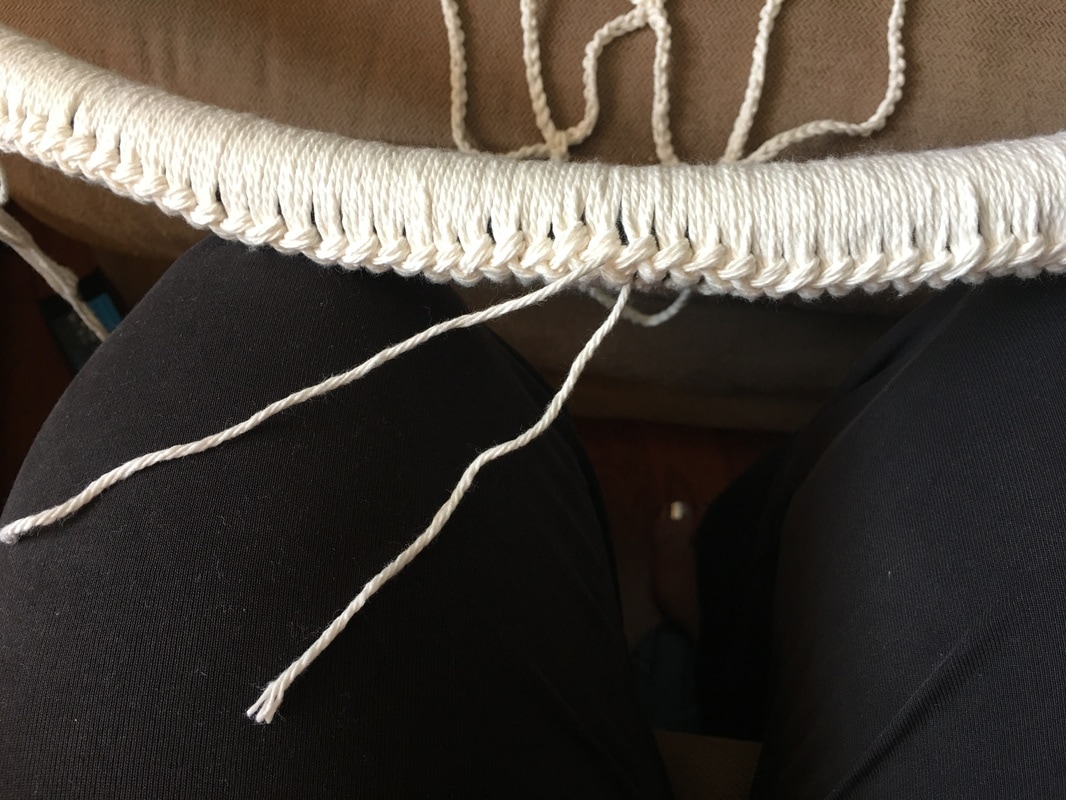
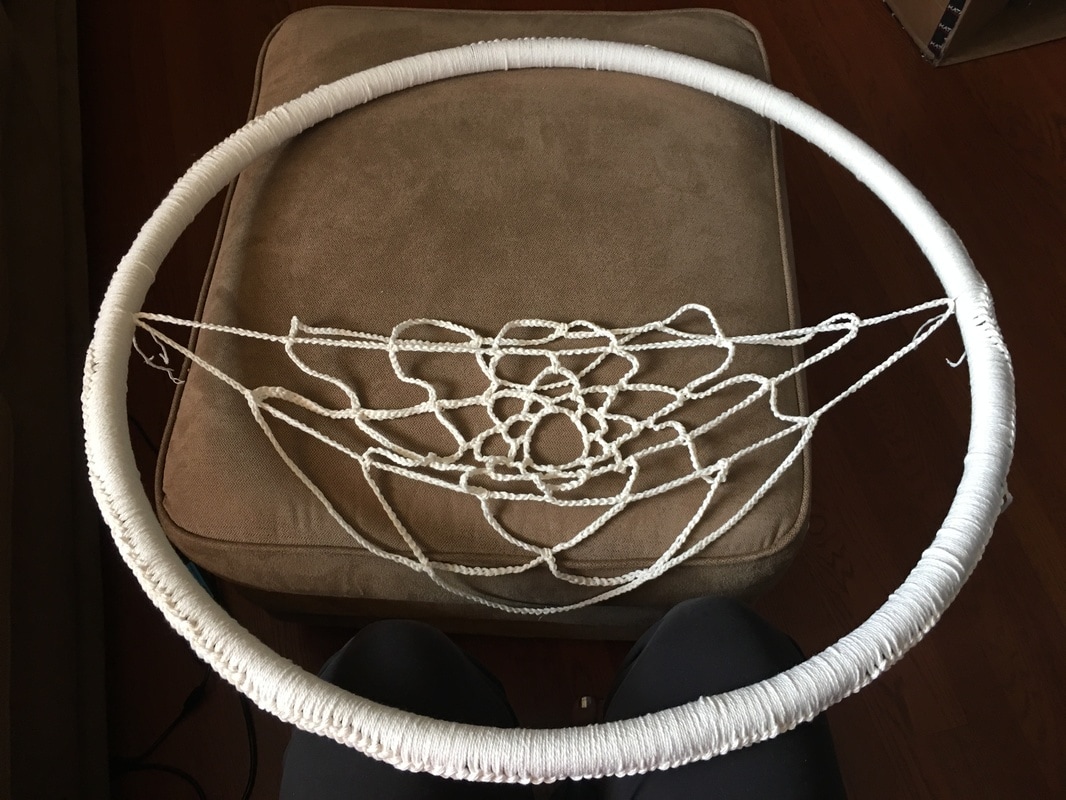
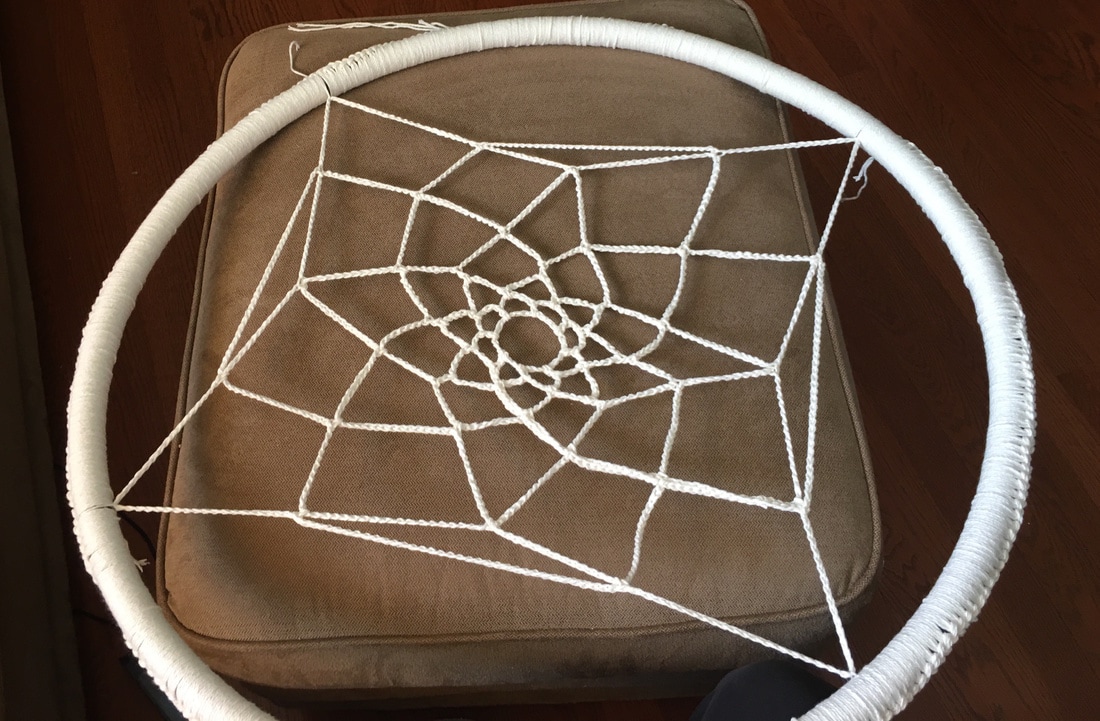
Hoop Crochet Center Directions: I really don't have directions per-say, I can just give you an idea of what I did. A couple of pointers ahead of time: - All stitches are into spaces, not into other stitches. This is important for spacing later on. - When you are finishing up your final loops to connect, make sure you have an even number. It helps to have an even number so you can connect the loops equally around the hoop later on. - For this reason, every row must be crocheted separately from every other row. You cannot do this pattern in the round. - To get to the center of each loop to start the next round I would slip stitch up the side of the first hoop in the level. When all is said and done you can't even see these extra stitches. The directions for this are in row 6 below.
 Thanks for visiting! Check out our other crochet patterns and ideas on our website or on our Pinterest boards and our DIY Shower & Weddings! Have a wonderful day:-) Sincerely,
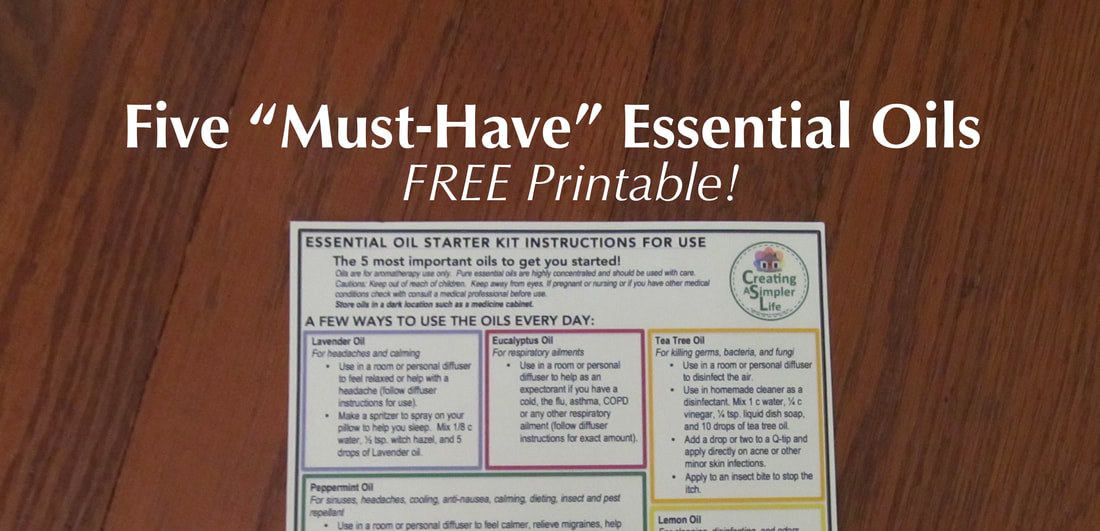
I believe in using natural ingredients in my daily life and that is why I strive to use essential oils whenever possible. However, I don't have a lot of different kinds of oils (Of course this is because I like to keep things as simple as possible!). So I have a basic go-to assortment of what I call my Five 'Must-Have' Essential Oils because they cover just about everything I need to use them for on a daily basis. So whether you use essential oils already, are new to them, or if you're considering getting started, then these are the five oils I personally need on a daily basis!
Feel free to download and print our FREE instruction card about the Five "Must-Have" Essential Oils and their uses! It can be found below the video:-) 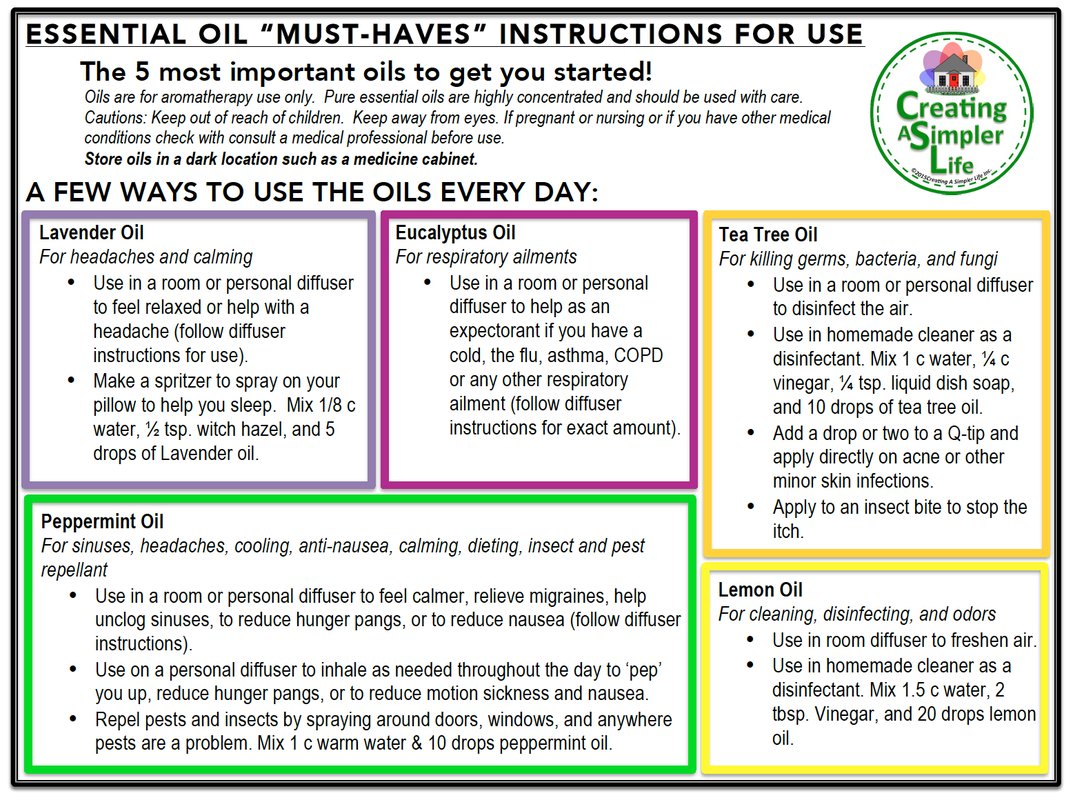
Thank you for visiting!
Check out our Essential Oil Pinterest Board for more uses and ideas! Sincerely,
This post is dedicated to two special people: my daughter since I am making it for her wedding day and my friend Patty who recently said "I want to make one for my kids room." I will be posting another giant dreamcatcher soon, however the difference is that the center is crocheted a little different and there are no feathers so the bottom part is much simpler to make!
Second Giant Dreamcatcher DIY How To coming soon! See...no feathers so the bottom is simpler! It was also made with a repurposed hula hoop!!
Supplies Needed:
Directions:
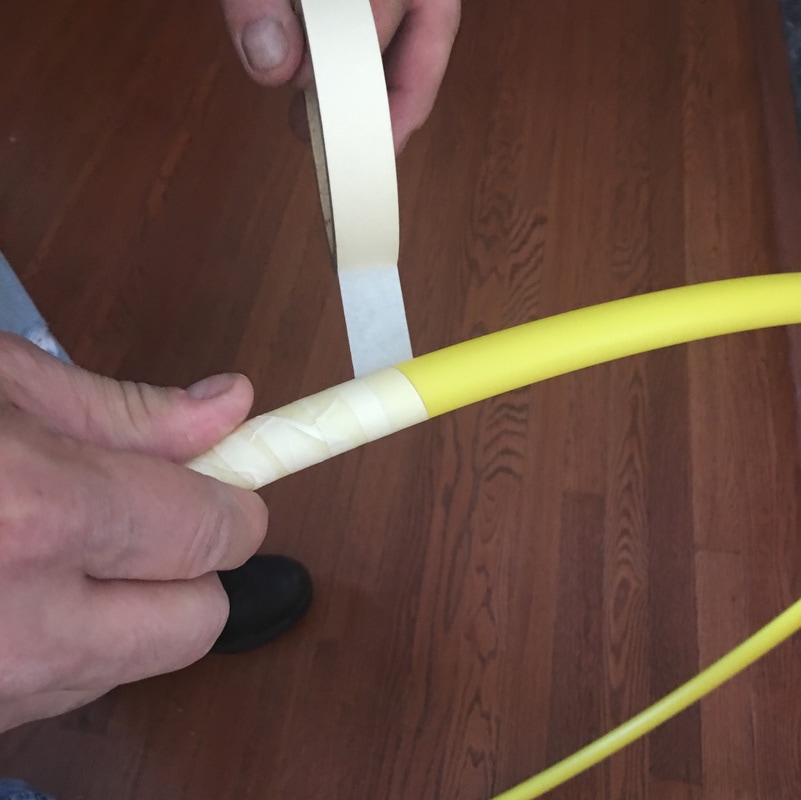
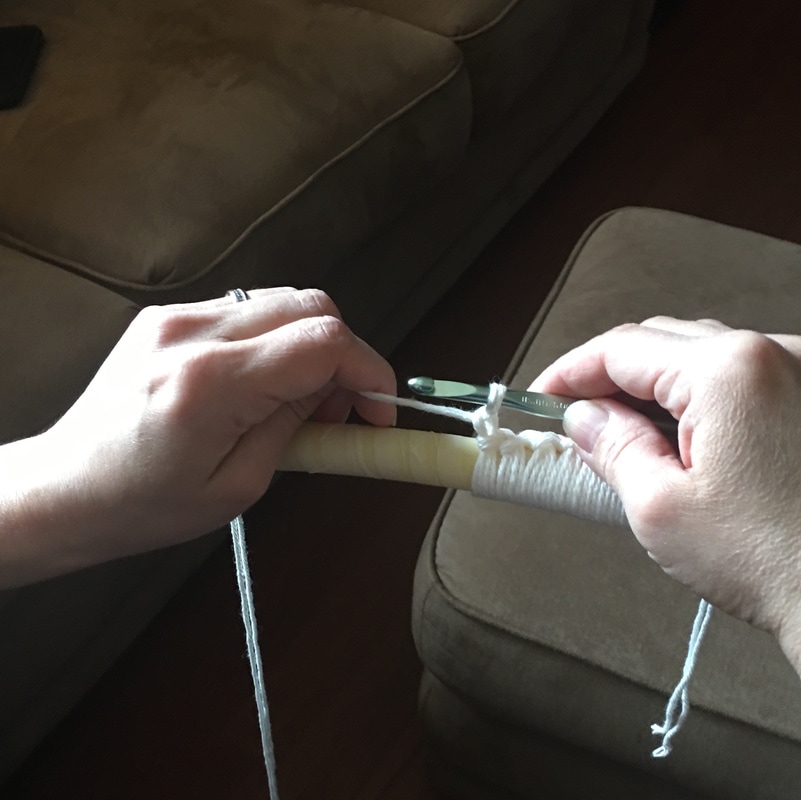
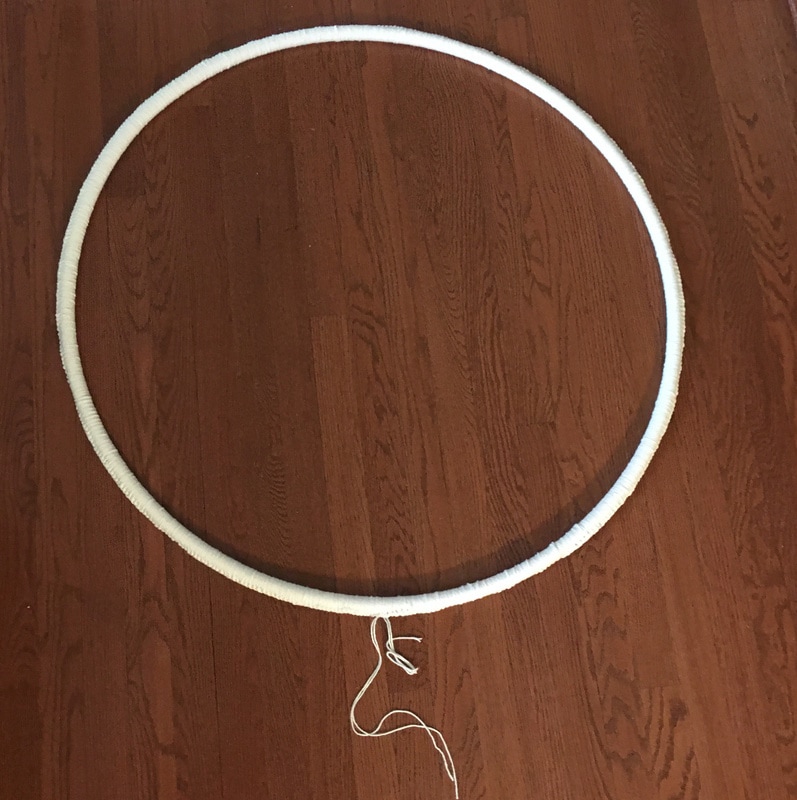
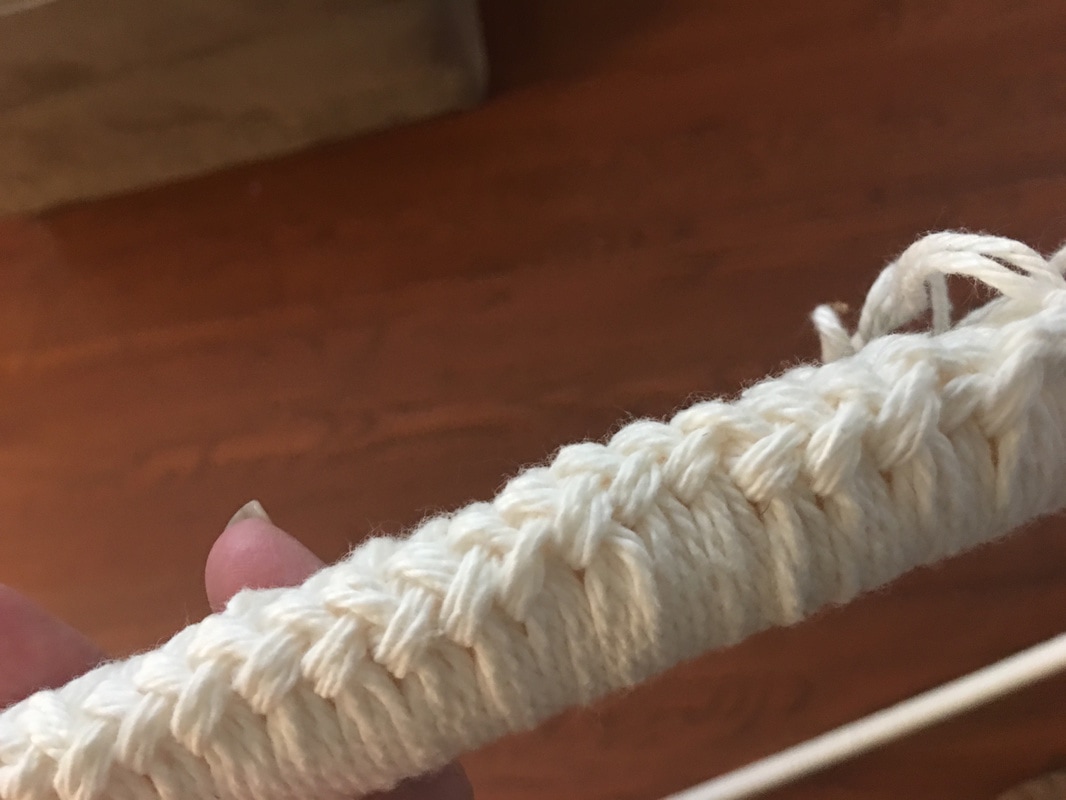
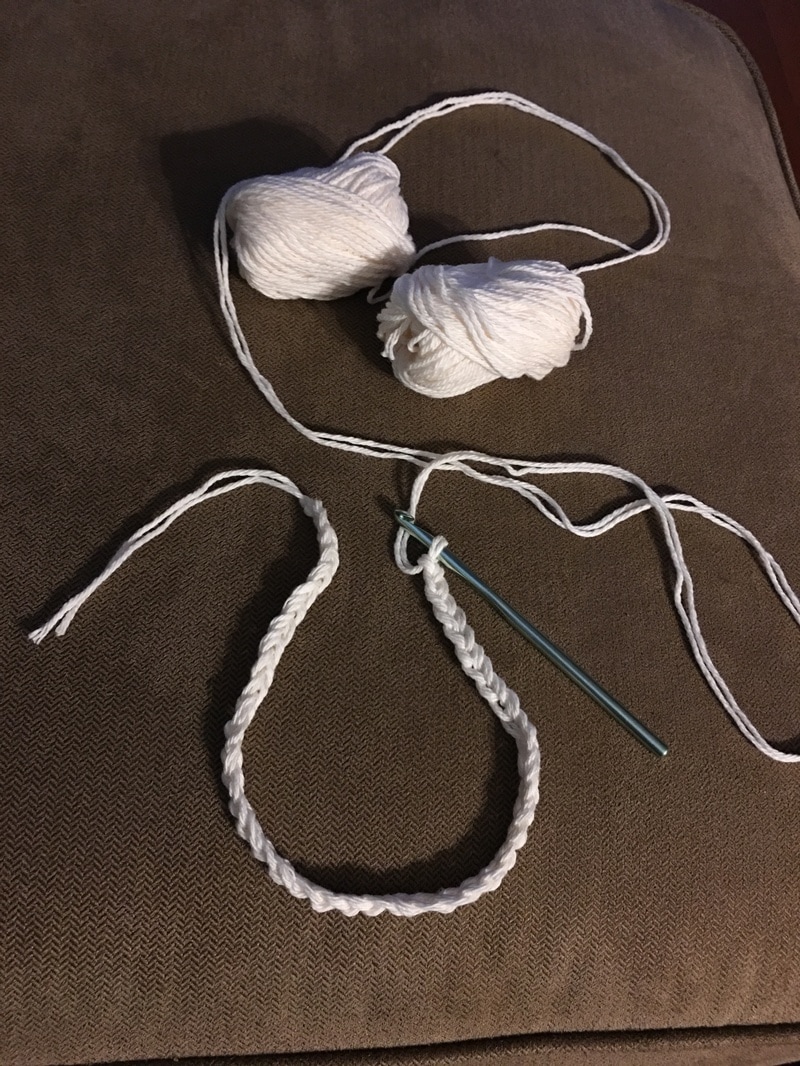
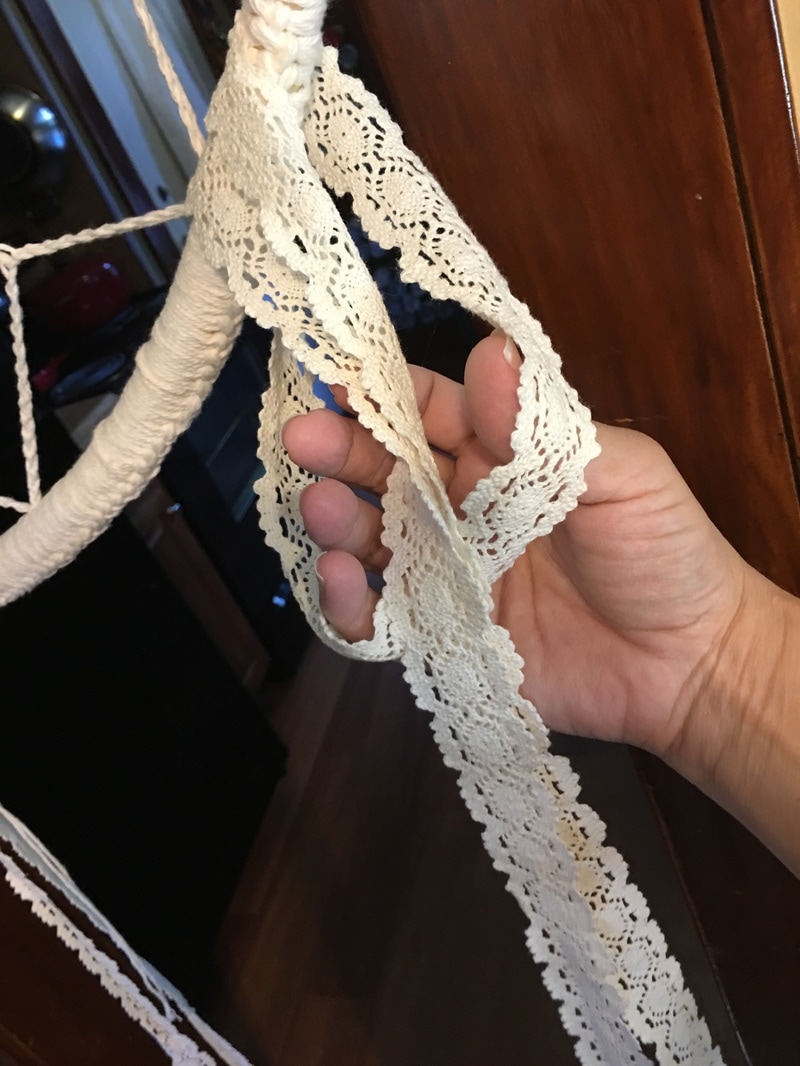
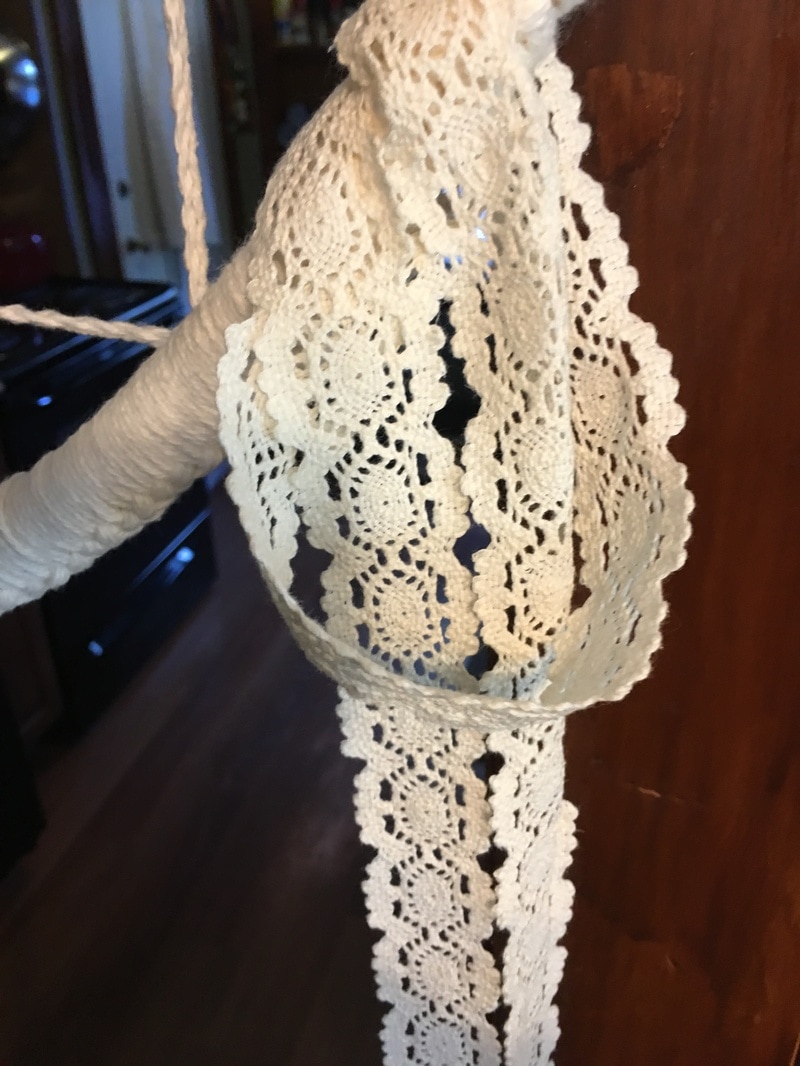
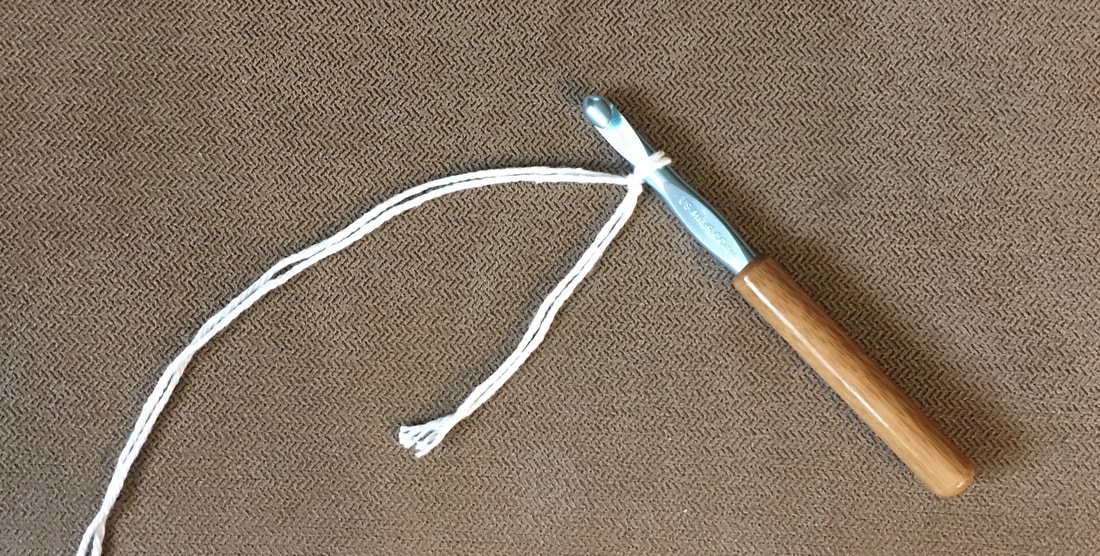
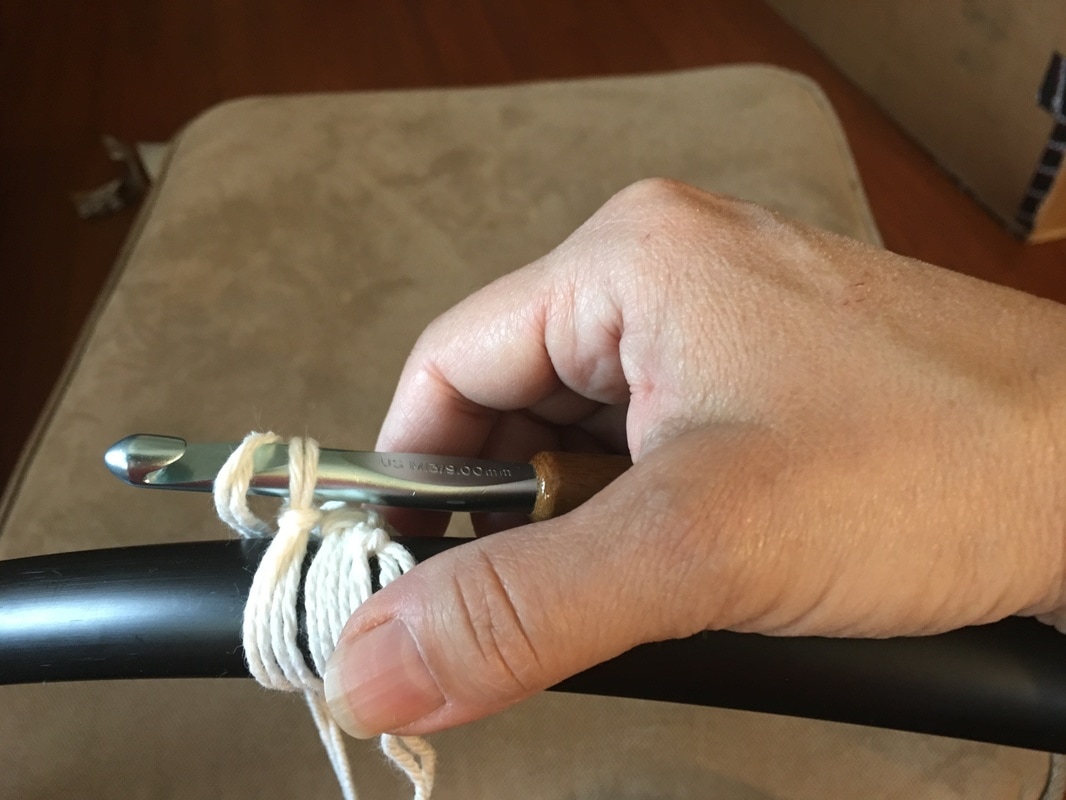
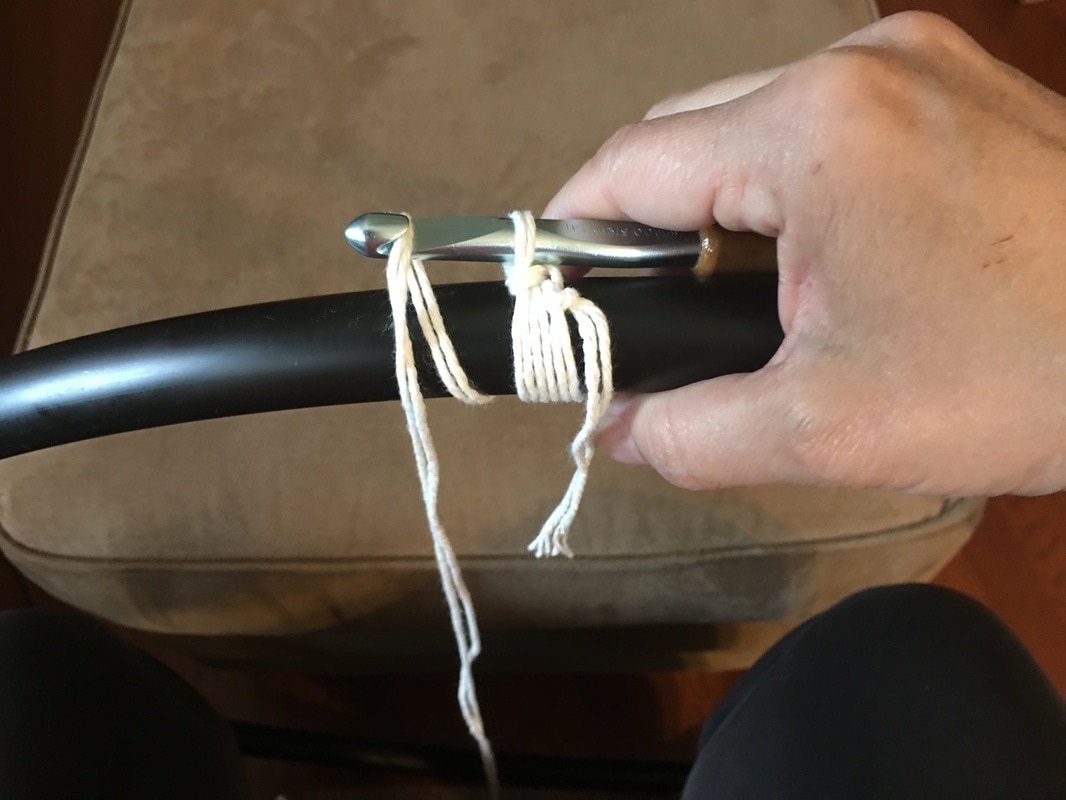
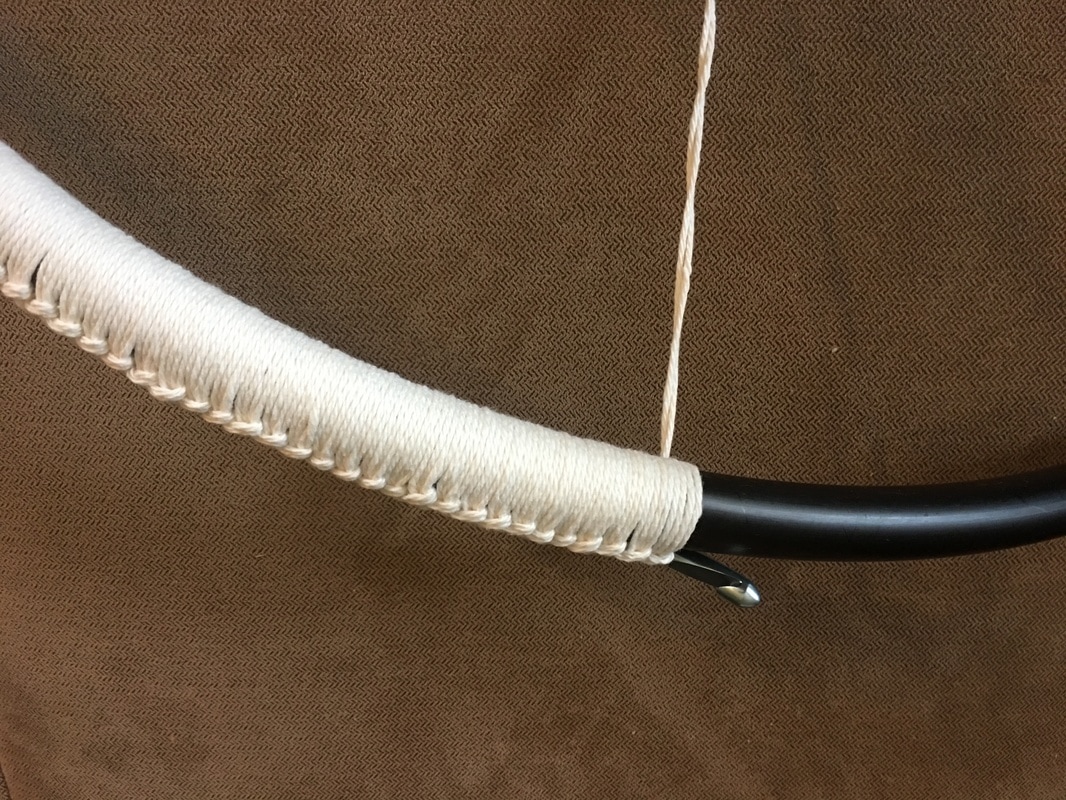
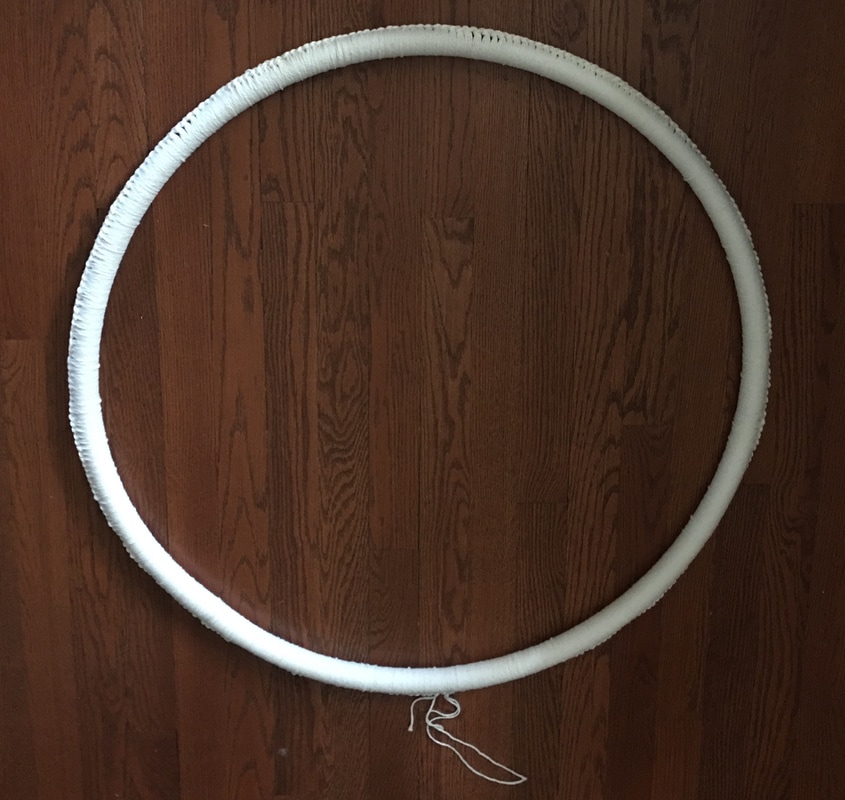
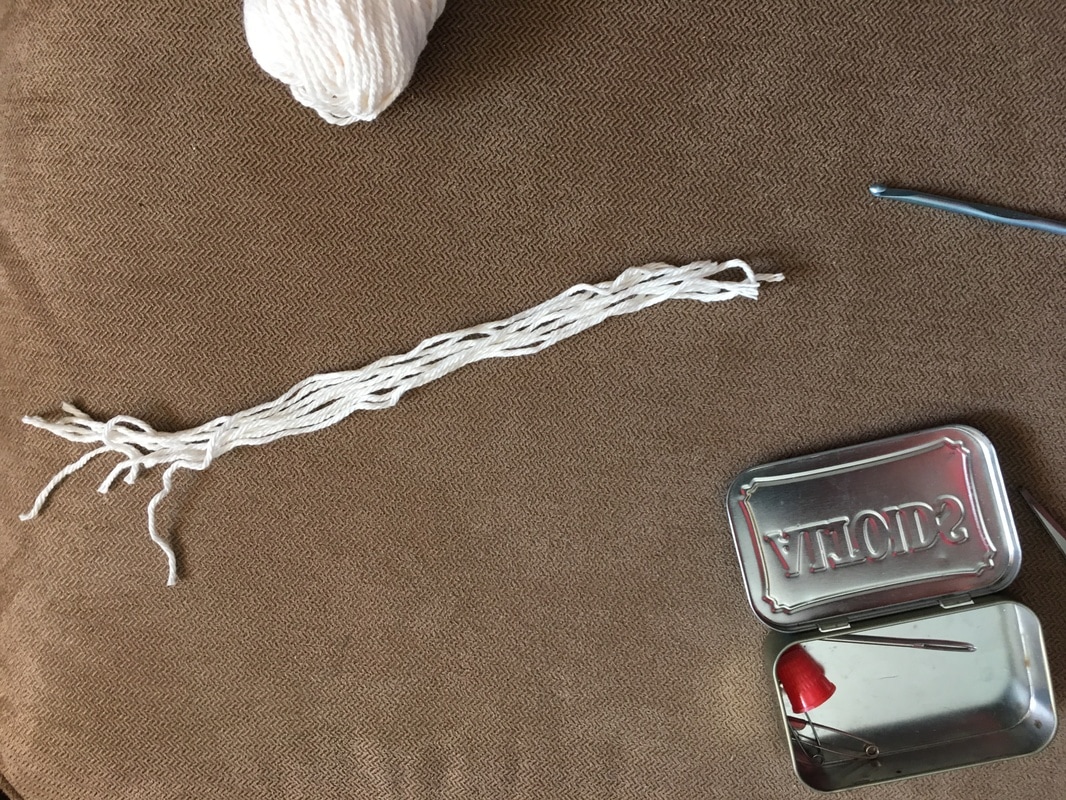
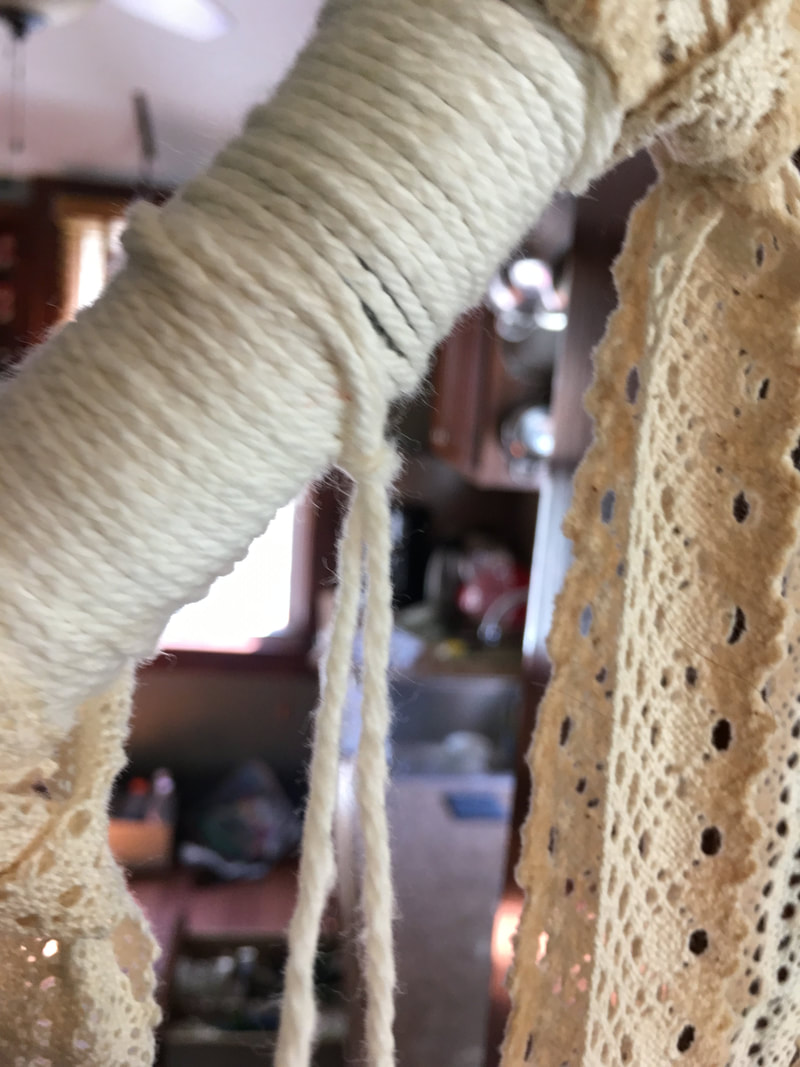
Make the hoop and wrap it with yarn.
Crochet the center:
HINT: always do an even number of loops.
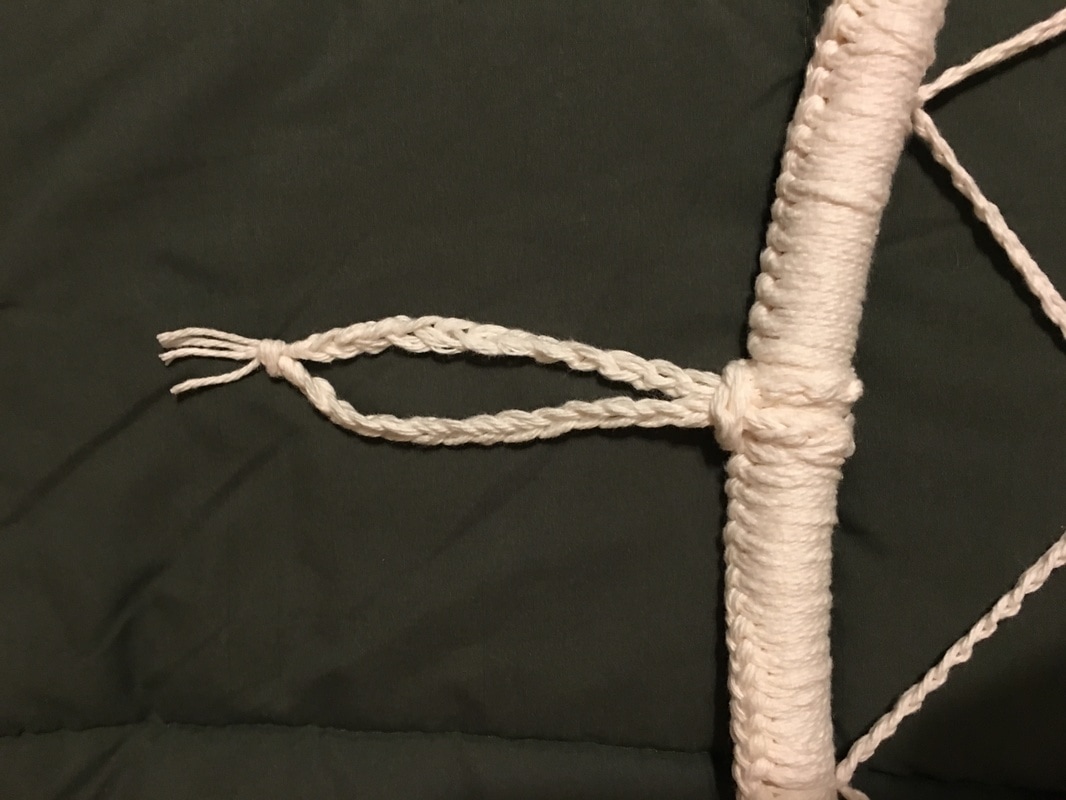
Add the fringe and feathers:
Supplies (some are affiliate links):
P.S. Sorry if some of the pictures are a little blurry - it is kinda hard to be working and snapping pictures at the same time!
Thanks for visiting :-)
Follow me for more fun projects and ideas and check out our other DIY Shower & Wedding Ideas! Sincerely,
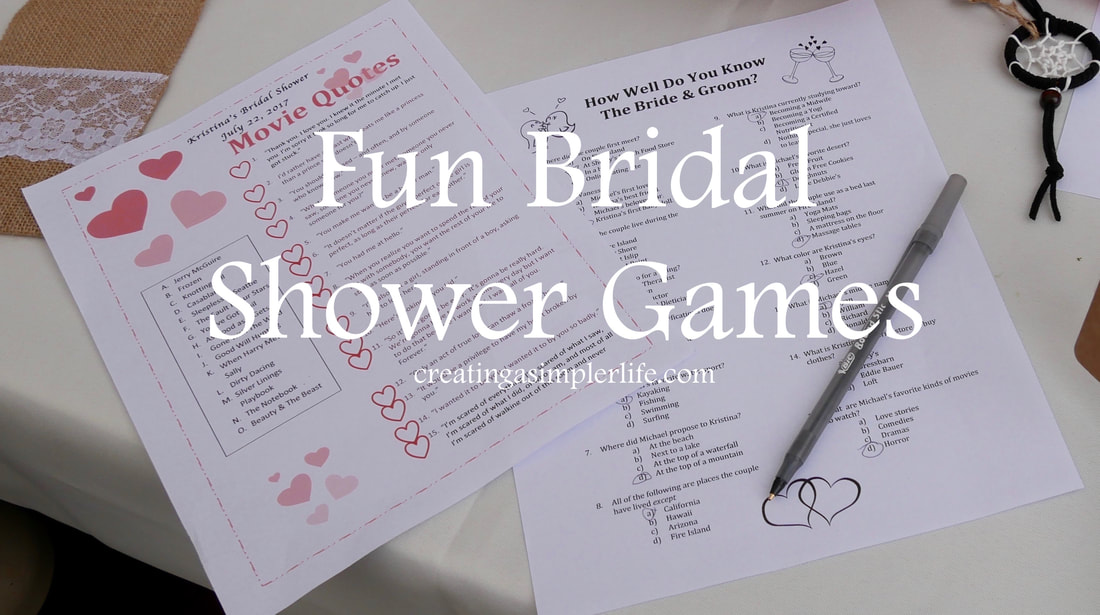
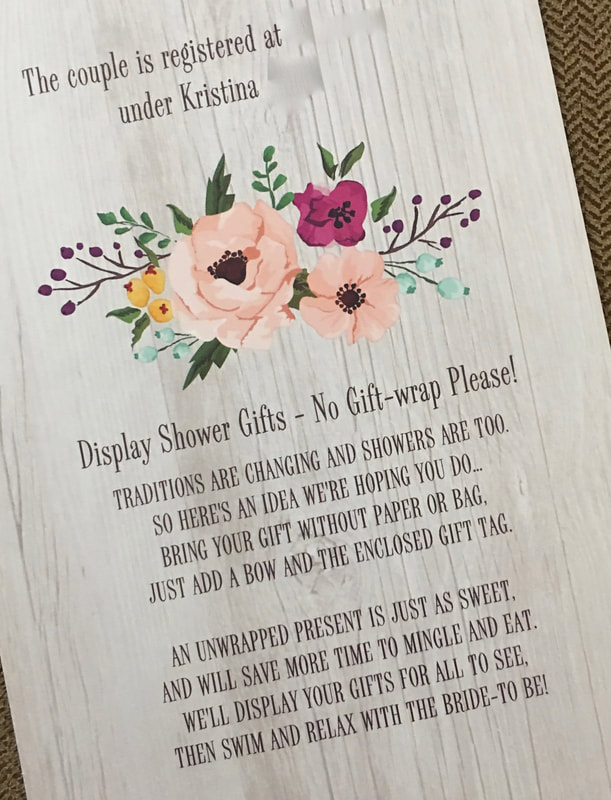
My daughter did not want to spend any of her time opening presents during her recent bridal shower. Instead she wanted all gifts to be unwrapped so they could be set up on tables and viewed by everyone. This created a slight problem because bridal shower games were basically created so that guests are not too bored during the "present opening." I loved the idea of my daughter not opening the presents because I personally find that part of showers excruciating, but I still wanted there to be some fun games to play. Actually I needed guests to play some games because I intended to do a small auction during the party (I got that brilliant and fun idea from my sisters recent bridal shower and I loved it!).
The auction I made had about 20 gifts to give away so we gave everyone about 20 tickets as soon as they arrived. We did this simply by putting the 20 tickets in the mason jar mugs everyone would get to drink from but you could easily just hand them out which is what they did at my sisters shower. This was not enough tickets though and that is why games were necessary! Winners could earn more tickets! More tickets = more chances to win a prize gift.
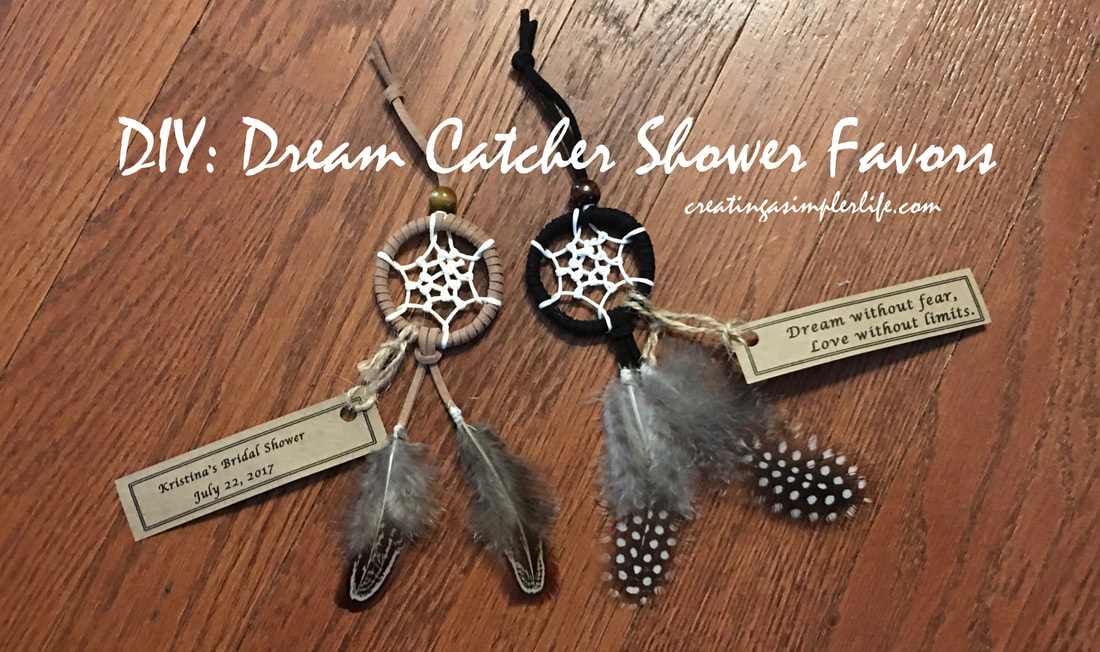
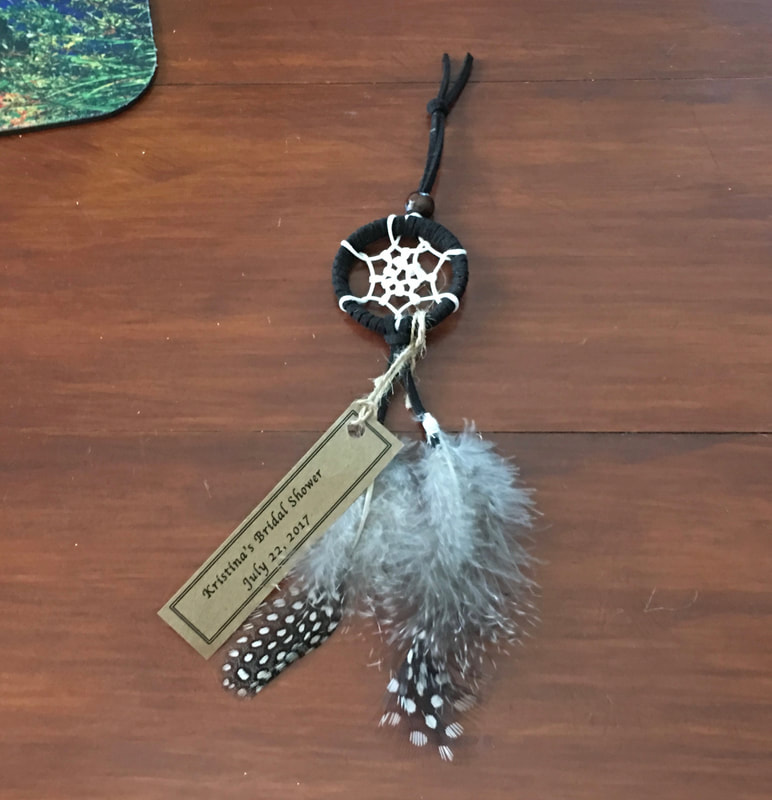
NOTE: nobody would go home empty handed even if they did not win one of the auction prizes because guests could keep their mason jar mug and they also received a mini dream catcher favor - See how the mini dream catcher favors are made here!) 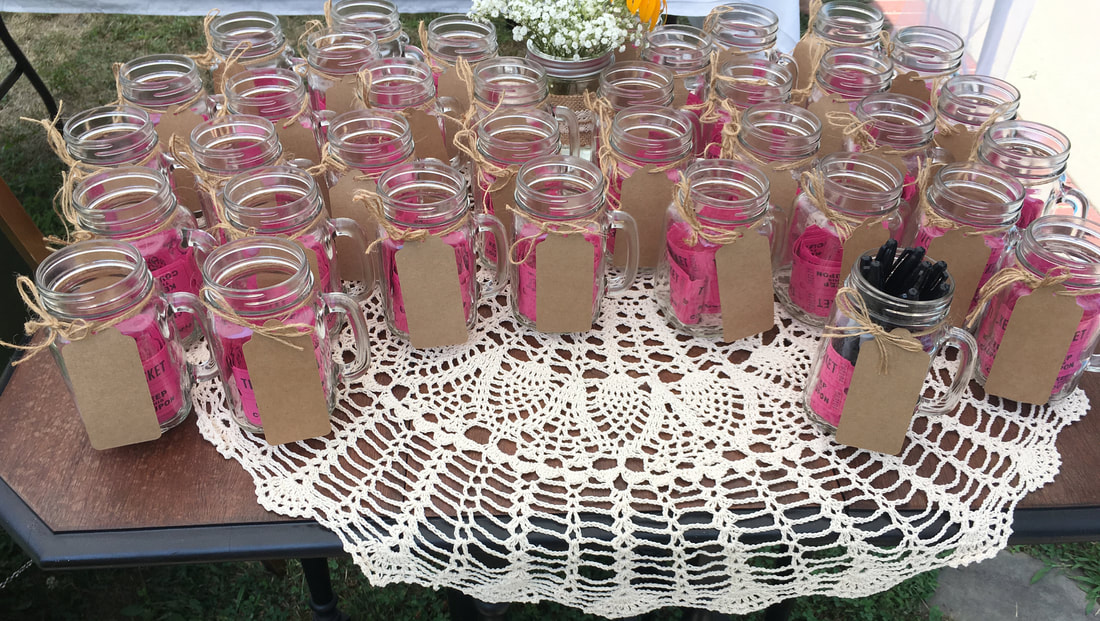
Mugs with about 20 tickets for the auction inside! Labels are for guests to write their names on.
Affiliate Links through Amazon.com:
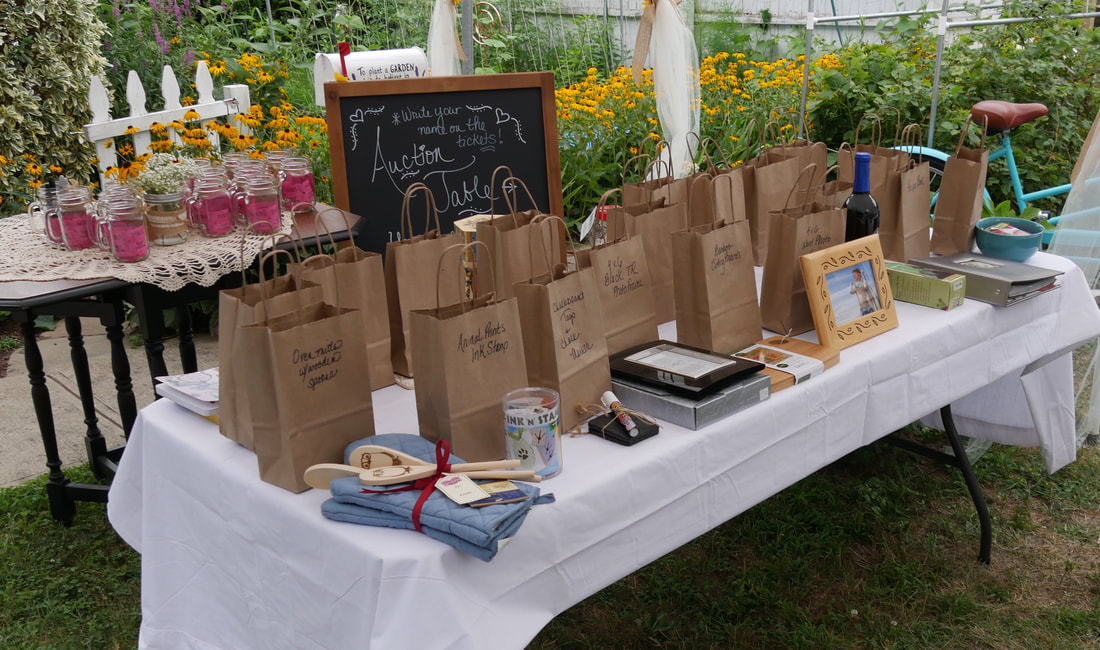
A picture of the auction table. The gift prizes are displayed for all to see and guests can put their tickets in the brown paper gift bags behind. We had the bride to be pull the tickets during desert time!
So basically since we needed to give out more tickets I came up with these two simple fun games (Thank you to Pinterest for the general ideas!).
The first game is a matching game of famous 'love quotes' from movies. There is a free MS Word document download below. We had a mix of ages at my daughters shower so the movies I used spread over a long period of time. Feel free to change them as you see fit and enjoy! 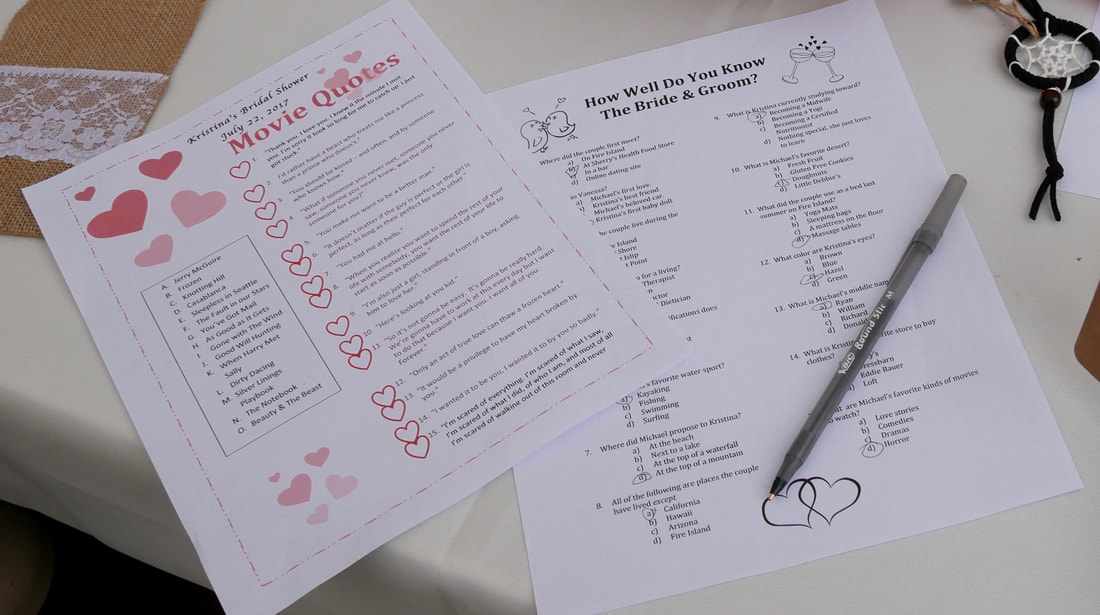
Here are the two games we played. They were distributed to guests to work on during lunch.
The second game is a multiple choice 'test' about the bride and grooms lives. again, there isI have a free download for you below (MS Word document) where you can cut and paste in your own questions and answers. Don't forget to put the brides name and the date of the shower at the top too!
Both games were given out during lunch time for the guests to collaboratively work on. Toward the end of the lunch I gave out the answers and guests graded their own answers. They were rewarded an extra ticket for every correct answer! It's all in fun so nobody checked for honesty or not, because well, who really cares? During desert the bride pulled a ticket for each prize gift and they were distributed to the winners to take home! So simple! Everyone had great things to say about the games and the way the shower was run. The bride to be had quality time to be with all the guests during the shower and I have had many people share with me how wonderful and relaxed everything was. In my eyes that spells S.U.C.C.E.S.S.!! But most importantly, my daughter was truly happy and enjoyed herself immensely. What more could a mother ask for?
Thanks for visiting!
Check out my other FREE downloads here, our DIY Shower & Wedding Ideas here, and follow me on social media for more great ideas :-) Sincerely,
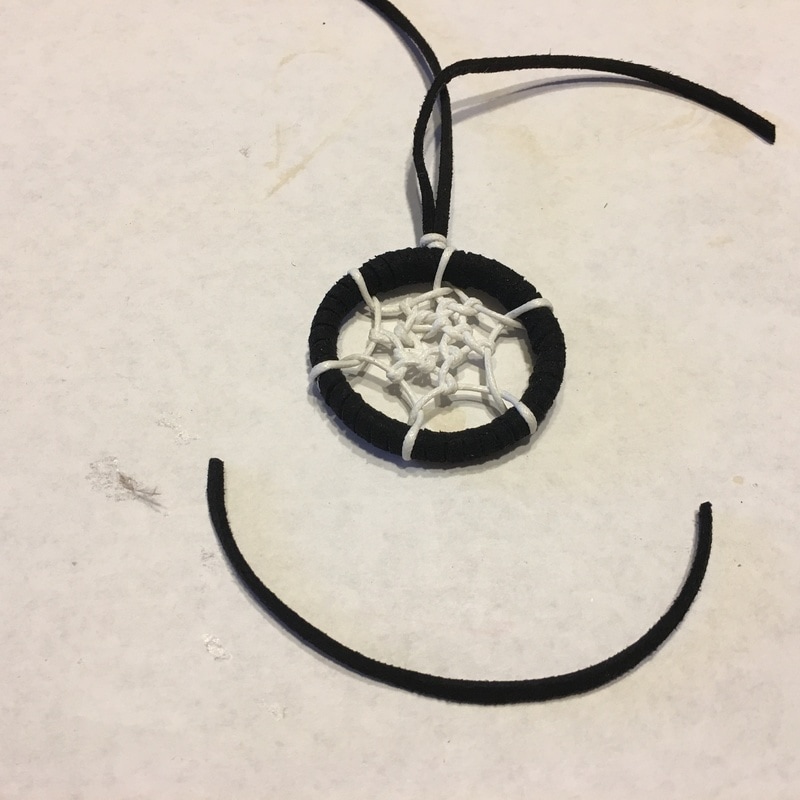
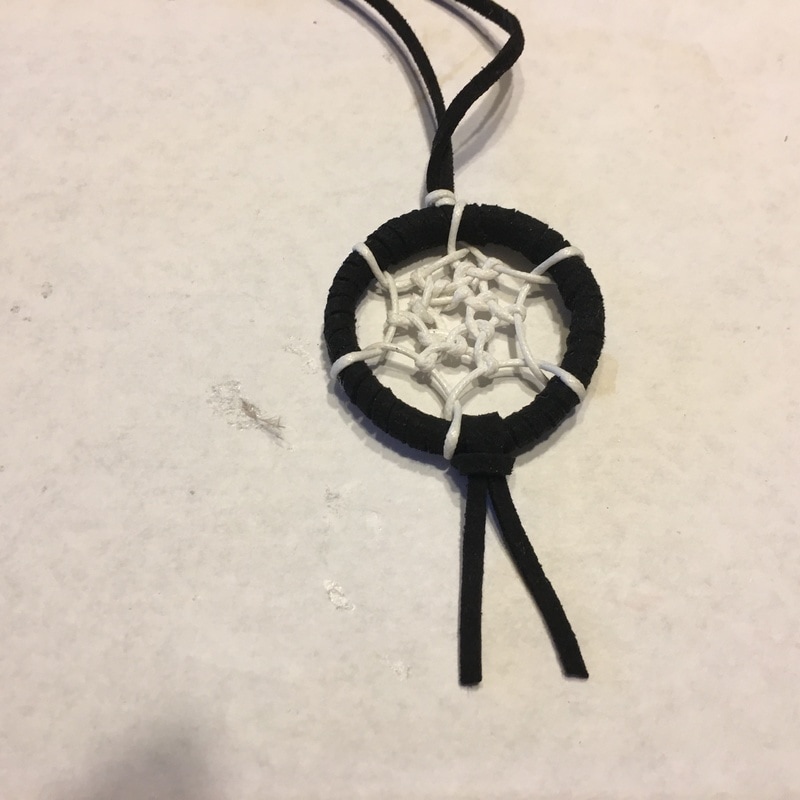
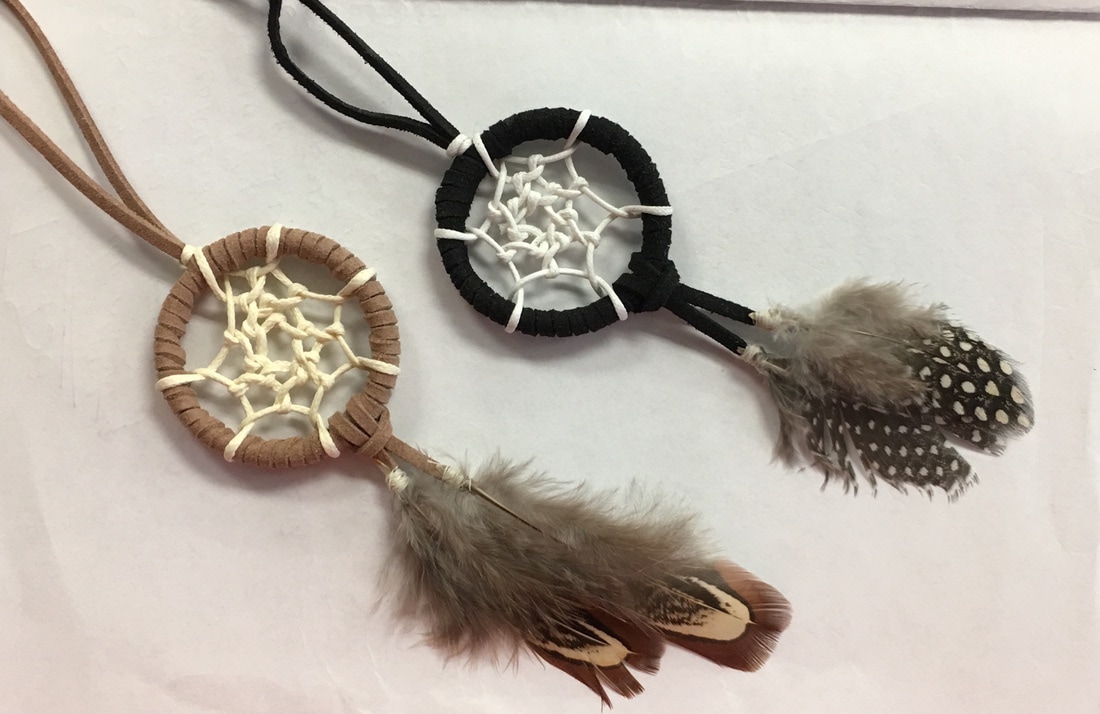
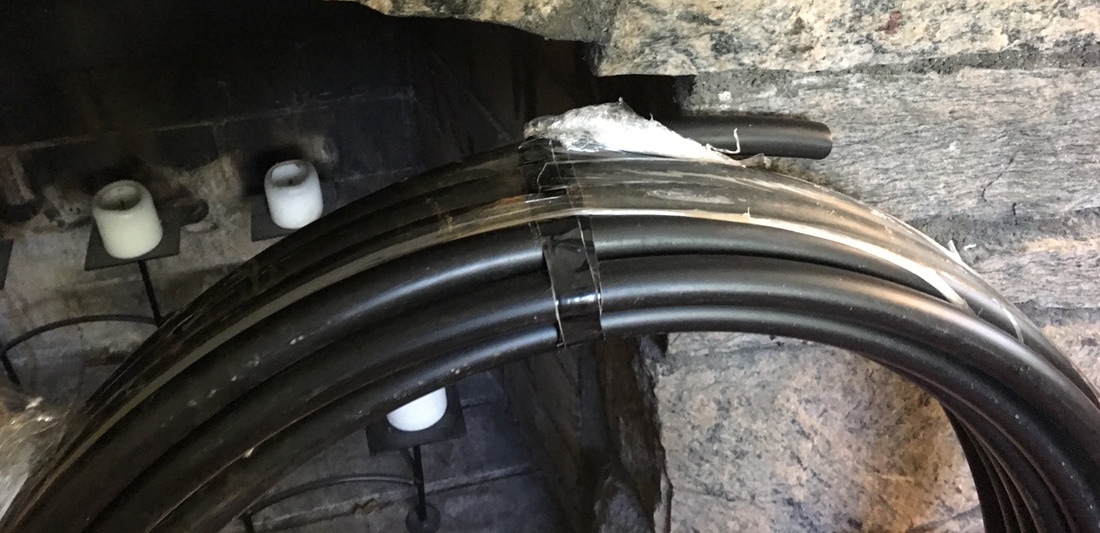
My new thing lately is making dream catchers. My daughter decided that she wanted a giant dream catcher for her wedding day and that was the beginning of my 'dream catcher' research! That led to the absolute first, and largest dream catcher I have made to date (post coming soon)! Since then I have made many more out of many different types of materials but my absolute favorite are all the dream catchers made out of what would normally be thrown out as garbage (or recycled depending upon where you live). I came up with this idea out of a need to make a lot of similar dream catchers as favors for my daughters bridal shower, and I think I need to pat myself on my back because, well, I absolutely love the way they came out! But you be the judge :-)
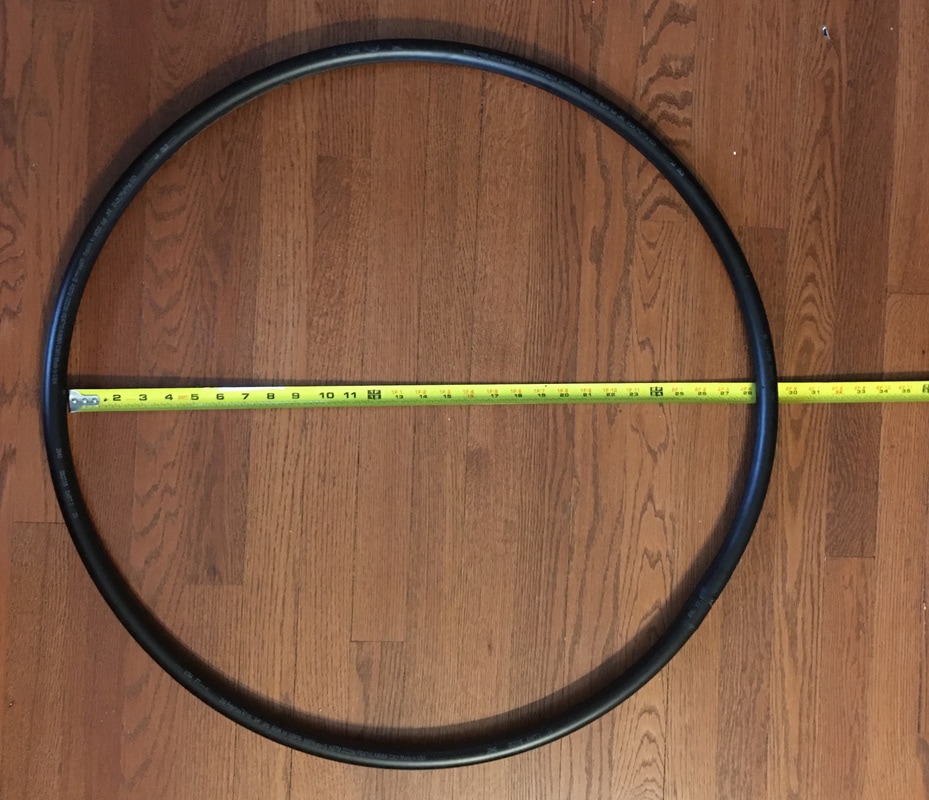
Completed Dimensions of Dream Catchers: Approximately 2" wide x 7" long (including loop to hang it) FREE PRINTABLE (and editable) LABELS BELOW! P.S. I know this is a lot of pictures so I am sorry ahead of time!
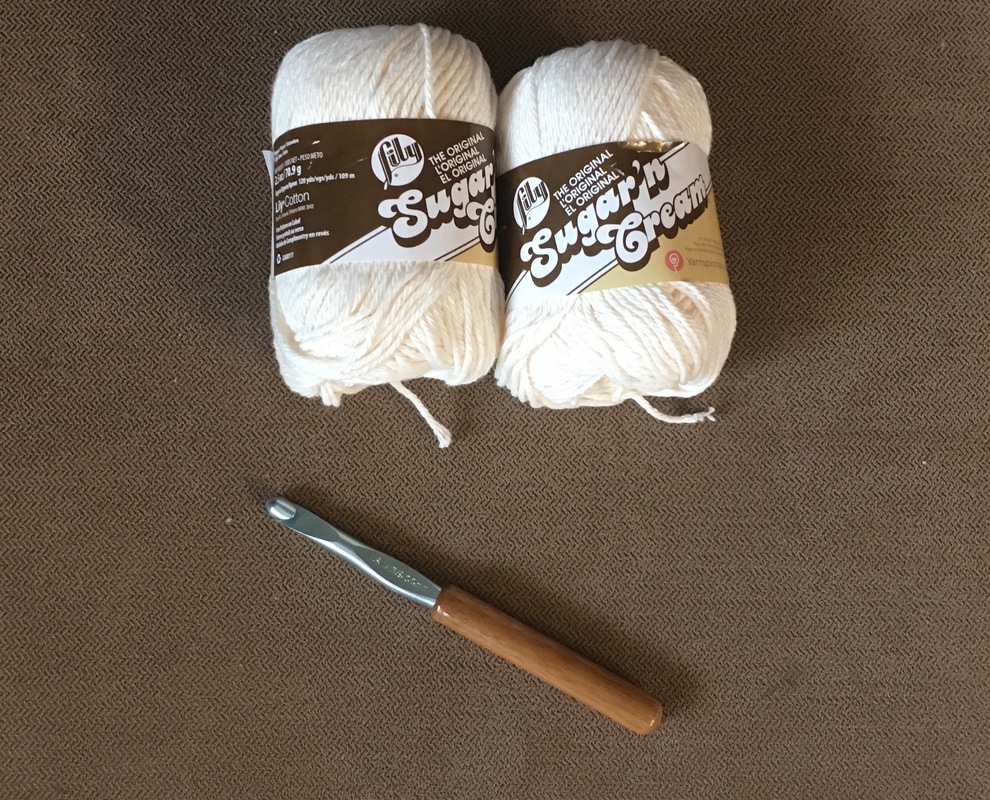
Supplies Needed:
(see pictures, links, and prices at very bottom of post for affiliate link supplies)
Video "How-TO" (pictorial directions below):
FREE PRINTABLE TAG LABELS:
The two sides are separate so you can choose to just do one side, for example, just the "Dream saying" side. They are also MS Word documents so that you can edit as needed as far as the date and the name for the bridal shower side. Definitely do a trial on white paper if you are printing both sides so that you can tweak the positioning as needed. These were my final prints so they should be good but you never know.
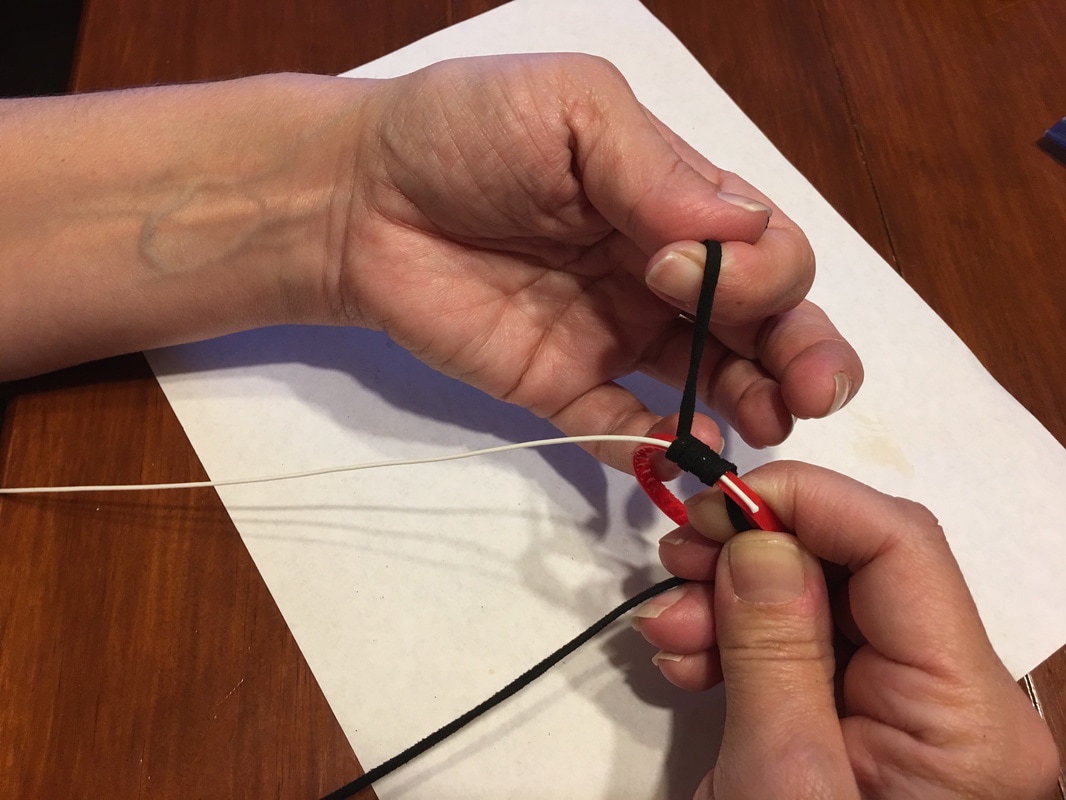
Pictorial Directions :
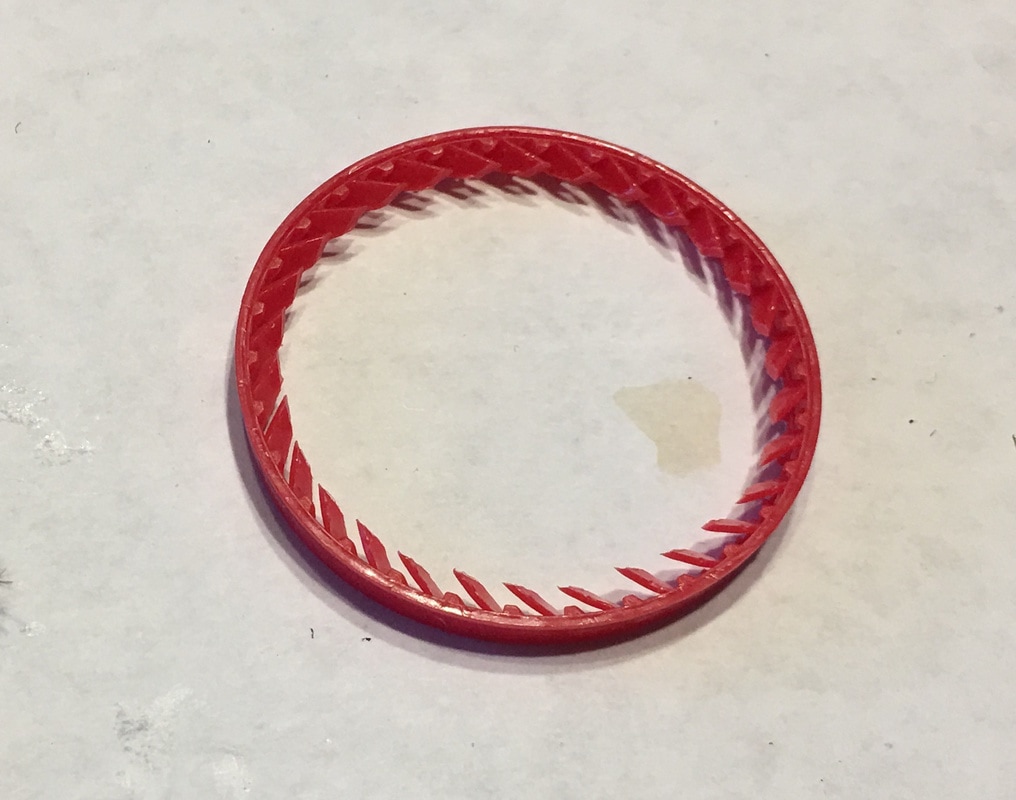
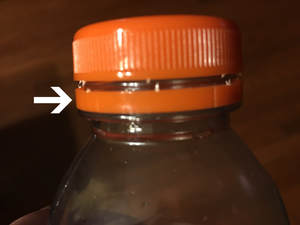
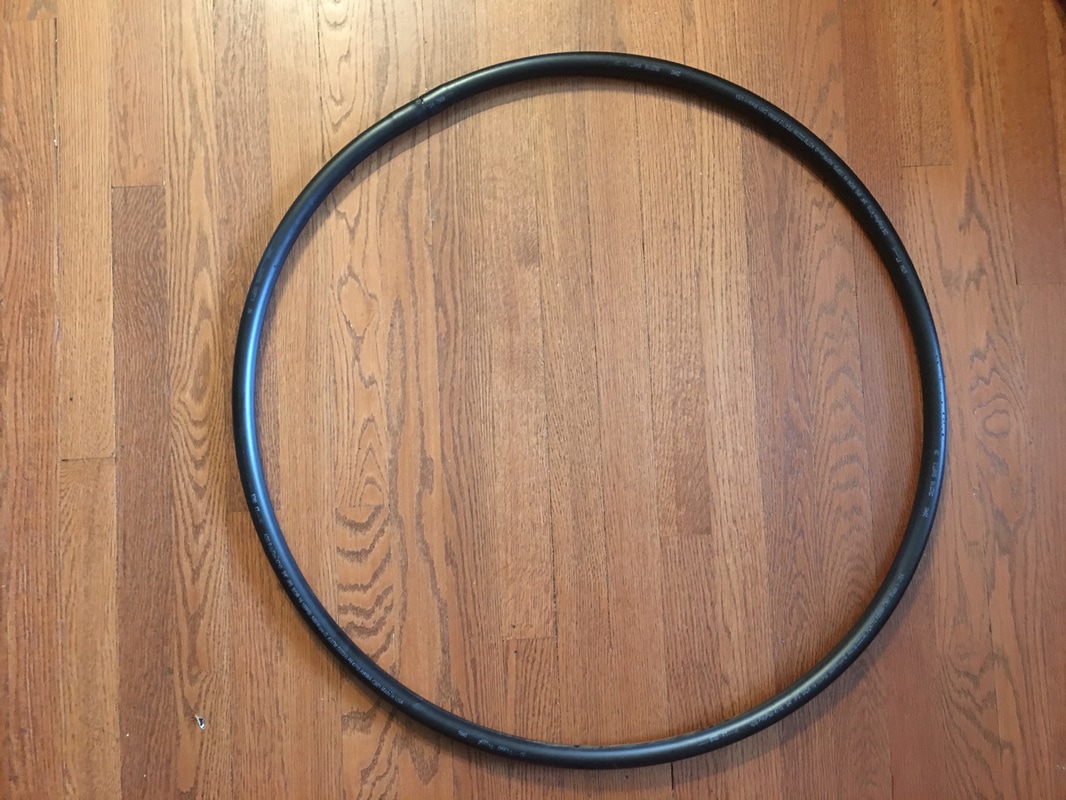
The plastic ring from a gatorade bottle! They also are on milk containers and many other plastic bottles!
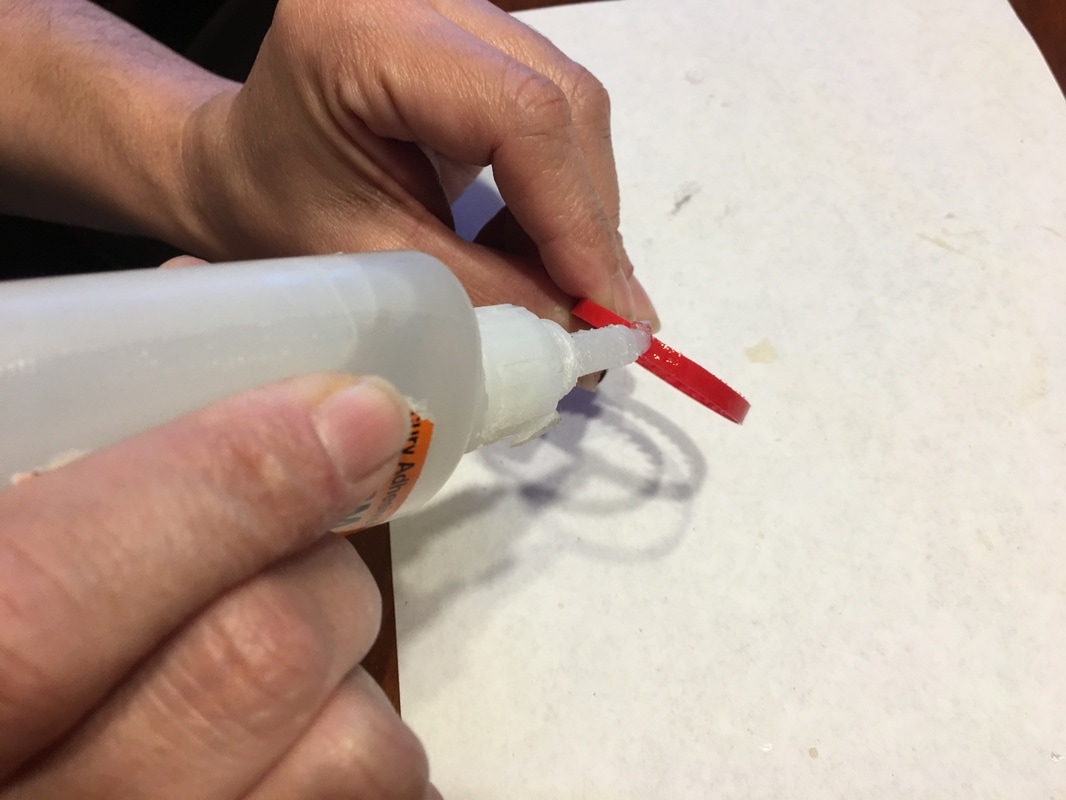
Add a bot of gorilla glue...
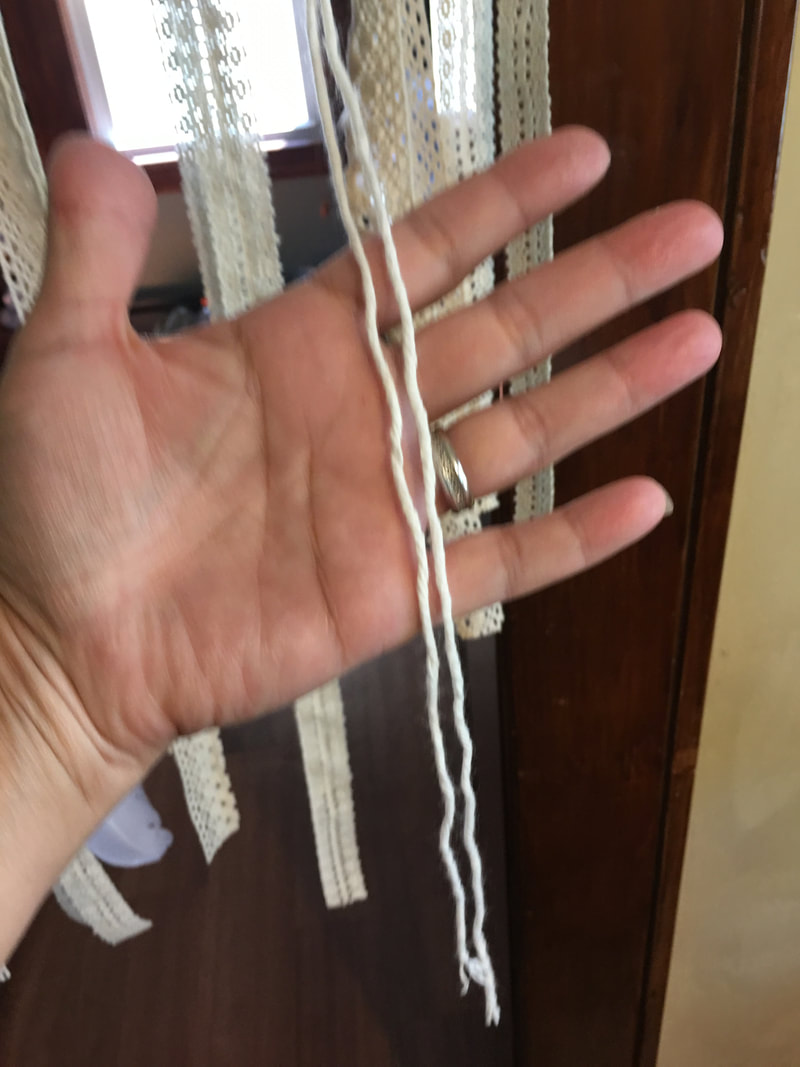
And attach the end of the cut piece of cotton string for the center of the dream catcher (about 1.5 feet long max).

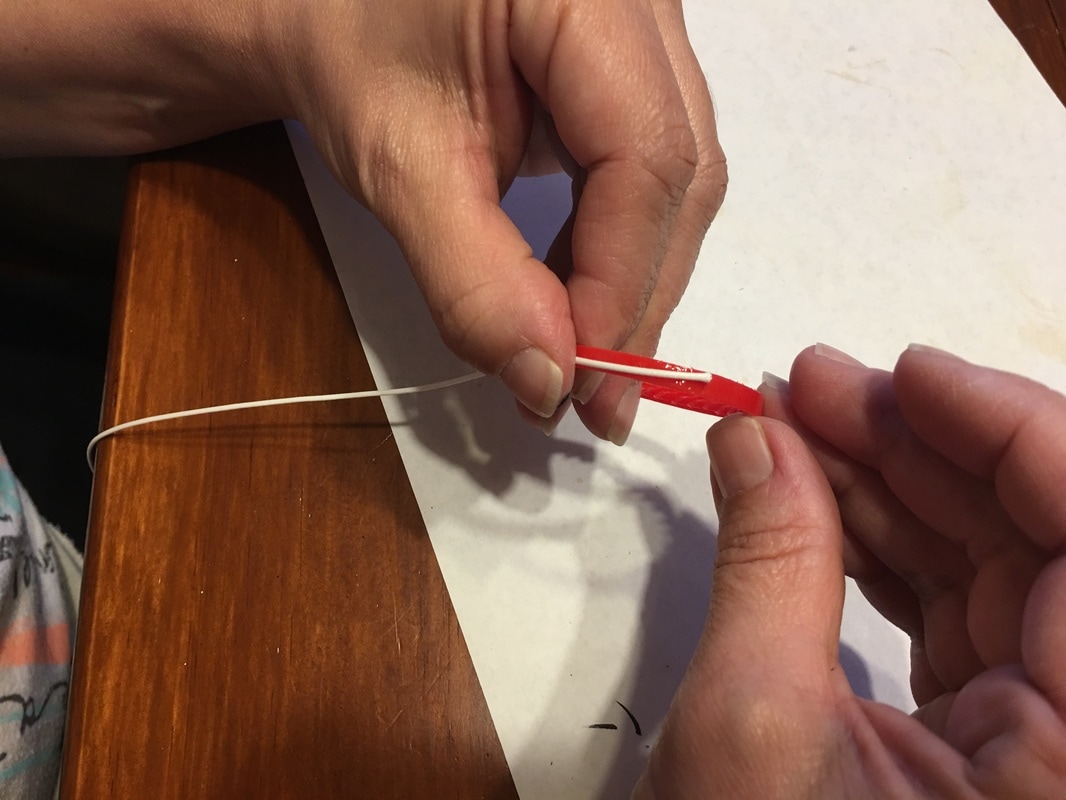
Then begin to wrap the ring with the faux leather piece - also about 1 - 2 feet long. Be sure to leave a long piece at the beginning to use to hang it.
Wrapping in progress...
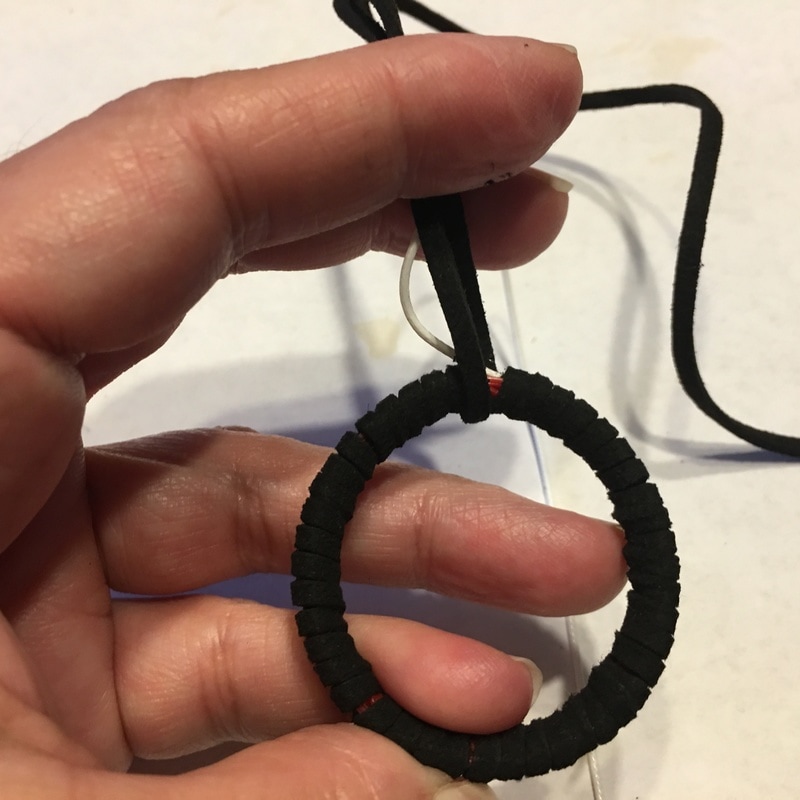
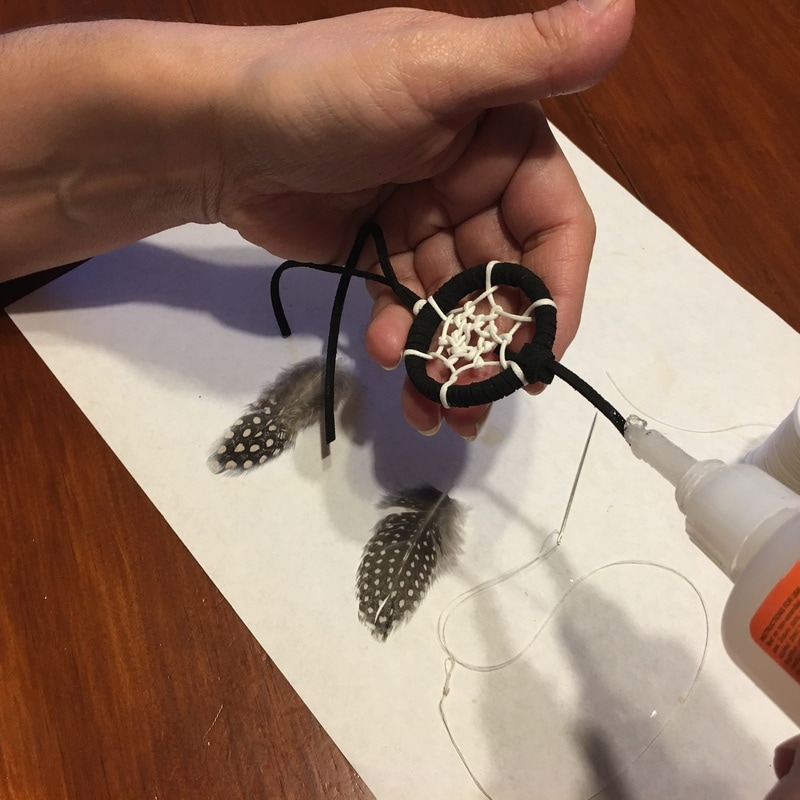
Wrapping done! Now you wrap the center string around the top pieces, pull it through to knot it and add a dab of glue to hold it.
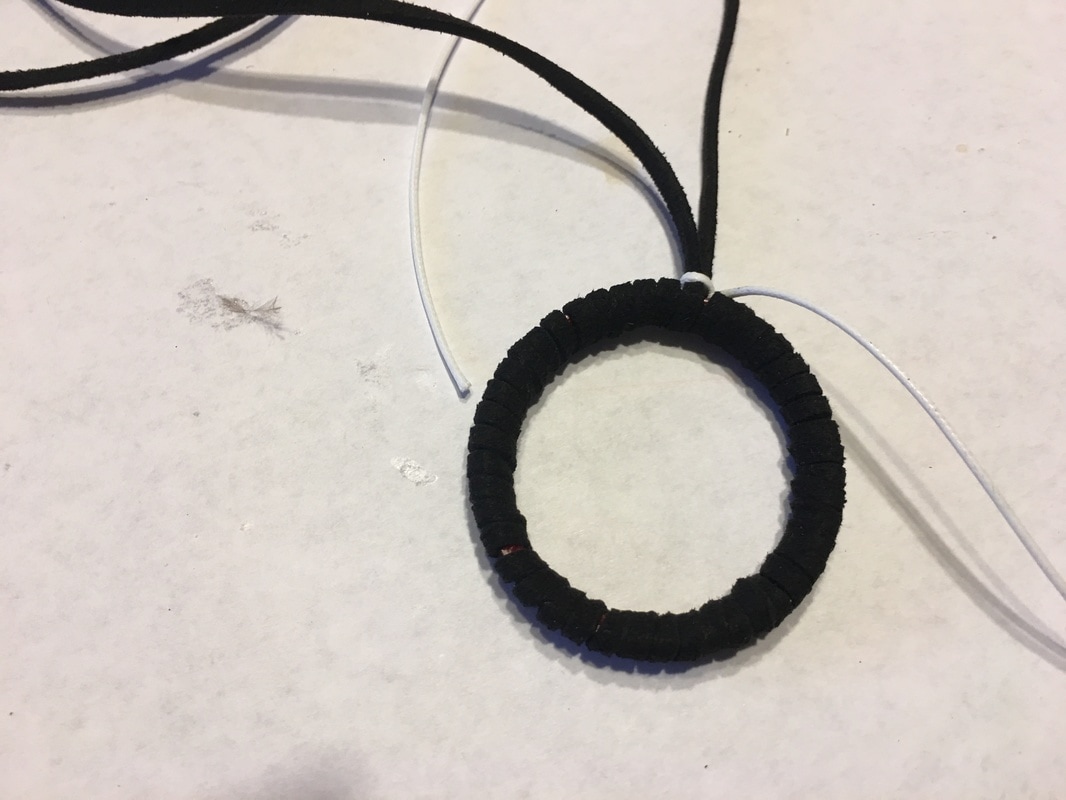
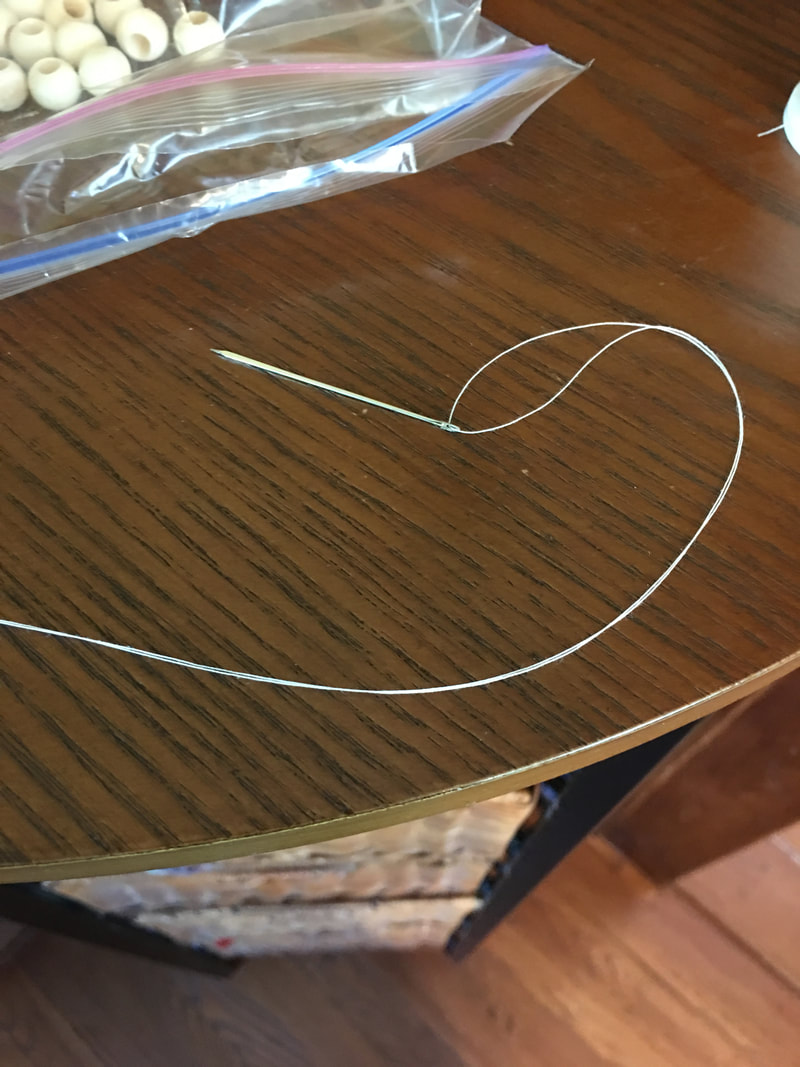
Done! the center piece will now be threaded on the yarn needle.
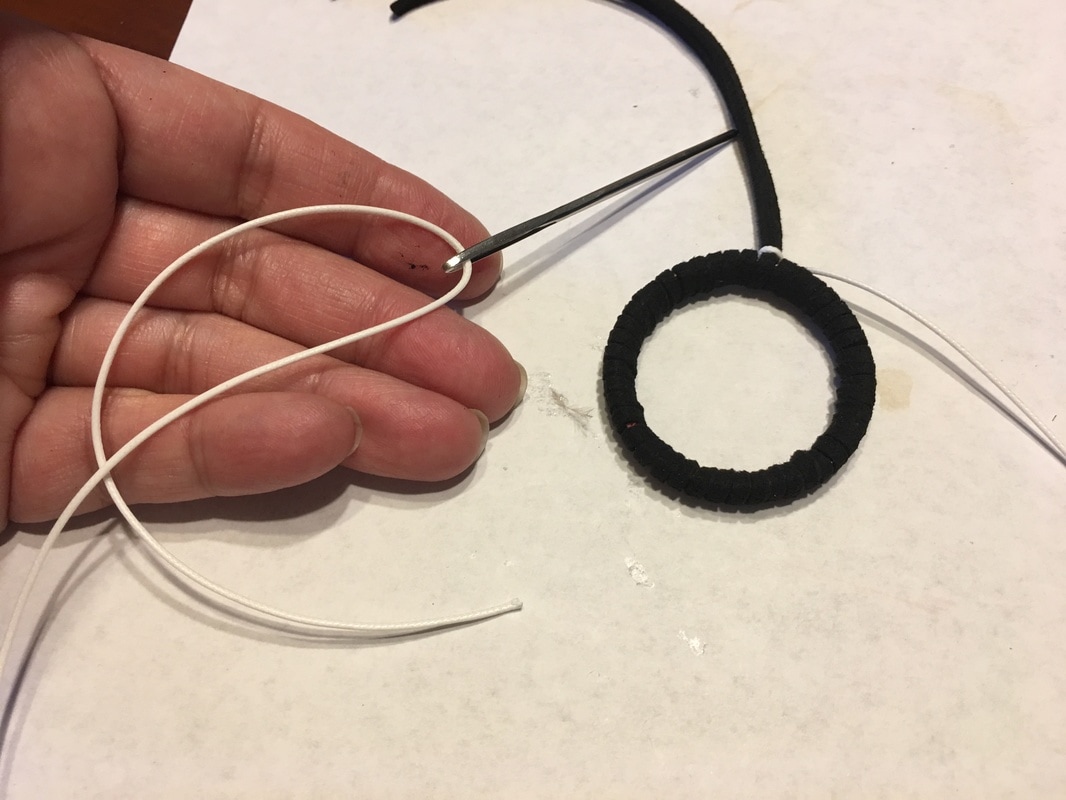
Check out this simple picture for how to weave the center part http://www.craftsforkids.com/projects/dream_catchers.htm
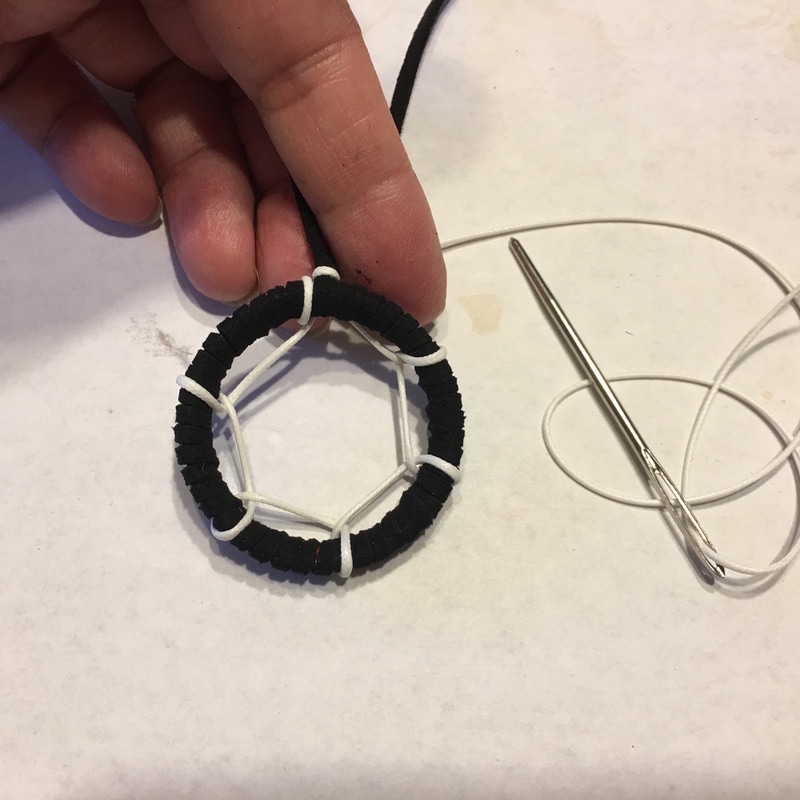 Start weaving the dream catcher center. Start weaving the dream catcher center.
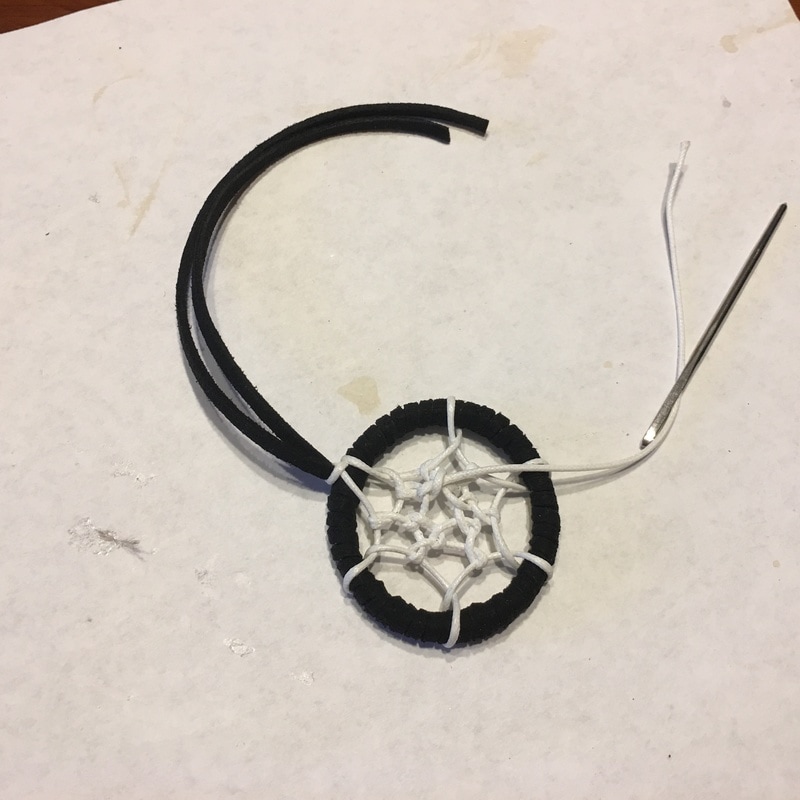
When done with the center make a small knot on the back.
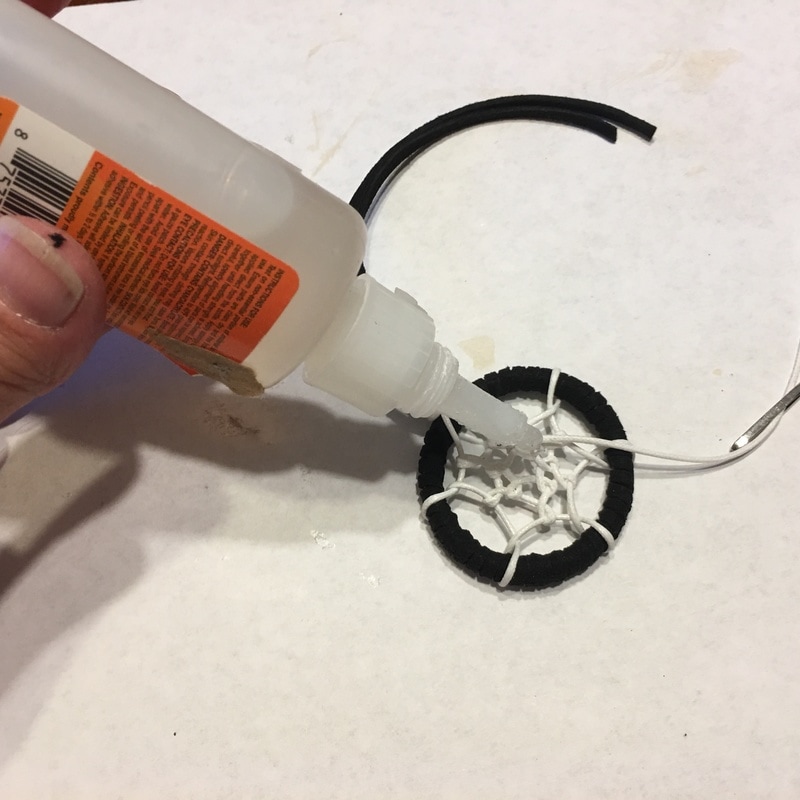
Add a dab of glue and let it dry.
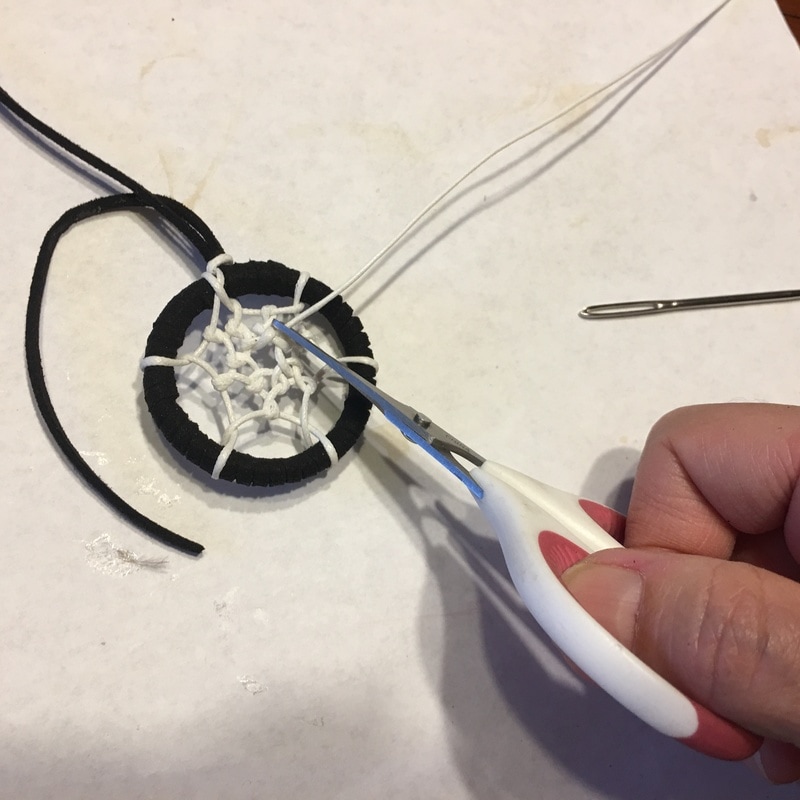
After the glue is fully dry (I wait overnight), then clip off the end.
Cut a pice for the feathers to hang from.
Tie it in place - more like looping it in place really.
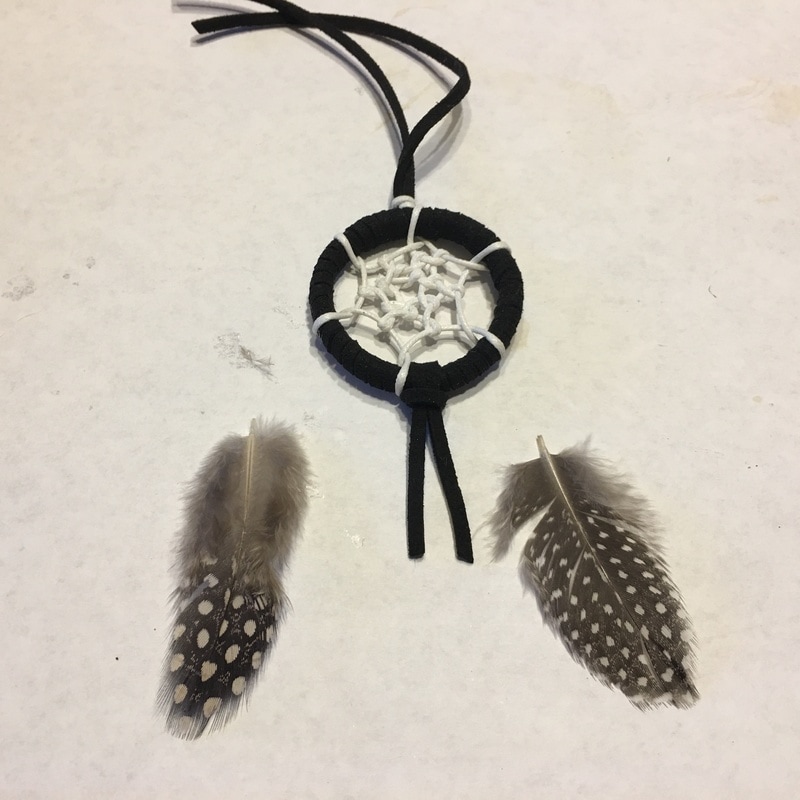
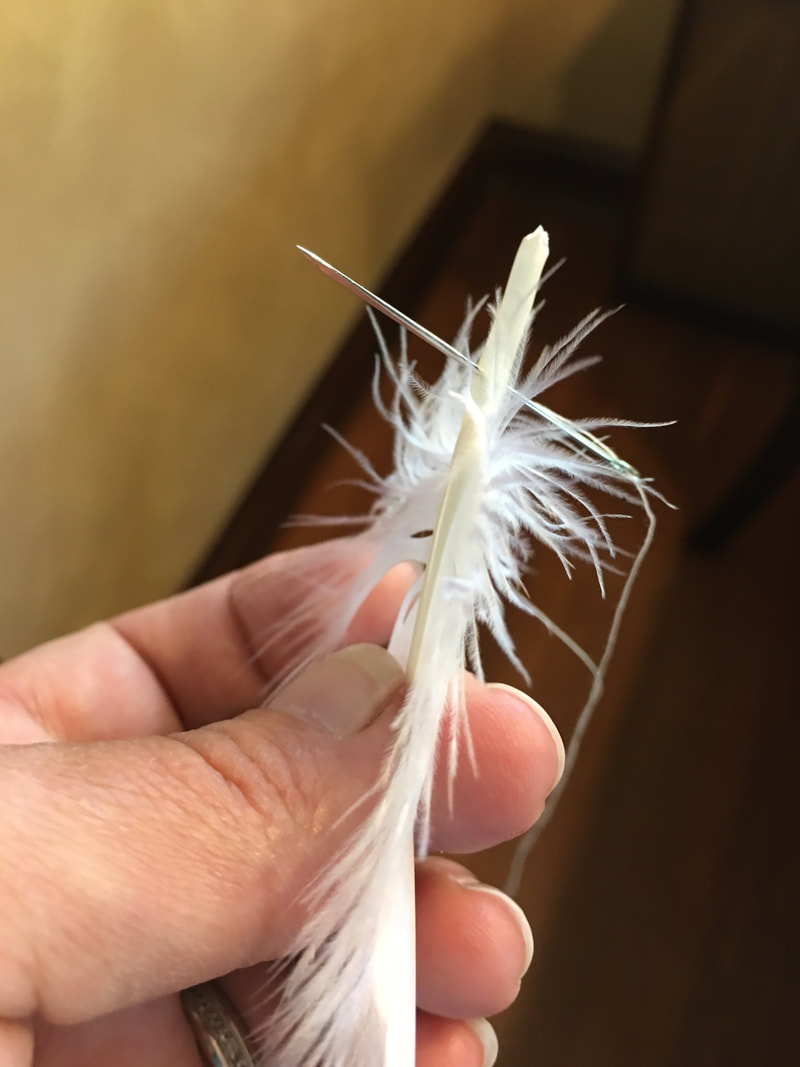
Choose feathers that will look good together.
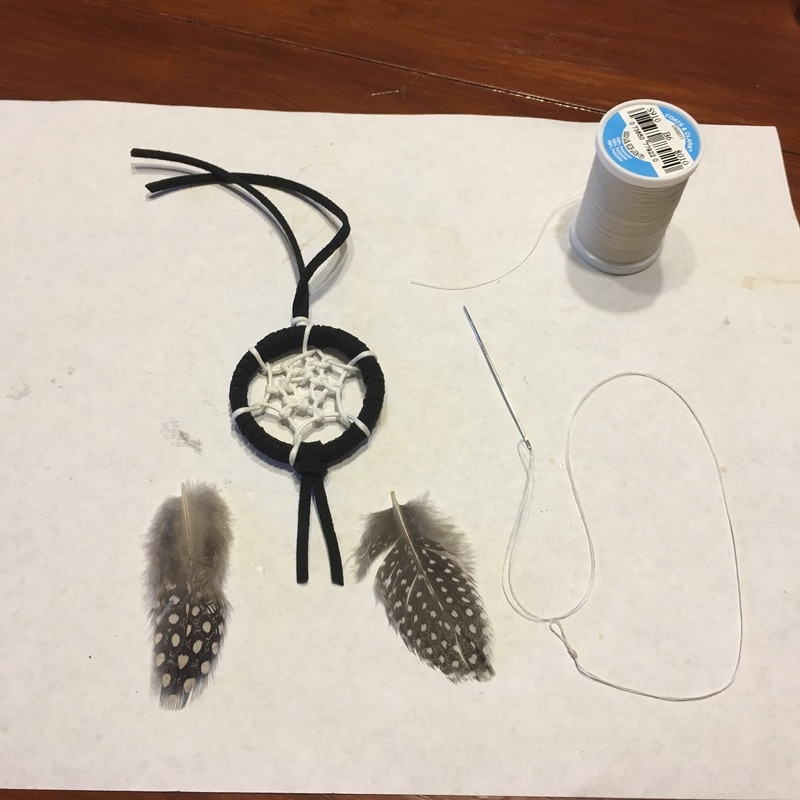
Get a needle and thread ready.
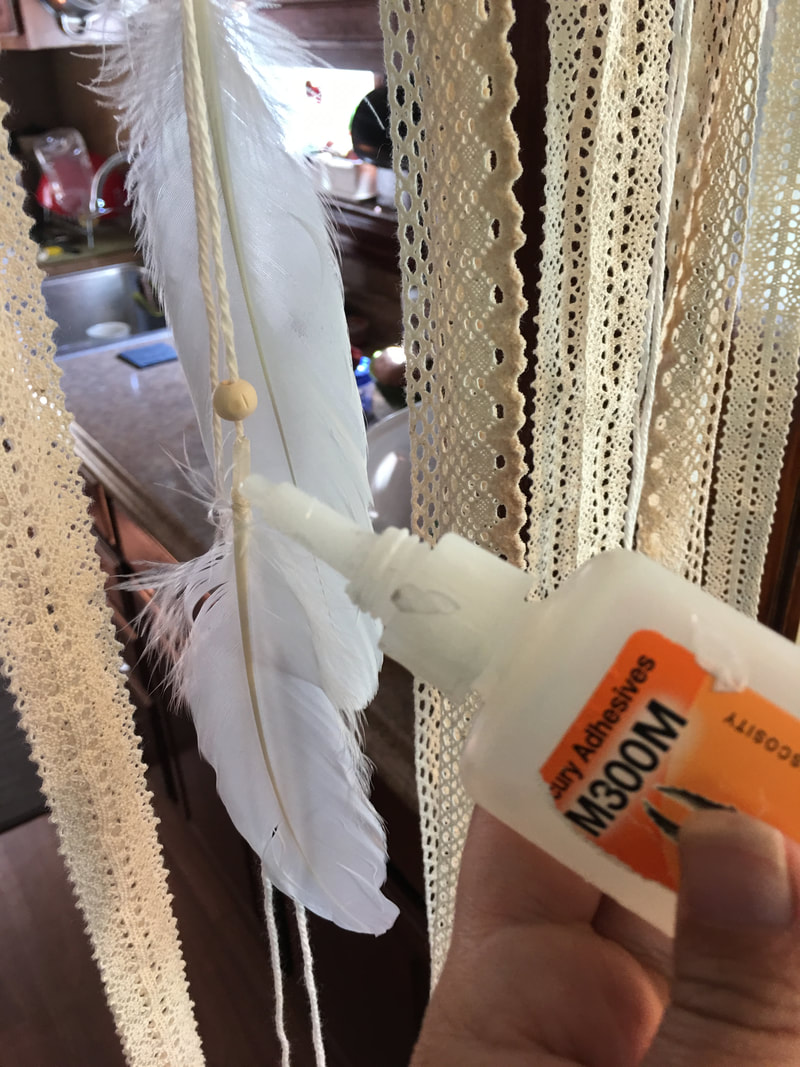
Add a dab of glue to help hold the feather in place.
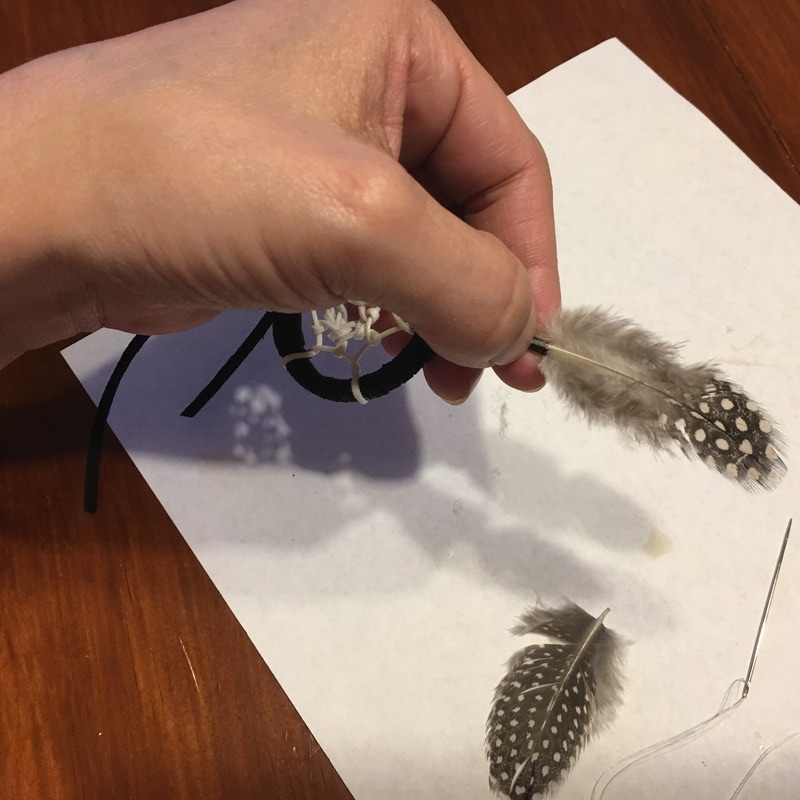
Place the feather on the front of the faux leather.
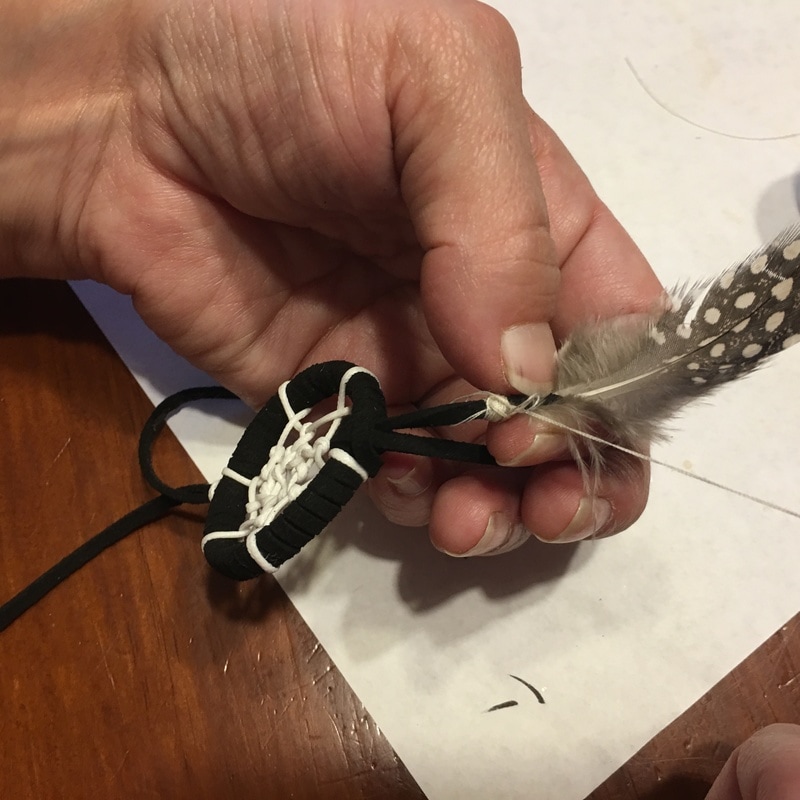
And begin wrapping it in place with the needle and thread. Nothing is sewn - I simply wrap the thread around and around and then run the needle through the wrapped portion before clipping it at the end. Then I add a drop of glue to make it permanent.
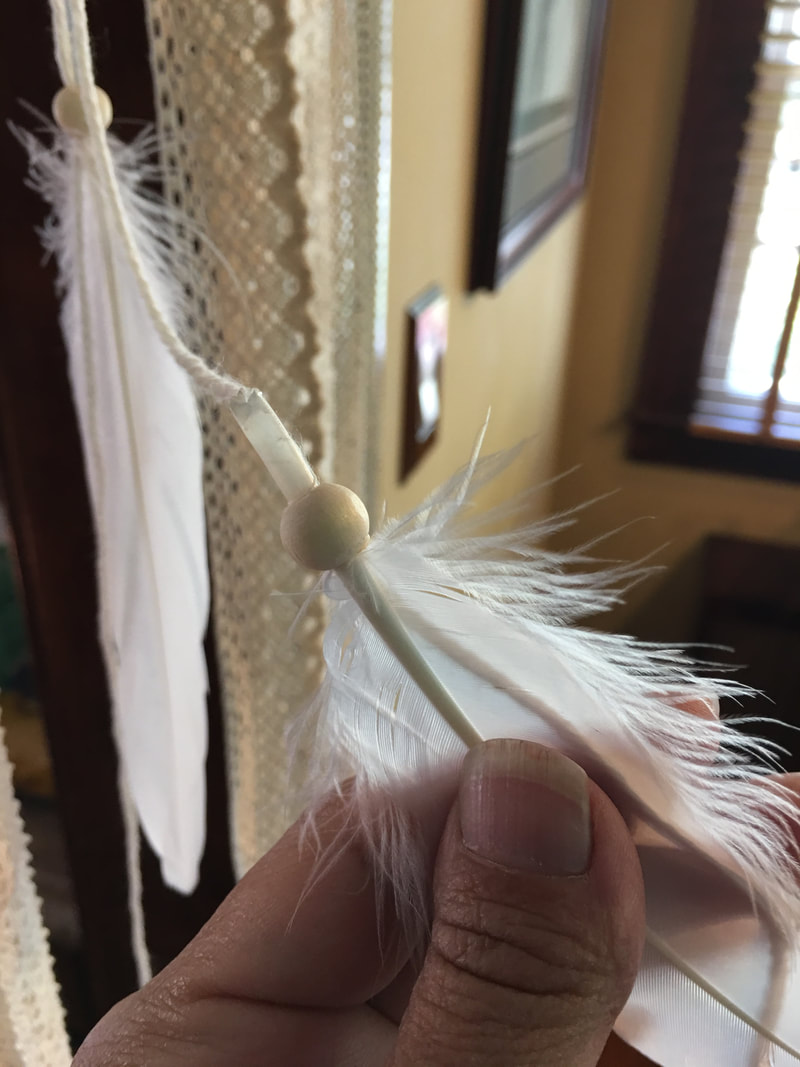
Do the same thing for the second feather. Be sure to add a dab of glue after the thread is done too!
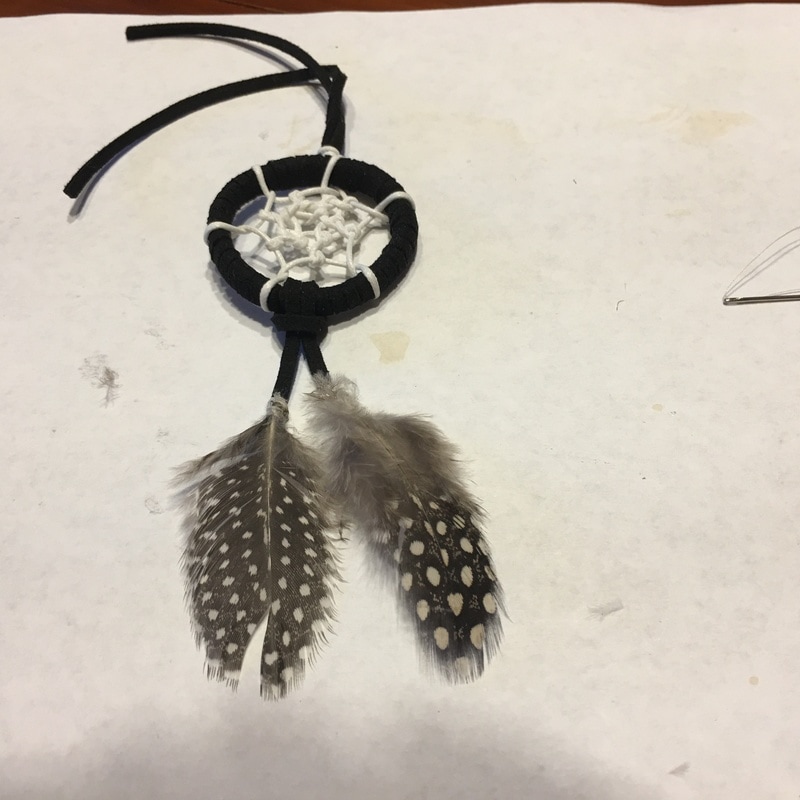
I made two different colors and still can't decide which one I like best! But they aren't done yet...
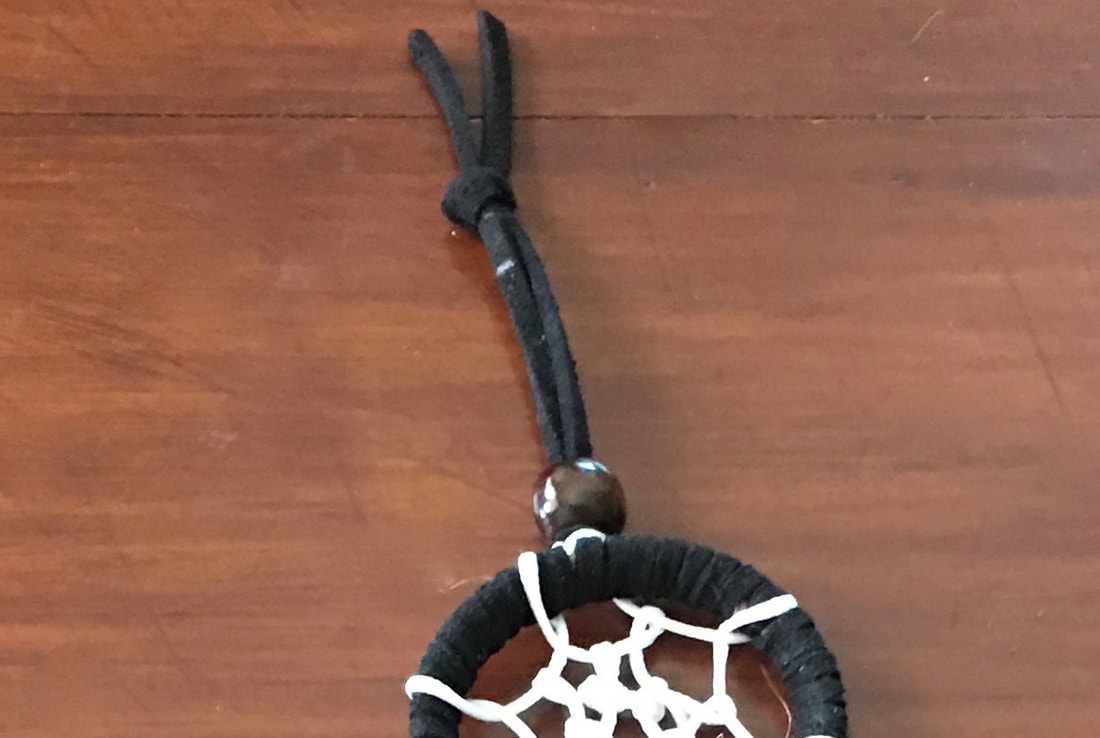
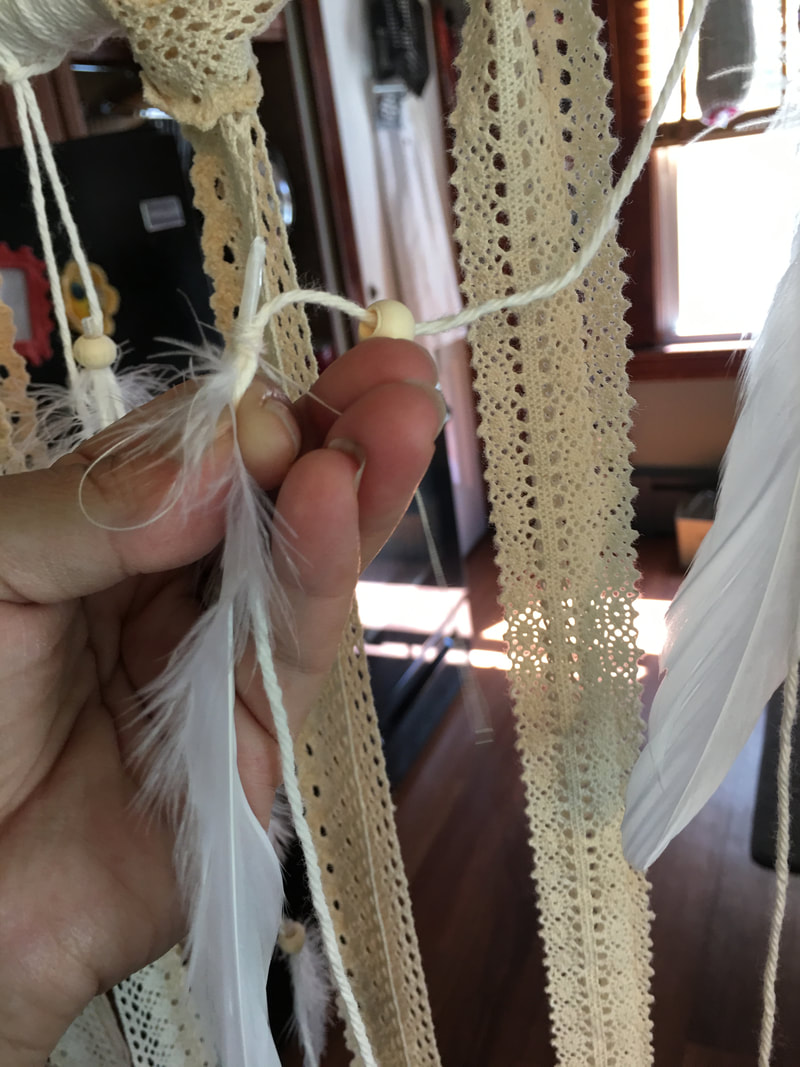
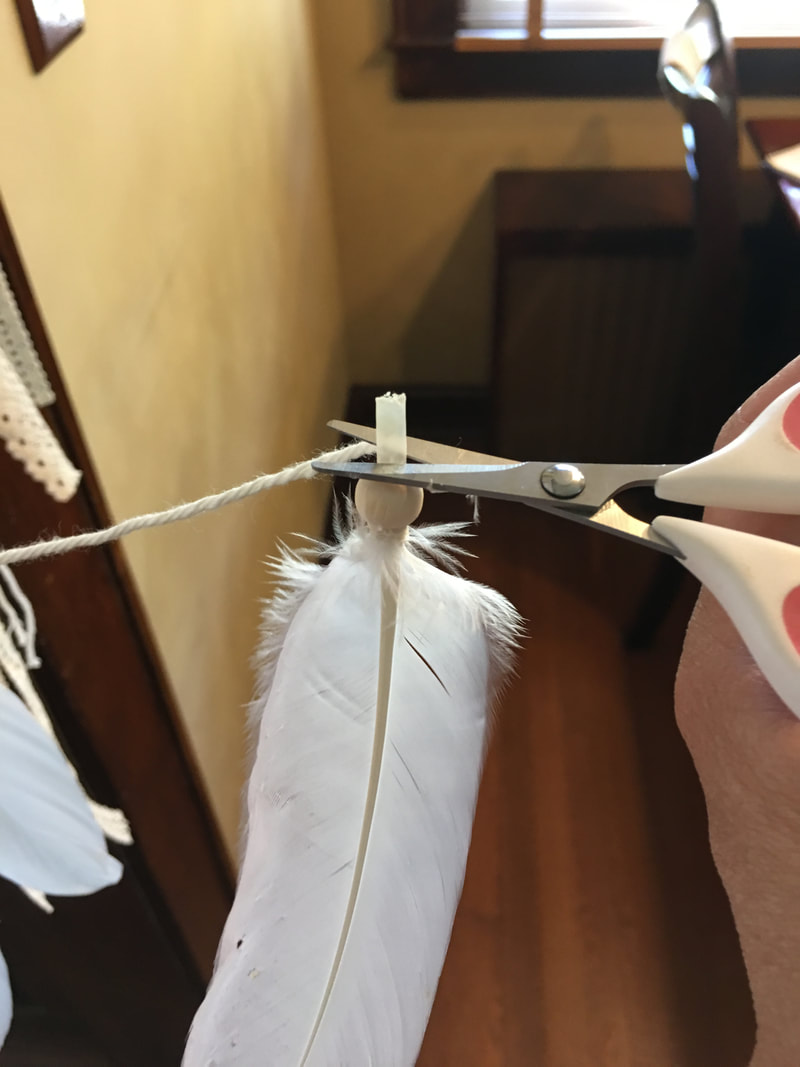
Add a drop of glue, slip on the bead (we had to drill holes larger first), and tie a nice little knot at the top! After snipping the ends even there is now a nice little loop for hanging just about anywhere!

Print out the tag on the brown craft paper and cut them out. Notice that I printed on both sides! This is not necessary though. I also use a paper cutter for nice neat cuts but scissors will work too.
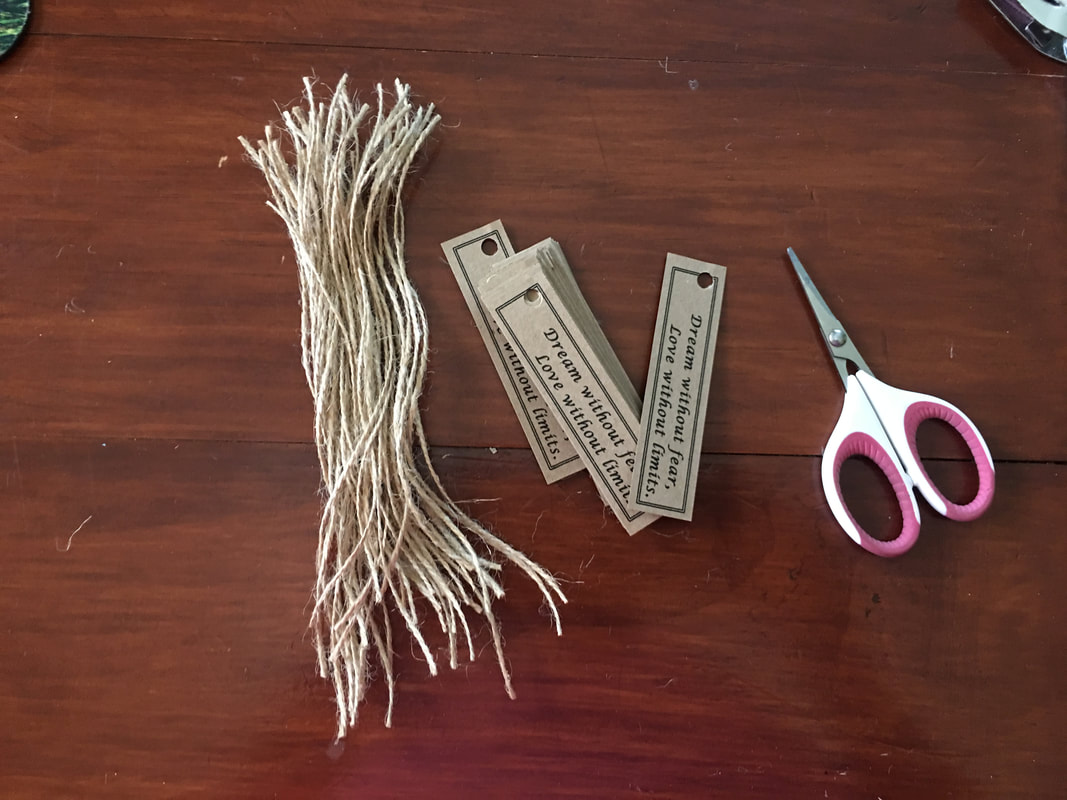
Puch a hole in each tag and cut lengths of twine (approximately 6" each).
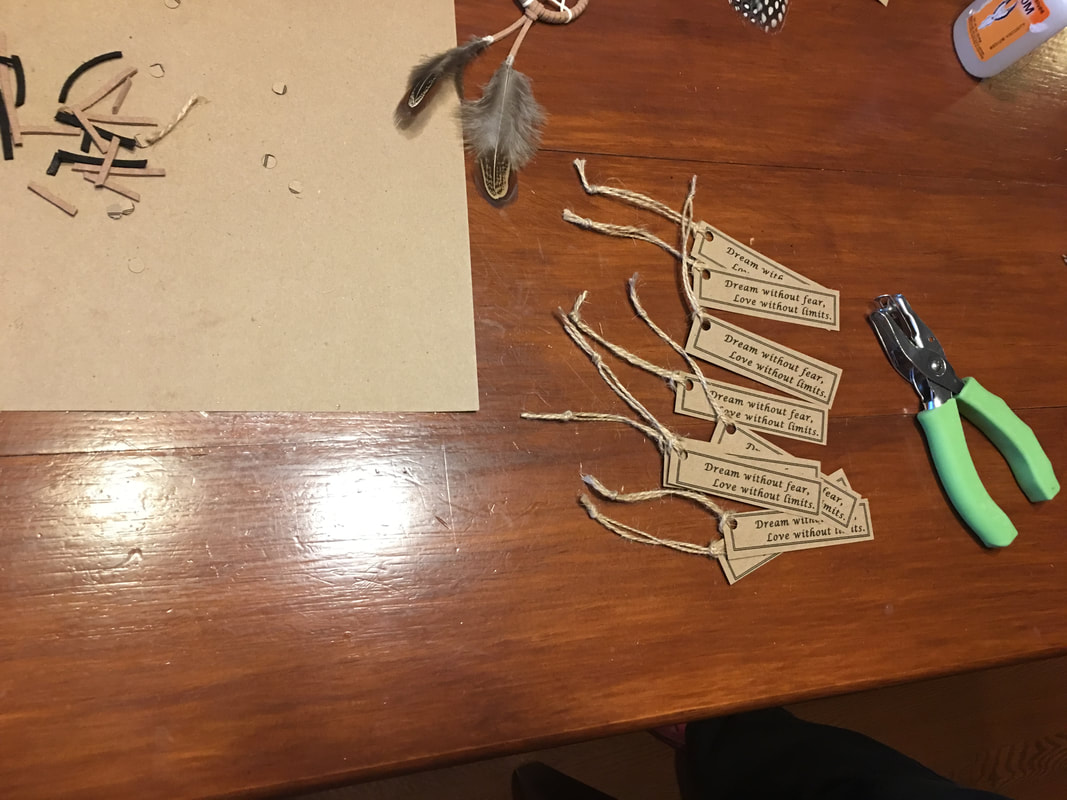
Loop the twine through the punched holes.
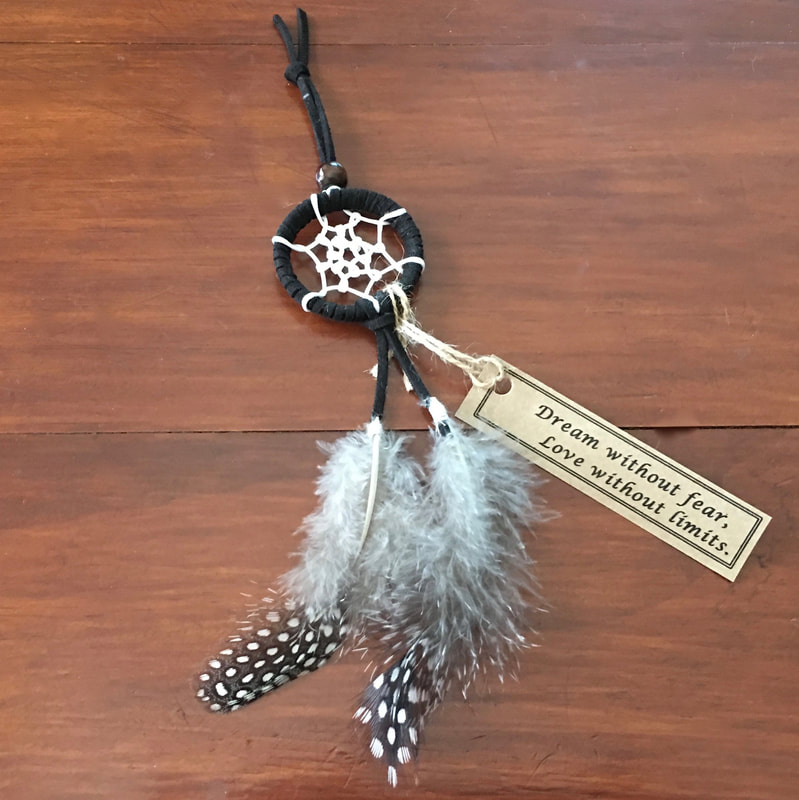
Dream without fear, love without limits.
Then loop the tag onto the dreamcatcher!
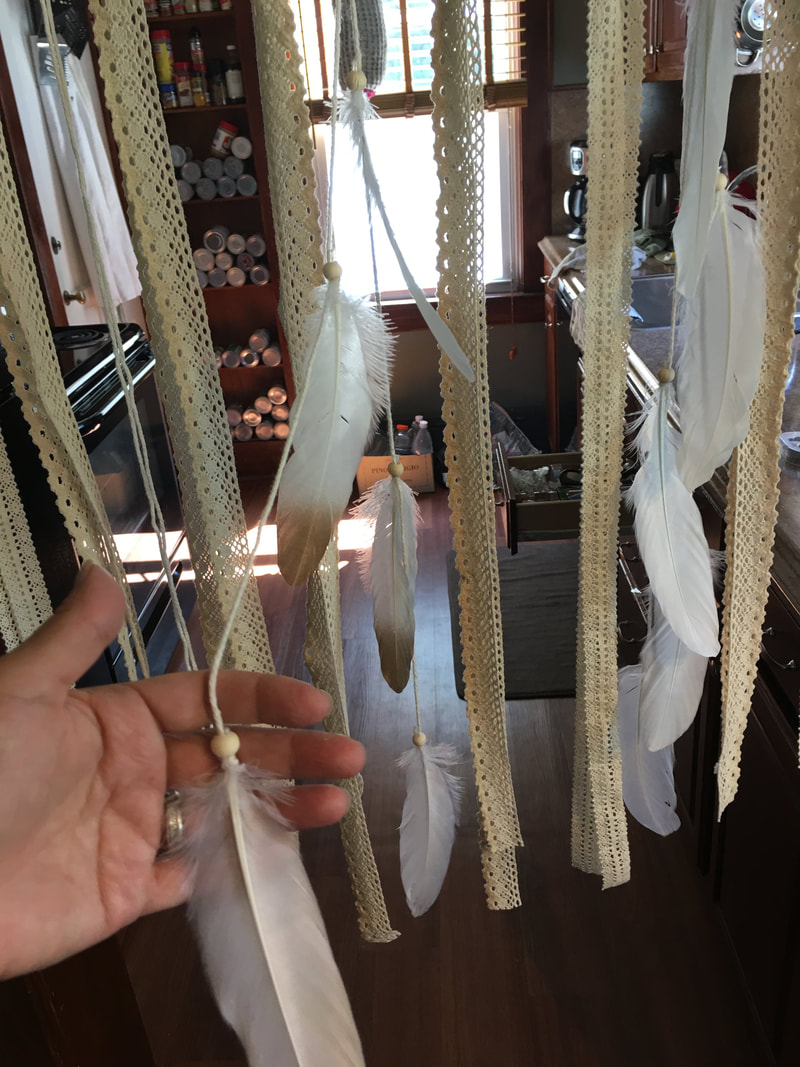
I have to say that everyone loved these and my daughter was so excited over them! So not only are they repurposing plastic, but they are something nice that are small enough to be hung anywhere!
Thank you for visiting! Please check out all my other DIY Shower & Wedding projects and follow me on social media for more crafty things!
Sincerely,
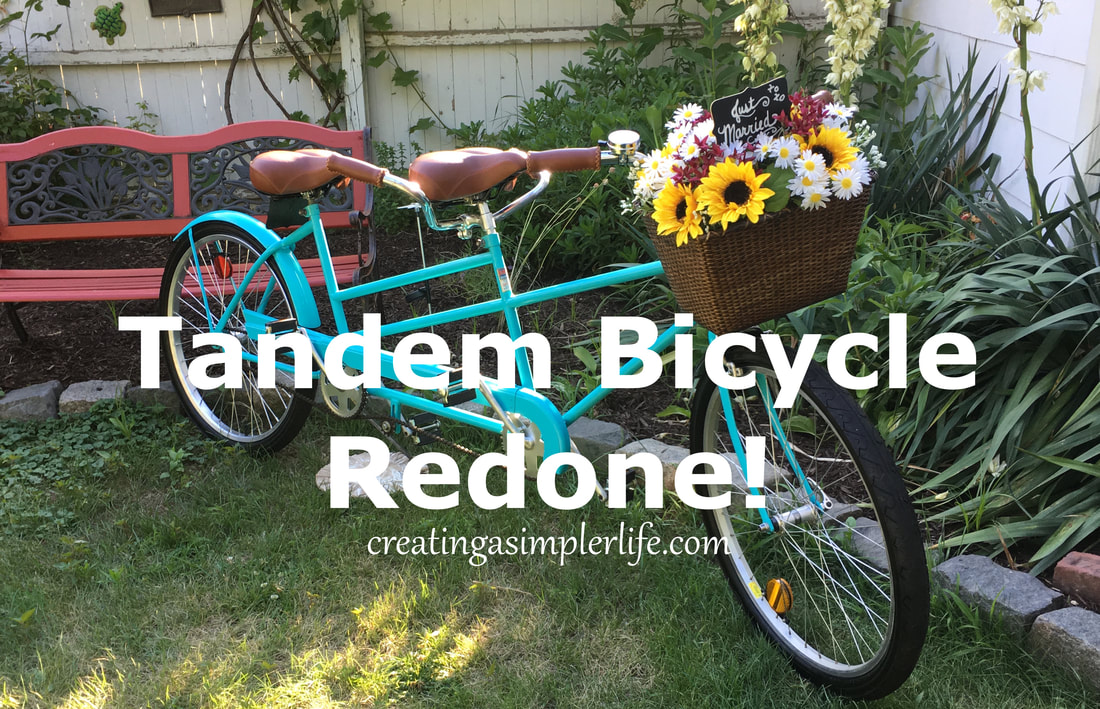
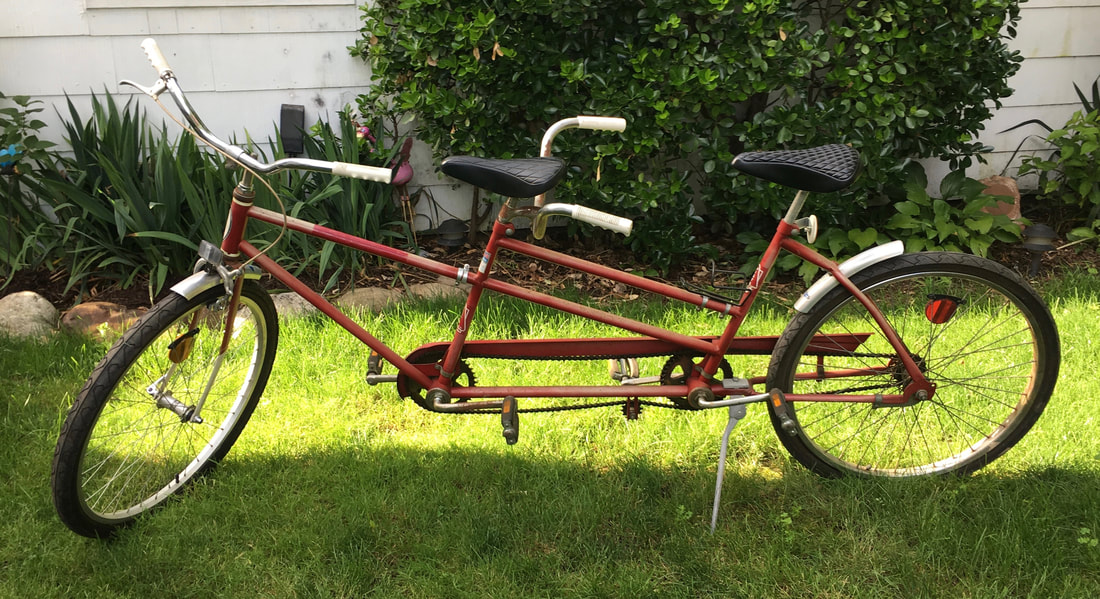
My brother and sister-in-law have had this old 1970's Vista duo tandem bike in their garage for several years now. I always thought it was the coolest thing to ride a tandem bike, especially as a kid because brings up good memories of when my cousin Lynn and I used to ride her families tandem around town. So when my in-laws recently said their's was going in the garbage if we didn't want it I jumped on the offer....but not for me.
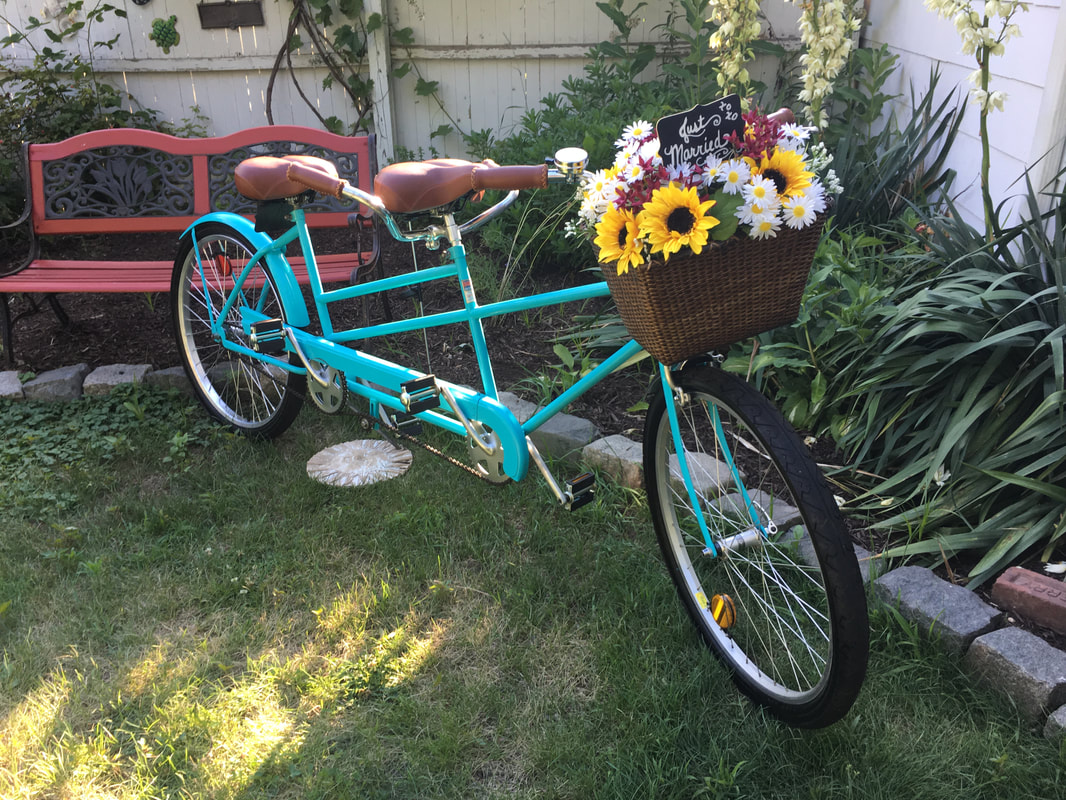
My daughter is getting married in September and she and her fiancé live on Fire Island. If you know anything about living on Fire Island it's that there are NO cars driven around (other than for emergencies). You get around by walking or biking so what could be more perfect than having a "just married" tandem bike for them to ride around together on? My brother and sister-in-law agreed that this would make an awesome gift to for the 'married couple to be' and so we set to work! And of course it is far better than simply throwing it out ;-) With little bit of time, some MONEY, and a lot of love we finished it up just in time for my daughter's bridal shower. Let us know what you think!
BEFORE....
Check out our video of how we did it!
We did have to purchase a few items to make it work, mostly from Amazon, but a few from Target, Michaels, Lowes, and The Vicious Cycle (the local bike shop that used to be Sally's) as well. Kudos to The Vicious Cycle by the way, who must have parts saved from the beginning of time! They actually had handlebars for the second seat that worked perfectly (we couldn't get rid of the rust on the originals)!
Other parts we purchased:
I also added a tin can wedding thingy to the back so when they ride it back to the house after the wedding ceremony by the beach it will be absolutely perfect!
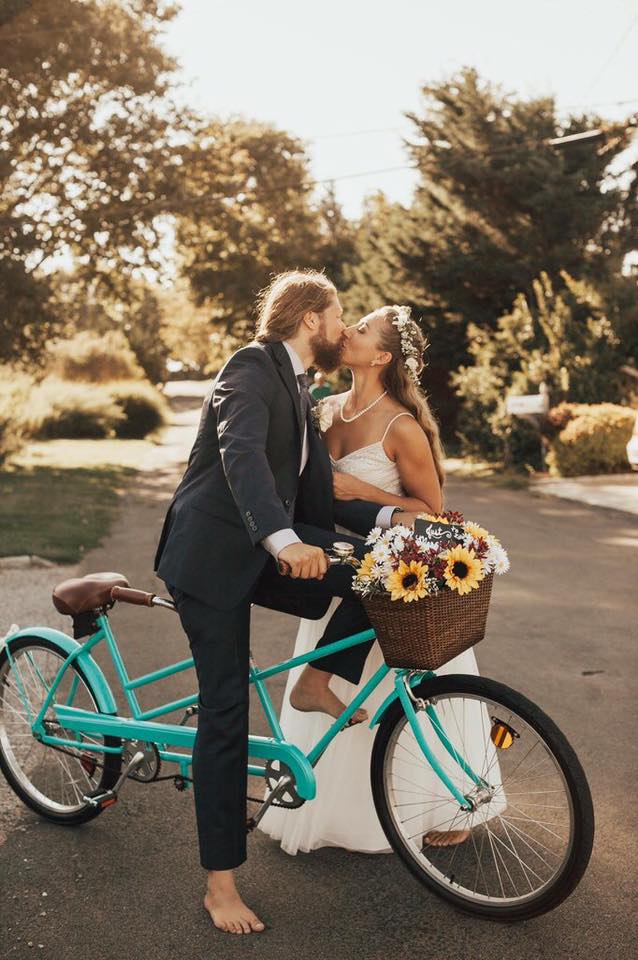
And here are the newlyweds on the bike! They rode it from the beach ceremony to the back yard reception a few blocks away. It was perfect :-) Thank you to Samantha Brancato for the beautiful photo.
Thanks for visiting.
I really hope you enjoyed this post. I have to say that this was one of my absolute all time favorite projects! Not only did I get to spend time with my husband, but we worked with his brother as well. Best of all the gift was for my beautiful bride-to-be daughter and her fiancé. What could be better? Doing wonderful things for our loved ones is what life is all about! Don't you agree? See more DIY Shower & Wedding projects here! Sincerely,

Well, we have our mini homestead land. Our next big project will be to put a road in, but in the meantime we are preparing to build a garage with a livable loft to live in and use until we build our main house. Part of the plans and preparation for the garage construction is the materials. We really don't want to buy everything brand new. First of all, new costs money and doesn't necessarily mean that the product is better. Secondly, there are tons of materials and supplies out there that are used and still in perfect working order! No reason to fill the dumps with good stuff. We are happy to refurbish, reuse, and repurpose if it helps save the Earth, but even more importantly, saves us money!
This Vermont casting stove was being discarded by our new neighbor. Yup, it was going in the garbage! So the little window was cracked and it needed a good cleaning. "No biggie, we can fix that!" said my husband. And guess what? He did! I didn't even tell you the best part yet: the stove came with 12 feet of stove pipe too! Livable garage loft, we are ready for you! 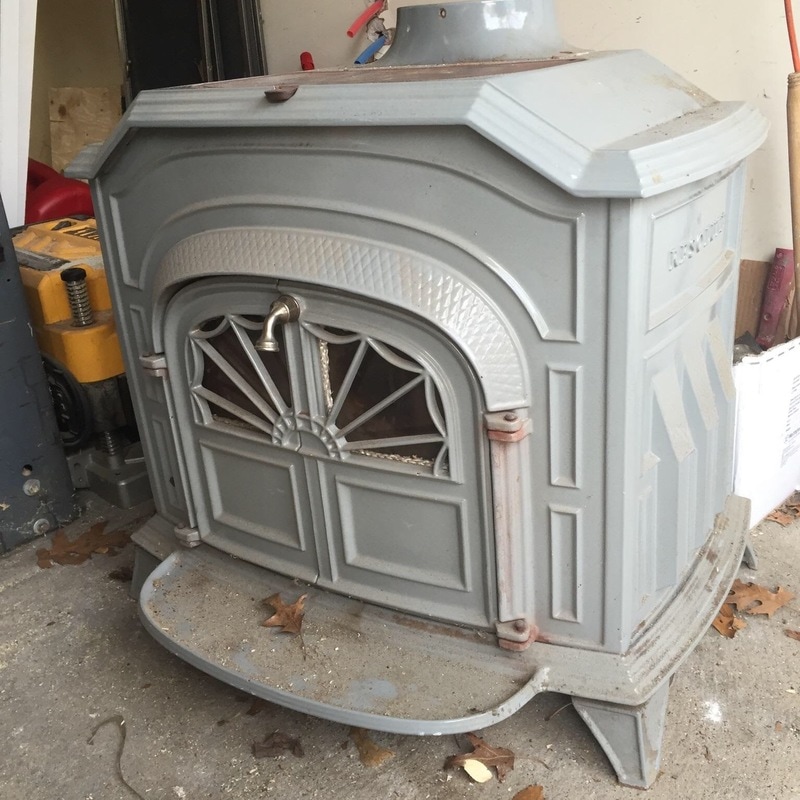
My husband simply went online, did a little research as far as what stove it is exactly - The Vermont Castings Resolute from 1979 - and purchased new glass for the door windows and a gasket kit. He purchased all the parts from Mountain View Hearth Products in Montana. He had to call them up and talk to them to make sure he was getting the right parts and they were super helpful. We highly recommend them if you need any stove parts!
Took some time for him to take it all apart, clean it, and put it back together but now it is like brand new! Total cost: less than $200. Savings: THOUSANDS! 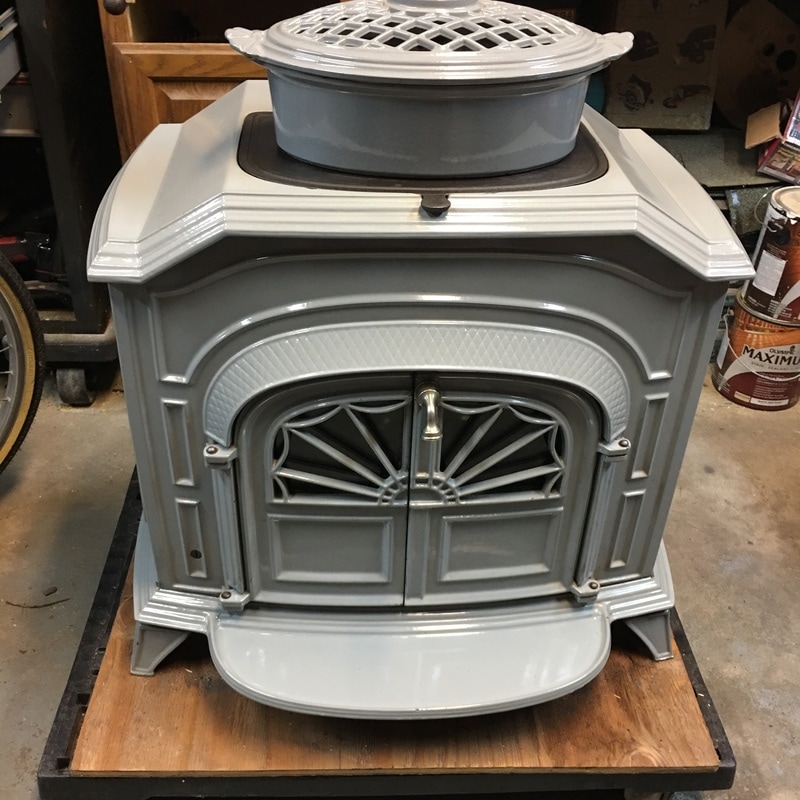
A few other items we have collected for FREE so far:
Still on the lookout for:
One of our favorite places to visit is Restore in Ronkonkoma. It is run by Habitat for Humanity and all proceeds go to building homes for people in need. They get donations of used or leftover building materials, supplies, flooring, cabinets, even furniture and appliances! We never know what we will find when we visit but it is super fun to go! So if you have something to get rid of, or are looking for something particular, consider checking them out. It is worth it! Think of it like a thrift store for building and home needs!
Thanks for visiting!
Check out our other ways to save money and our future homestead plans! Sincerely,
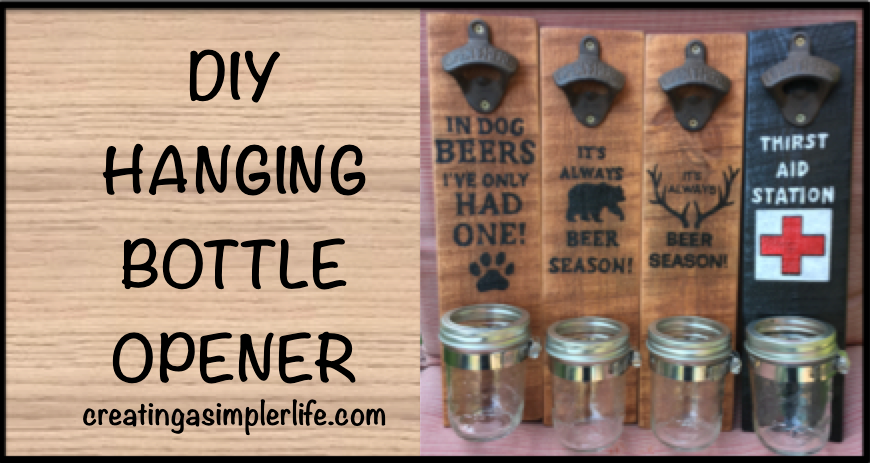
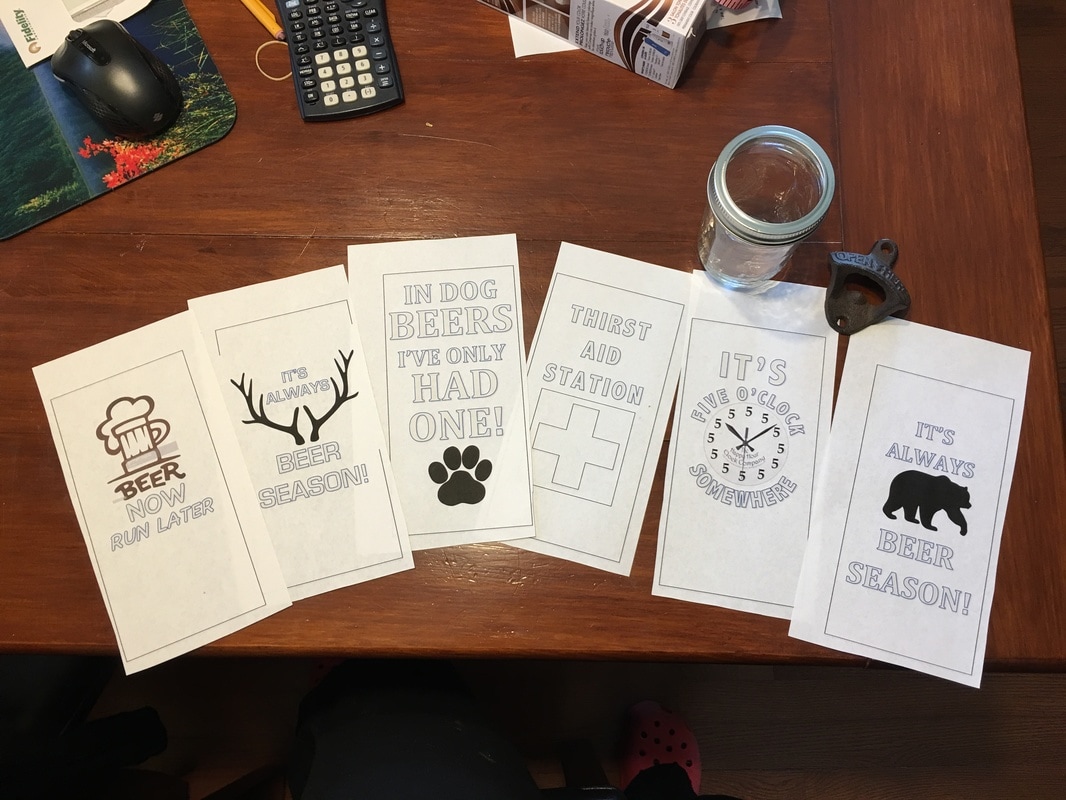
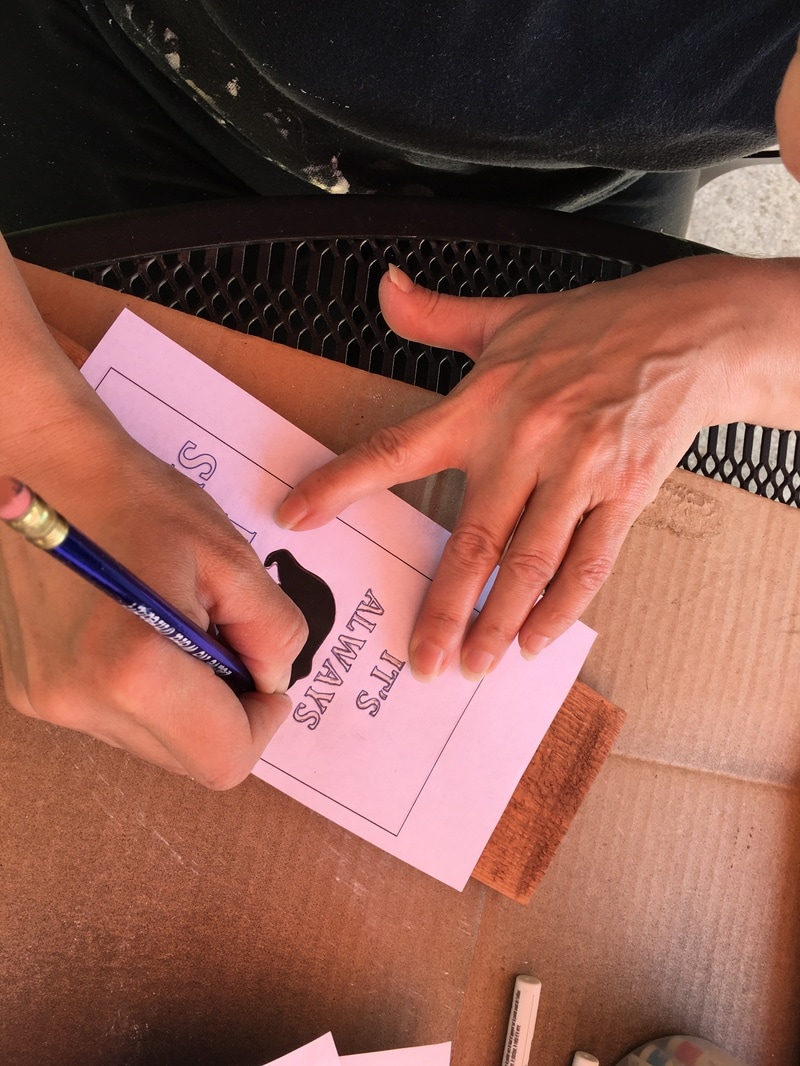
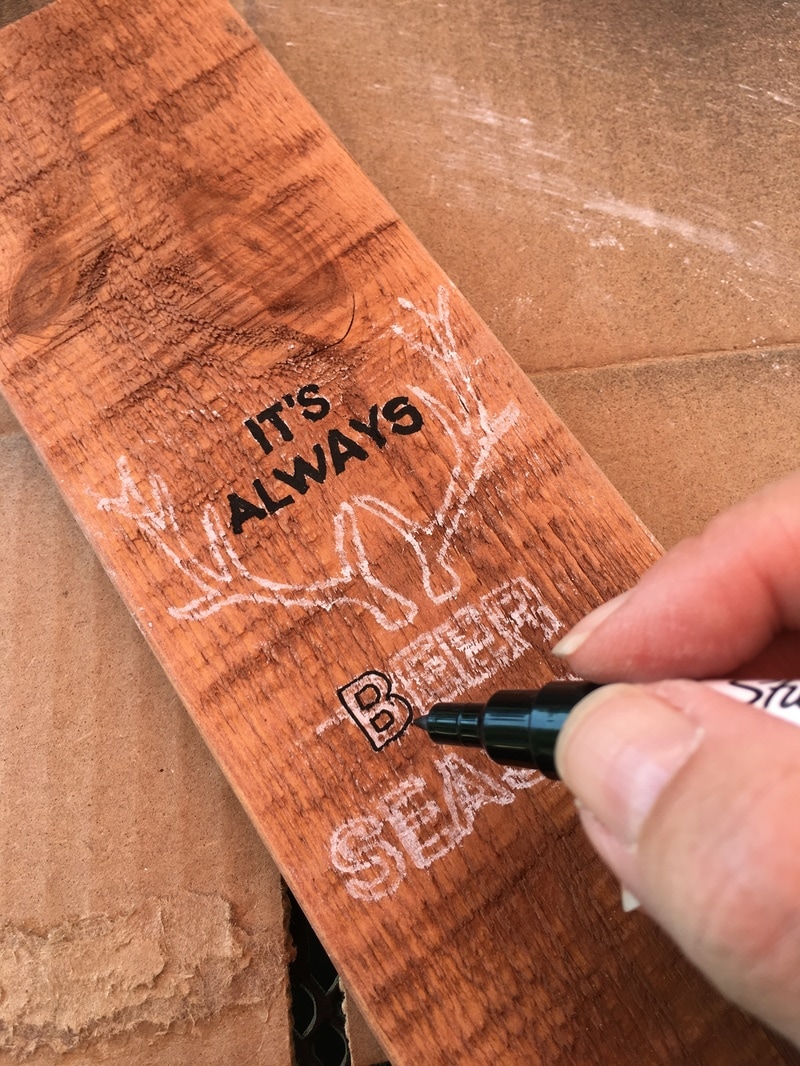
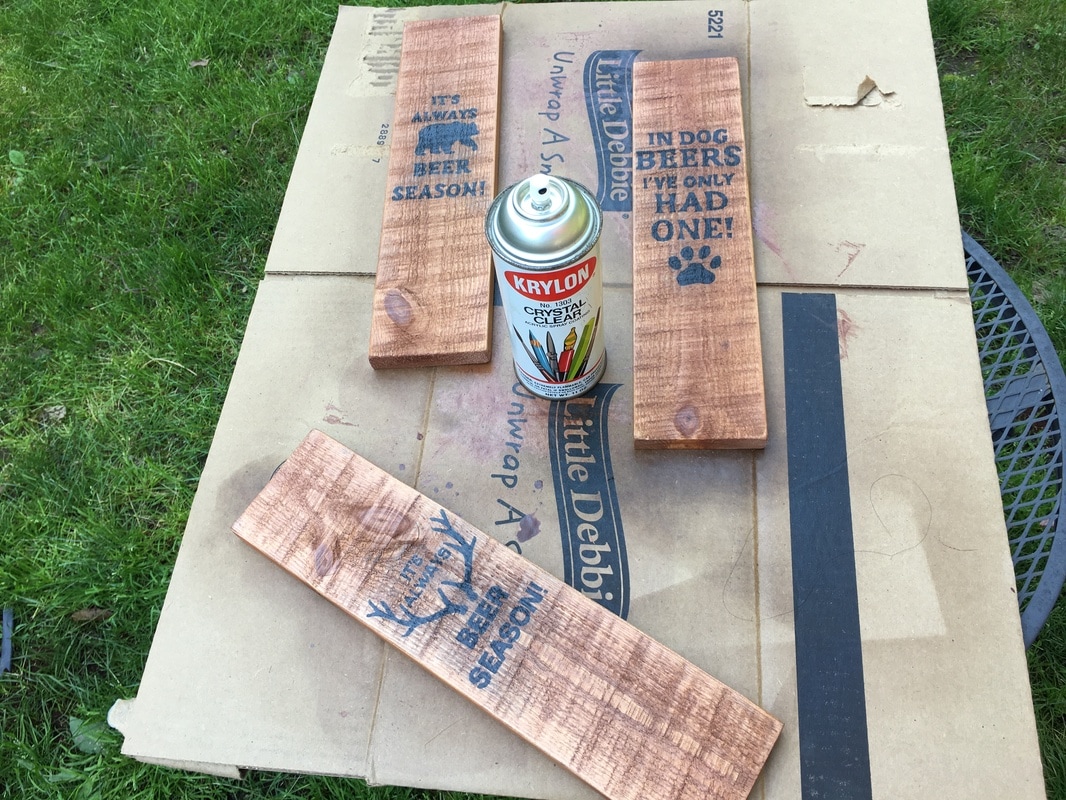
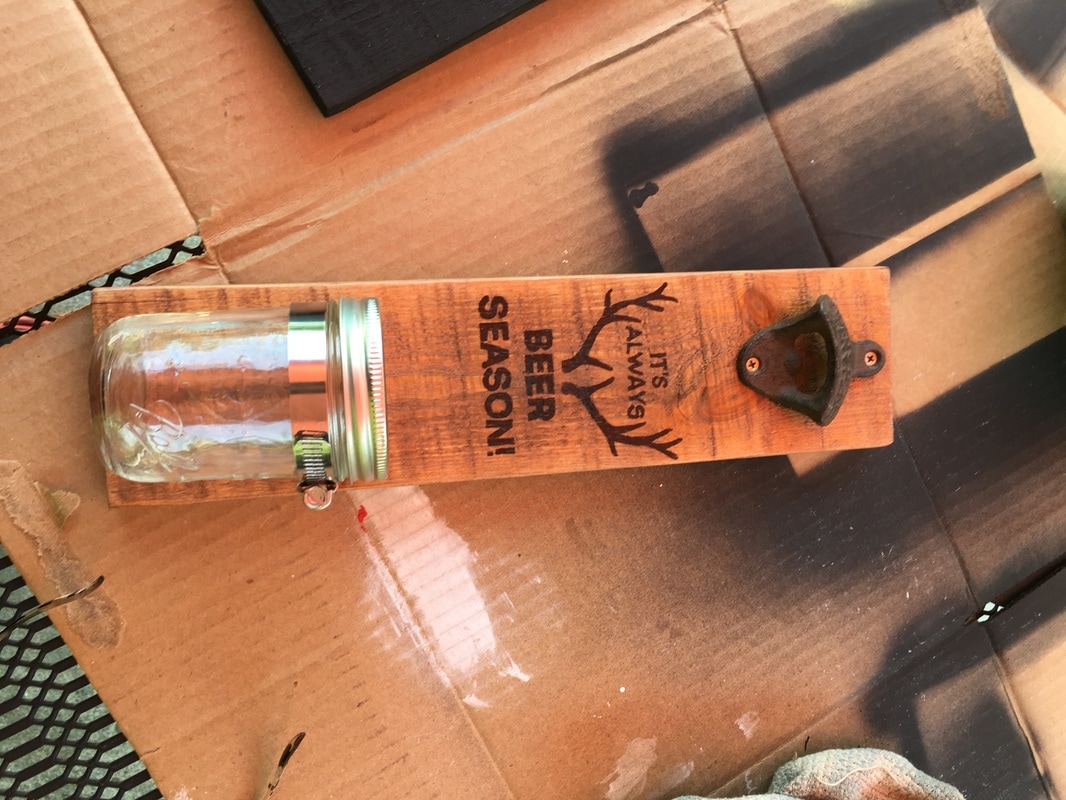
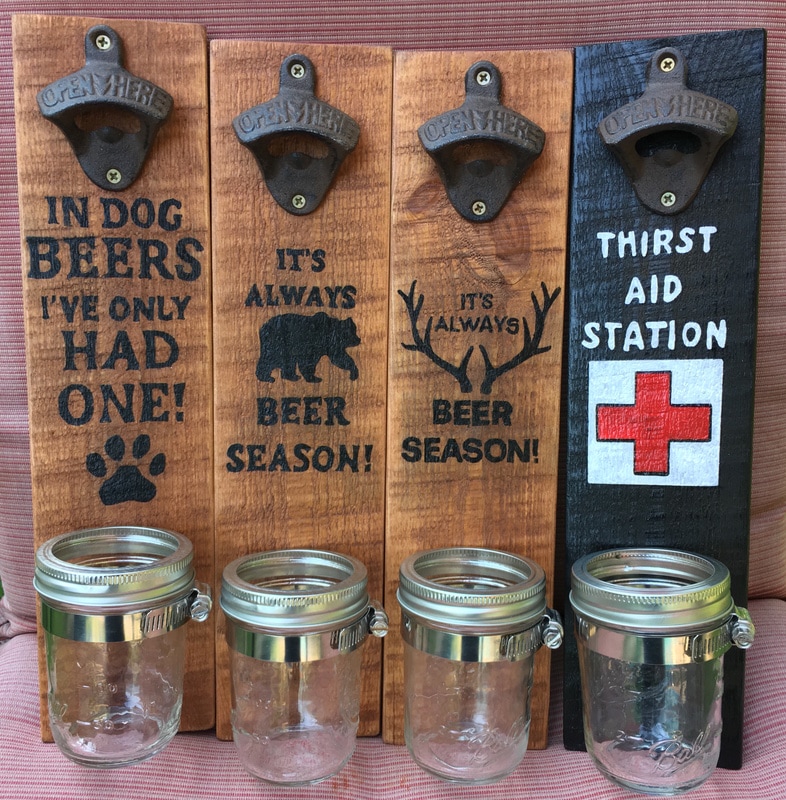
This was a coordinated effort between myself and my husband so we could surprise the Dad's in our family at our annual Father's Day barbecue!
This DIY hanging bottle opener was the perfect gift. It was pretty simple to make and we learned a few lessons along the way, but overall we are really happy with how they all turned out!
Supplies Needed:
Directions:
Thanks for visiting!
Check out all my other DIY ideas here on this site or on myPinterest Board! Please follow me on social media as well :-) Sincerely,
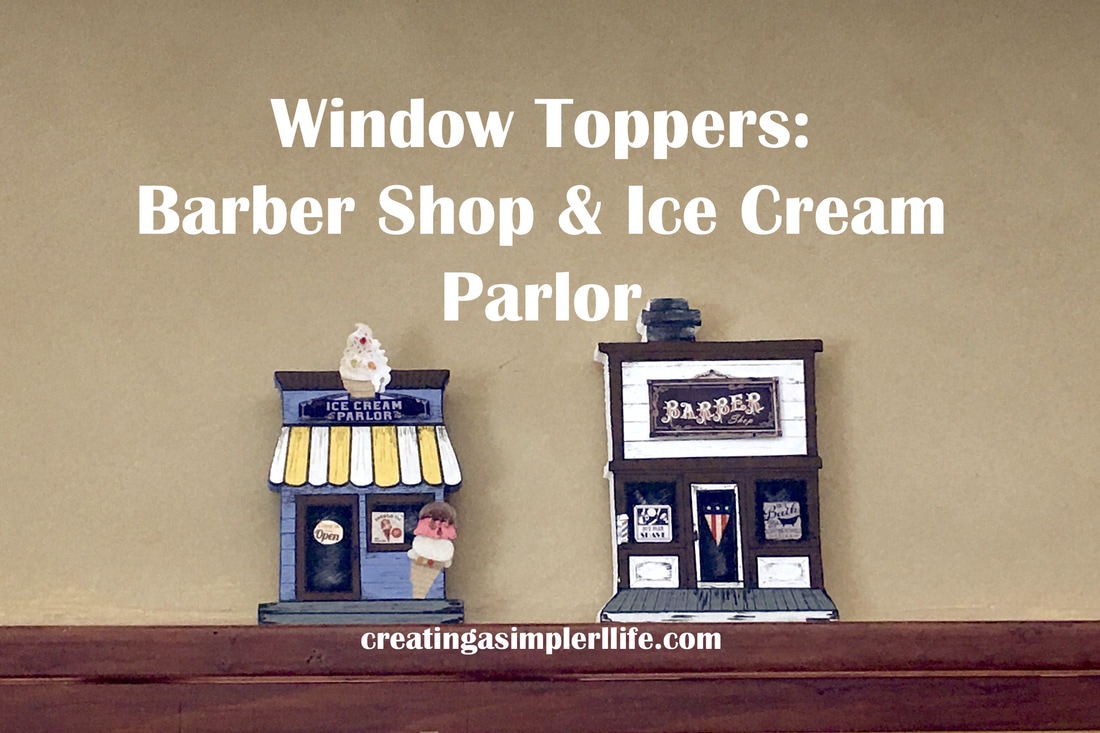
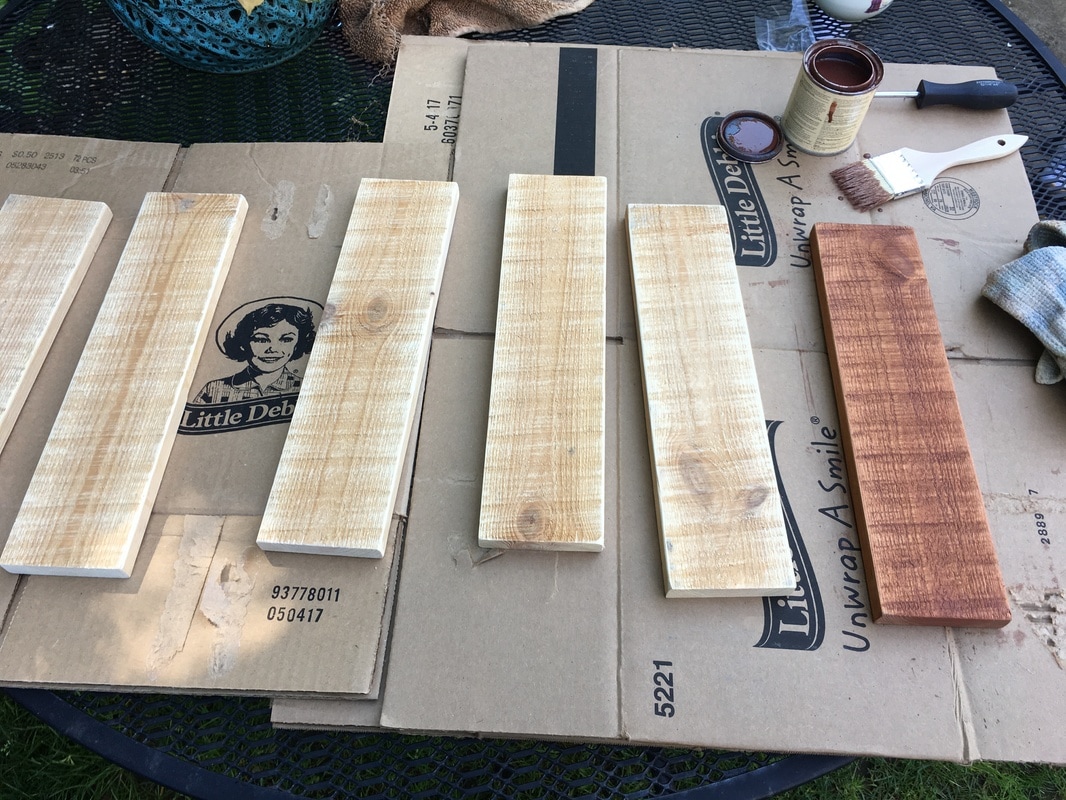
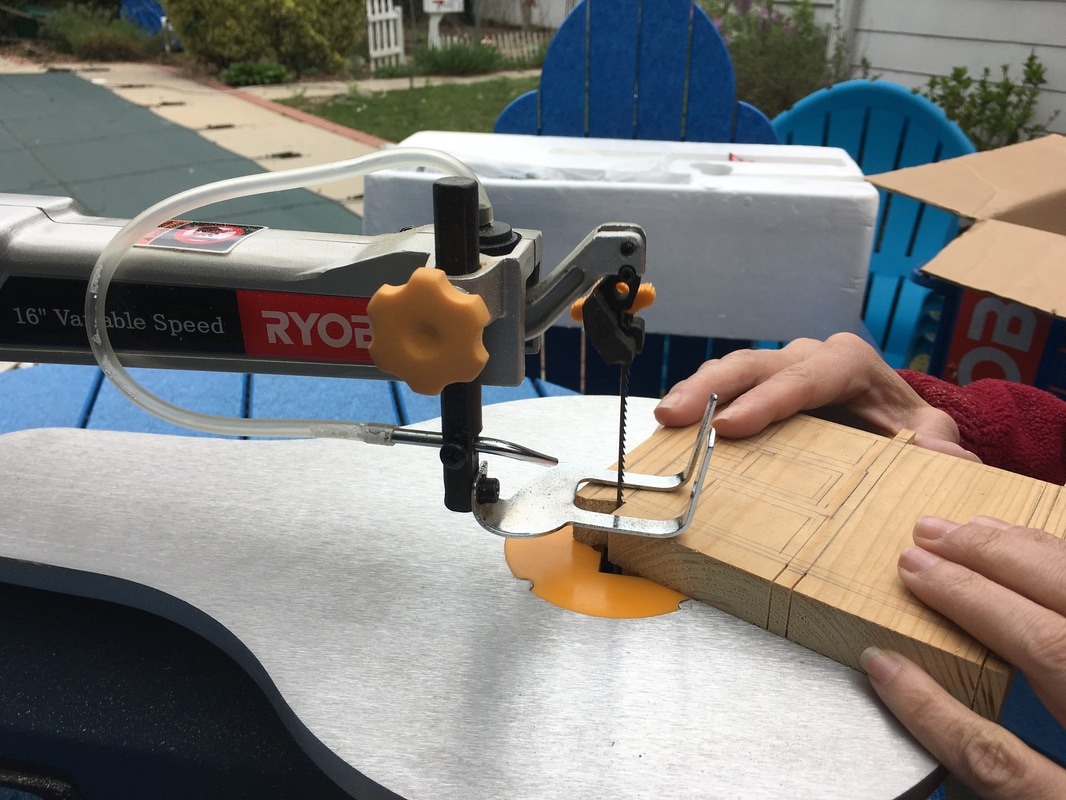
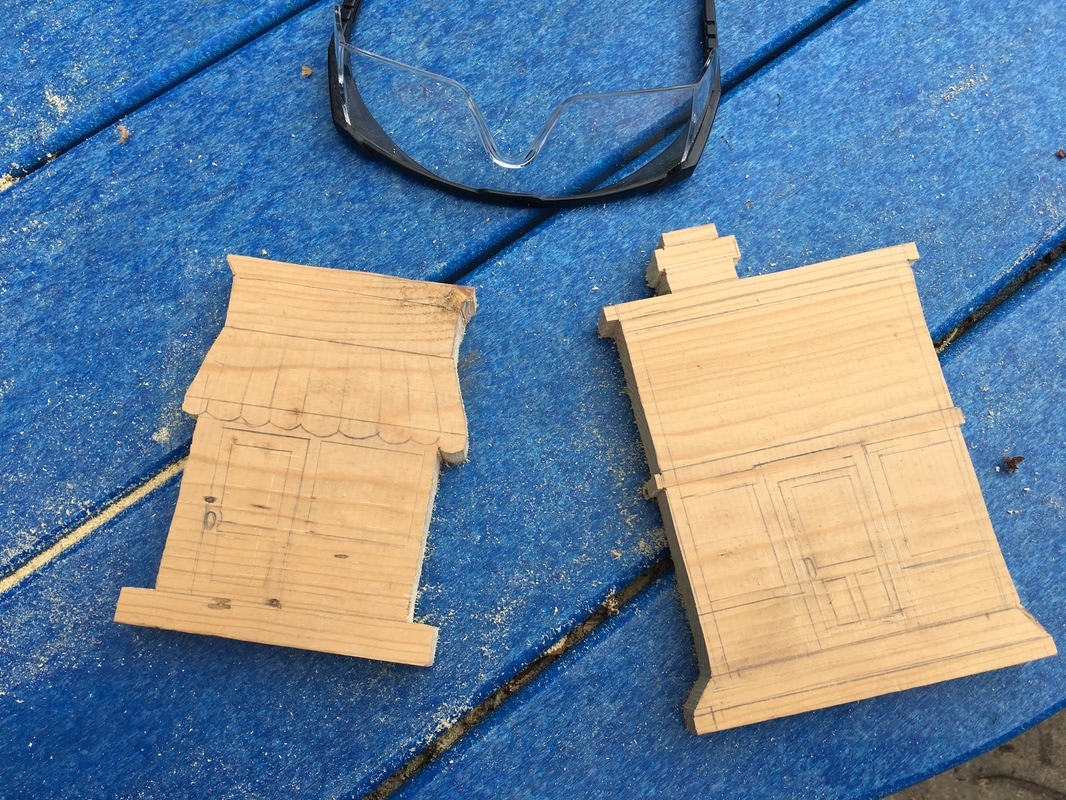
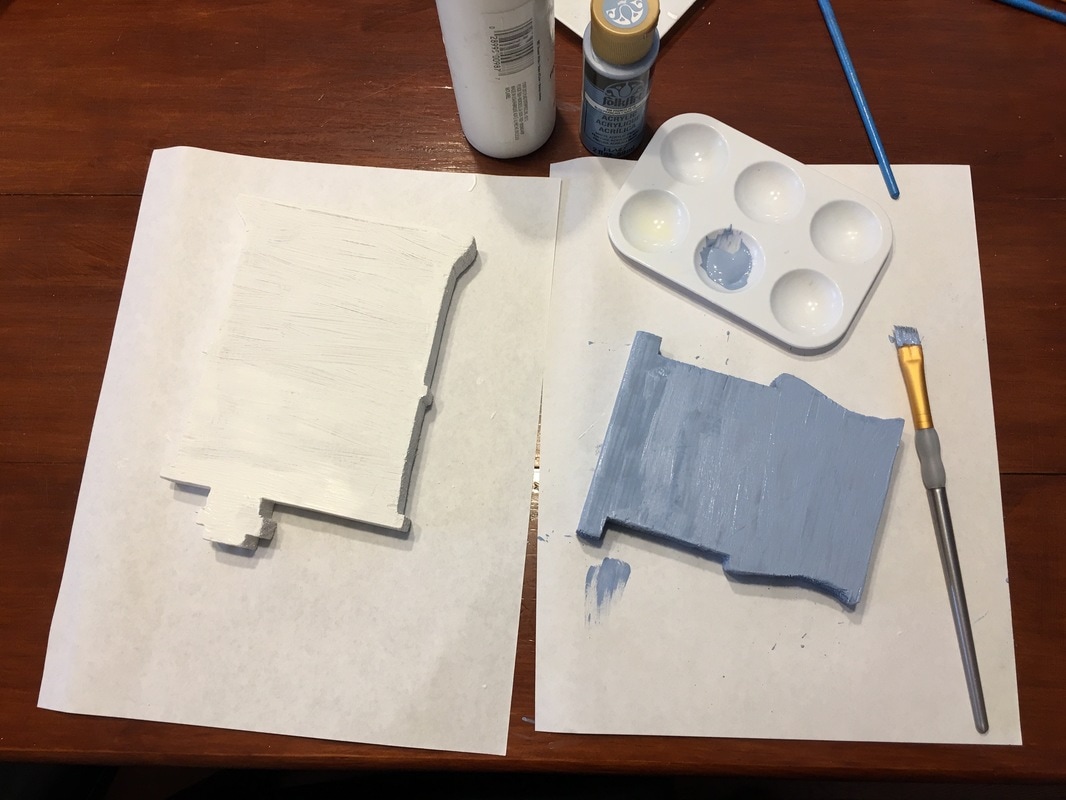
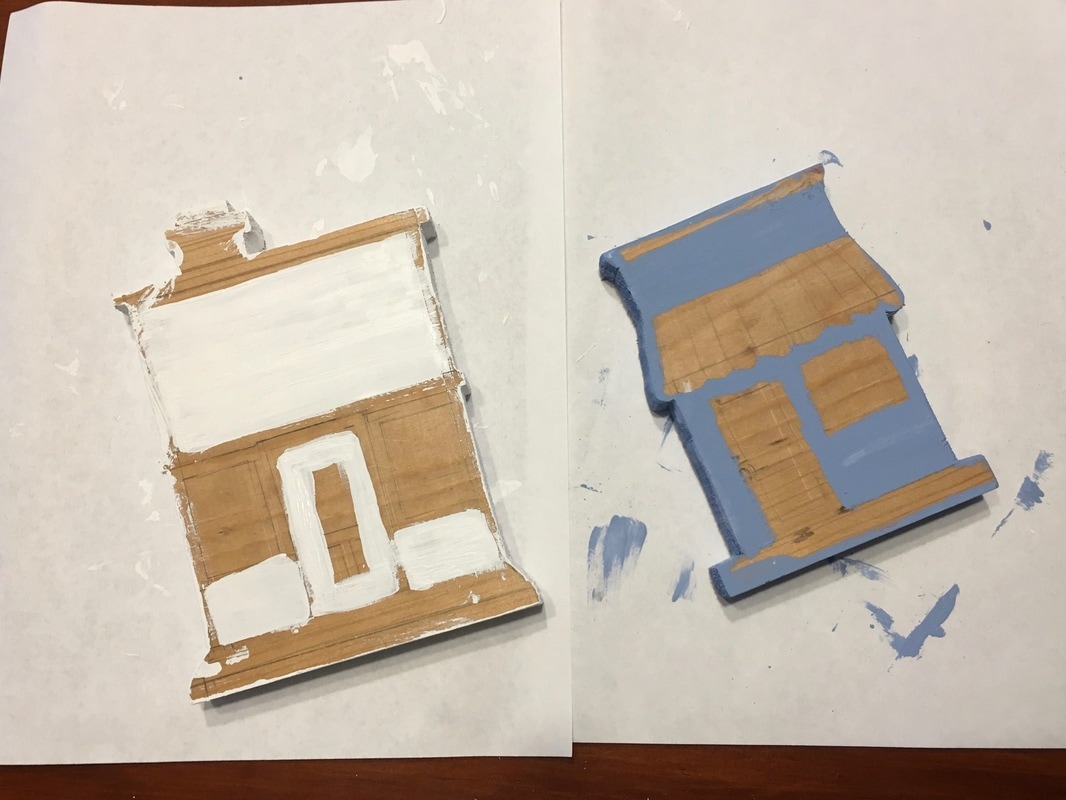
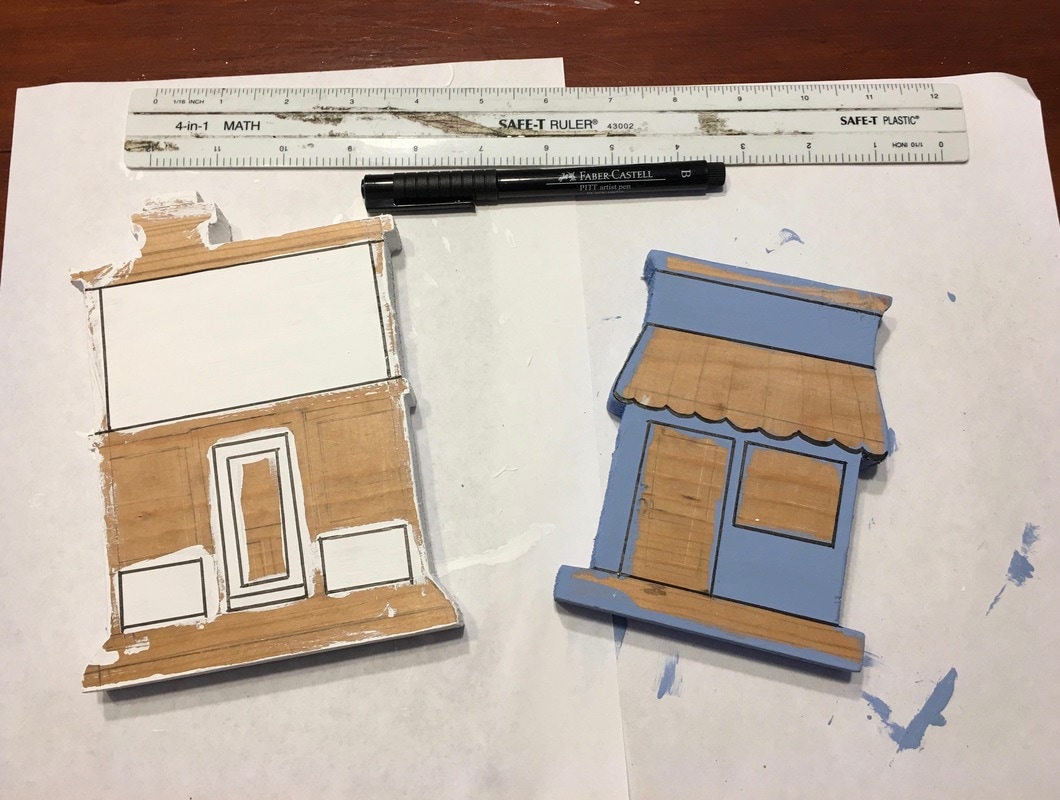
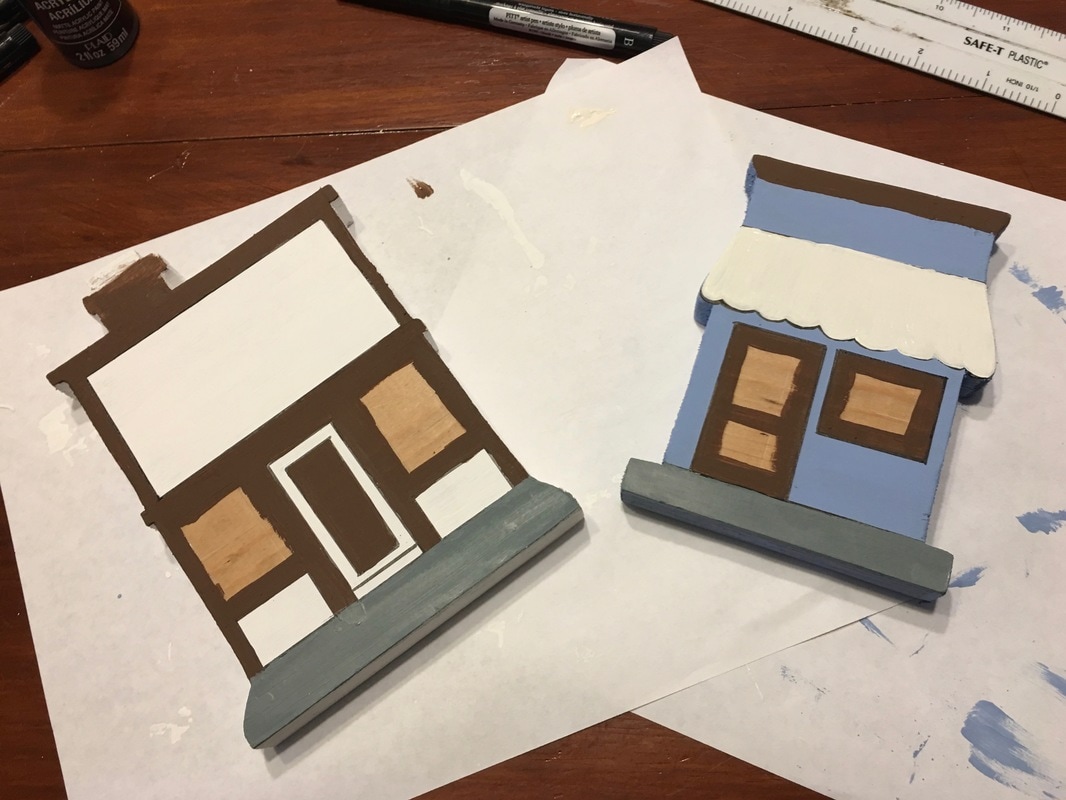
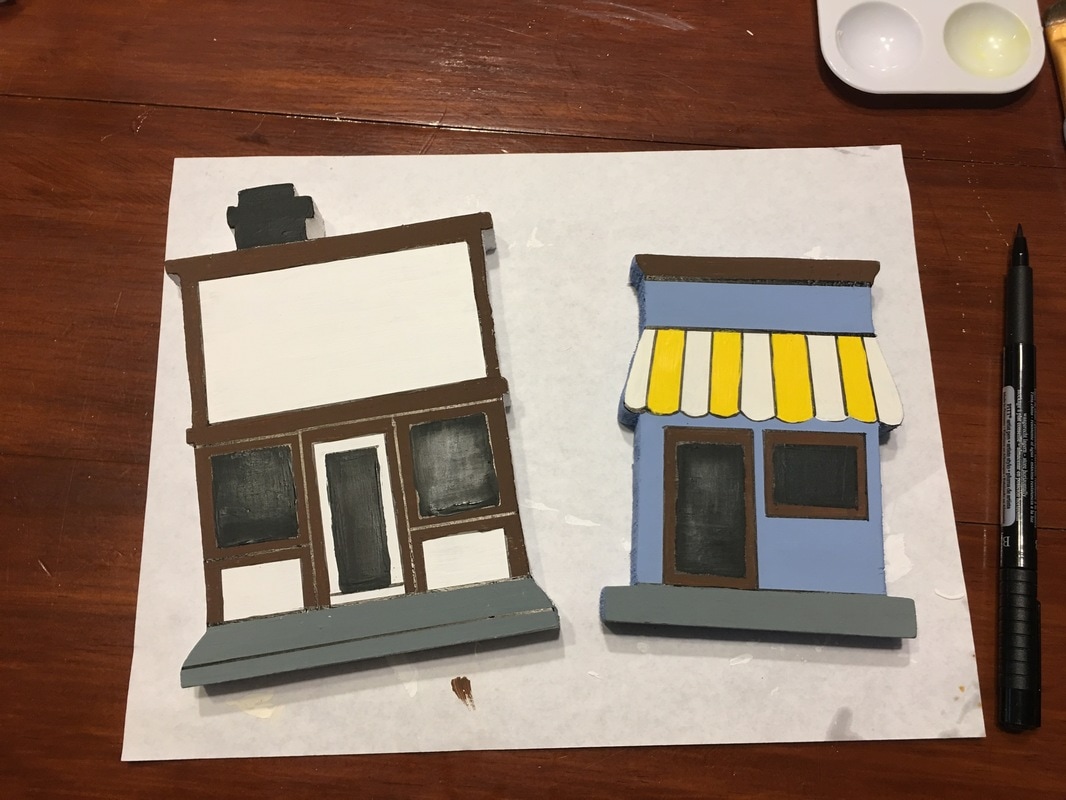
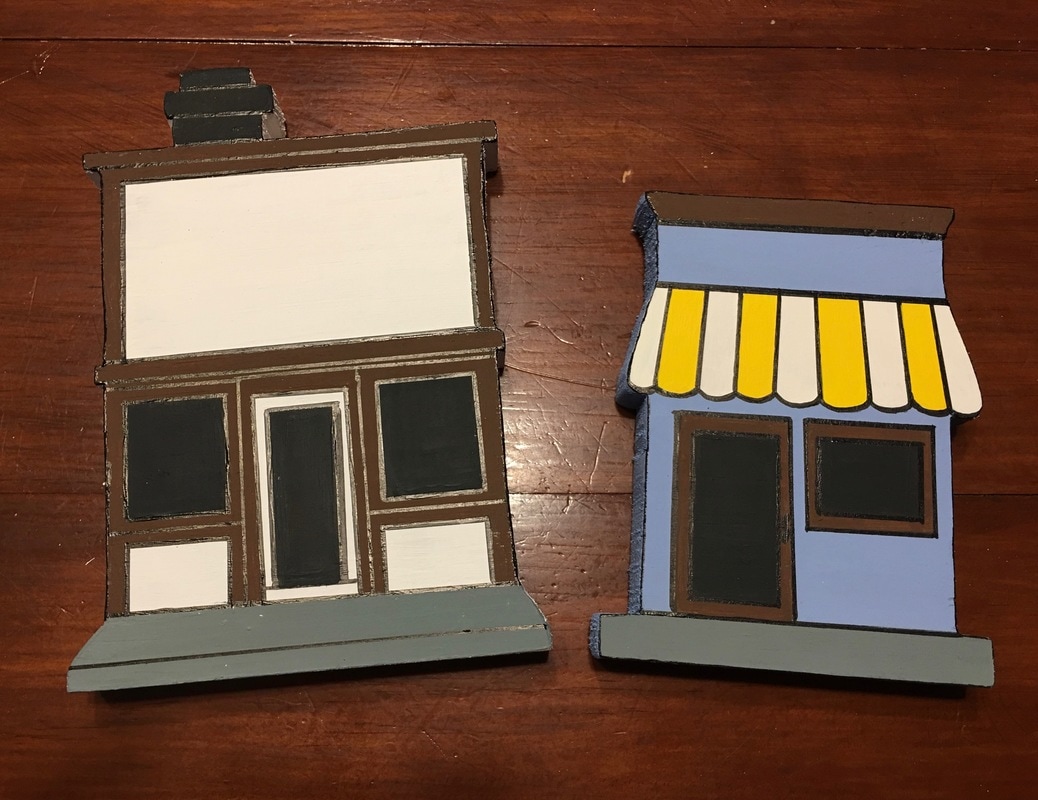
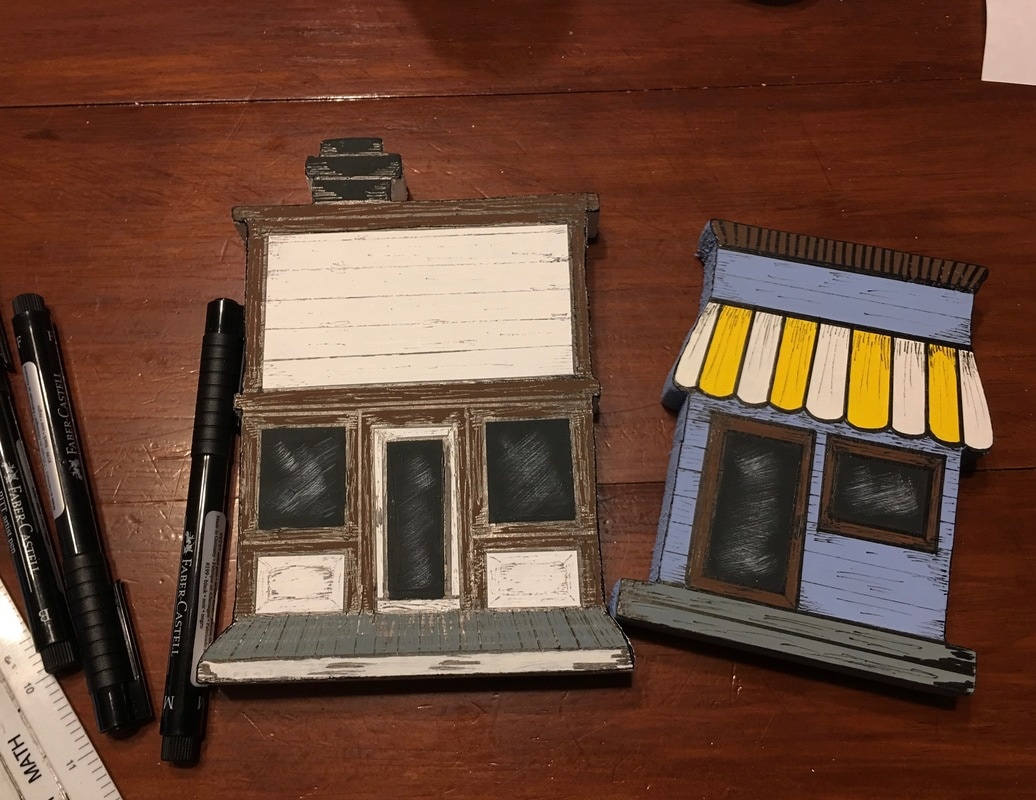
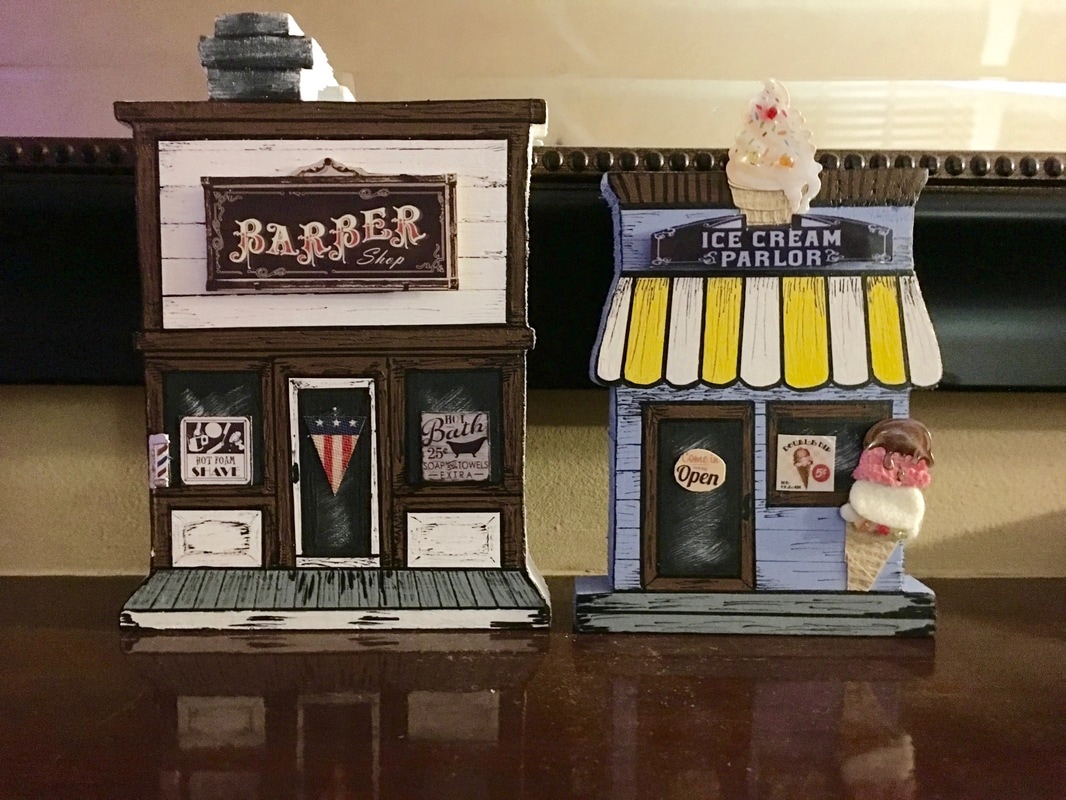
Once upon a time my mom spotted something similar to these at a craft fair. Of course she came to me and asked if I would be able to make something like that for her for Mothers Day. And... of course I said yes! That was several years ago and since then I have made many different 'building' window frame toppers (pictures below) and have had many inquiries into how exactly I make them. I will tell you this, they take time but when it comes to making them with love for my mom, well I can't put a price tag on that!
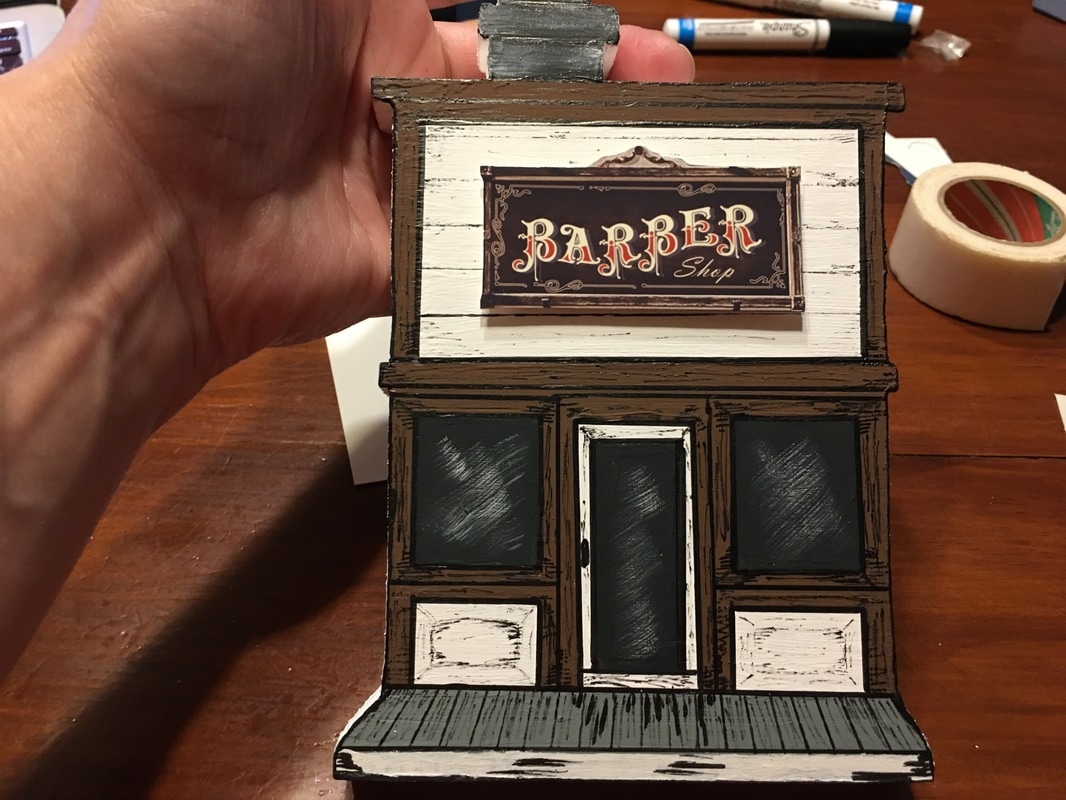
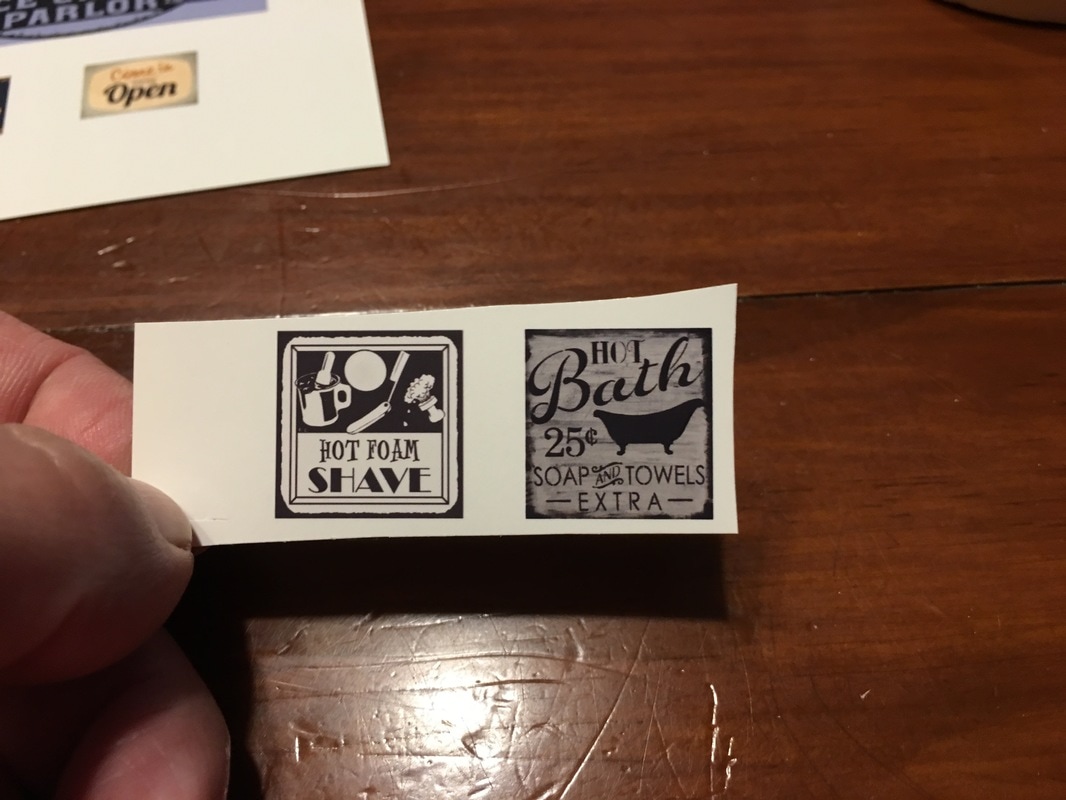
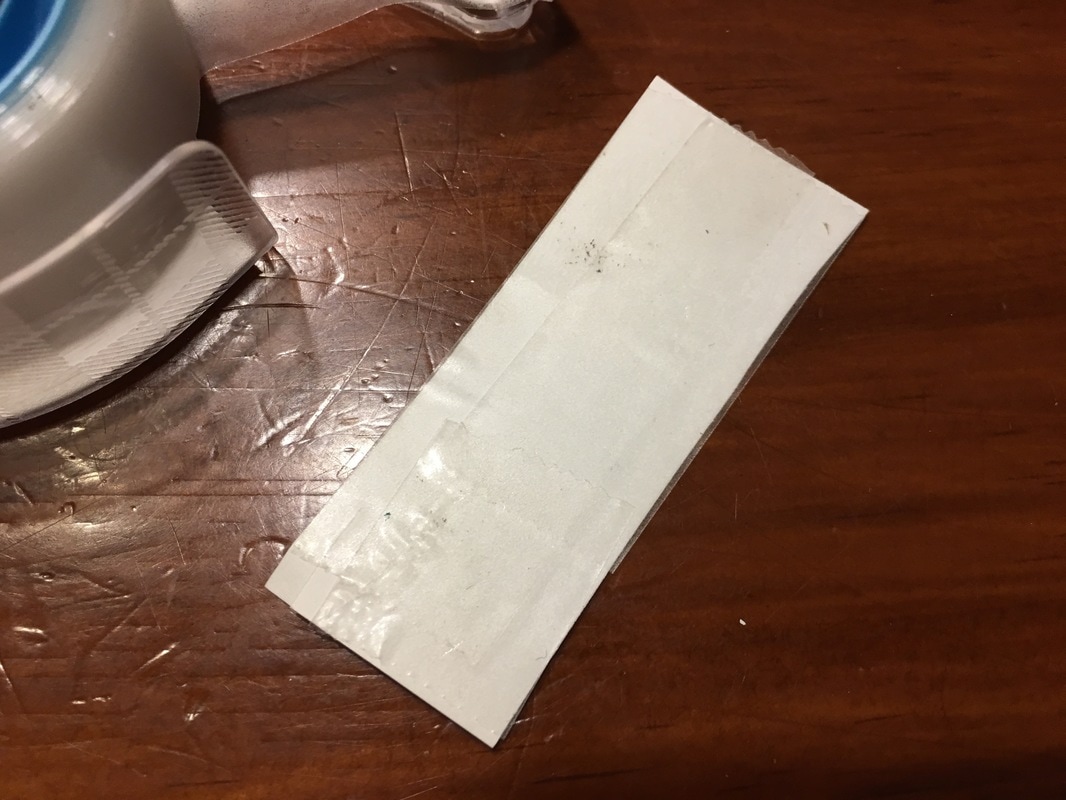
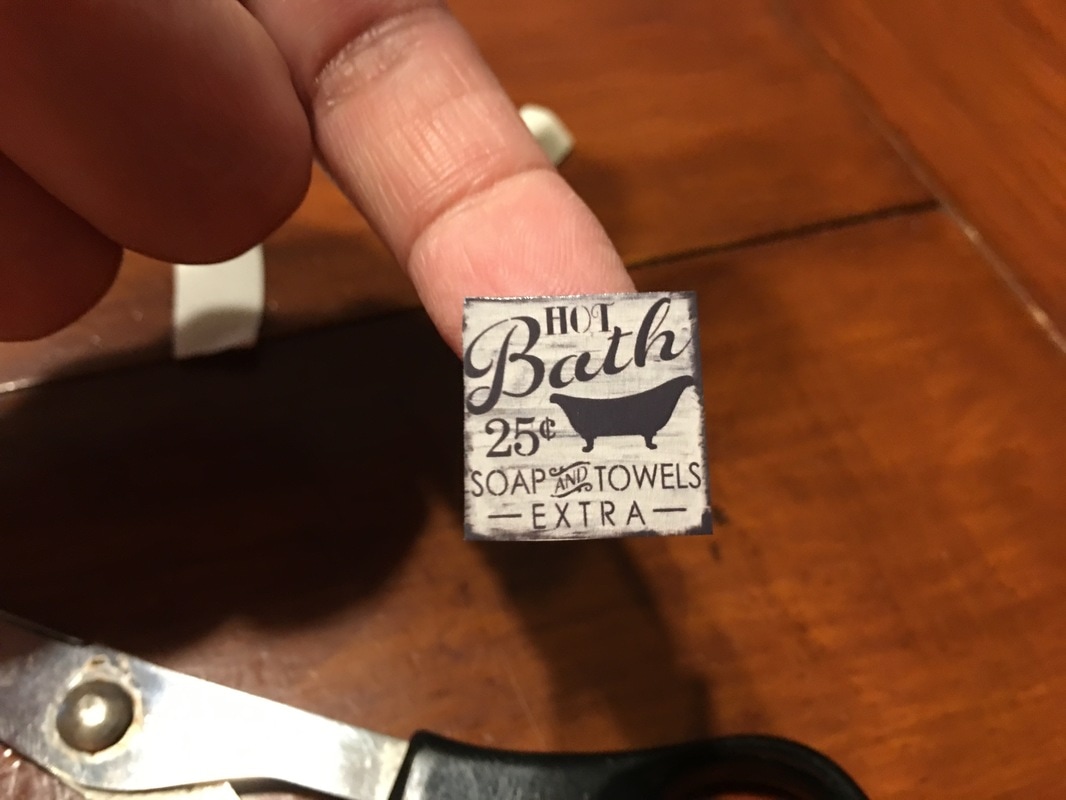
In case you're not sure what a window topper is, it is a wooden design that is about 3/4" wide and sits on top of the window frame as a decoration. It could also go on top of a door frame and look just as good! ***Great way to repurpose old pine shelving! Supplies Needed:
Check out this video of my latest building (2/6/18) on YouTube:
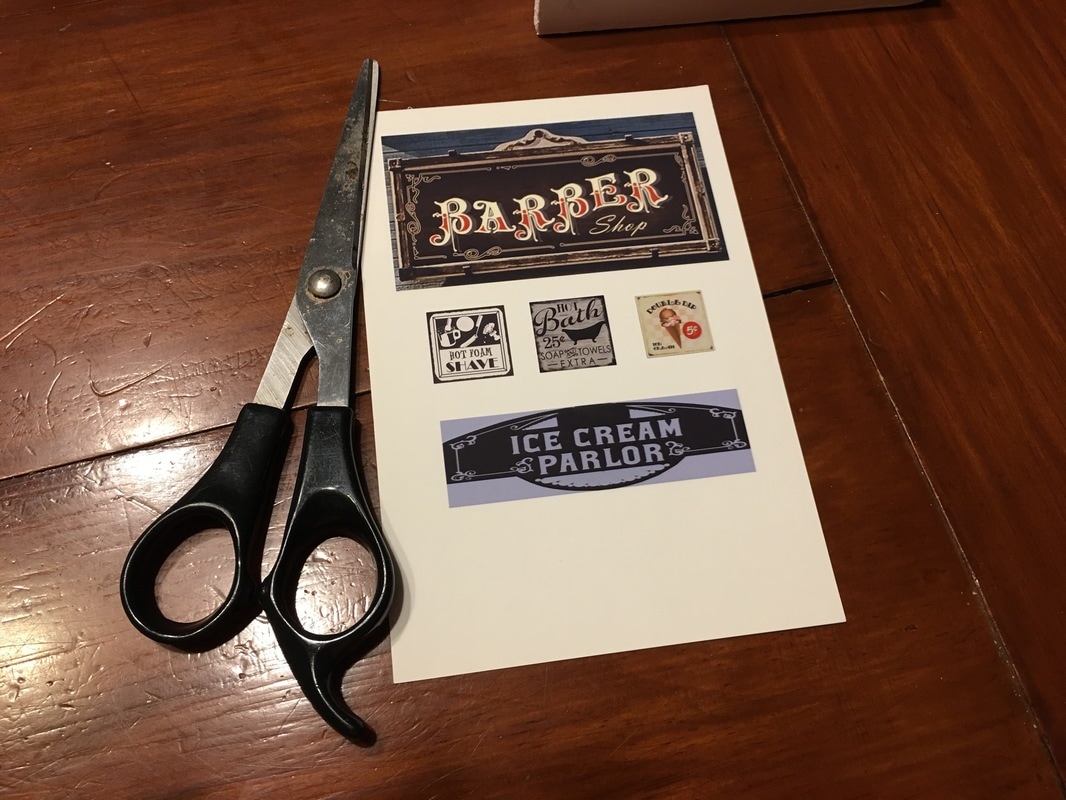
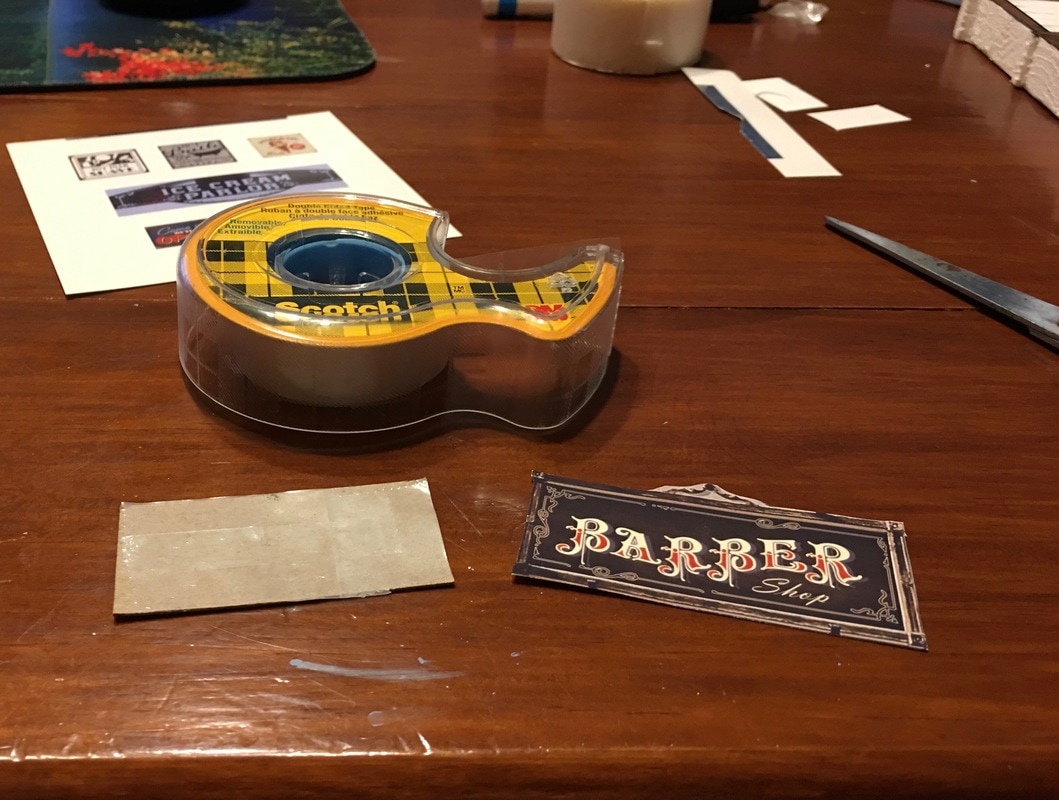
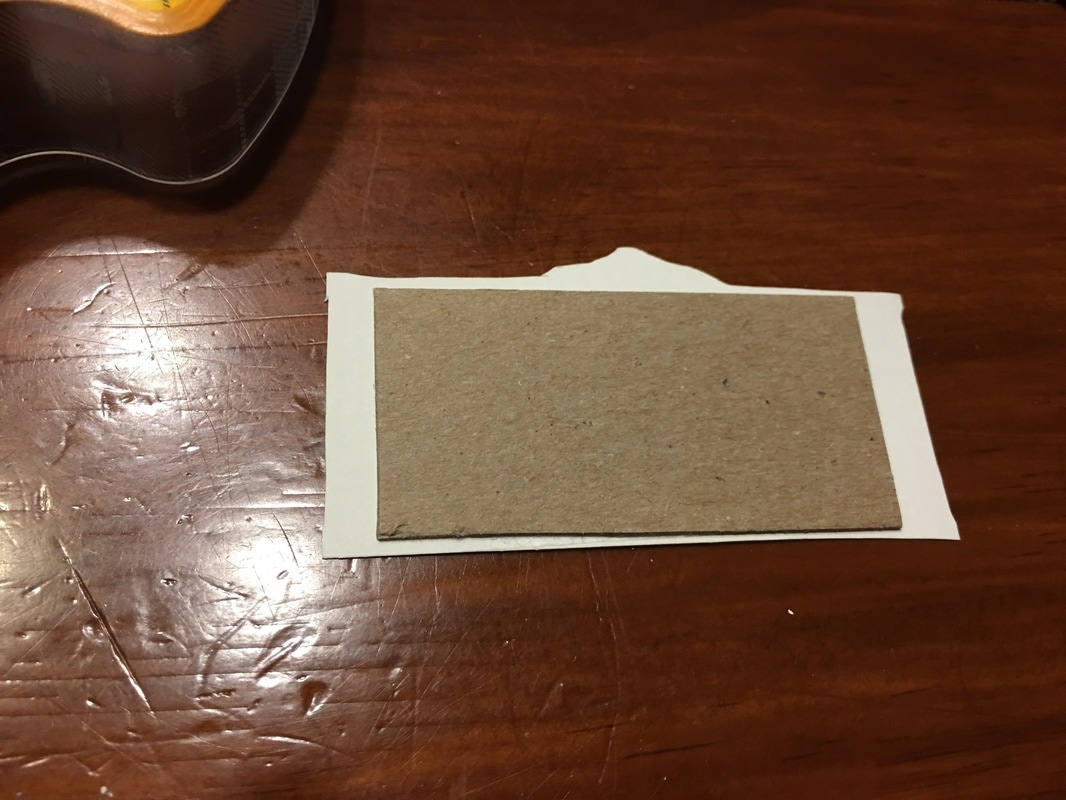
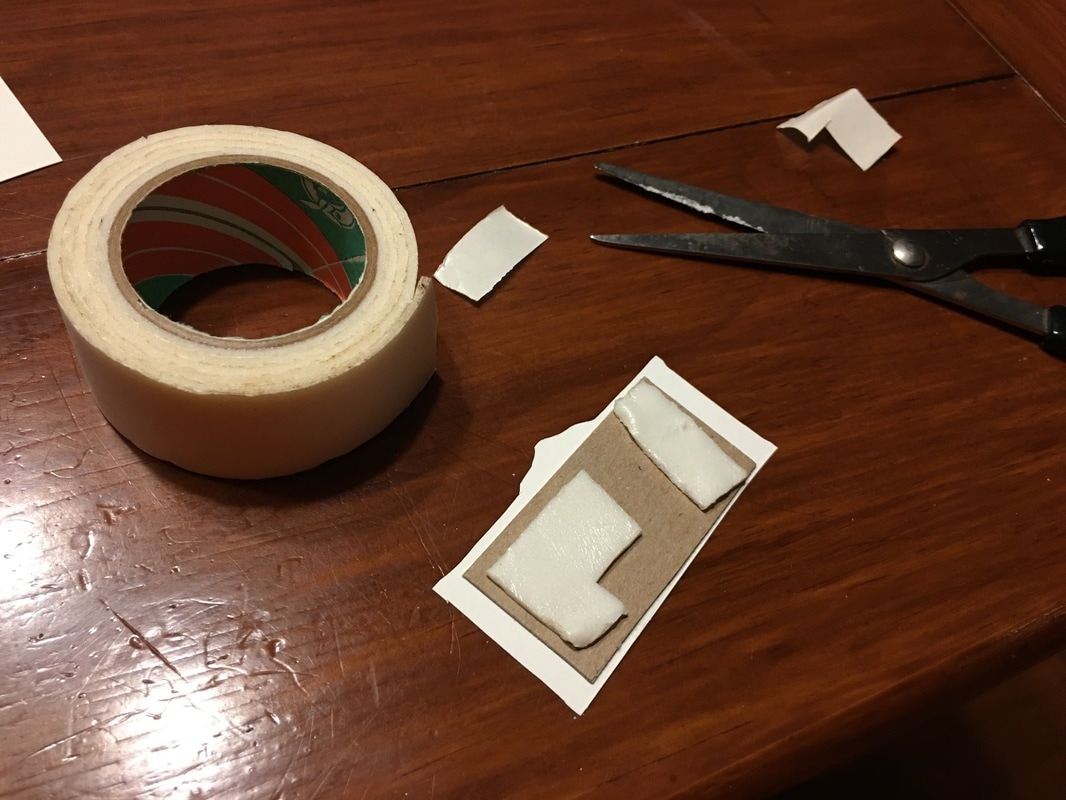
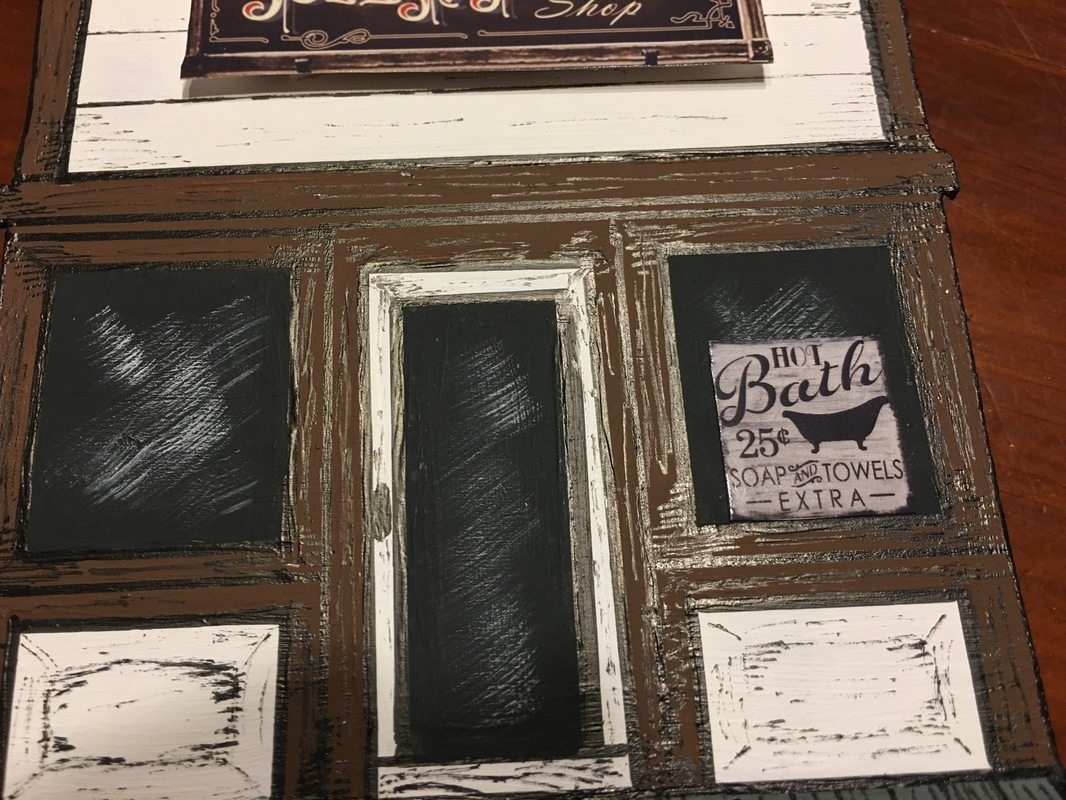
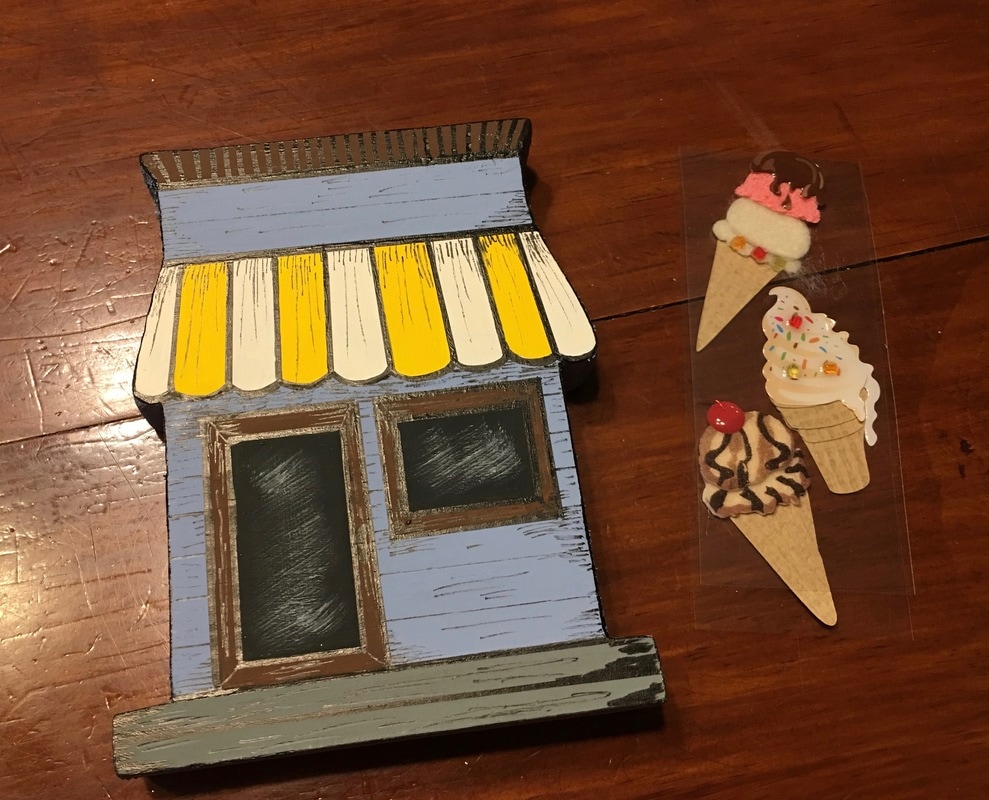
Pictorial HOW TO of
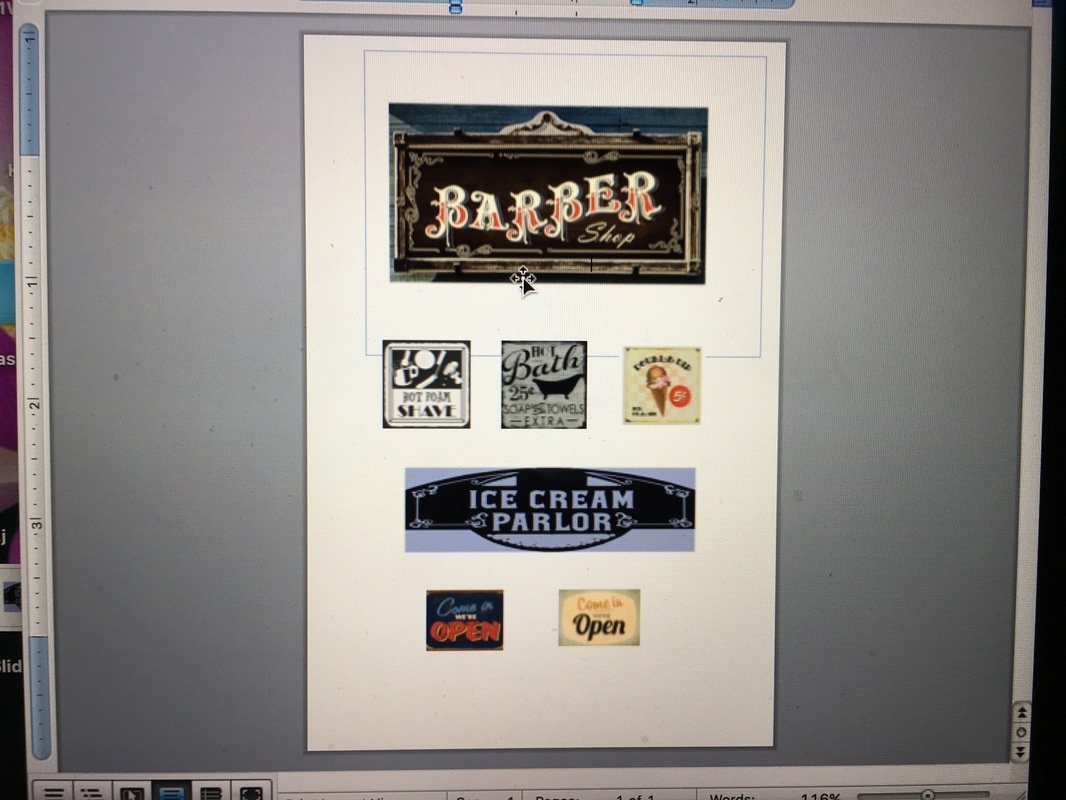
Barber Shop & Ice Cream Parlor:
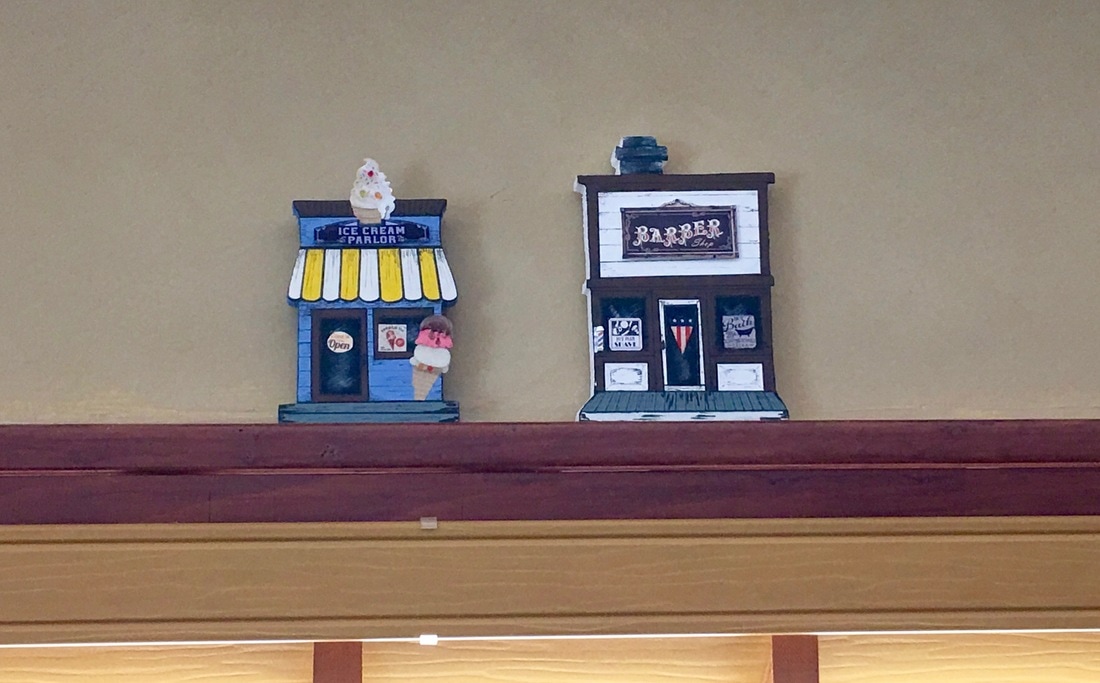
Here's a slide show of all the building window toppers I have made for my mom to date:
Thanks for visiting!
Please follow us on social medial: Pinterest, Facebook, Google+ and or Instagram! Sincerely,
|

Hi there! I'm Kathie, the author behind Creating A Simpler Life blog. I'm excited to share our longterm projects (and planning) toward building our future retirement homestead in the Adirondack Mountains of New York. In the meantime I will be sharing all the other little things we do that are part of creating our simpler life!
Categories
All
Archives
July 2020
|


 RSS Feed